
Introduction
The Quiz module has been introduced to conduct online test in an effective way and there is no loss of time to check the paper. In this module, yo can create quiz, import questions from local drive and also can save the prepared questions in a question bank.
Quiz Options
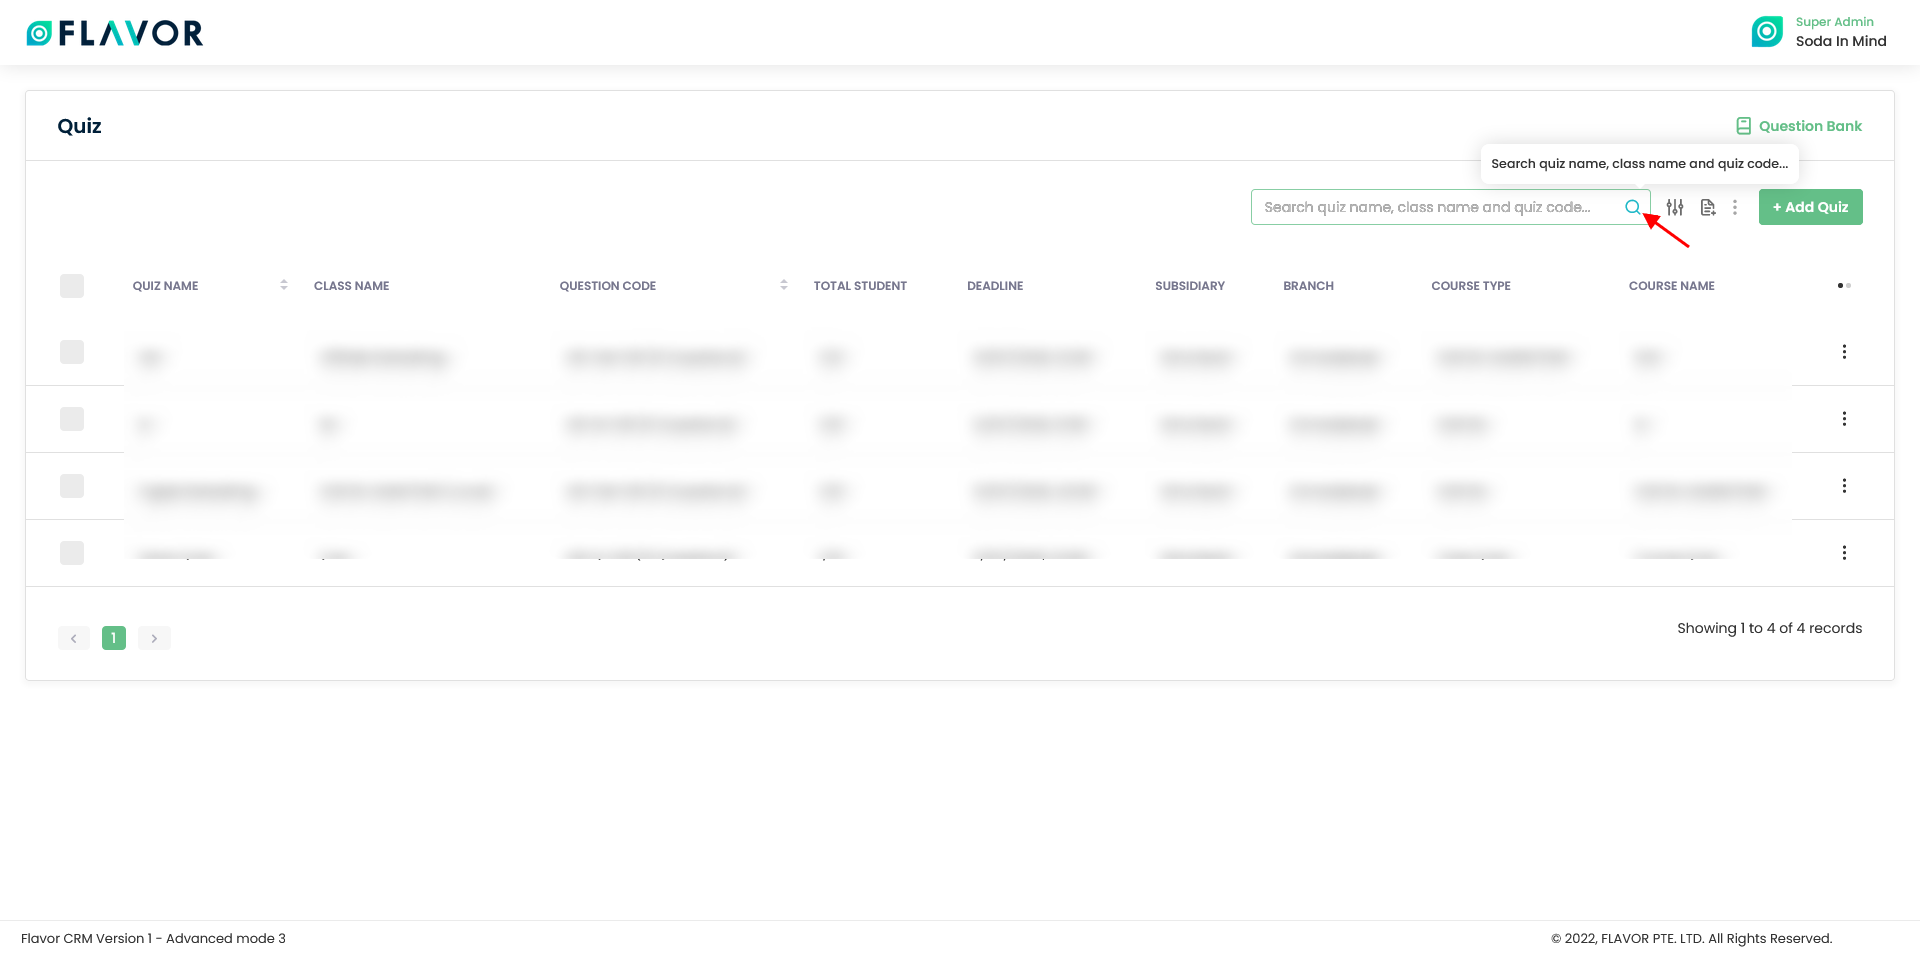
Search
You can search for a quiz by the quiz name, class name and quiz code. To search, click on the search icon. Enter the quiz name, class name or quiz code and press enter. You can see the search results in the list.
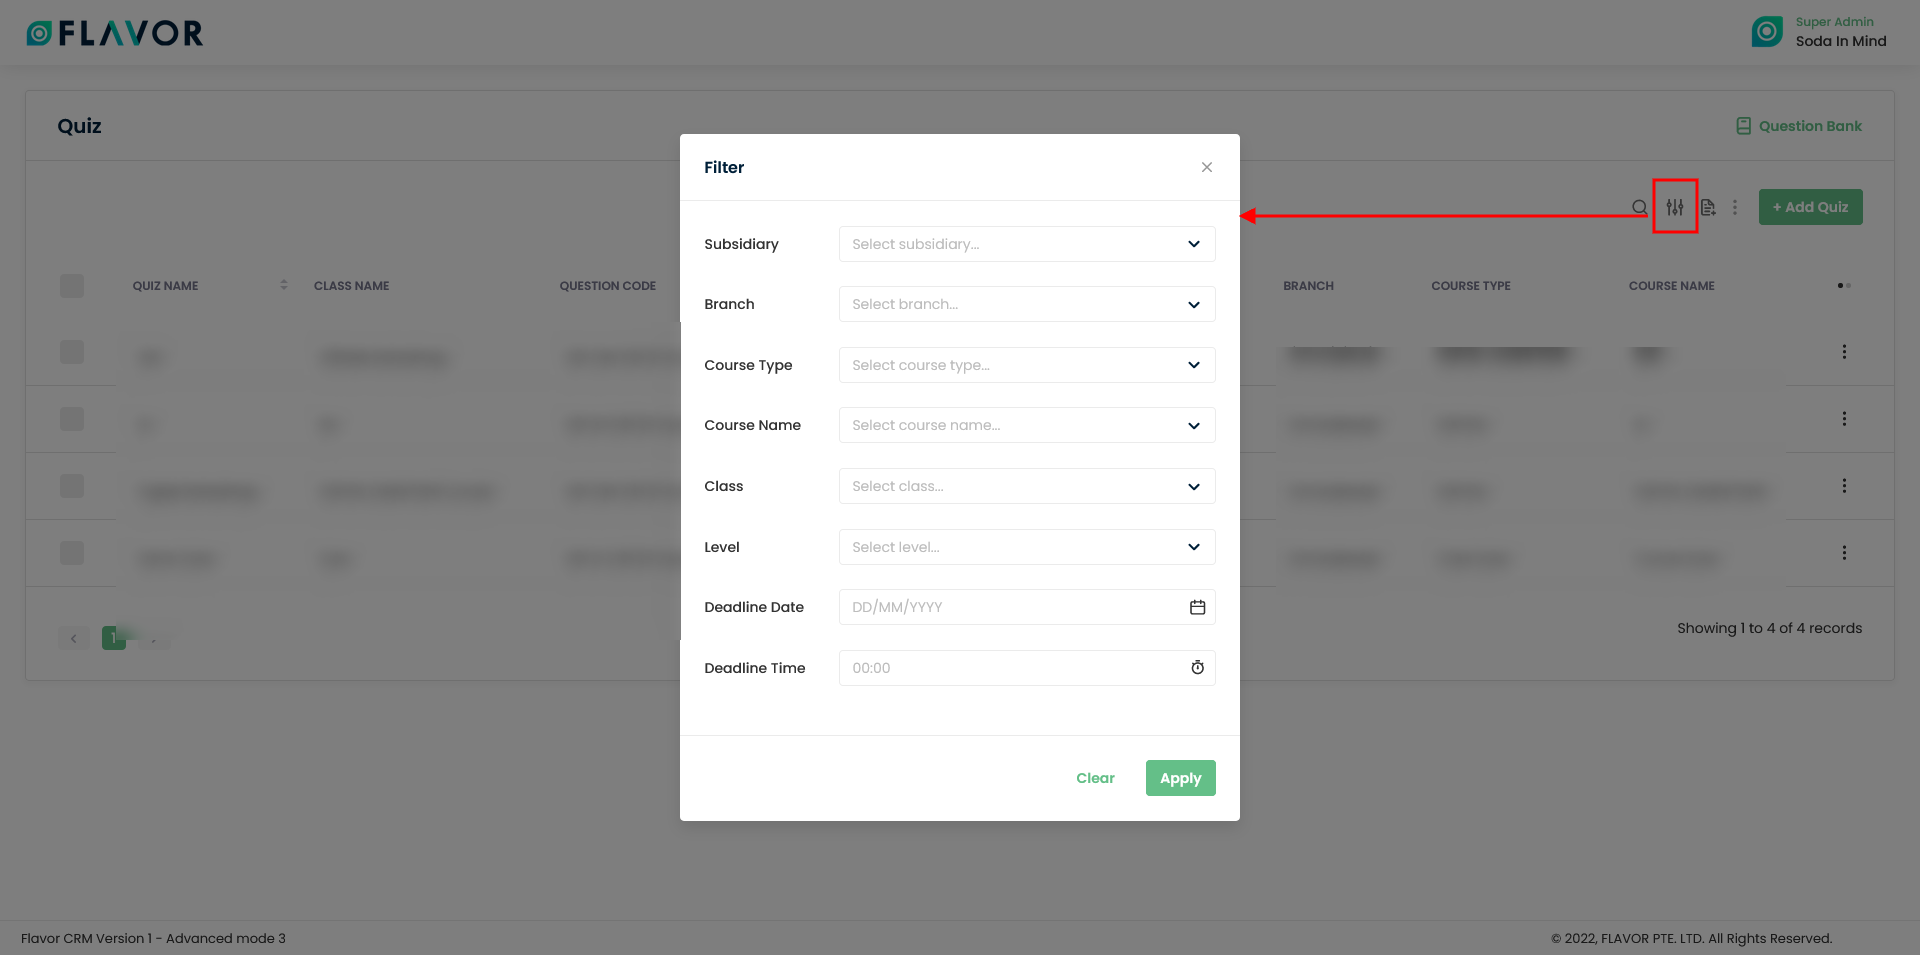
Filter
You can filter the quiz records based on specific parameters like Subsidiary, Branch, Course Type, Course Name, Class Level, Deadline Date and Deadline Time. To open the filter pop up, click on Filter Icon. Select the data according to your need, then click on the Apply button to get filtered records.
Export
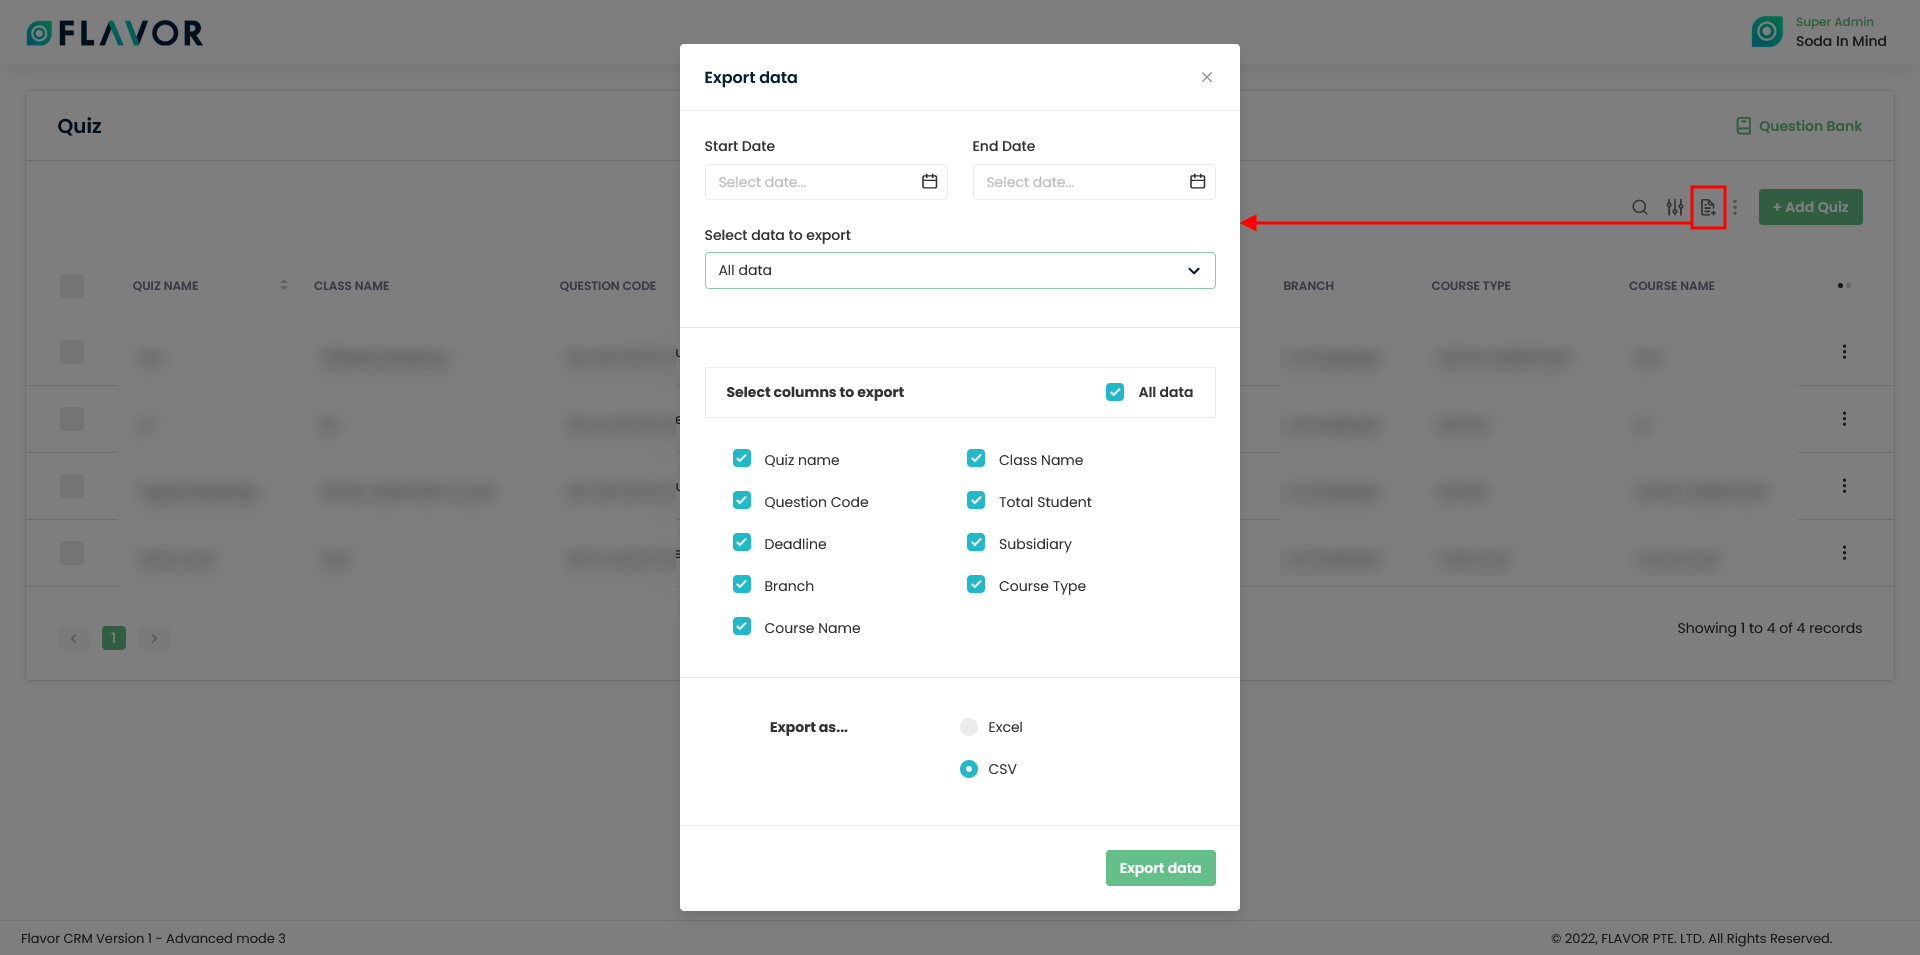
To export the Quiz data you need to click on the export icon. After clicking on the Export button, a pop-up named Export data will appear.
- Start Date and End date: Select the time period in the start date and end date column for which data is required.
- Select Data to Export: Here, you can export all rows or 15 rows to 1000 rows based on selection from the dropdown.
- Select Column to Export: Select columns which you need to export. But if you want all the details of Quiz, simply click on “ALL DATA” and you will get all the records of Quiz in your exported file.
- Export as: Then select a format in which you want to download your data i.e. (EXCEL or CSV).
- After selecting the relevant options, click on the Export data button. A popup named Export data confirm will appear on your screen. You need to enter the email address where you want to send the file. And then click on the Submit button.
Bulk Action Button
- The Bulk Action Button is disabled by default. When you mark on the check box , which appears on the starting on each row, this action button will be enabled.
- You can select/deselect the rows by marking the checkbox.
- After selecting any record go to the action button, click on the button a small popup will appear. There, you can see two options Share Quiz Link and Delete.
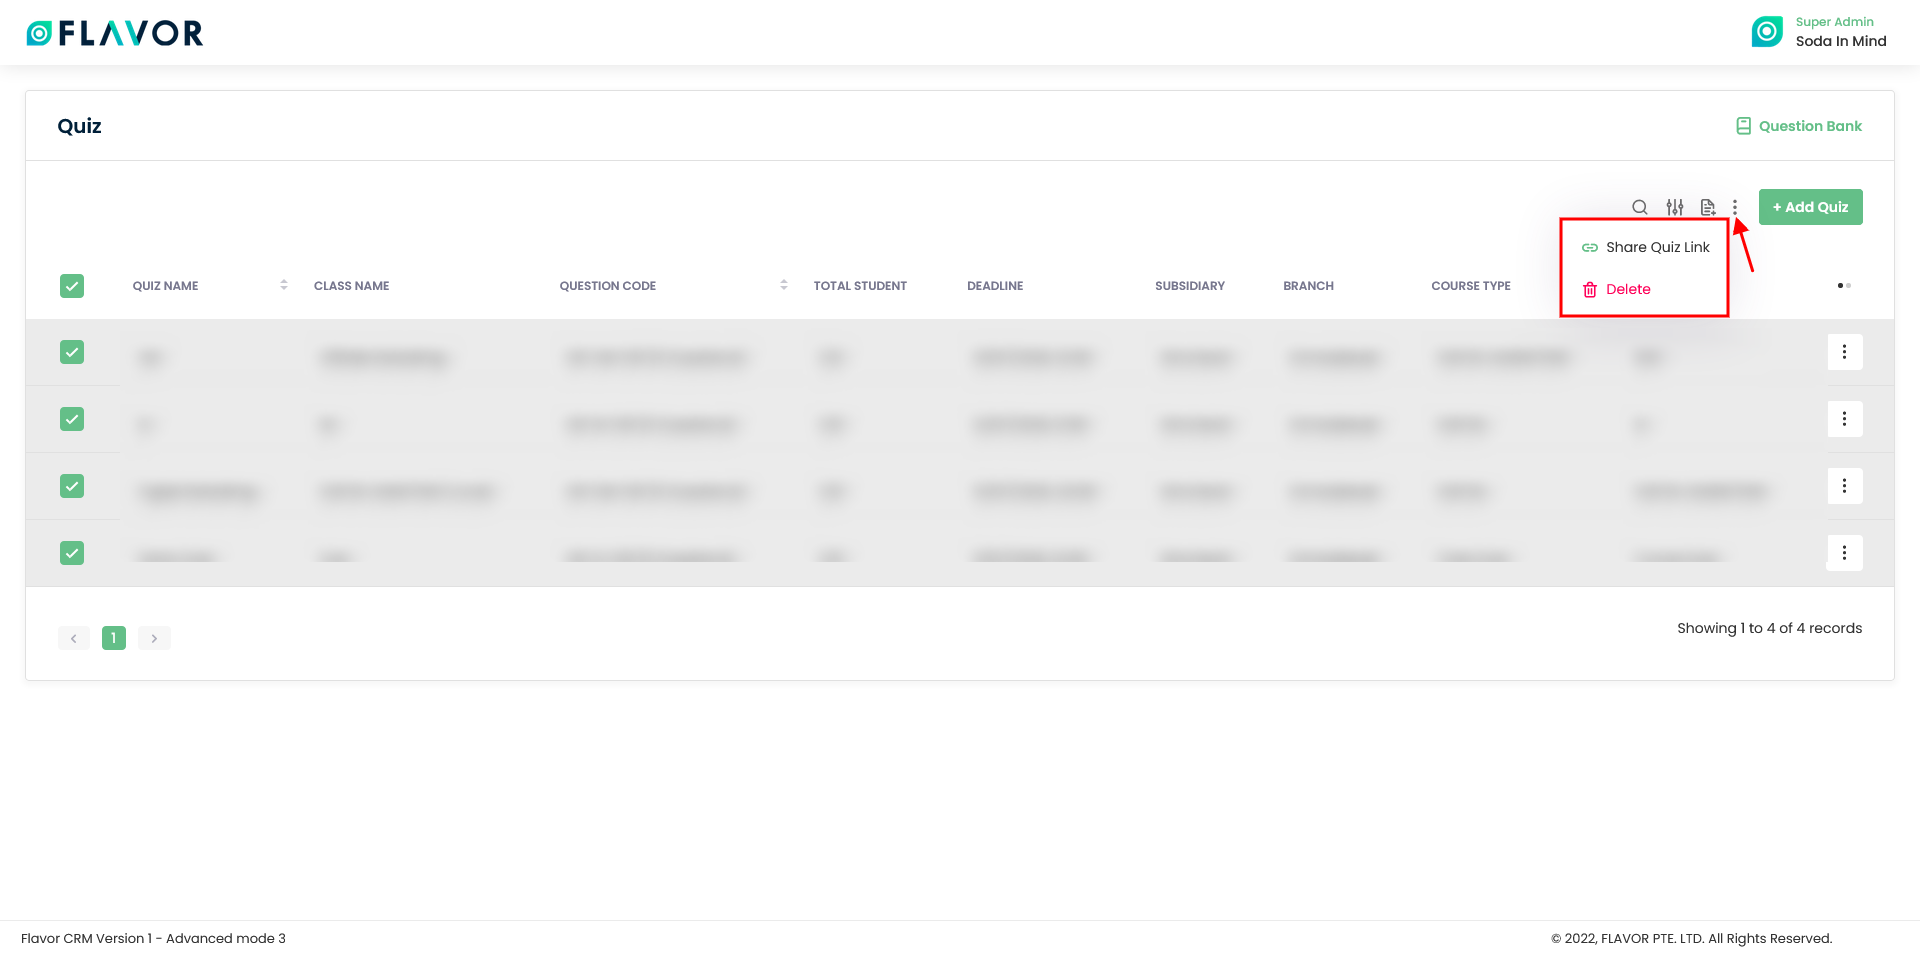
Share Quiz Link
- Click on this link to share the quiz link to all the registered students in all these class.
- You need to enter the Subject and the link from the Add value.
- Click on the Send button.
Note: The quiz link will go to the students registered email address.

Delete
- Click on the Delete button to delete all selected quizzes or particular quiz.
- After clicking on the Delete button, a confirmation popup will appear on your screen.
- Click on the Delete button to delete the quiz.
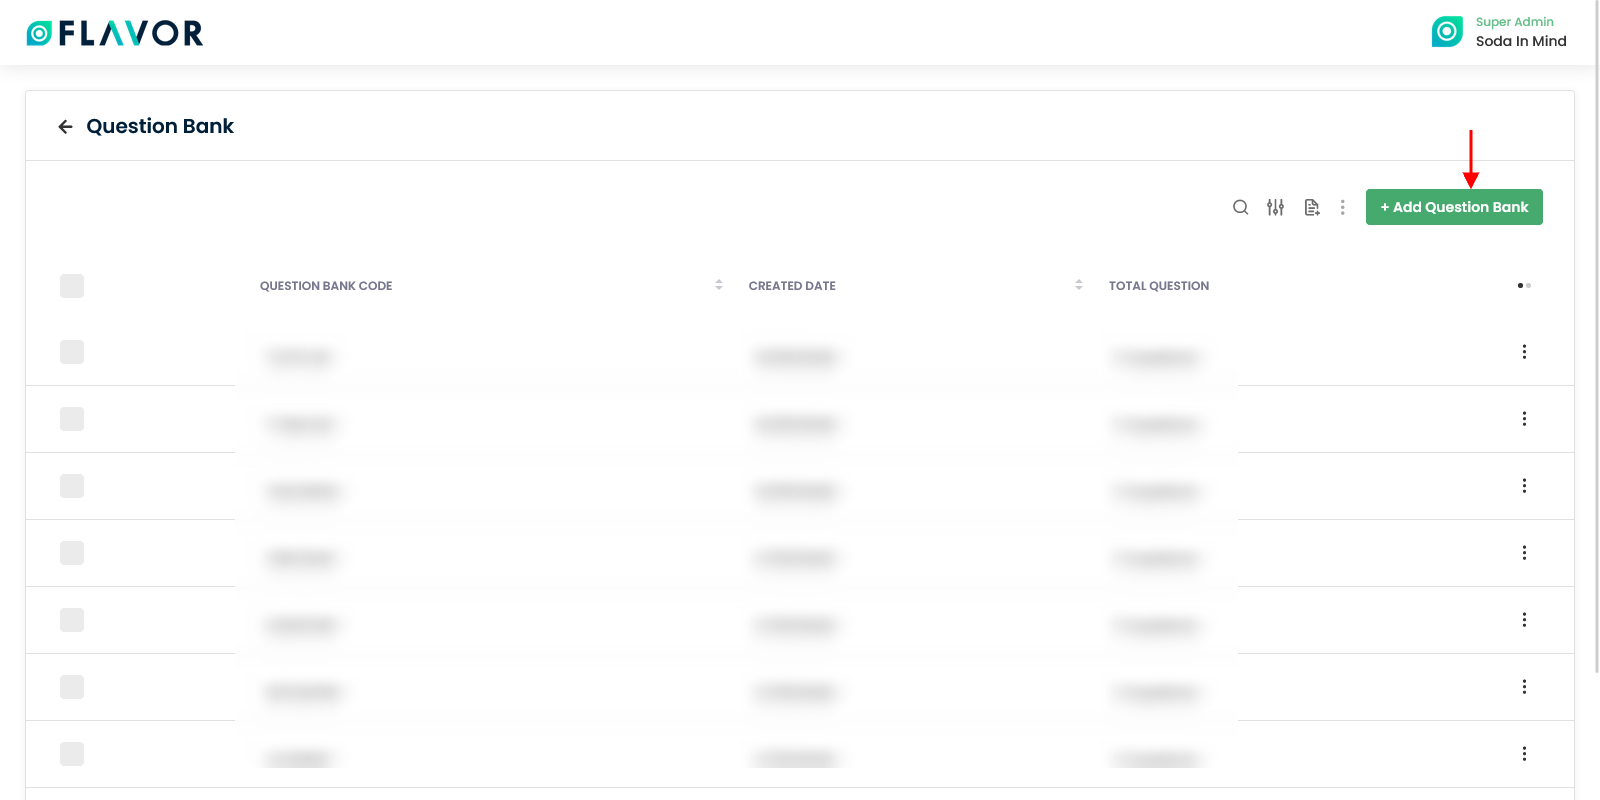
Question Bank
Question Bank is the repository of all the set of questions being saved as question bank while creating quiz. It can also be added explicitly. Each set of questions are saved with unique Question Bank code.
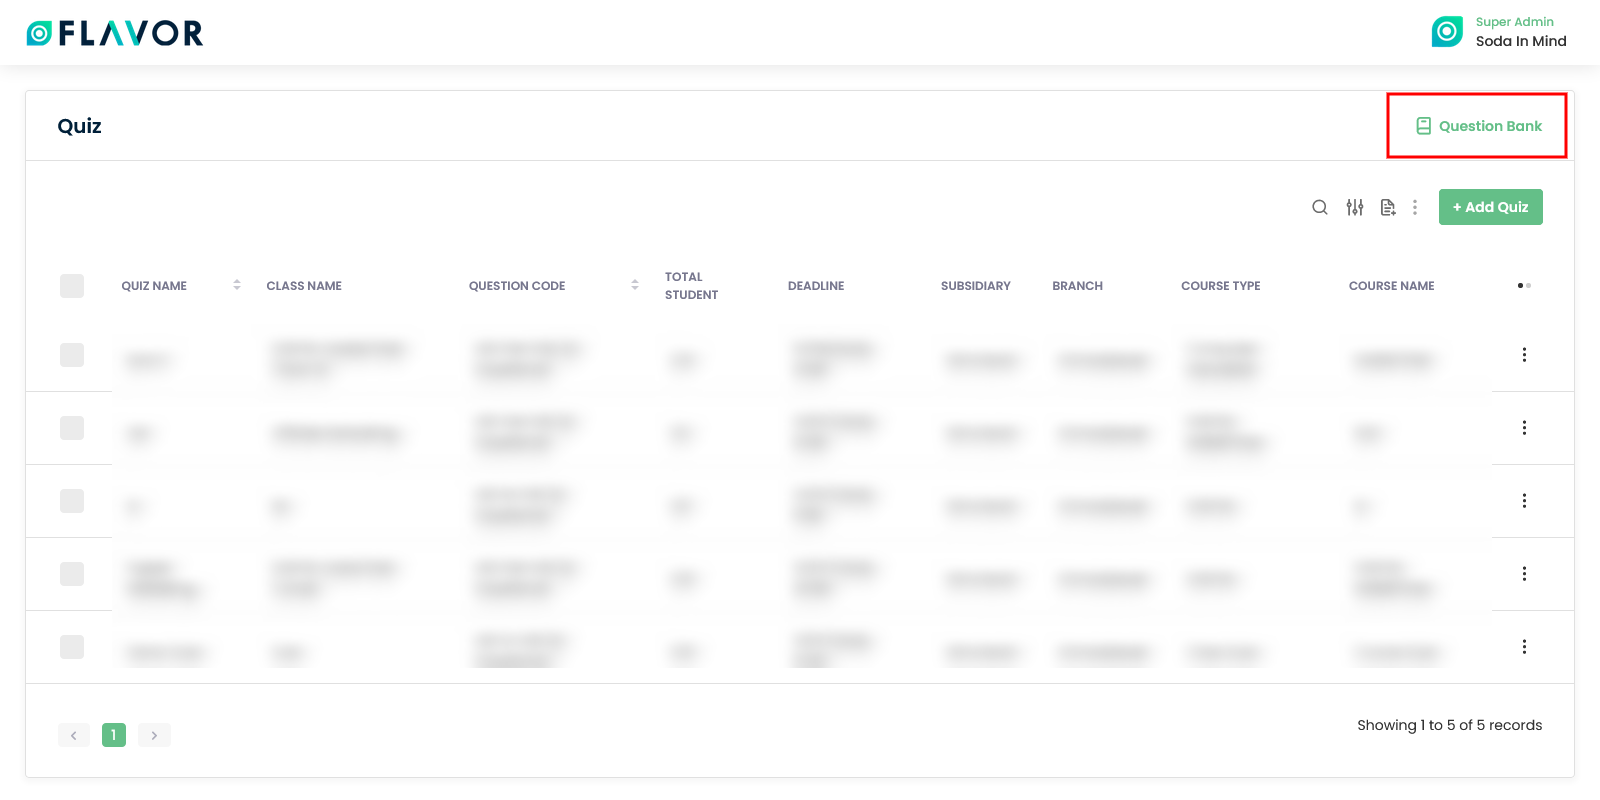
On clicking at the Question Bank link at the top right. It will navigate you to the Question Bank listing page.
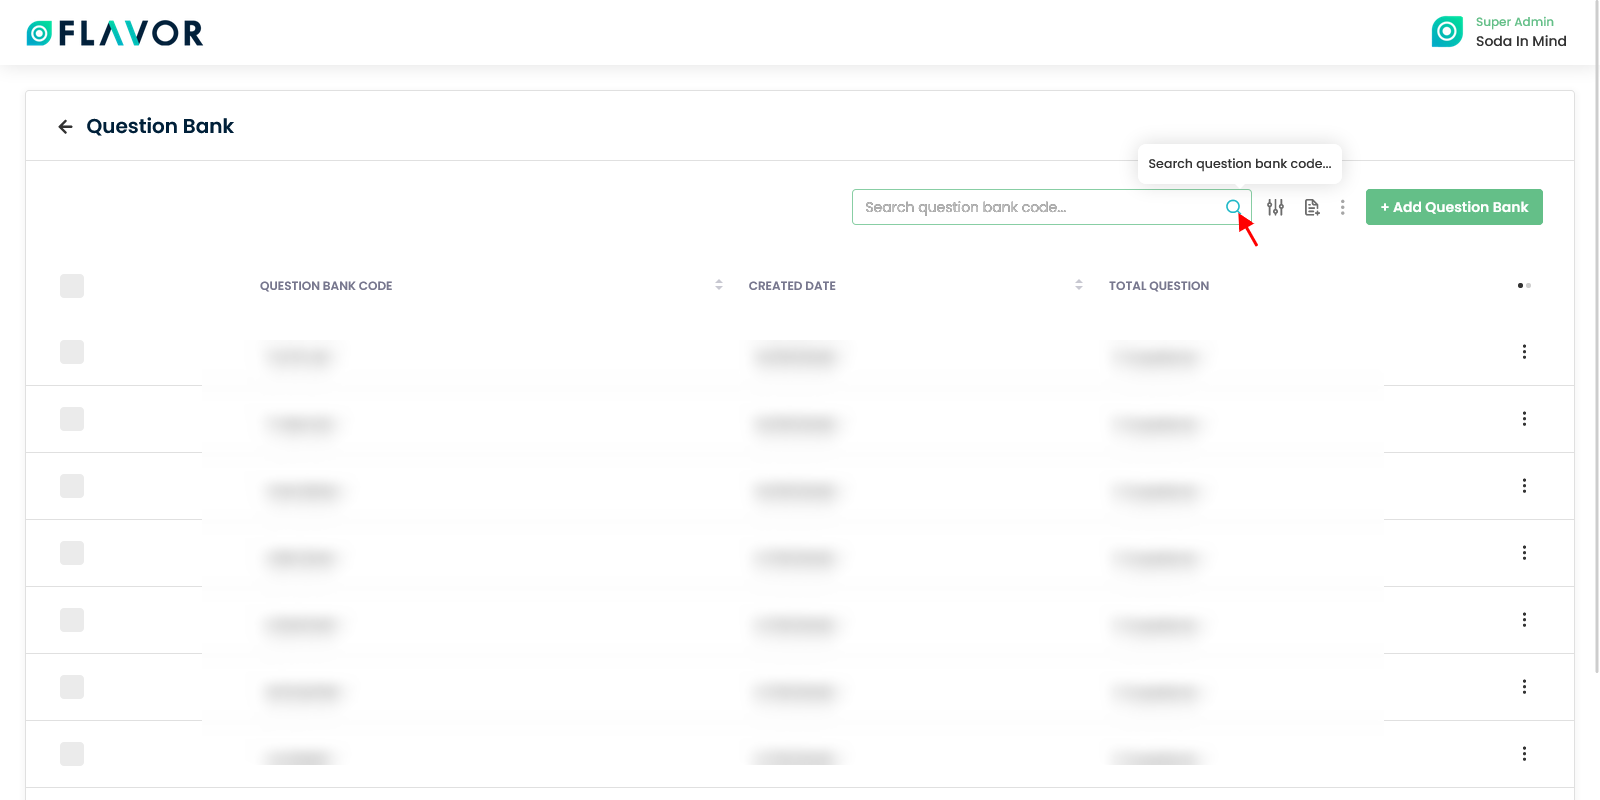
Search
You can search for a Question bank by the Question Bank Code. To search, click on the search icon. Enter the Question Bank Code and press enter. You can see the search results in the list.
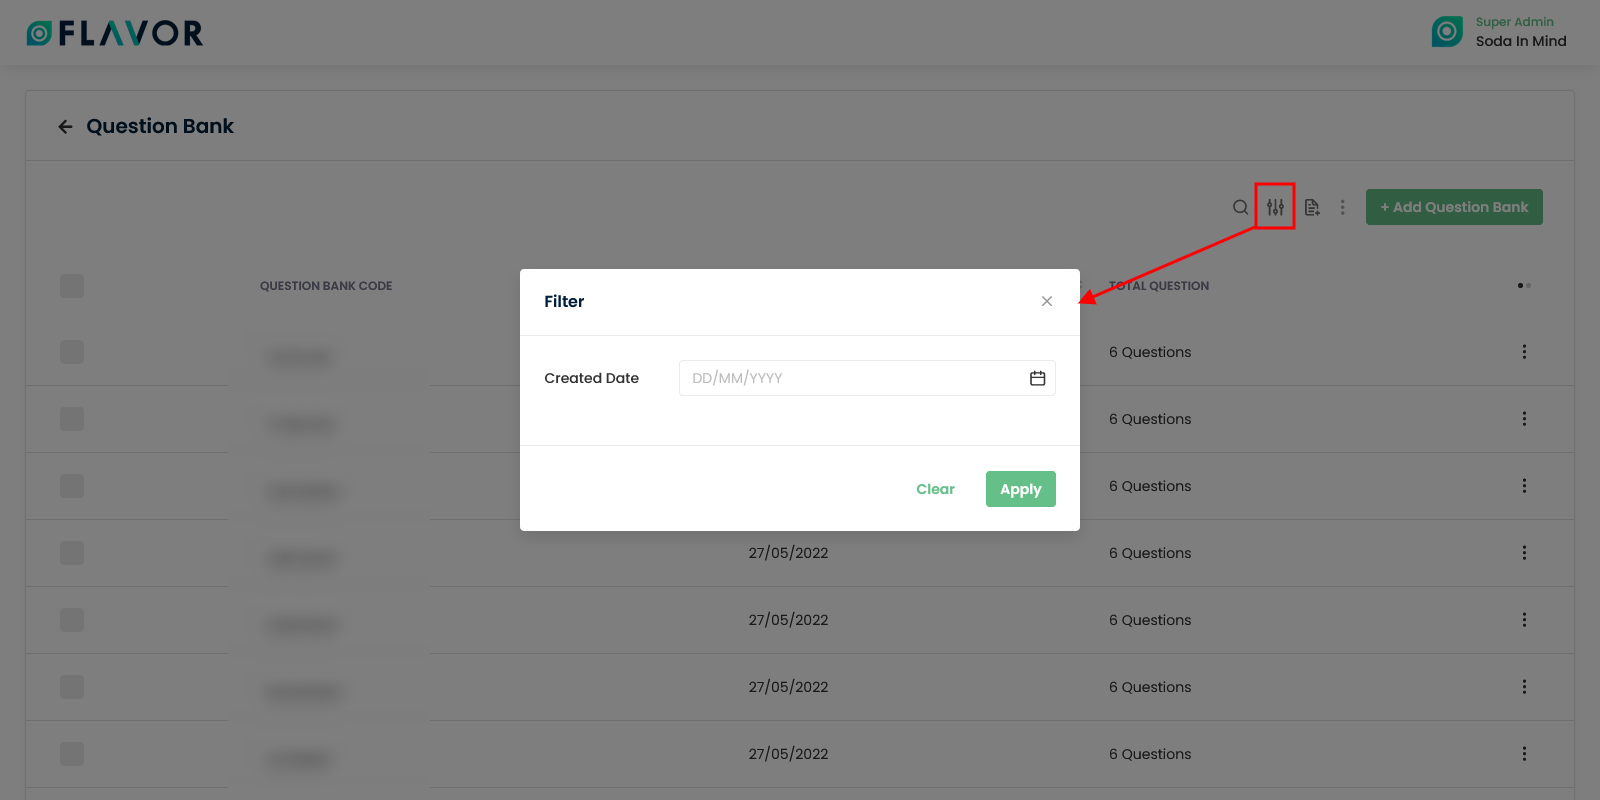
Filter
You can filter the question bank records based on specific parameter like Created Date. To open the filter pop up, click on Filter Icon. Select the data according to your need, then click on the Apply button to get filtered records.
Export
To export the Question Bank data you need to click on the export icon. After clicking on the Export button, a pop-up named Export data will appear.
- Start Date and End Date: Select the time period in the start date and end date column for which data is required.
- Select Data to Export: Here, you can export all rows or 15 rows to 1000 rows based on selection from the dropdown.
- Select Column to Export: Select columns which you need to export. But if you want all the details of Question Bank, simply click on “ALL DATA” and you will get all the records of Question Bank in your exported file.
- Export as: Then select a format in which you want to download your data i.e. (EXCEL or CSV).
- After selecting the relevant options, click on the Export data button. A popup named Export data confirm will appear on your screen. You need to enter the email address where you want to send the file. And then click on the Submit button.

Bulk Action Button
- The Bulk Action Button is disabled by default. When you mark on the check box , which appears on the starting on each row, this action button will be enabled.
- You can select/deselect the rows by marking the checkbox.
- After selecting any record go to the action button, click on the button a small popup will appear. There, you can see Delete option.
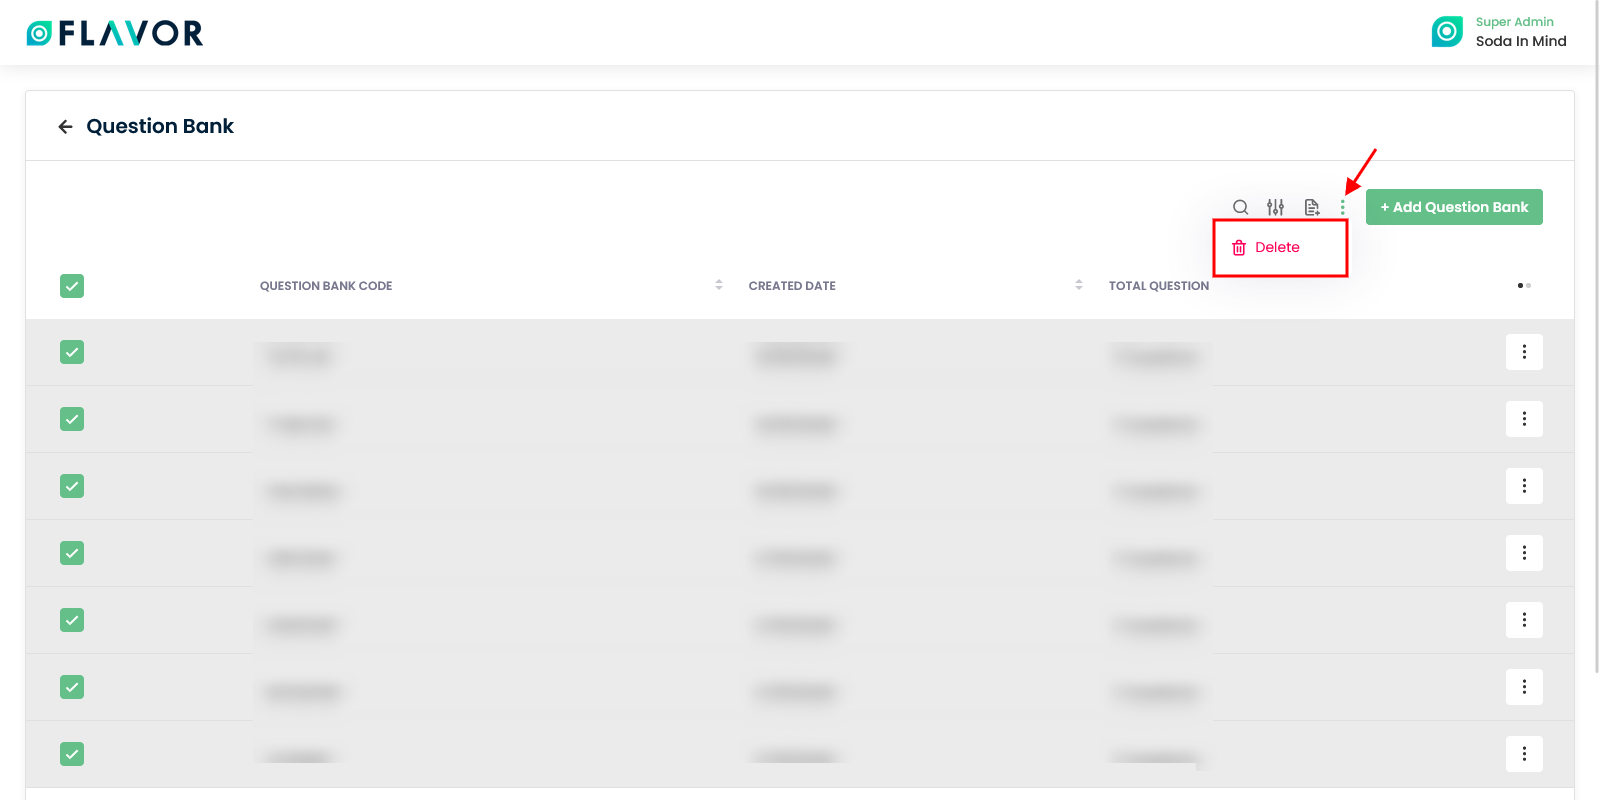
Delete
- Click on the Delete button to delete all selected question banks or particular question bank.
- After clicking on the Delete button, a confirmation popup will appear on your screen.
- Click on the Delete button to delete the quiz.
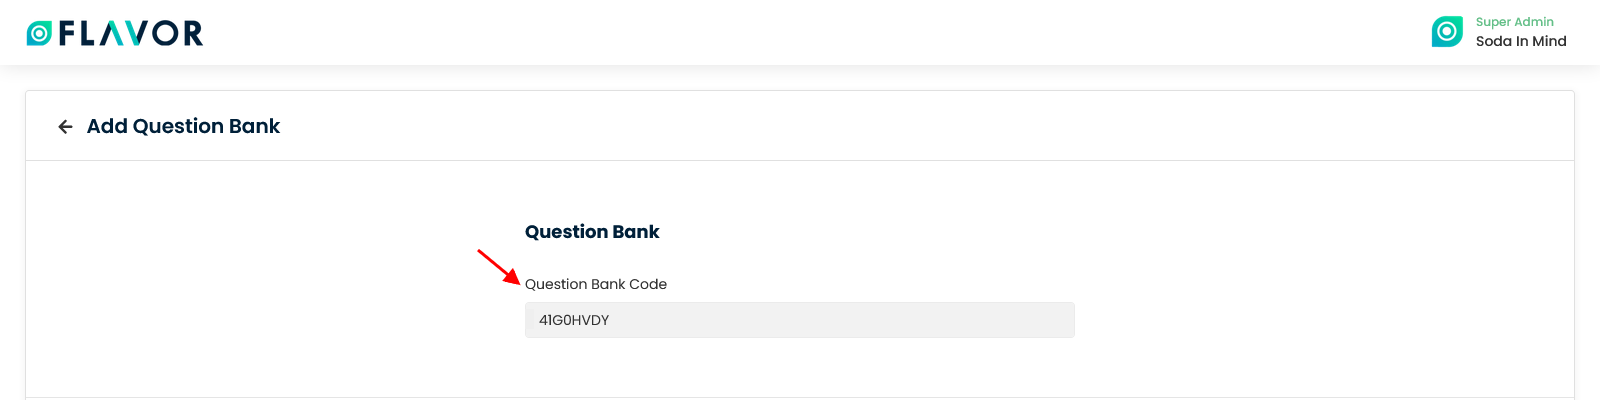
Add Question Bank
You can click on the +Add Question Bank button to add set of questions to the question bank.
Once you click on this button, it will navigate you to the Add Question Bank Page. Under the Question bank section you can see the Question Bank code, which is autogenerated and cannot be edited.
In Add Question section you can see two options are available.
- Add questions
- Import Local Questions
Add Questions
Here, you can directly add questions. Question can be Multiple Choice or Short Answers.
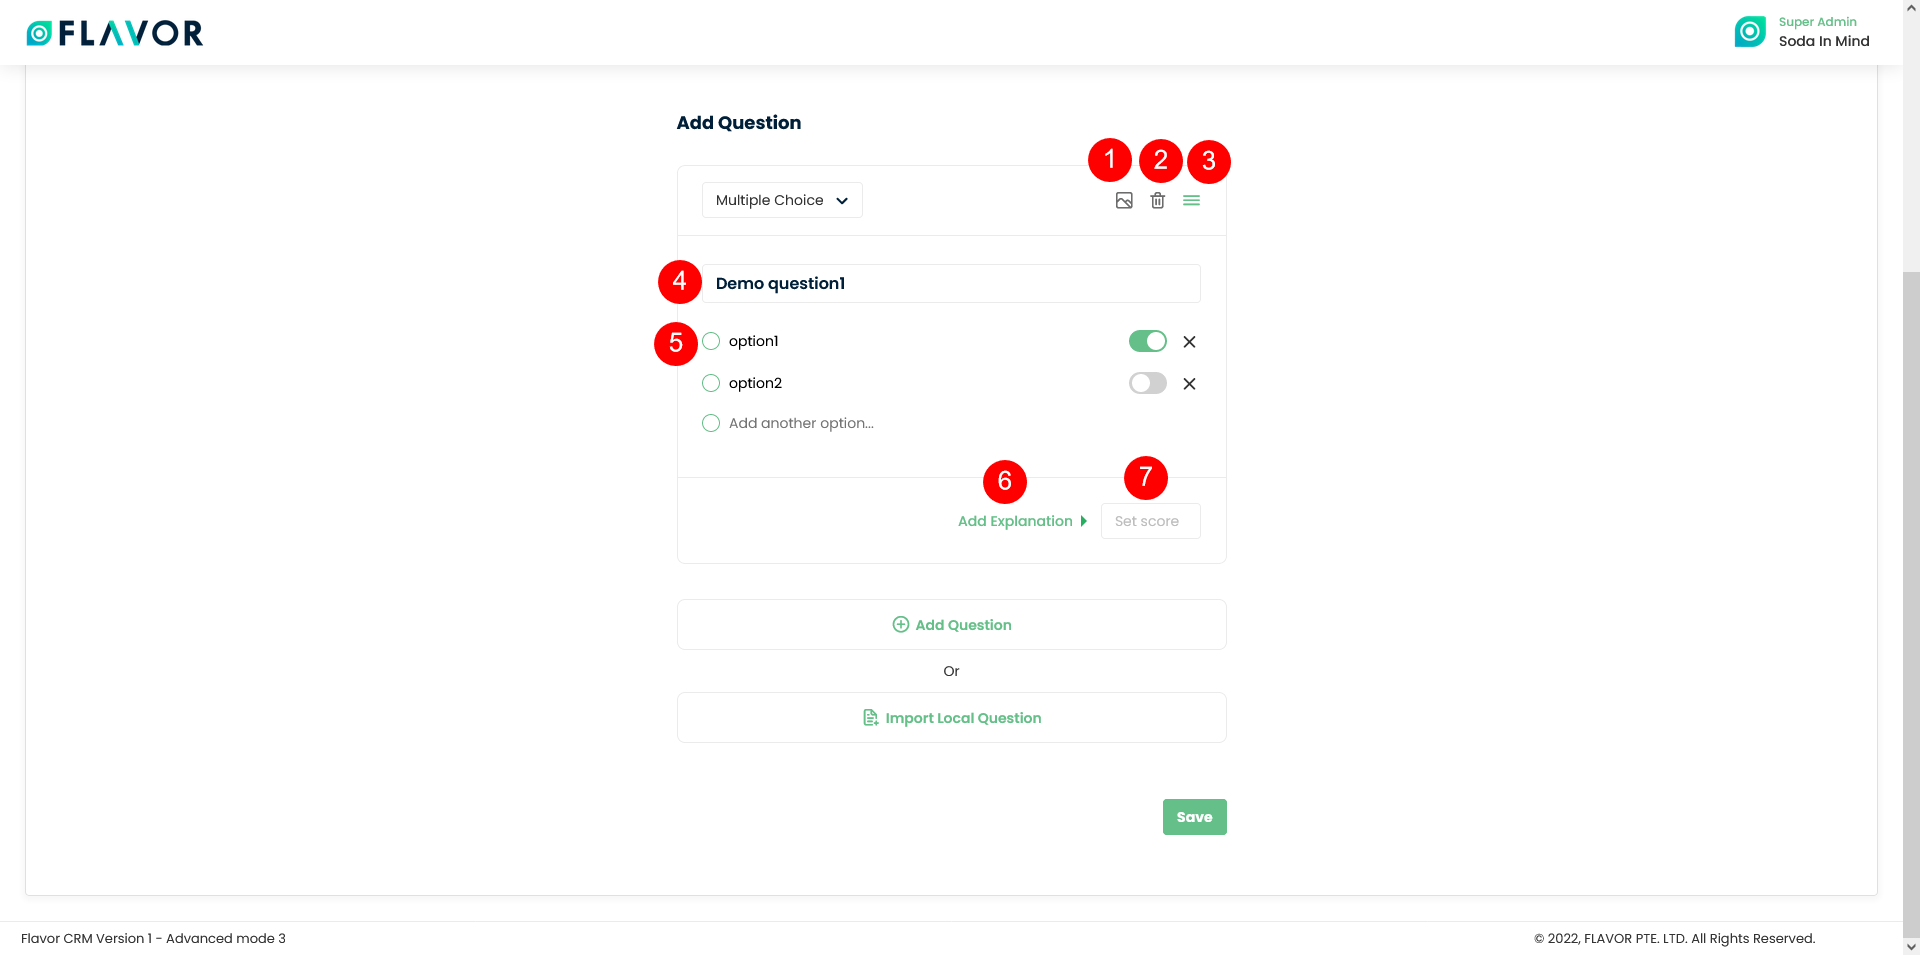
- Attach image to question: You can attach an image to the question added by using this icon.
- Delete question: You can delete the question by clicking on this icon.
- Drag to reorder question: You can rearrange the question order by dragging this icon.
- You can Add question here in this text box.
- You can add option for the question given.
- Add Explanation: When you click this, a text box will appear. In that you can add the explanation for the given question.
- You can set the score for the given question.
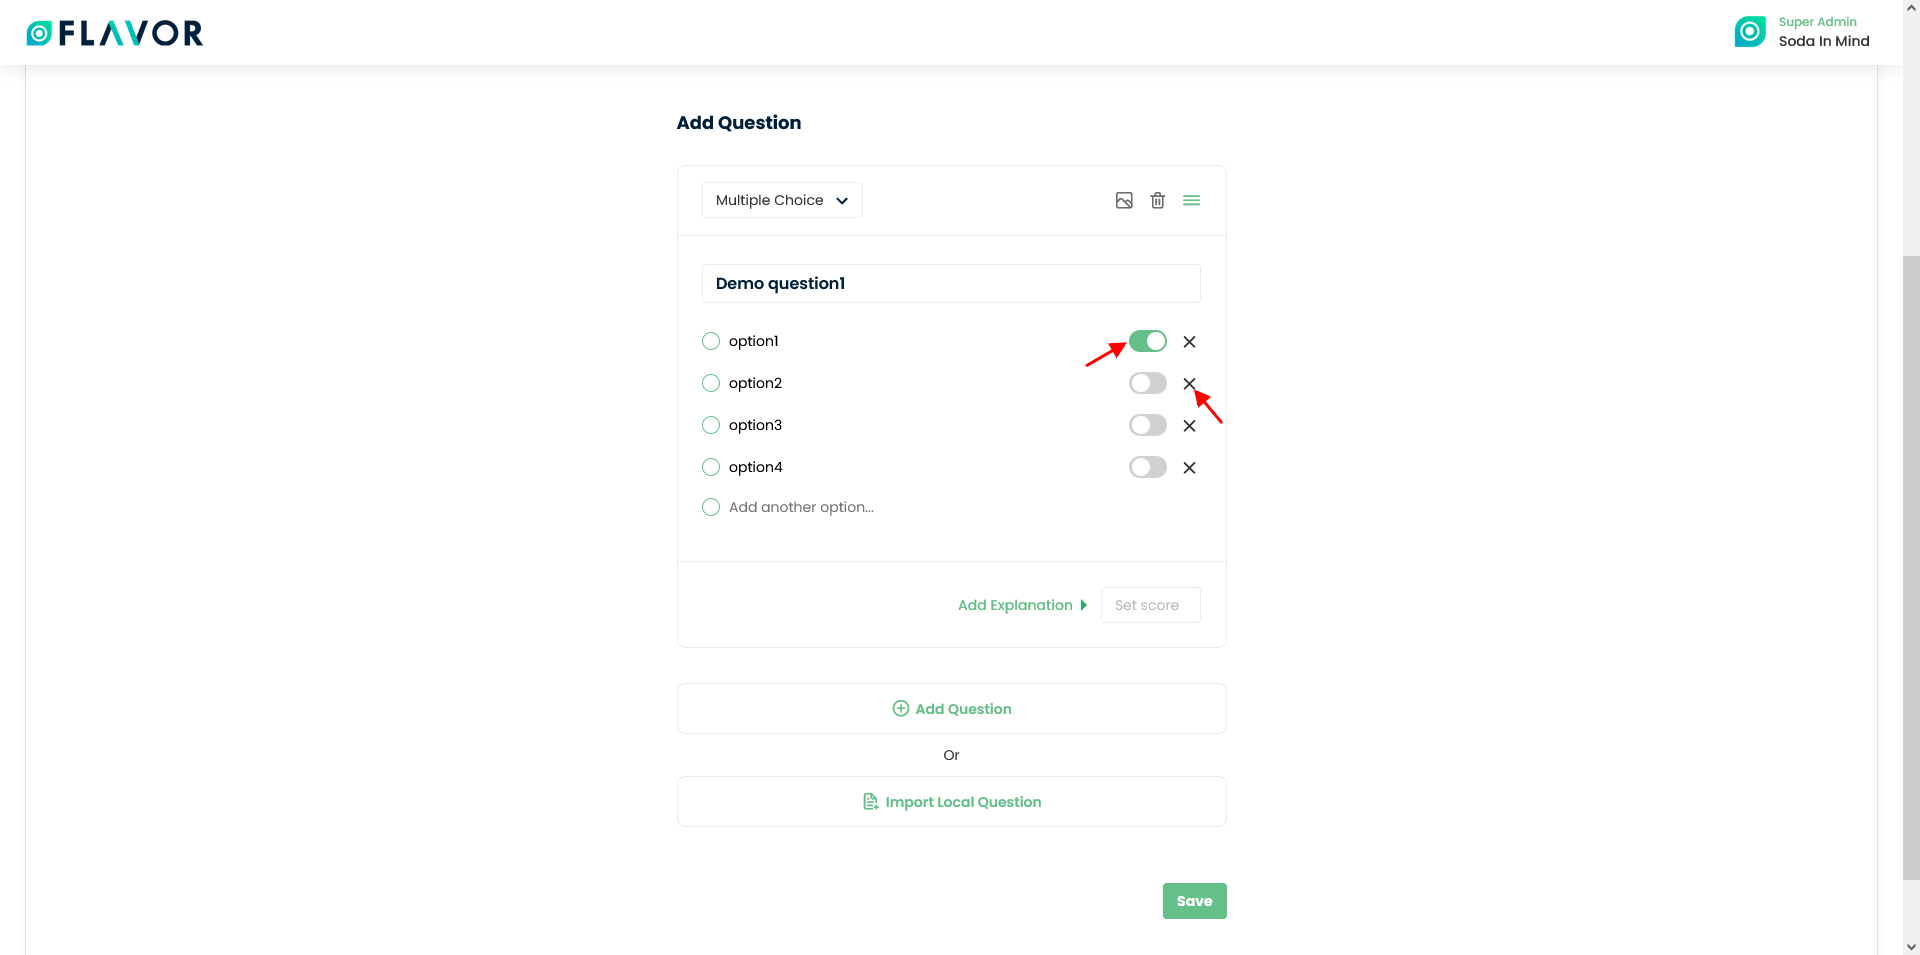
While adding option, you can choose the correct answer by enabling the switch. Also can delete the option by click on cross icon.
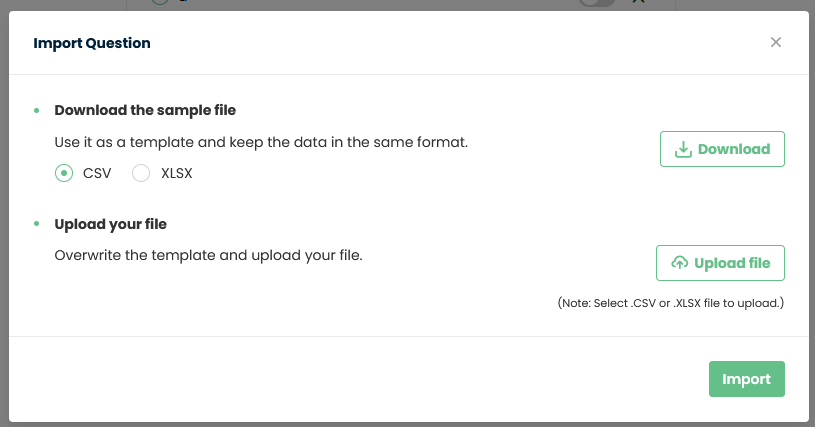
Import Local Questions
Here, you can upload the downloaded file after filling the questions set.
- You click on Import Local Question button.
- A pop up will named import question will appear on your screen.
- Download the sample file which is available in two format viz. .CSV and .XLSX.
- After filling up the sample file, you can upload the file by clicking on Upload file button.
- Click on Import button. A pop up will appear on your screen.
- Click on Submit button.
- Click on Save button
Questions Bank Records
Column Sorting
All records will be shown in Tabular Format. You can sort the data by clicking on Column Sorting Arrows in Table’s Header.
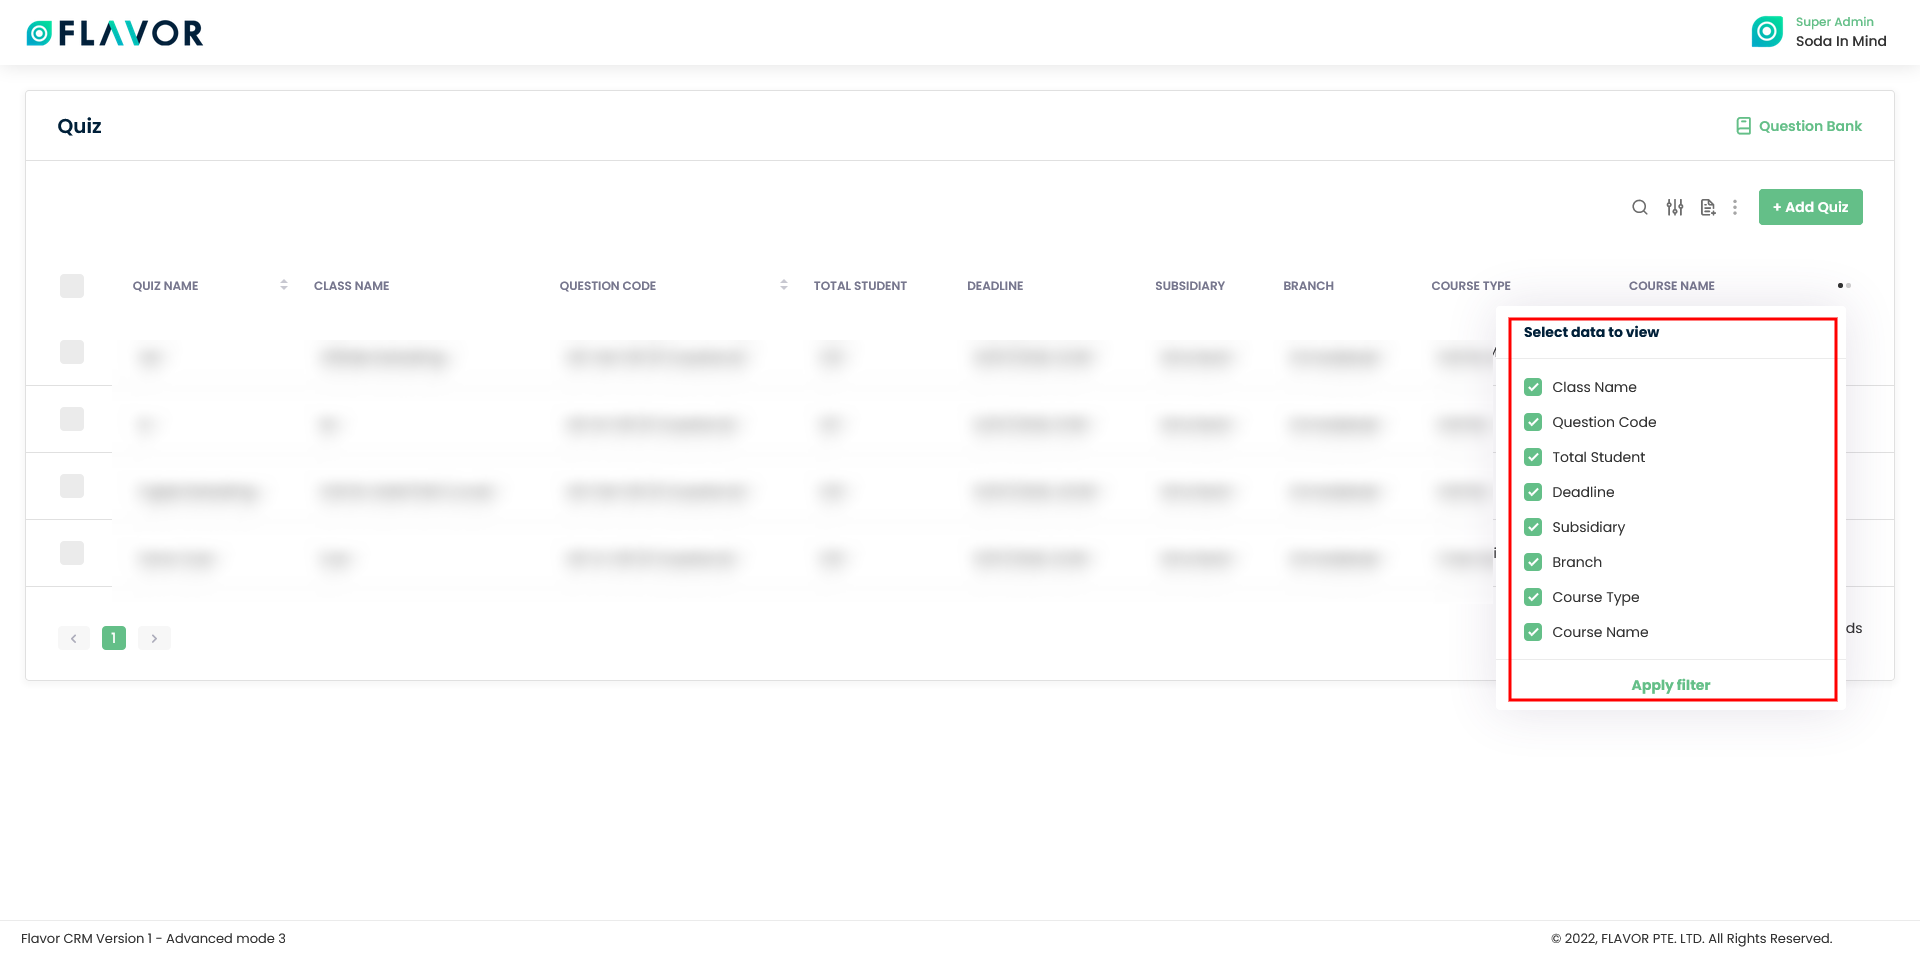
Column Visibility
You can sort columns by clicking on the Ellipsis Icon, you will get the pop-up form named Select Data to View. Mark the columns you want to see and unmark the ones you don’t want to see in the table. After this procedure click on the Apply Filter button.
Note: If you click on each record, it will redirect you to edit page to change/update the question bank.
Action Buttons
Click on Action Button (Vertical Ellipsis), a popup box will appear on your screen with Delete option. If you click on delete option, a confirmation message will appear. If you click on Delete button that particular question bank will get deleted.
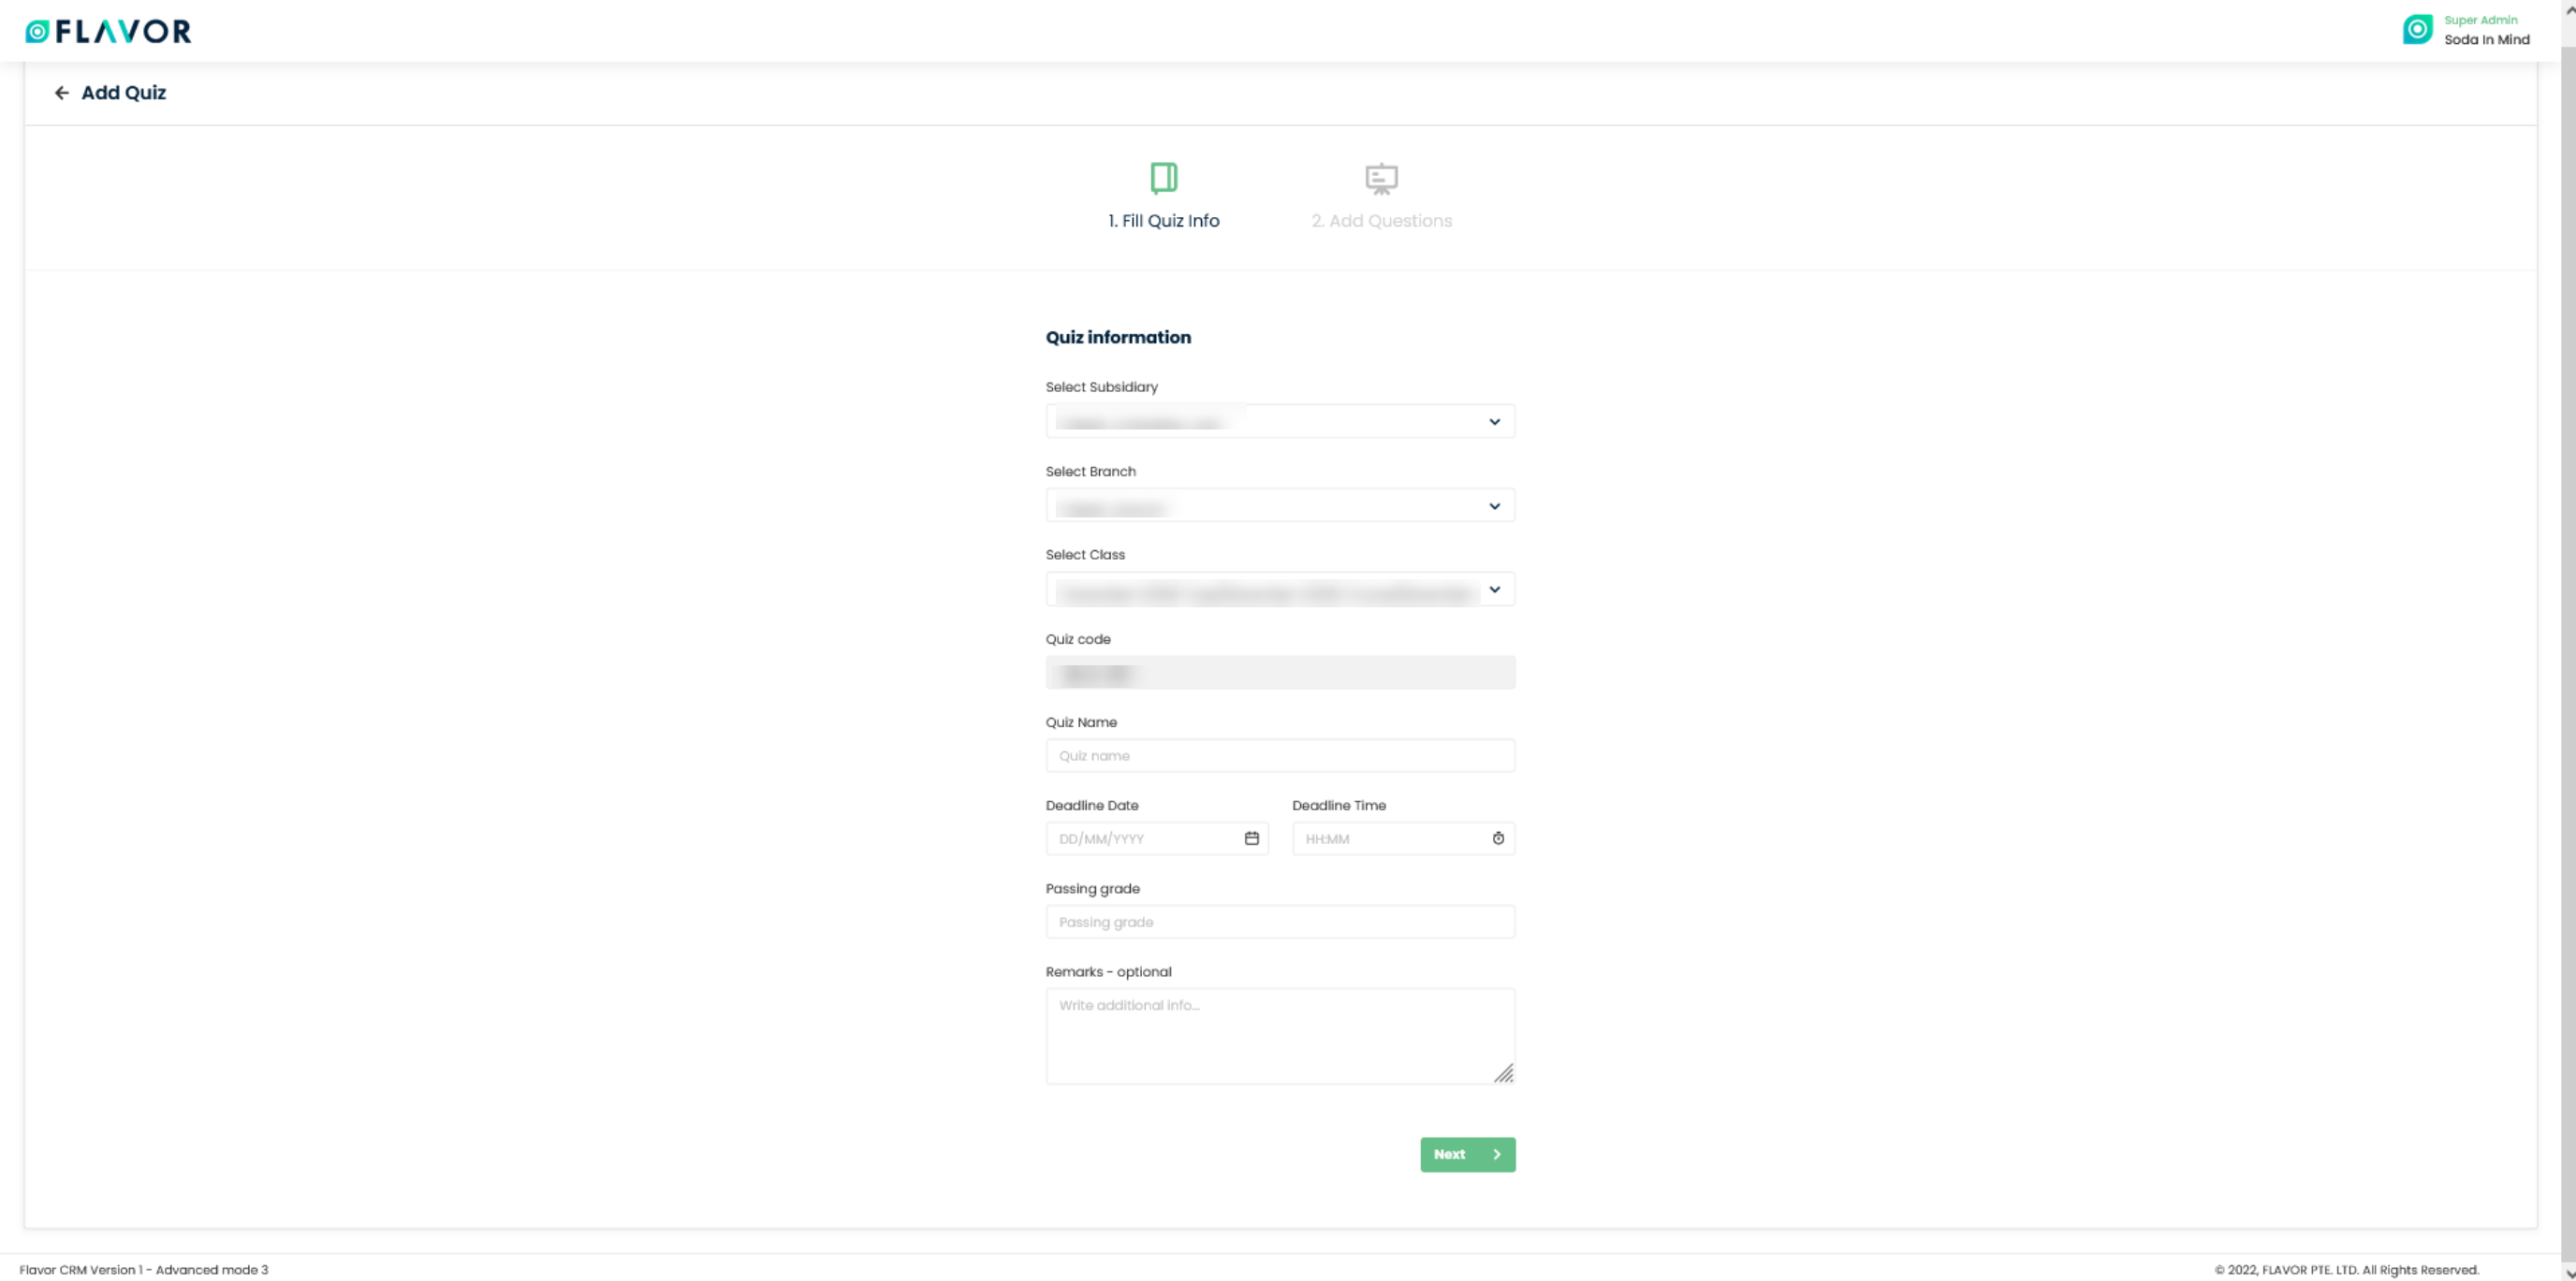
Add Quiz
To add a new quiz, you need to click on + Add Quiz button. You will be redirected to the Add Quiz page. Here, you can see 2 sections.
Fill Quiz Info
The first tab opens after the user clicked the button.
Note: Before fill quiz info is finished, the second tab will be disabled.
- Select Subsidiary: Select the Subsidiary for which you are creating the quiz.
- Select Branch: Based on the Subsidiary, the branch dropdown will get filled. Select a branch from the dropdown.
- Select Class: Select the class from the dropdown.
- Quiz code: Once you select the class, the Quiz code is auto generated, which is not editable.
- Quiz Name: Enter the Quiz name.
- Deadline Date: Select the deadline date.
- Deadline Time: Select the deadline time.
- Passing Grade: Enter the passing marks.
- Remarks: Give the remarks which is optional.
Click on Next Button.
Add Questions
Randomize Question: If you enable the switch, then when the quiz is taken, the questions on the quiz will be in random order.
You can add the questions in three different ways viz. Add Question, Import from Question Bank, Import Local Question.
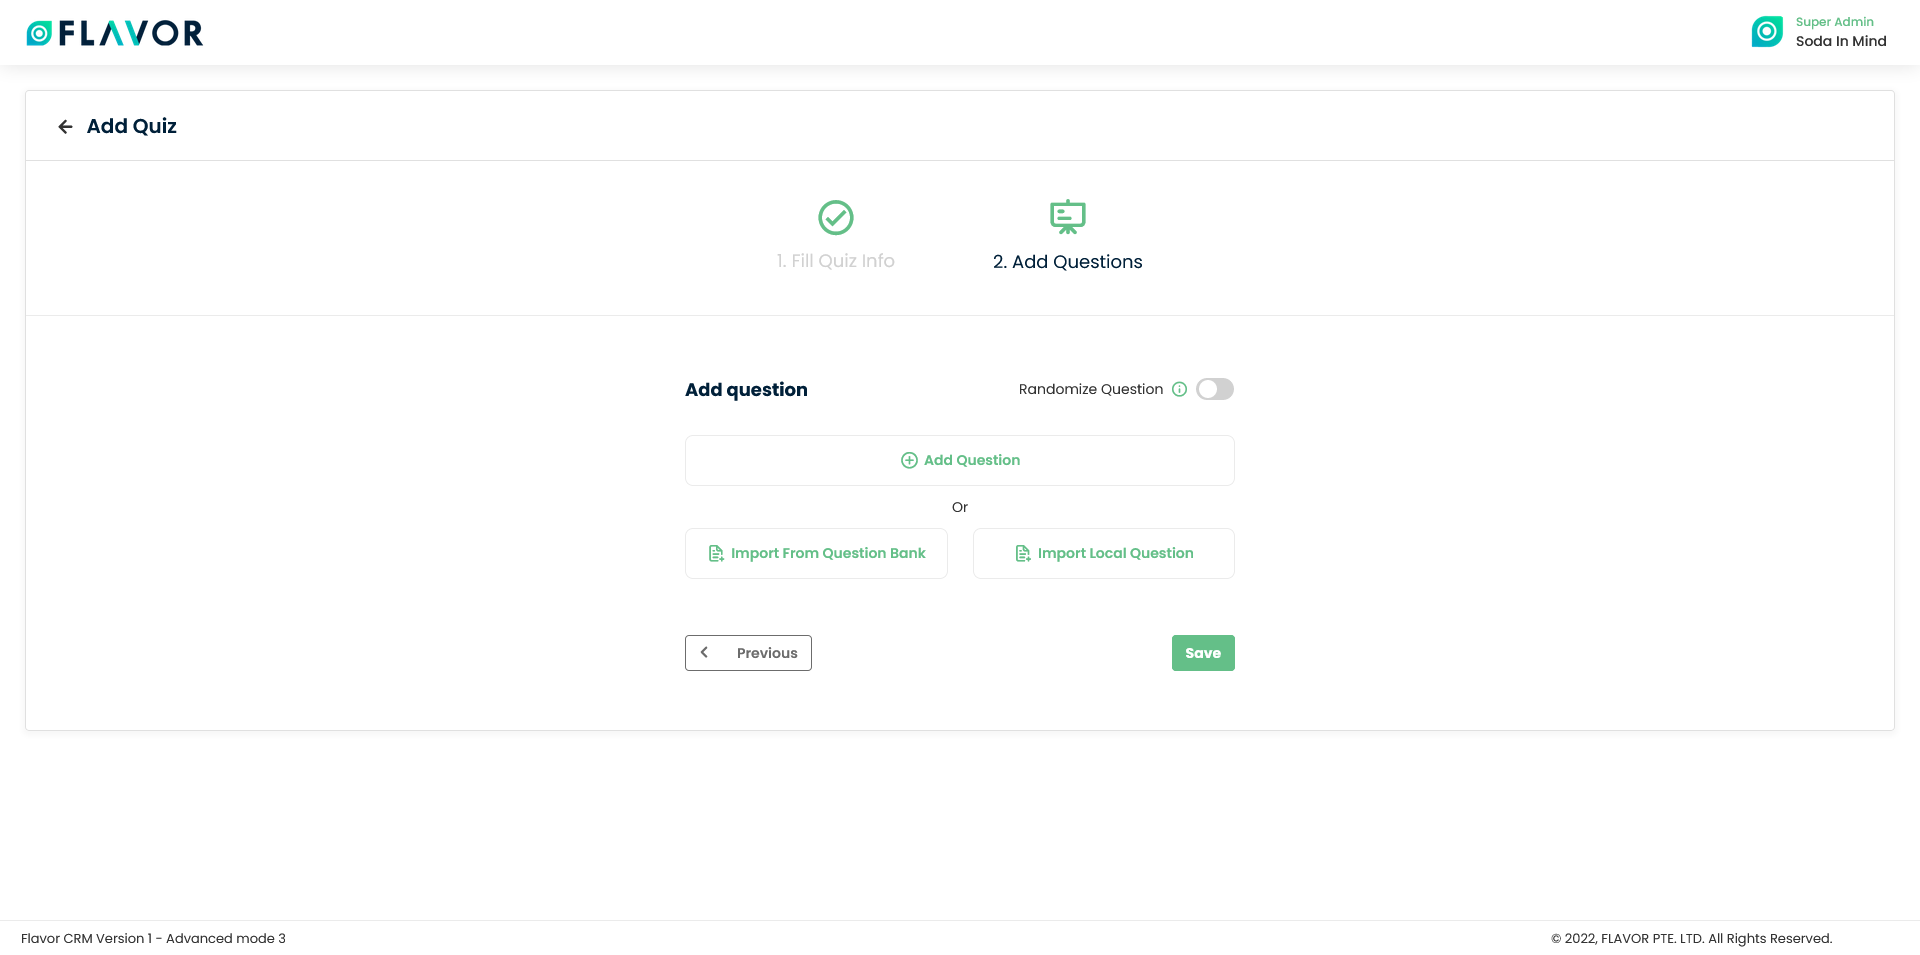
Add Question:
Here, you can directly add questions. Question can be Multiple Choice or Short Answers.
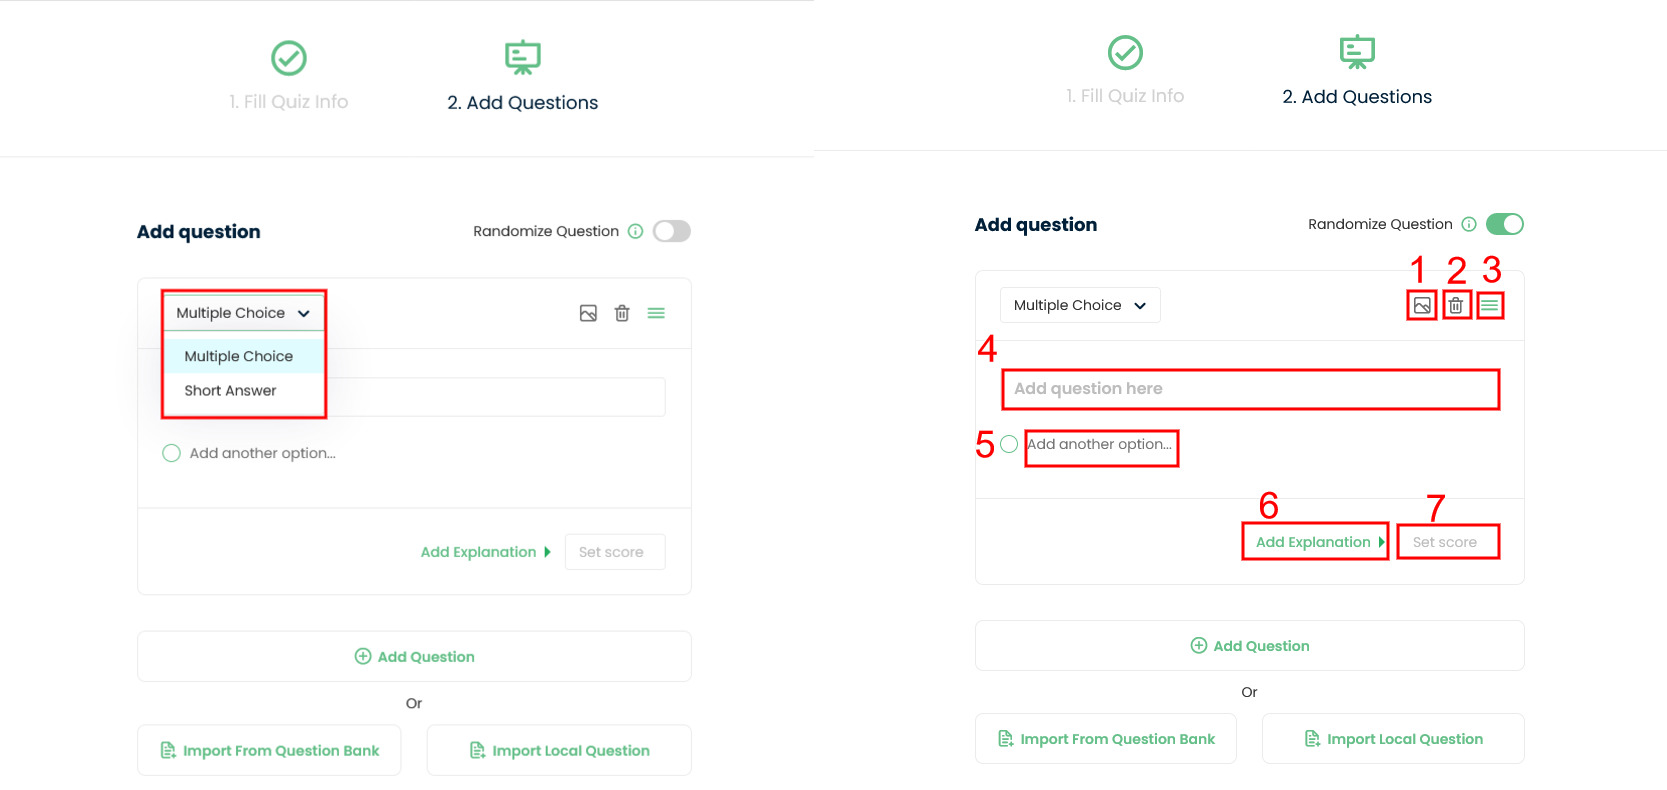
- Attach image to question: You can attach an image to the question added by using this icon.
- Delete question: You can delete the question by clicking on this icon.
- Drag to reorder question: You can rearrange the question order by dragging this icon.
- You can Add question here in this text box.
- You can add option for the question given.
- Add Explanation: When you click this, a text box will appear. In that you can add the explanation for the given question.
- You can set the score for the given question.
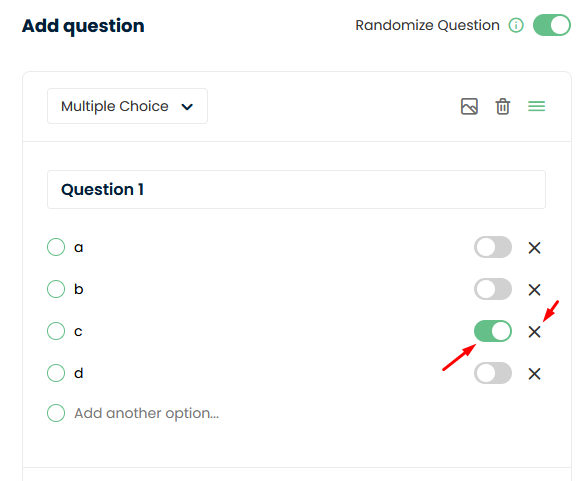
While adding option, you can choose the correct answer by enabling the switch. Also can delete the option by click on cross icon.
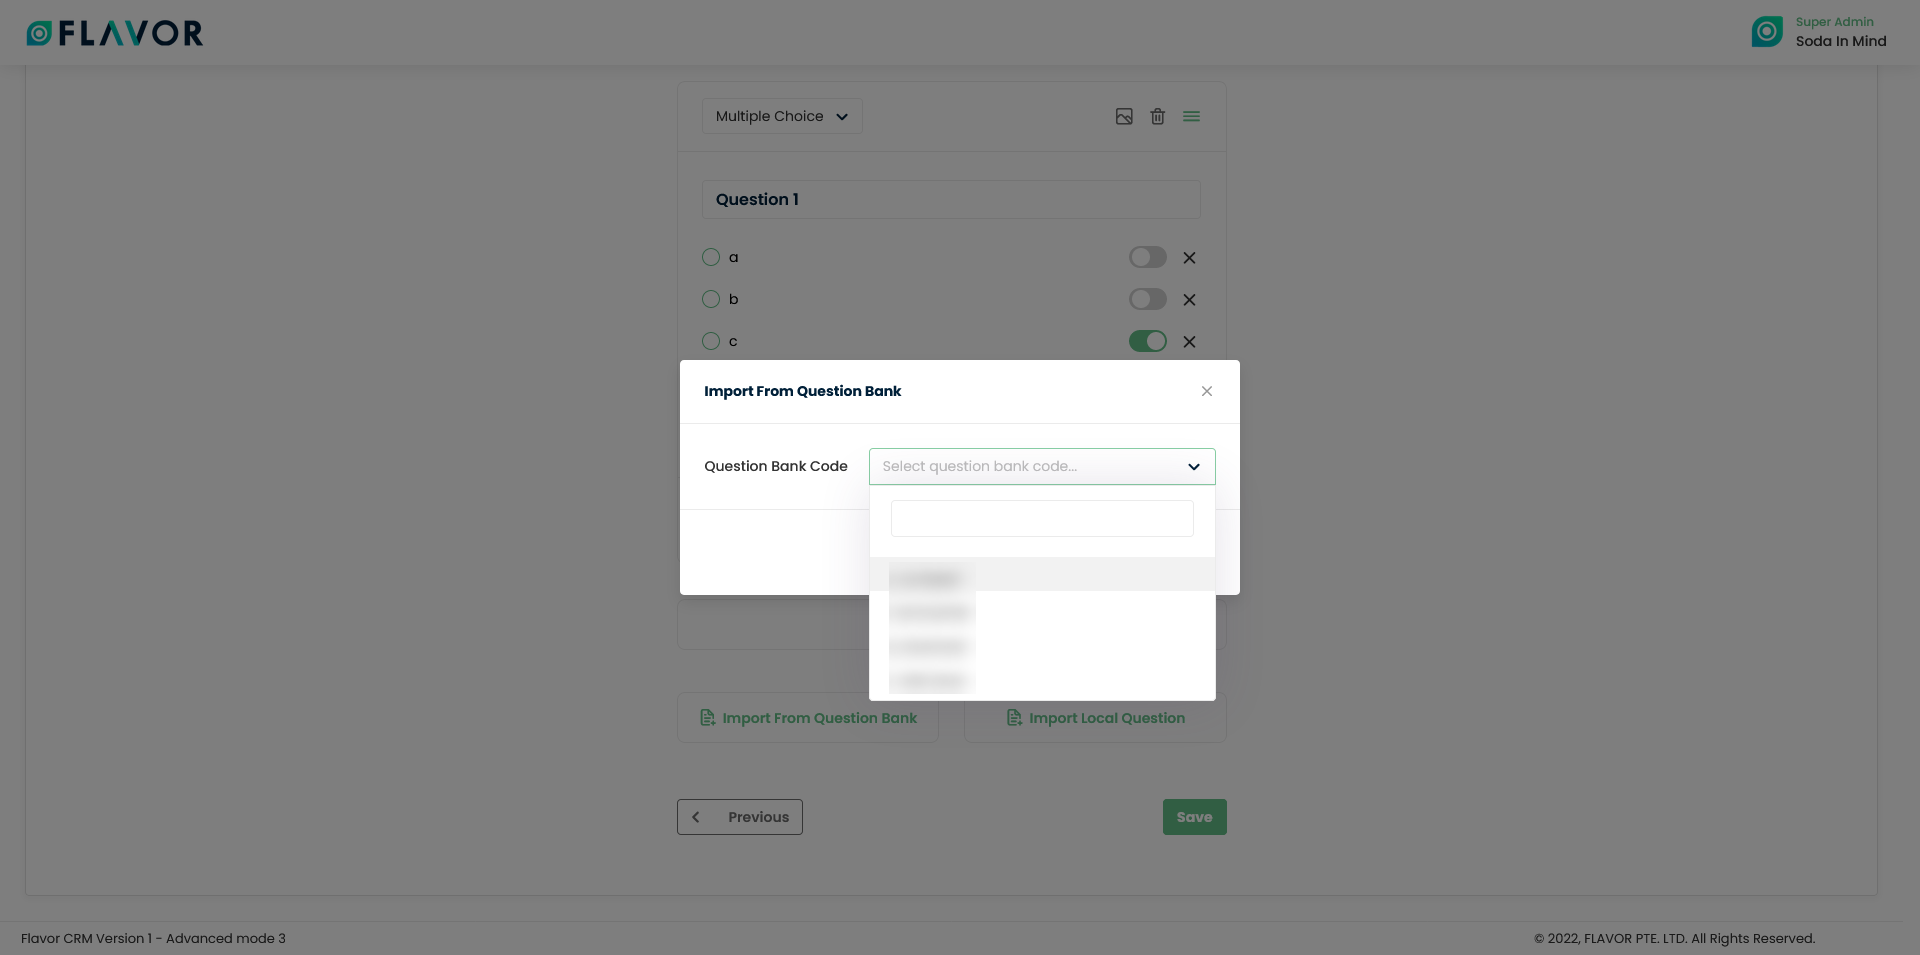
Import From Question Bank:
- Click on the Import From Question Bank.
- A pop up form will appear.
- You need to choose the Question Bank Code from the drop down.
- Click on Add button.
- The list of question will appear. Click on Save button.
Import Local Question:
- You click on Import Local Question button.
- A pop up will named import question will appear on your screen.
- Download the sample file which is available in two format viz. .CSV and .XLSX.
- After filling up the sample file, you can upload the file by clicking on Upload file button.
- Click on Import button. A pop up will appear on your screen.
- Click on Submit button.
- Click on Save button.
Quiz Records
Column Sorting
All quizzes will be shown in Tabular Format. You can sort the data by clicking on Column Sorting Arrows in Table’s Header.
Column Visibility
You can sort columns by clicking on the Ellipsis Icon, you will get the pop-up form named Select Data to View. Mark the columns you want to see and unmark the ones you don’t want to see in the table. After this procedure click on the Apply Filter button.
Expand Records
At the starting of all records, there is an Expand Button (Down Arrow), after clicking on this button a record will be expanded. From here will get the entire information of any quiz. You can collapse the record by clicking on the same button.
Action Buttons
Click on Action Button (Vertical Ellipsis), a popup box will appear on your screen with Share Quiz Link, Edit and Delete quiz options.
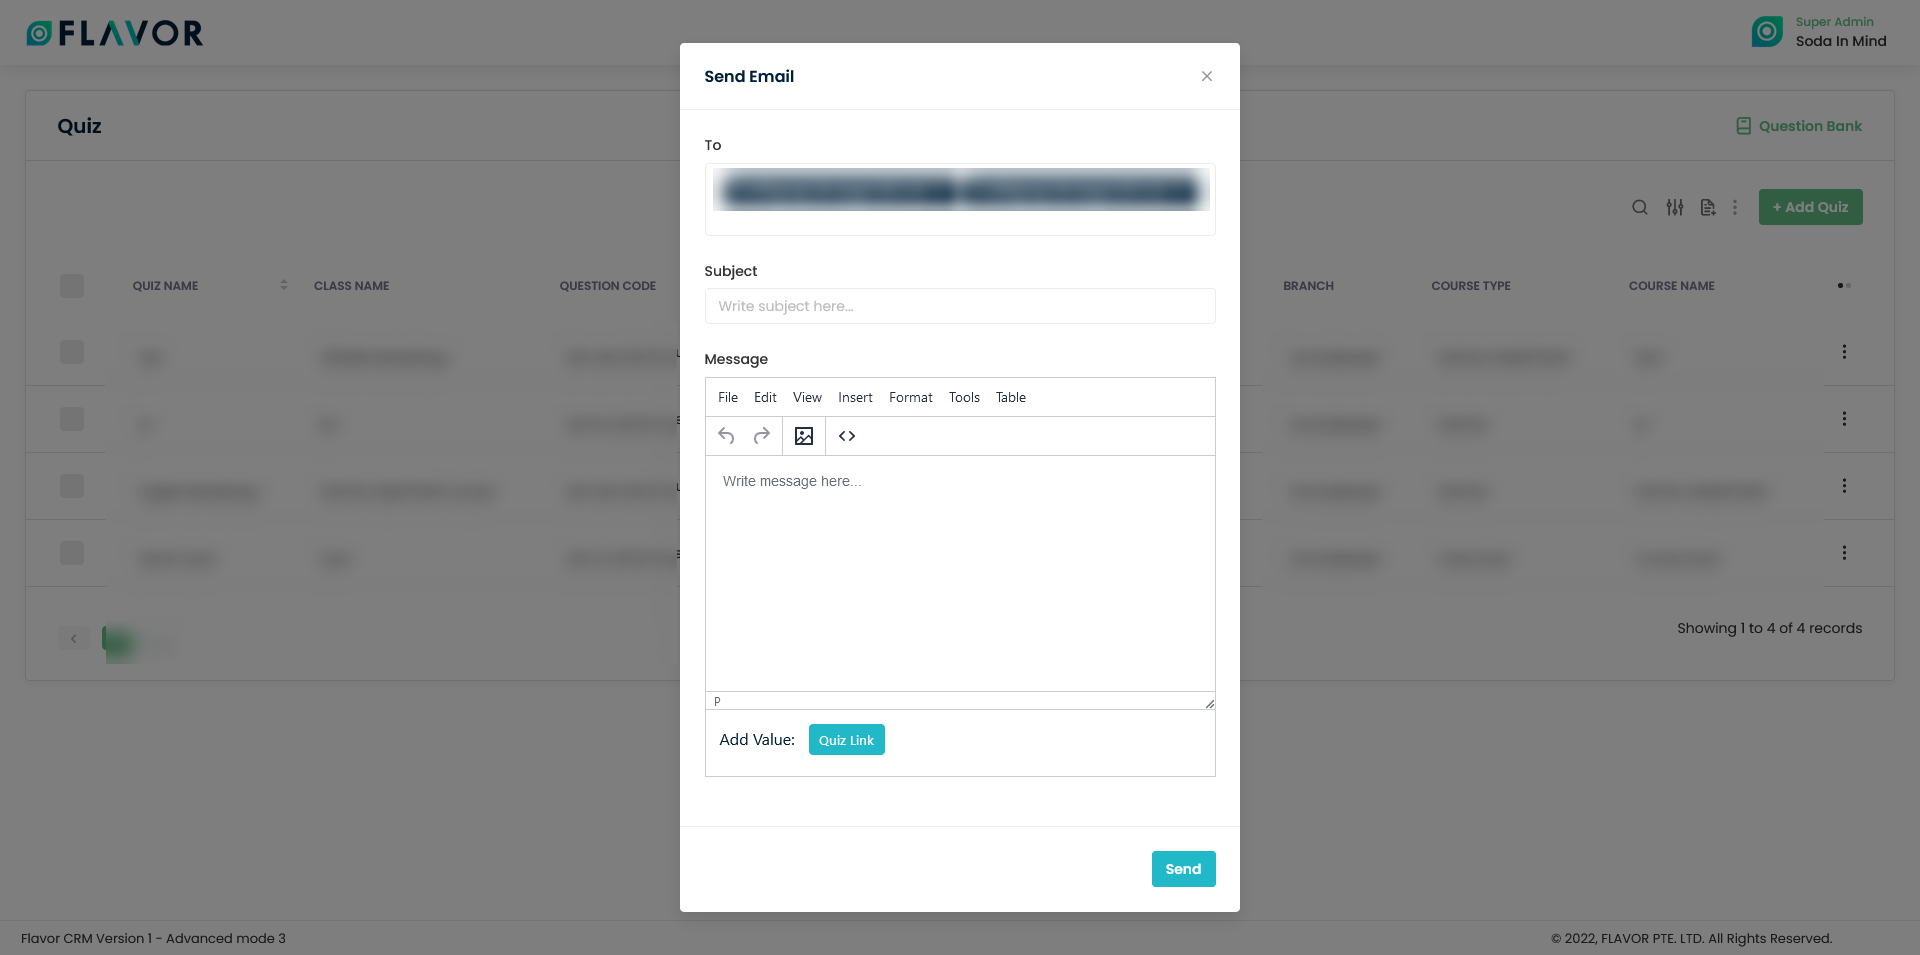
Share Quiz Link
- Click on this link to share the quiz link to all the registered students in that class.
- The To field will have the email addresses of all the students registered in that class.
- You need to enter the Subject and the link from the Add value.
- Click on the Send button.
Note: The quiz link will go to the students registered email address.
Edit
- Click on this Edit option, you will be redirected to the Edit Quiz page.
- From here, you can update the quiz information.
- After the changes made, click on the Save button.
Note: If any quiz attempt is done, then edit quiz option gets disabled.
Delete
- Click on the Delete button to delete that particular quiz.
- After clicking on the Delete button, a confirmation popup will appear on your screen.
- Click on the Delete button to delete the quiz.
Quiz Details
In Quiz Details, you can see the Class Name, Course Type, Course Name, Level, Subsidiary, Branch, Deadline Date, Deadline Time, Quiz Code(you can copy the quiz code by clicking on it).
Quiz Profile
Edit Quiz
- Click on this Edit Quiz, you will be redirected to the Edit Quiz page.
- From here, you can update the quiz information.
- After the changes made, click on the Save button.
Student Status
Here, you can see the list of all the student who are registered under this class.
Search
You can search for a student by the Student name, Student number or points. To search, click on the search icon. Enter the Student name, Student number or points and press enter. You can see the search results in the list.
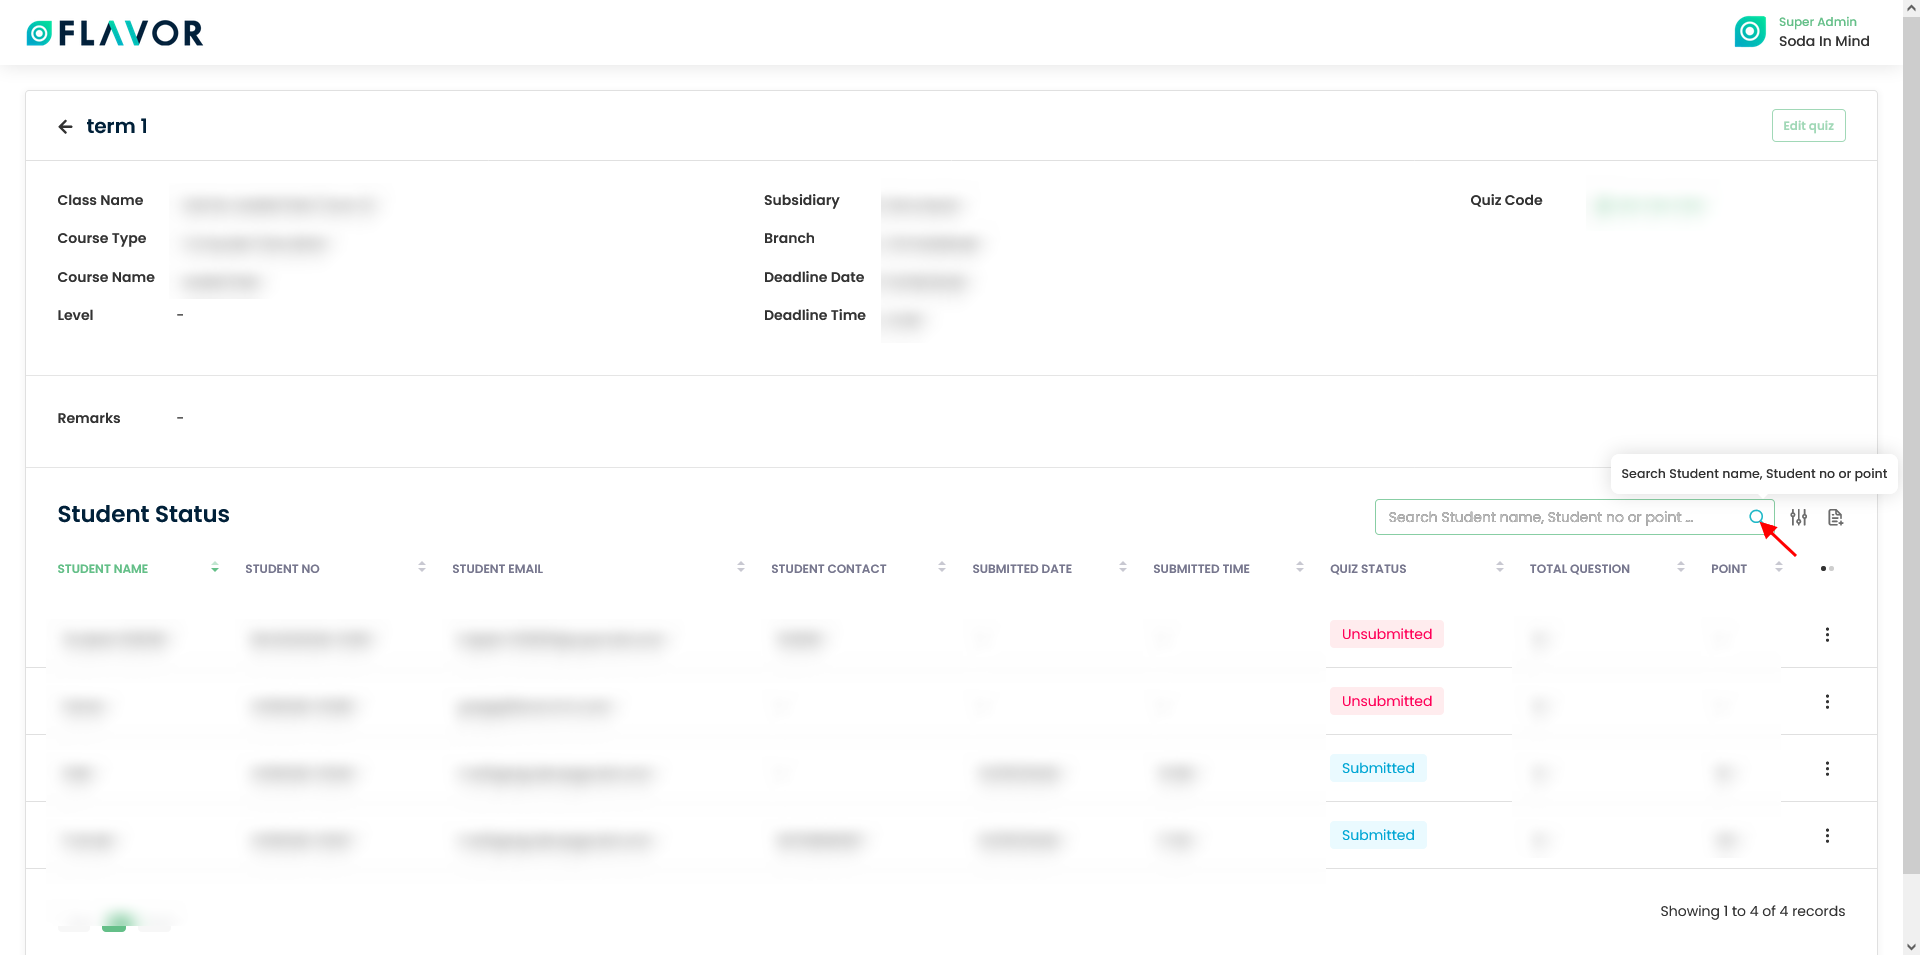
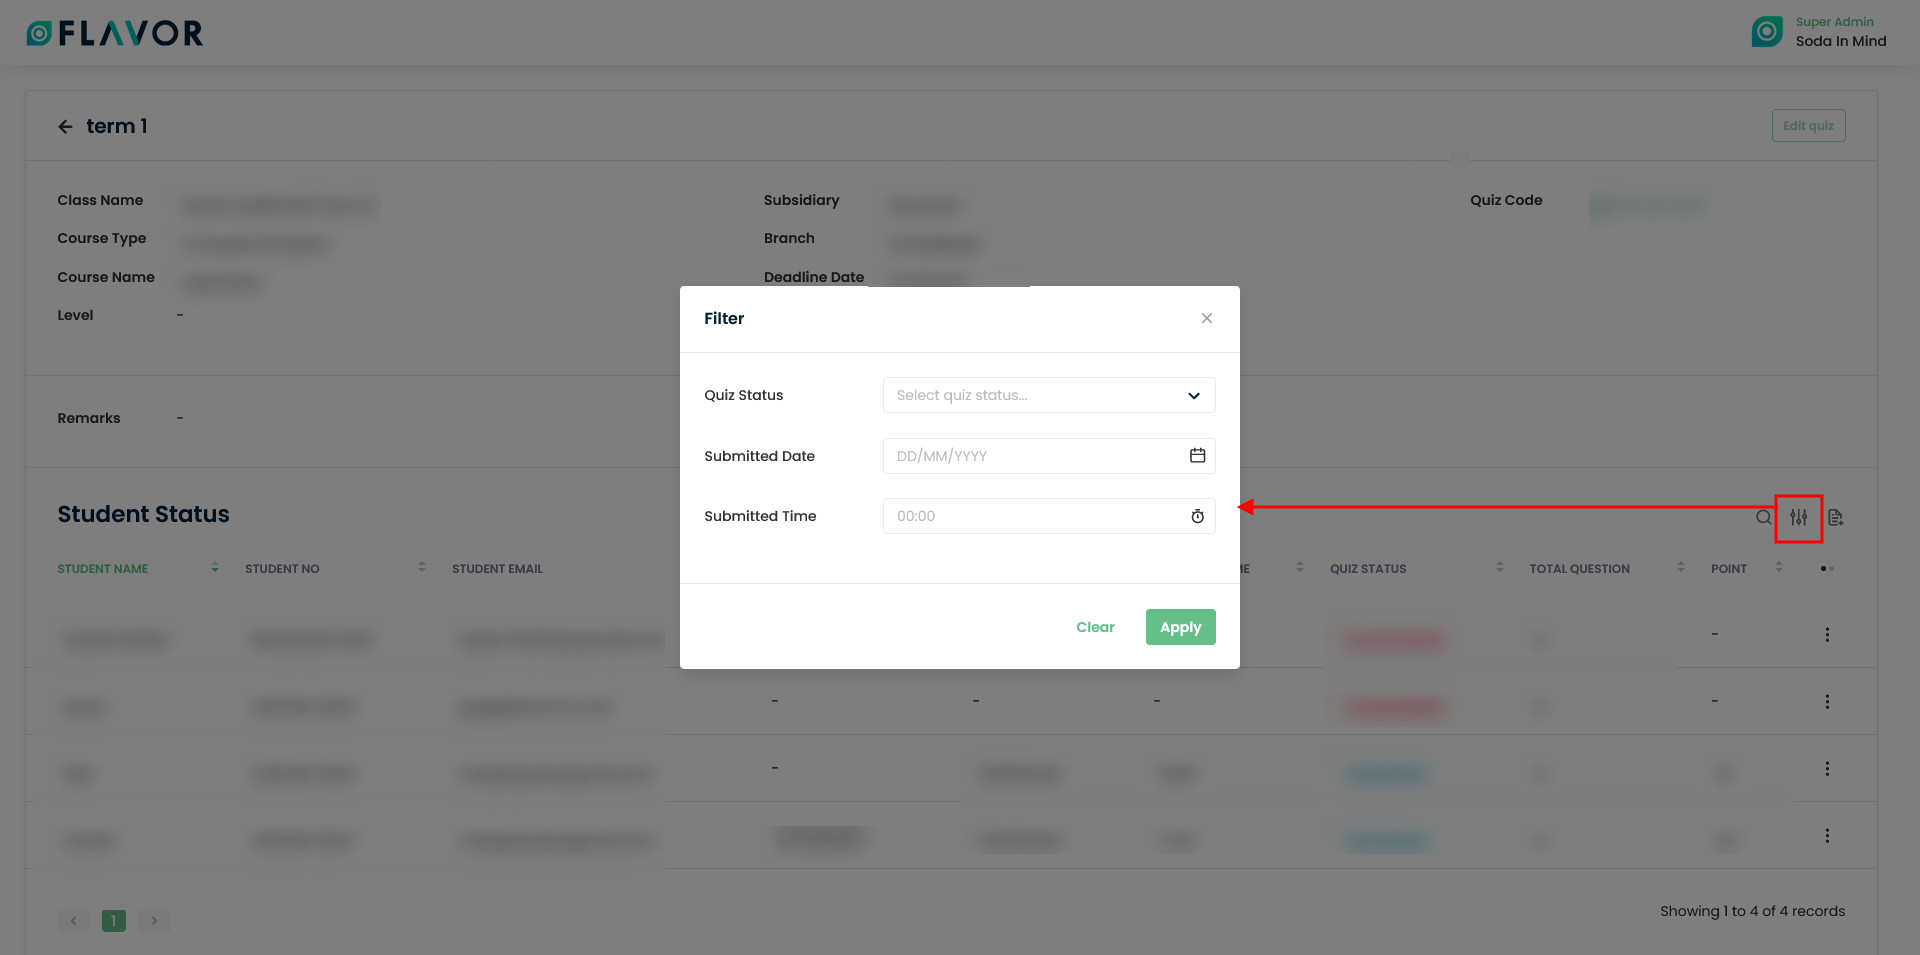
Filter
You can filter the student records based on specific parameters like Quiz status, Submitted Date and Submitted Time. To open the filter pop up, click on Filter Icon. Select the data according to your need, then click on the Apply button to get filtered records.
Export
To export the Student data you need to click on the export icon. After clicking on the Export button, a pop-up named Export data will appear.
- Start Submitted Date and End Submitted Date: Select the time period in the start submitted date and end submitted date column for which data is required.
- Select Data to Export: Here, you can export all rows or 15 rows to 1000 rows based on selection from the dropdown.
- Select Column to Export: Select columns which you need to export. But if you want all the details of Student, simply click on “ALL DATA” and you will get all the records of Student in your exported file.
- Export as: Then select a format in which you want to download your data i.e. (EXCEL or CSV).
- After selecting the relevant options, click on the Export data button. A popup named Export data confirm will appear on your screen. You need to enter the email address where you want to send the file. And then click on the Submit button.
Action Button
Click on Action Button (Vertical Ellipsis), a popup box will appear on your screen with Share Quiz Link and Retake Quiz.
Share Quiz Link
- Click on this link to share the quiz link to that registered students in that class.
- The To field will have the email addresses of that student in that class.
- You need to enter the Subject and the link from the Add value.
- Click on the Send button.
Retake Quiz
The Retake Quiz gives you the option to reattempt the quiz. The Retake Quiz will be enabled if the Randomized Question remains enabled.
Need more help? Ask us a question
Please let us know more of your details and our team will reach out to you very shortly.