
You can check the Classes by clicking on the Classes from the main navigation panel of the Flavor EduPortal. This module is provided under the Education section in the navigation panel.
By clicking on the Classes, from the left menu you will be redirected to the Classes Page where you will see Ongoing, Upcoming, Inactive & All tabs.
Classes Tabs
Ongoing
on going tab is showing those classes which are currently active.
Upcoming Tab
In the upcoming tab, you can see the coming classes.
Inactive Tab
The classes which have been ended will be seen in the inactive tab.
All Tab
Here, you will see the list of all the classes, irrespective of their status which is ongoing, upcoming & inactive.
Makeup Class Tab
Here, you can see the list of Makeup Classes.
Classes Options
Search
Search By clicking on the Search Icon, you can search the specific classes by entering the course name, class name & teacher name.
Note: Do not use the Chinese characters in the search function.
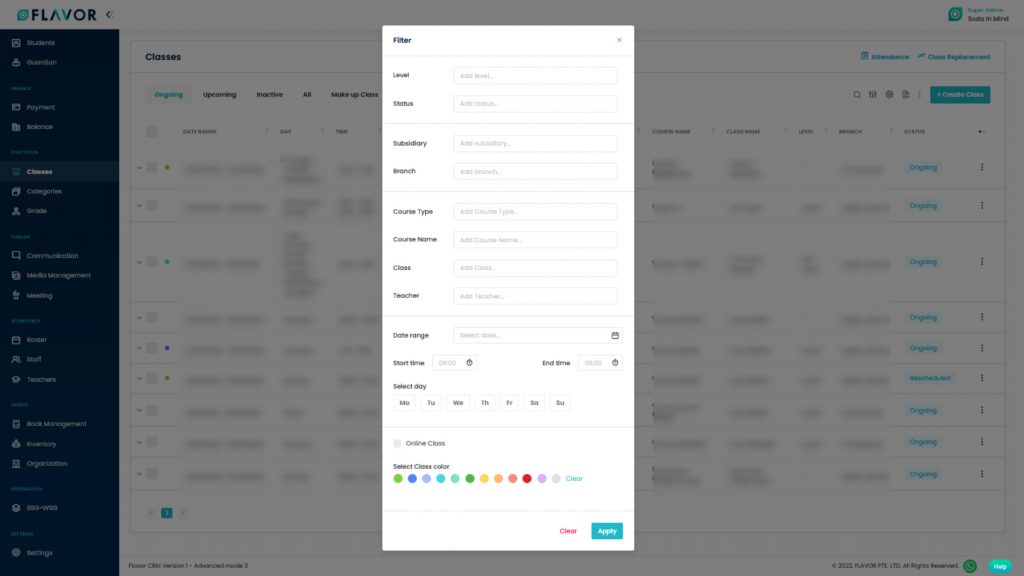
Filter
- You can filter the classes based on specific parameters. Click on Filter Icon, after clicking, a popup form named Filter will appear on your screen.
- Enter the Subsidiary & Branch, level, Status, Course type. Select the date range, start time and end time of the class, select the day, mark the check box online classes, and select the class colour.
- Click on Apply button to save parameters.
Import/Export
Navigate to the Import/Export icon. Click on that, a popup with two options will be open. Import Data & Export Data.

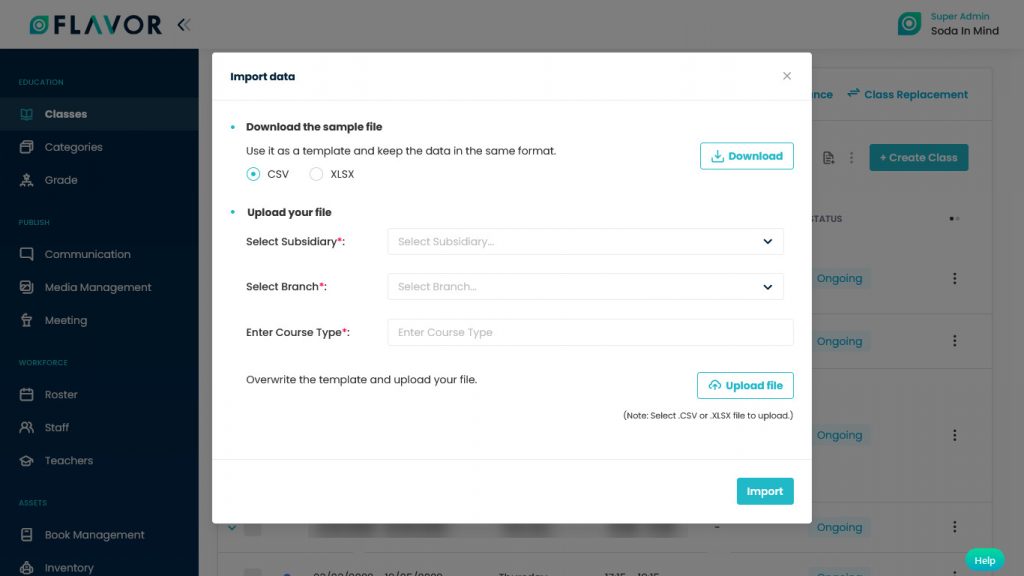
Import
- To import the data click on the Import Data option, after clicking a popup named Import Data will appear on your screen.
- Download the Sample File: If you want to download the sample file, click on the Download button. After clicking on the Download button a File Download window will be open on your screen, choose the Save File and then click on the OK button.
- This file contains the format based on which you can create .CSV file to import student data.
- Upload Your File: Select the Subsidiary, Branch from the dropdown, In which branch & Subsidiary do you want to upload a file, enter the course type. Then click on Upload File button. A File Selector Window will be open, choose a .CSV file to upload.
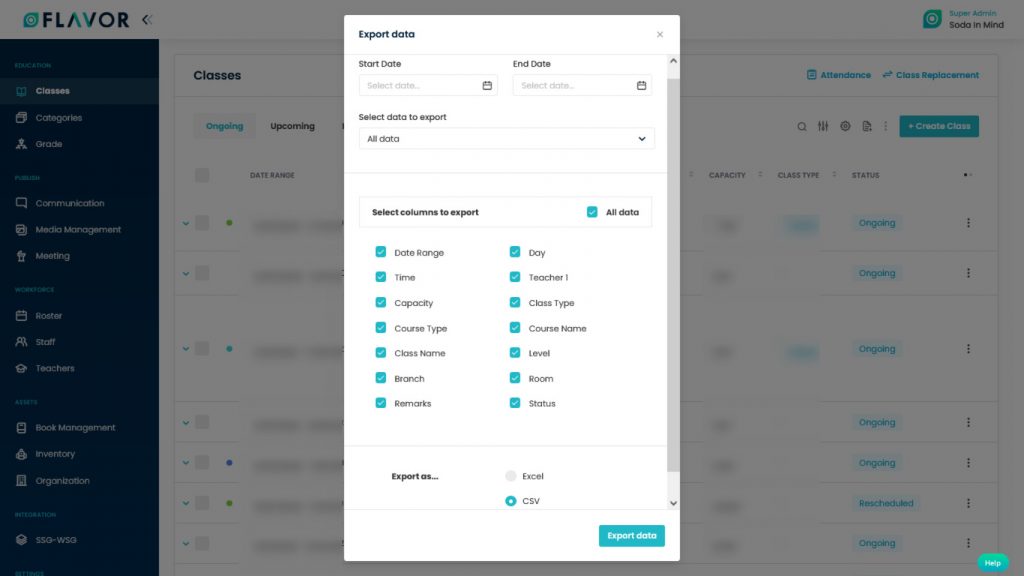
Export
- To export all data, you need to click on the Export Icon.
- After clicking on the Export icon, a pop-up form will appear on your screen.
- Start Date and End Date: Select the time period in the start date and end date column for which time period’s data you need.
- Select Data to Export: Here, you can export the data of all rows or 15 rows by simply clicking on the dropdown.
- Select Column to Export: Select columns which you need your data to export. Like if you want all the data of Classes, then simply click on “ALL DATA” and you will get the data of all classes in your exported file.
- Export as: Then select a format in which you want to export your data i.e (EXCEL or CSV).
After selecting the relevant records/data, click on the Export Data button to export all the data in the selected file (Excel/CSV).
Bulk Action Button
- The Bulk Action Button is disabled by default. When you mark on the check box, which appears on the starting on each row, this action button will be enabled.
- You can select/deselect rows by marking the checkbox.
- After selecting any record go to the action button, click on the button a small popup will appear. There, you can see three options Start, Stop and Delete class.
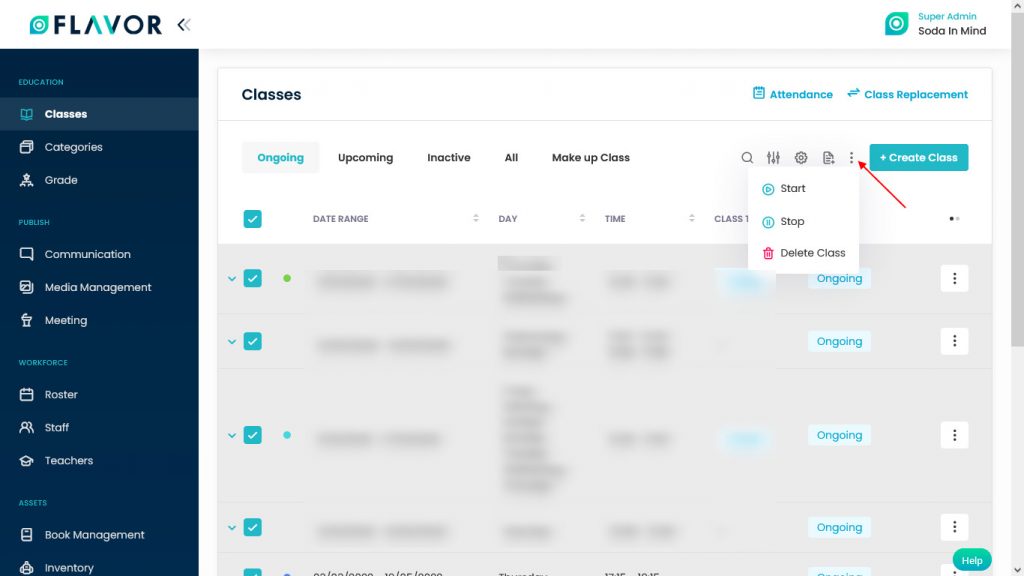
Start:
- Click on the Start button to start all selected classes or particular classes.
- After clicking on the Start button, a confirmation popup will appear on your screen.
- Click on the Yes button to start the class.

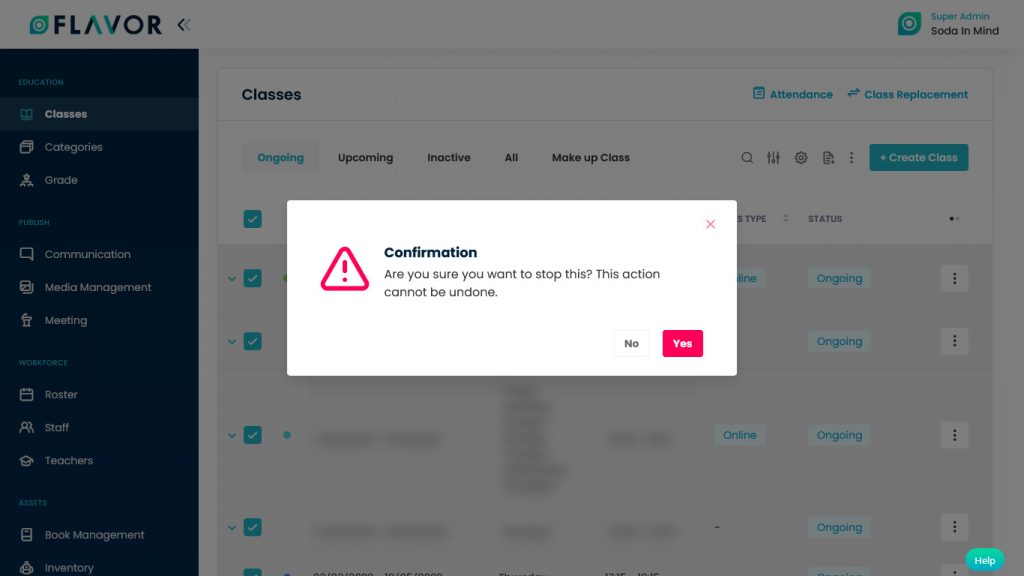
Stop
- Click on the Stop button to stop all selected classes or any particular class.
- After clicking on the Stop button, a confirmation popup will appear on your screen.
- Click on the Yes button to stop the class.
Delete Class
- Click on the Delete Class button to delete all selected classes or particular classes.
- After clicking on the Delete Class button, a confirmation popup will appear on your screen.
- Click on the Yes button to stop the class.
Note: You will lose all schedule, attendance, and Students data. This will remove Students from being registered from these Classes.

Create Class
To create a new class, click on the + Create Class button. You will be redirected to the Create Class page. Here, you can see 3 sections.
Fill Class Info:
The first tab opens after the user clicked the button.
Note: Before fill class info is finished, the rest of the tabs will be disabled. The same issue occurs when the second tab is not finished yet, only the first and second tab that is available to back and forth.
- Upload class image.
- Subsidiary: Select the Subsidiary for which you are creating the class.
- Branch: It’s a Dropdown filled under chosen’s subsidiary. These fields are assigned to the Admin only.

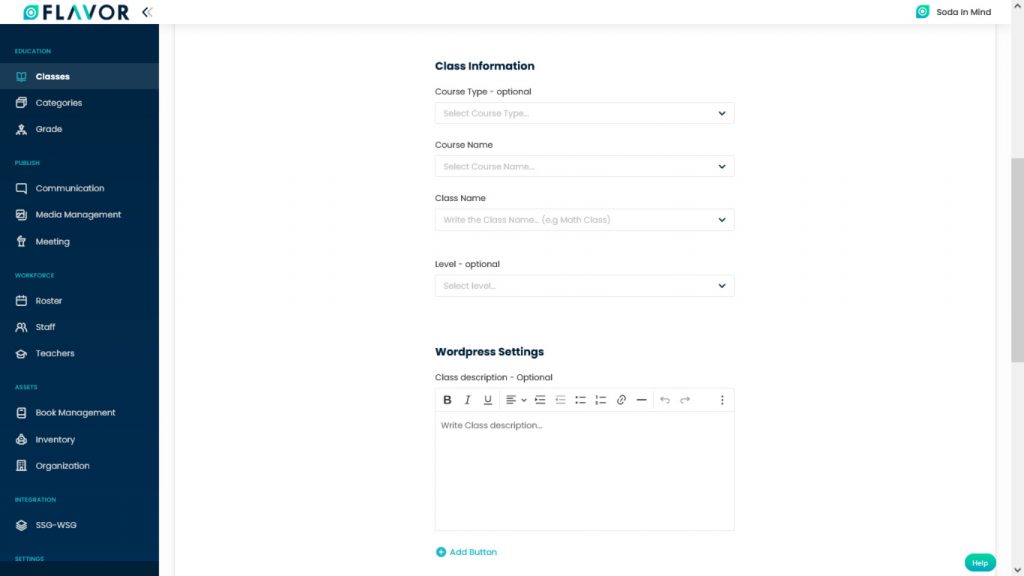
Class Information
- Class Information: Select Course Type, Course Name, Class Name & Level.
- Note: For Course Type, Course Name, Class Name & Level, if an admin types an unregistered value, the system will give a suggestion to add the value. After the user clicks add, then it will be stored in the database as its fields.
- Sync with TP Gateway: After clicking on the Sync with TP Gateway button, a popup will be open. Here, you can select the course list from the drop-down.
- Class Description: Here, you can give a description of the class.
- Add Button: At the bottom of the class description, you can see Add Button option. If you want to add a button under this section, then click on Add Button option. Fields with Button Name & Button Link will appear on your screen.
- If you want to add more buttons then click on + Add More Button. If you want to remove these button options click on the X Cross icon.
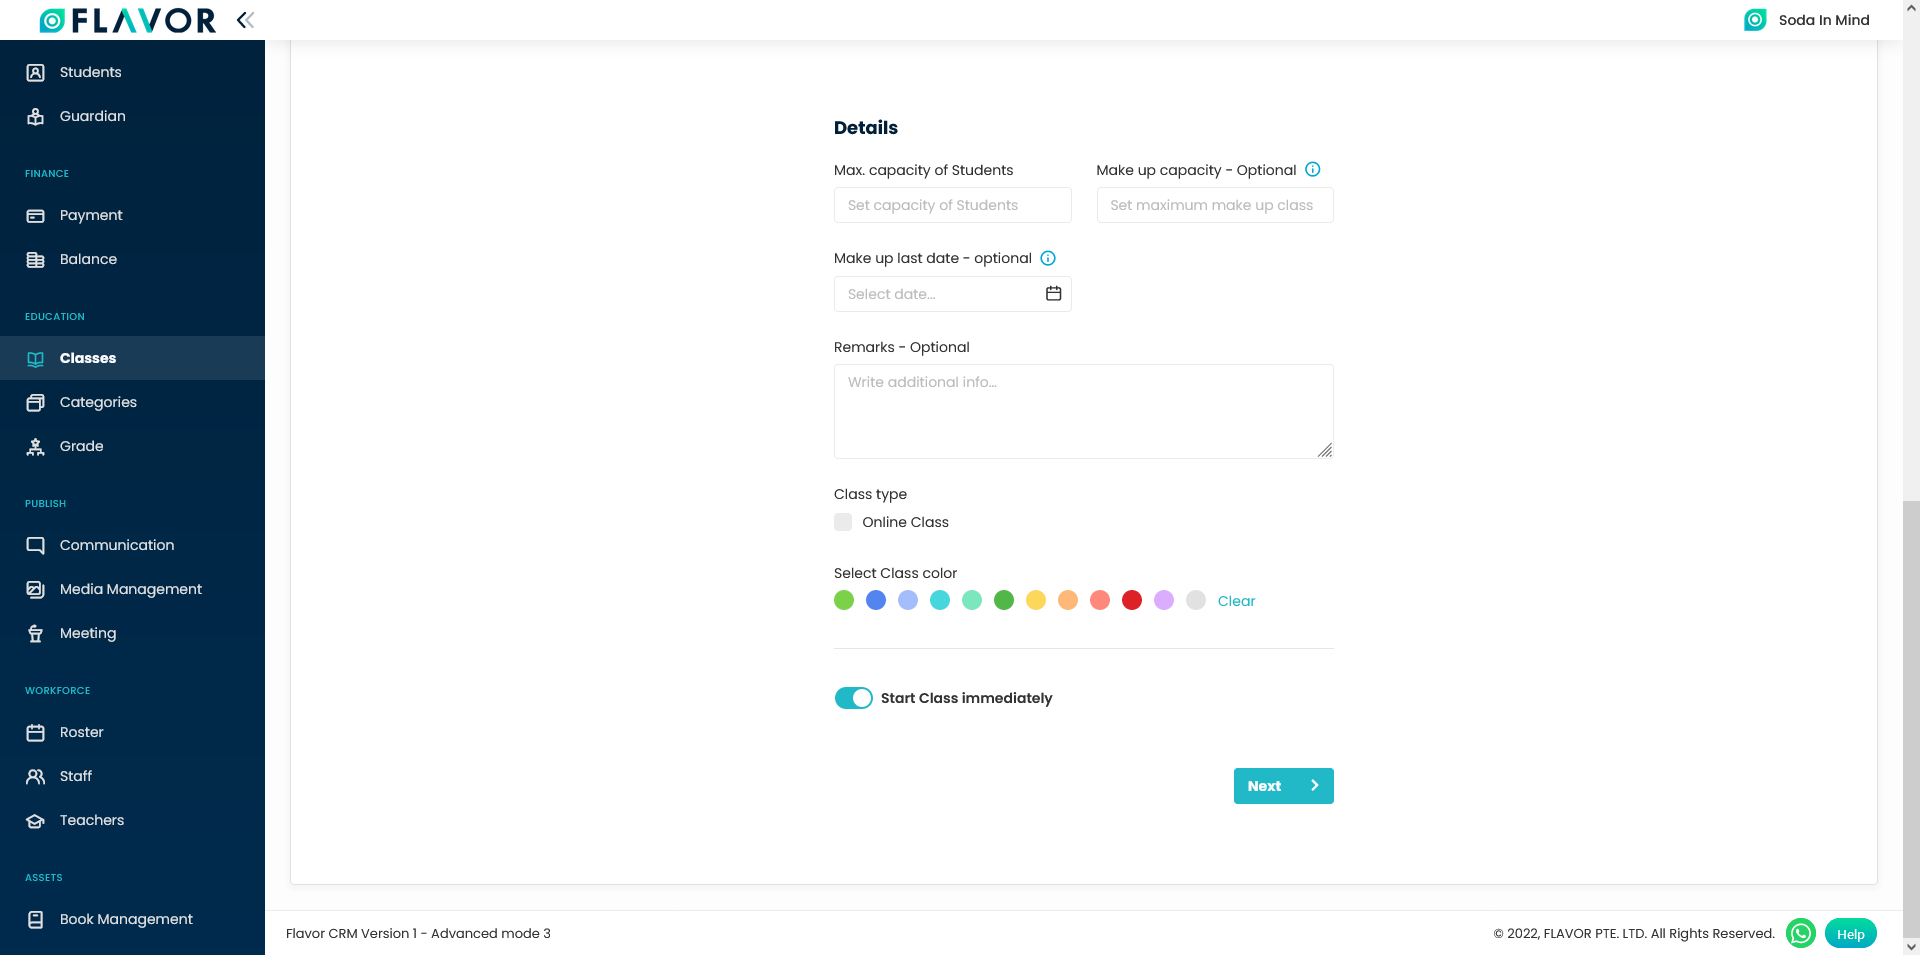
Details
- Navigate to the Details section.
- Max. Capacity of Students: Set the capacity of students.
- Makeup Capacity: This field is optional. If you fill this field, it will automatically create a makeup class. Set capacity of Makeup class.
- Make up last date: After the setting Make up last date, the session will not be visible beyond this date in the Add Make up class form.
- Remarks: Here, you can write additional information.
- Attach a Link: This field is used as additional information regarding links that can be embedded in the email body.
- Class Type: If the class you are going to create is an online class, then you have to enable the Online Class option by marking on the checkbox.
- Select Class Colour: Colour class palette, you can give any colour to any class.
- Start Class Immediately: Bu default, it is set on.
- Click on the Next button to go to the next tab.
Set Schedule
After clicking on the Next button you will be redirected to the Set Schedule Section of the form.
Room & Teacher
- Navigate to the Room & Teacher.
- Room: Select the Room from the drop-down.
- Teacher 1: Select the teacher from the dropdown who is going to take this class. It consists of a teacher list that has been registered.
- Teacher 2: Teacher dropdown, consists of a teacher list that has been registered, a teacher that has been assigned in Teacher 1 will not show in this field. Teacher 2 is an optional field where users can hide it in class settings.

Schedule
- Navigate to the Schedule. Here you can see the Schedule Type & Select Duration fields.
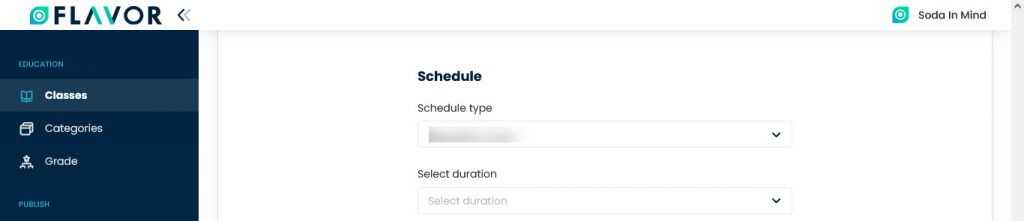
- Schedule Type: From the Schedule Type Dropdown, you can choose Repetitive Class and One Time Class options.
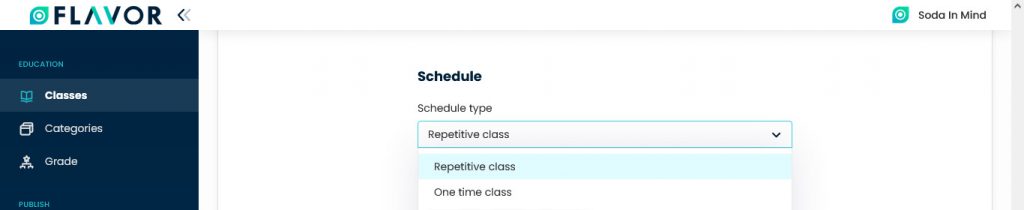
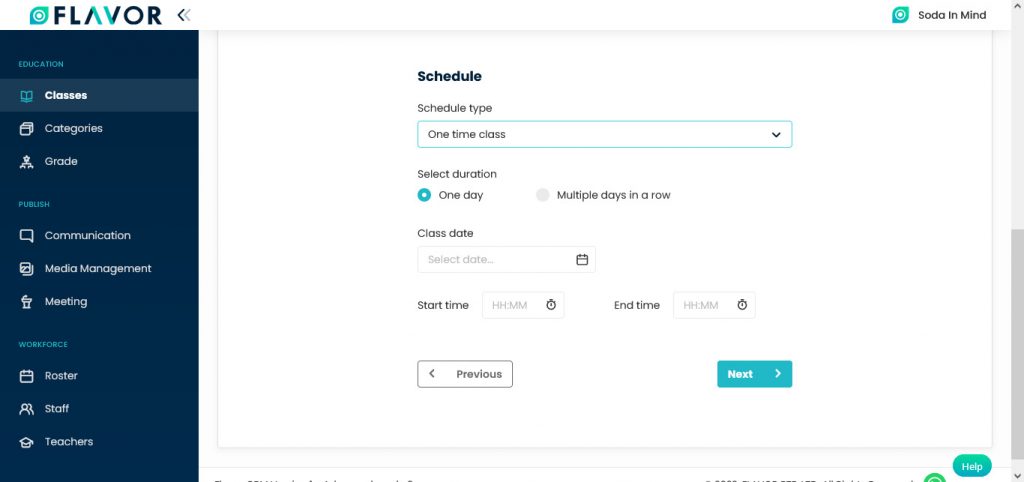
One Time Class
- Select One Time Class from the Schedule Type dropdown. This setting only can set one session or one schedule for a class.
One Day
- Select Duration: Navigate to the Select Duration section. Enable the One Day option by clicking on the radio button.
- Class Date: Select the date from the date picker to set when the class will be held on. Users can only choose one date.
- Enter the start time and end time for this class.
- Previous Button: Button to go back to the previous tab which is fill class info tab.
- Next Button: Click on the Next button to go to the next tab once all mandatory fields are filled.
Multiple Days in a Row
- Select Duration: Navigate to the Select Duration section. Enable the One Day option by clicking on the radio button.
- Date: Enter the start date and end date of the class.
- Note: The number of sessions will be following the number of dates that users choose from the start date to the end date.
- Enter the start time and end time of each session.

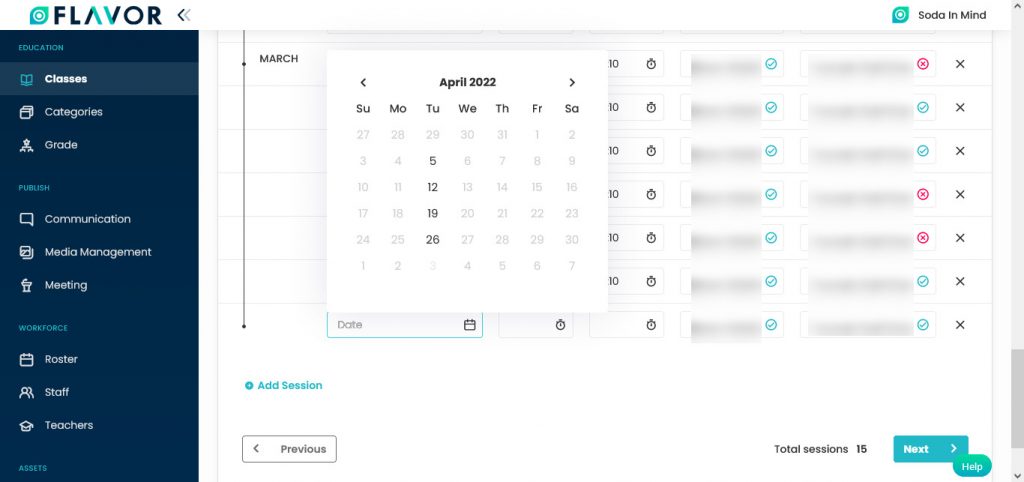
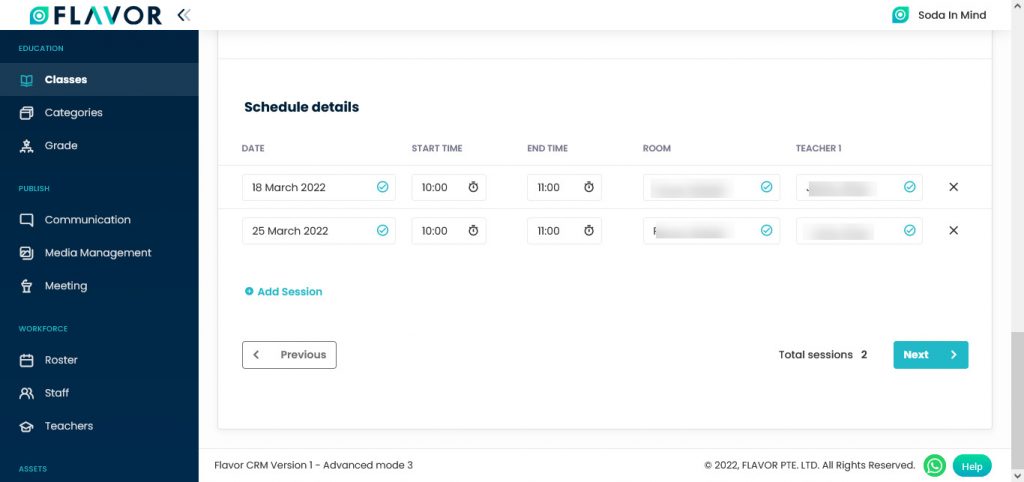
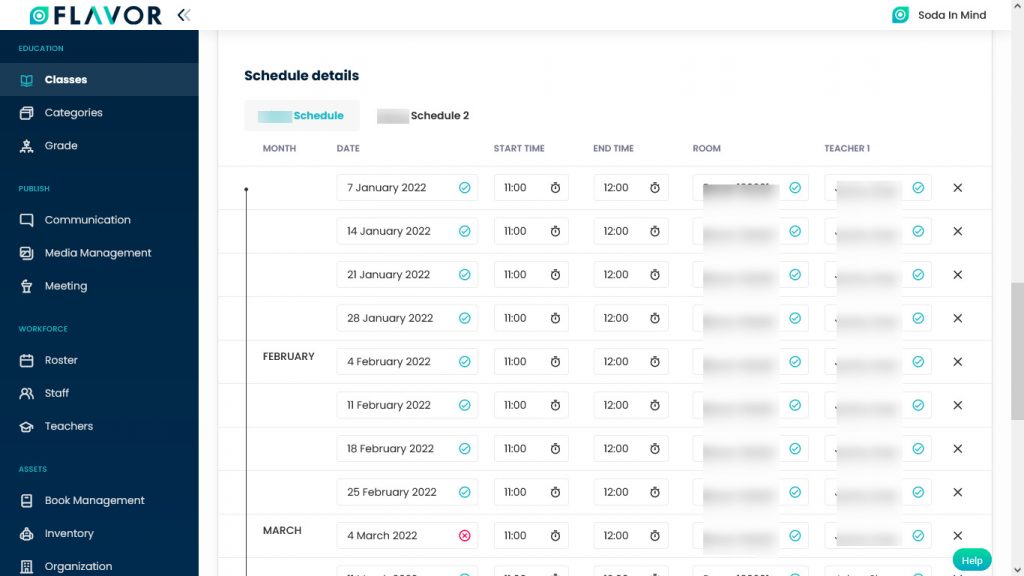
Schedule Details
- After filling in the details for Multiple Days in a Row Schedule Details will be generated based on the selected time and date.
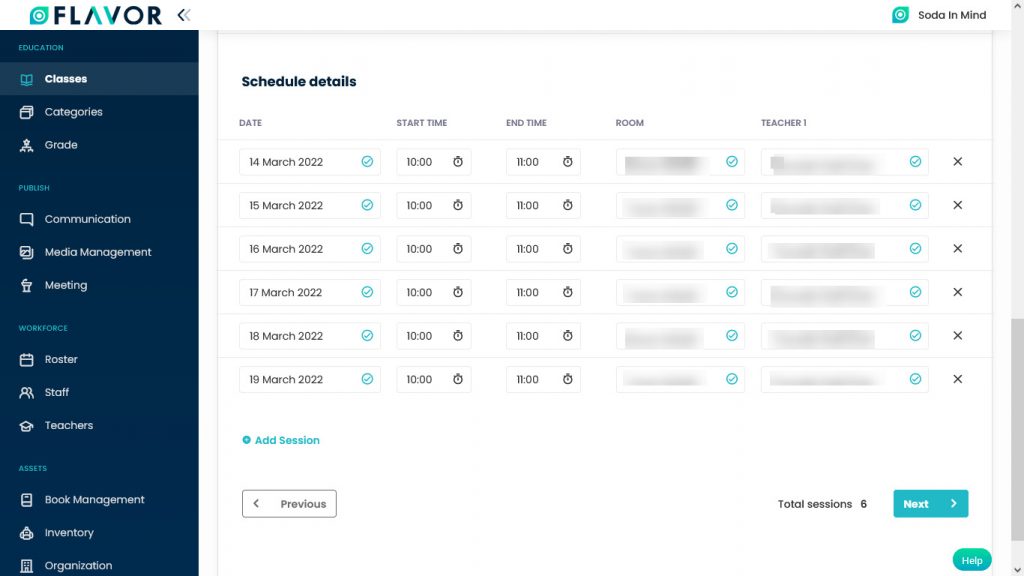
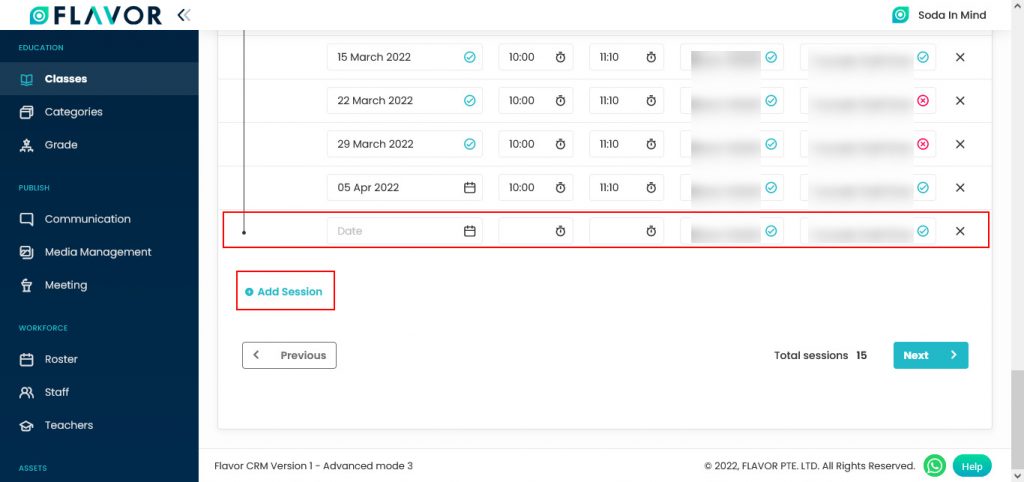
- You can add more sessions to the schedule by clicking the +Add Session button. After clicking on the button a row will appear. Here, you can see that all the fields are already filled, expected the date field. Enter the date for a new session.
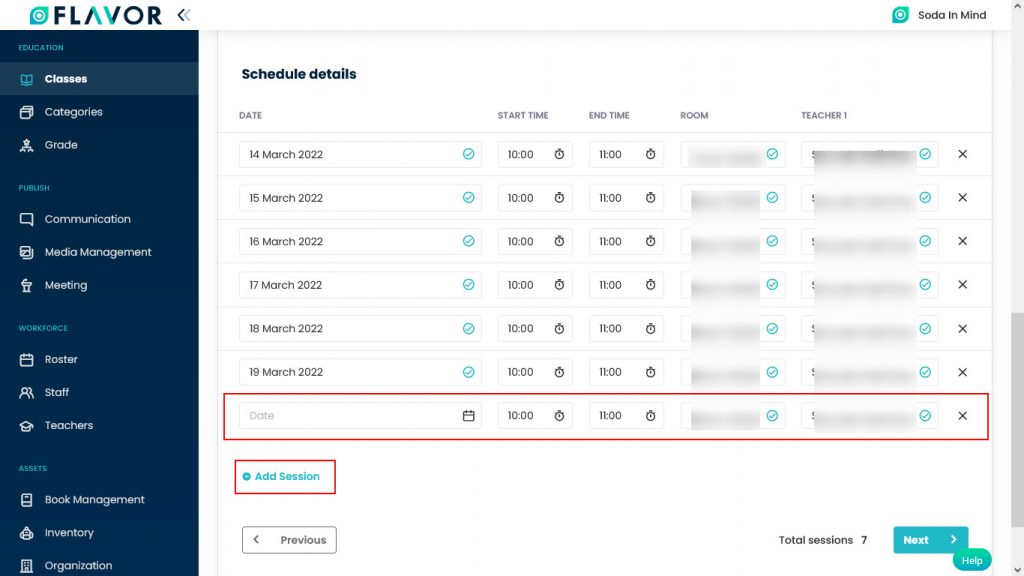
- You can remove the session just by clicking on the Cross (x) icon. By clicking on the ‘remove’ icon, you will see the confirmation popup to remove the session.
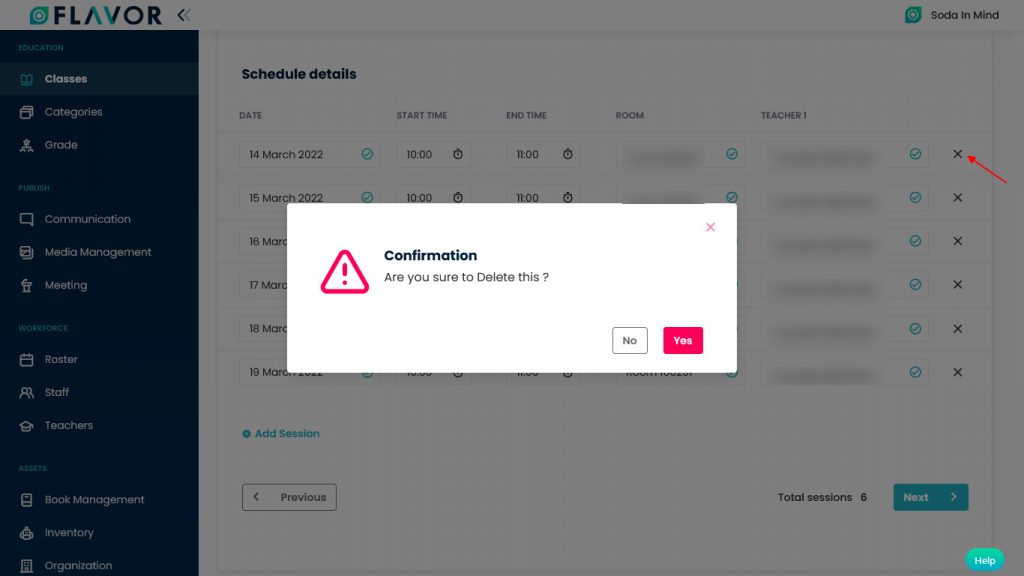
- Next Button: Click on the Next button to go to the next tab once all mandatory fields are filled.
- Previous Button: Click on the Previous button to go back to the previous tab.
- Before the Next button, you can see the number of Total sessions in this class.
Repetitive Class
Schedule Type Dropdown: Select the Repetitive Class type from the dropdown. Repetitive Class has 3 duration types.
- Monthly Smart Schedule
- Term Based
- Custom Period
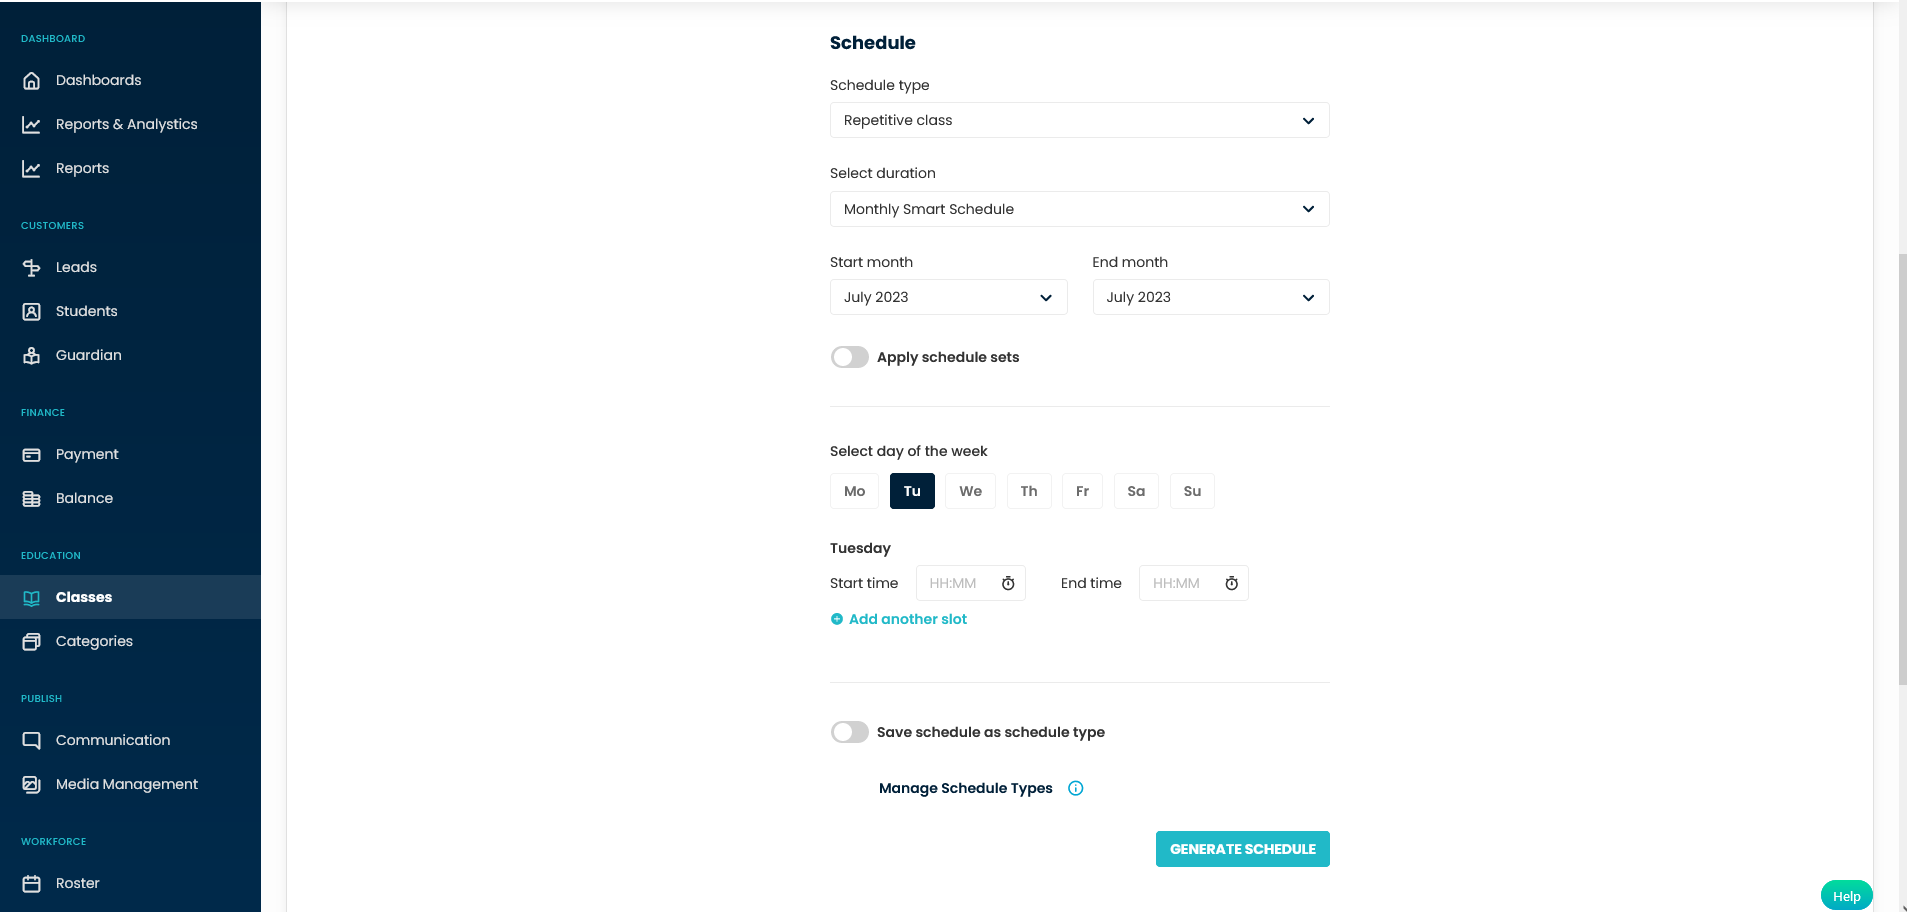
Monthly Smart Schedule
- Navigate to the Select Duration field, select Monthly Smart Schedule from the drop-down.
- Enter the Start Month & End Month as start and last schedule.
- Select the day of the week: Select the day of the week from here, on which day of the week you want to take your class.
- Enter the Start time & End time of the class.
- Click on Add another slot button link if multiple slots are required.
- Click on the Generate Schedule button.
- After clicking on the Generate Schedule button, schedule details will be generated.
Schedule Details
- Navigate to the Schedule Details. Here, you can see the details of all the classes which will be conducted between the selected date and time and from the same room and by the same teacher.
- These classes will be held on the day of the week that you have chosen.
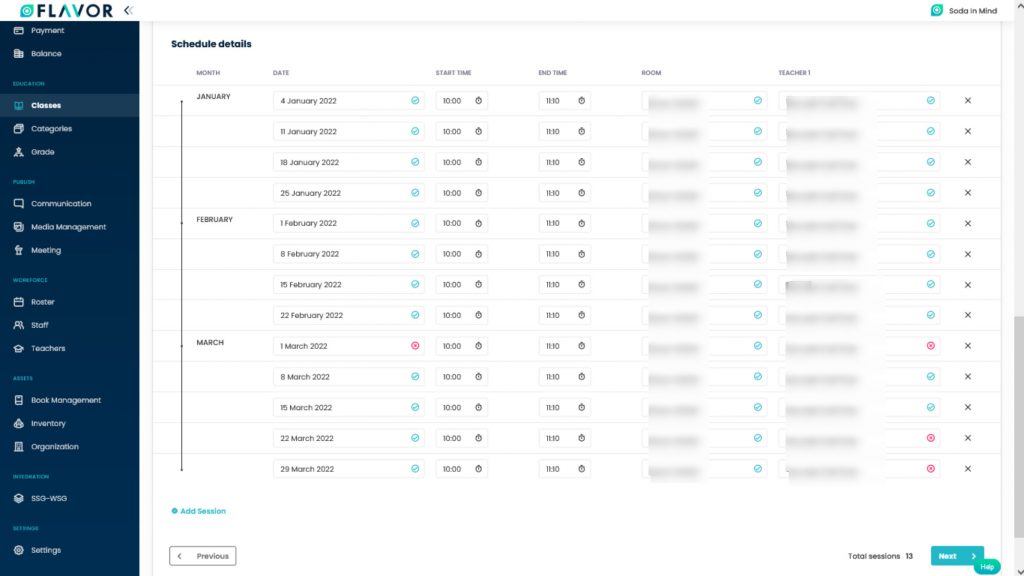
- You can add more sessions to the schedule by clicking the +Add Session button. After clicking on the button a row will appear. Here, you can see that all the fields are already filled, expected the date & time field. Enter the date for a new session.
- Note: In the date field, you will see only those dates enabled which will come on Tuesday because you selected Tuesday while creating a class.
- You can remove the session just by clicking on the Cross (x) icon. By clicking on the ‘remove’ icon, you will see the confirmation popup to remove the session.
- Next Button: Click on the Next button to go to the next tab once all mandatory fields are filled.
- Previous Button: Click on the Previous button to go back to the previous tab.
- Before the Next button, you can see the number of Total sessions in this class.
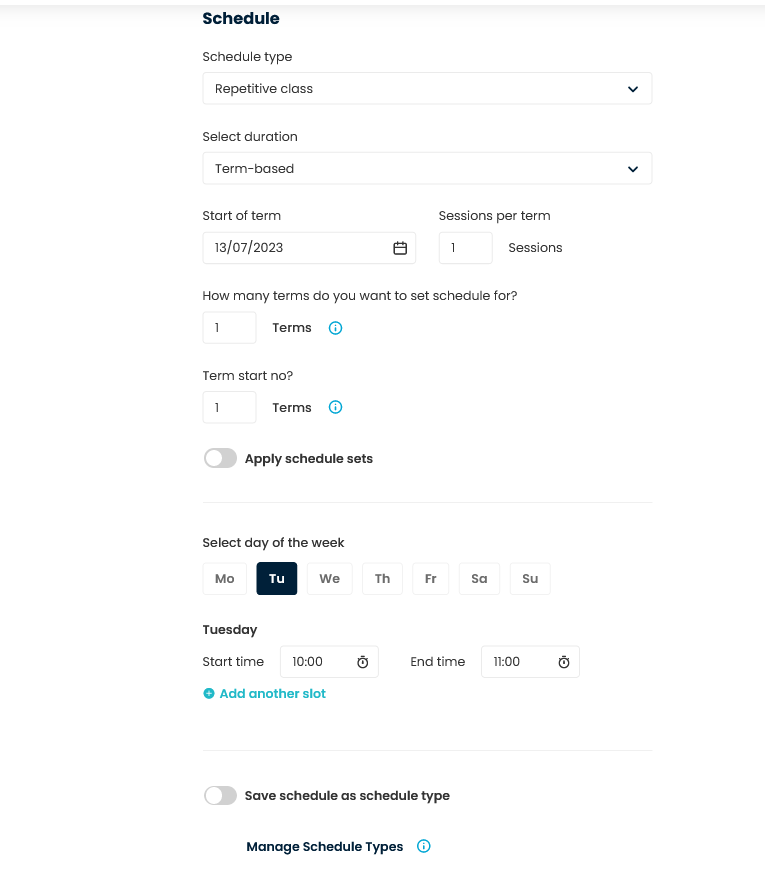
Term-based Schedule
- Navigate to the Select Duration field, select Term-based Schedule from the drop-down.
- Start of Term: Set the first date of this term.
- Session Per Term: Enter the total sessions per term.
- How many terms do you want to set schedule for: Enter total terms.
- Select the day of the week: Select the day of the week from here, on which day of the week you want to take your class.
- Enter the Start time and End time to set the duration of its class.
- Click on Add another slot button link if multiple slots are required.
- Click on the Generate Schedule button, schedule details will be generated based on the schedule set.
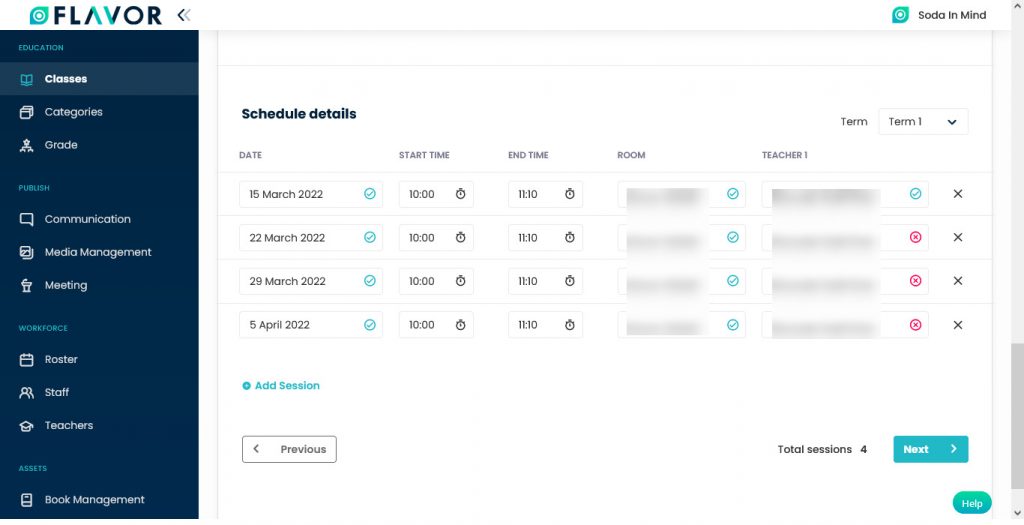
Schedule Details
- Navigate to the Schedule Details. Here, you can see the details of all the sessions which will be conducted between the selected date and time and from the same room and by the same teacher.
- These classes will be held on the day of the week that you have chosen.
- You can remove the session just by clicking on the Cross (x) icon. By clicking on the ‘remove’ icon, you will see the confirmation popup to remove the session.
- You can check the classes by selecting the term. Upper right corner of the Schedule Details you can see the Term Dropdown, from here you can check the classes by the term.
- If there is a holiday, there is a cross sign on the date field.
- If a teacher is occupied, there you can see a cross sign on Teacher’s name, you can change the date of the class.
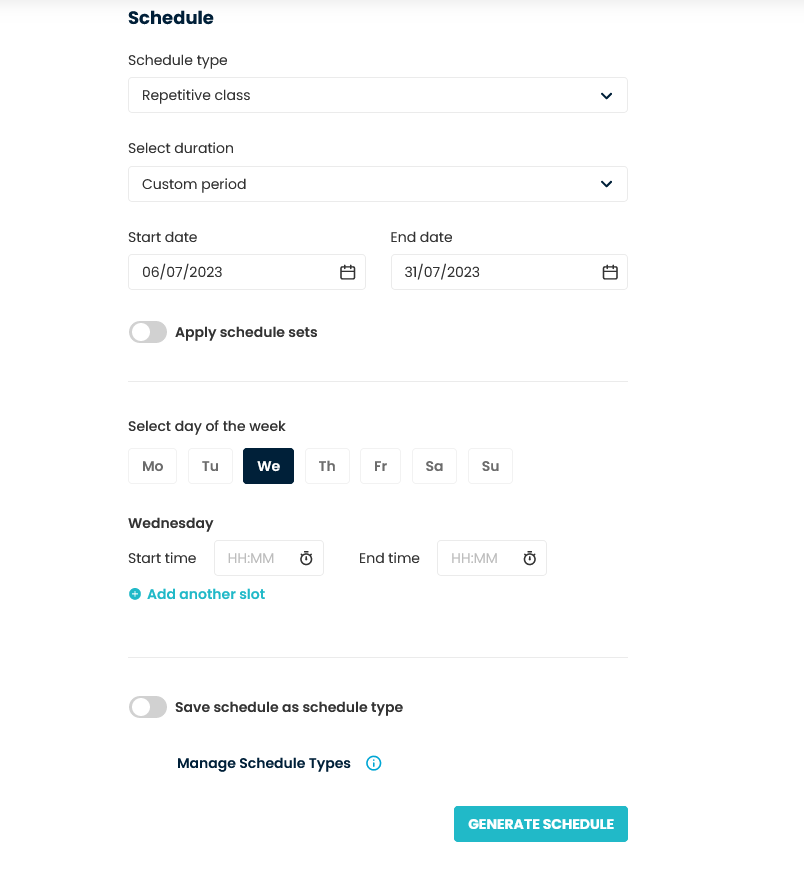
Custom Period
- Navigate to the Select Duration field, select Custom Period Schedule from the drop-down.
- Choose the Start Date & End Date.
- Select the day of the week: Select the day of the week from here, on which day of the week you want to take your class.
- Enter the Start time & End time of the class.
- Click on Add another slot button link if multiple slots are required.
- Click on the Generate Schedule button, schedule details will be generated based on the schedule set.
Schedule Details
- Navigate to the Schedule Details. Here, you can see the details of a class which will be conducted between the selected date and time and from the same room and by the same teacher.
- These classes will be held on the day of the week that you have chosen.
- You can add more sessions to the schedule by clicking the +Add Session button. After clicking on the button a row will appear. Here, you can see that all the fields are already filled, expected the date & time fields. Enter the date and time for a new session.
- Remember: In the date field, you will see only those dates enabled which will come on Tuesday because you selected Tuesday while creating a class.
- You can remove the session just by clicking on the Cross (x) icon. By clicking on the ‘remove’ icon, you will see the confirmation popup to remove the session.
Class – Set Schedule – Repetitive Class – Apply Schedule Sets
- Apply Schedule Sets: Enable this section by switching it. A new row Schedule Set will be open.

- Use of Schedule Set: It is used as a grouping up the class. For Example: If you have 2 teachers and you want to group them by Teacher 1 & Teacher 2. It will not affect the class list. If they have 100 Sessions and they want to check each class on each day. So they can use this grouping.
- Add Schedule Set: To create schedule sets click on the + Add Schedule Set button. After clicking a popup named Add Schedule Set will be open.
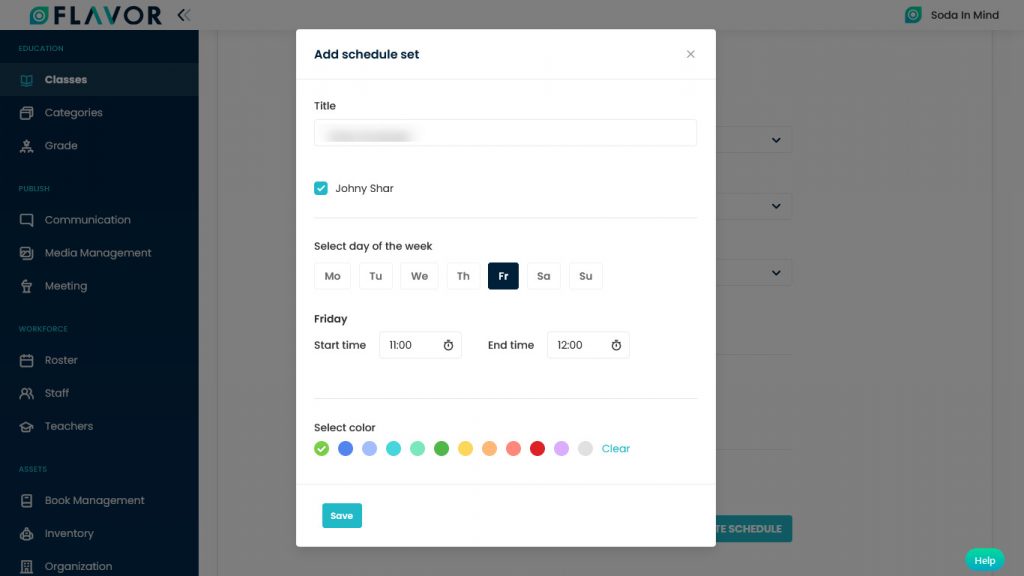
- Title: Enter the title of the Schedule.
- The teacher’s name is already checked.
- Select day of the week: Select the day on which you want to take a class.
- Enter the Start time & End time of the class.
- Select Color: Select the colour for class.
- Click on the Save button.
To Add More Schedule
- If you want to add more Schedule Set then click on the + Add Schedule Set button.
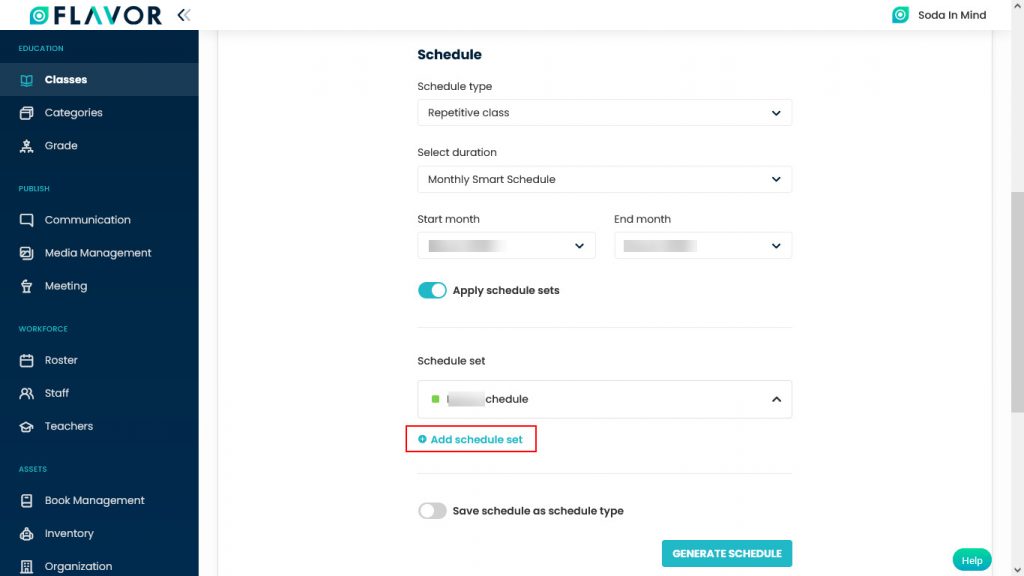
- After creating the schedule set, enable the Save Schedule As Schedule Type by switching it.
- Click on the Generate Schedule button, schedule details will be generated based on the schedule set.
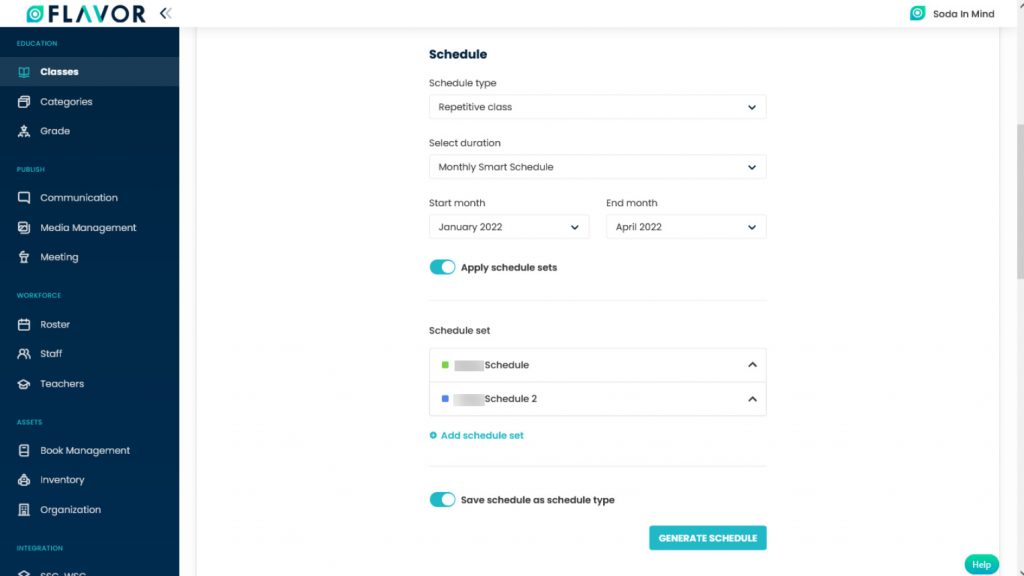
Note: Here, you can see 2 Schedule Sets have been created.
Schedule Details
In Schedule Details, you can see two schedules tabs have been created.
Next: Click on the Next button. If there is clashes or any public holiday during the session, a popup named ” Ignore Scheduled Clashes” will be open.
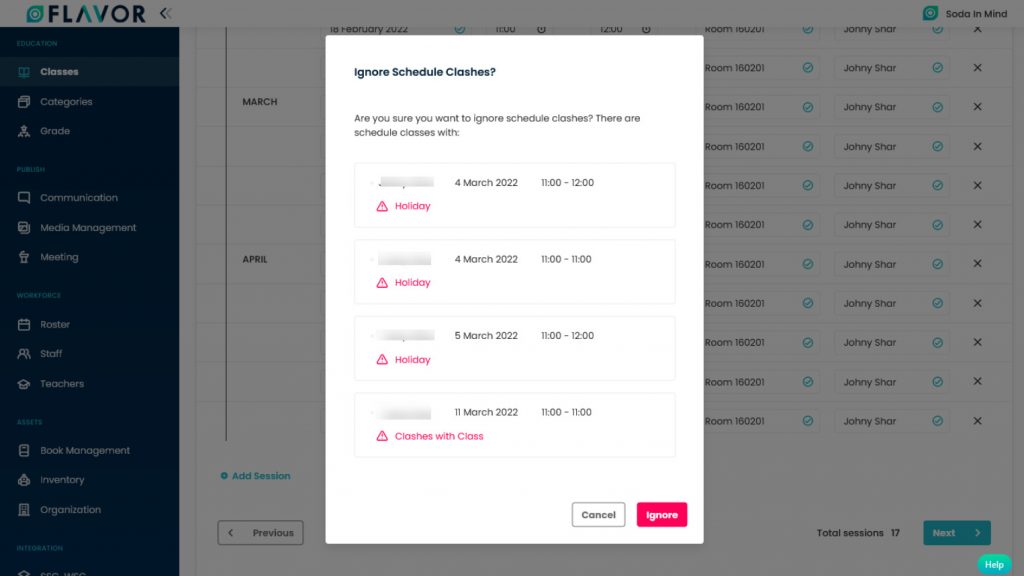
If you want to change the session date or time, then click on the Cancel Button. If you are ok with clashes then click on the Ignore button.
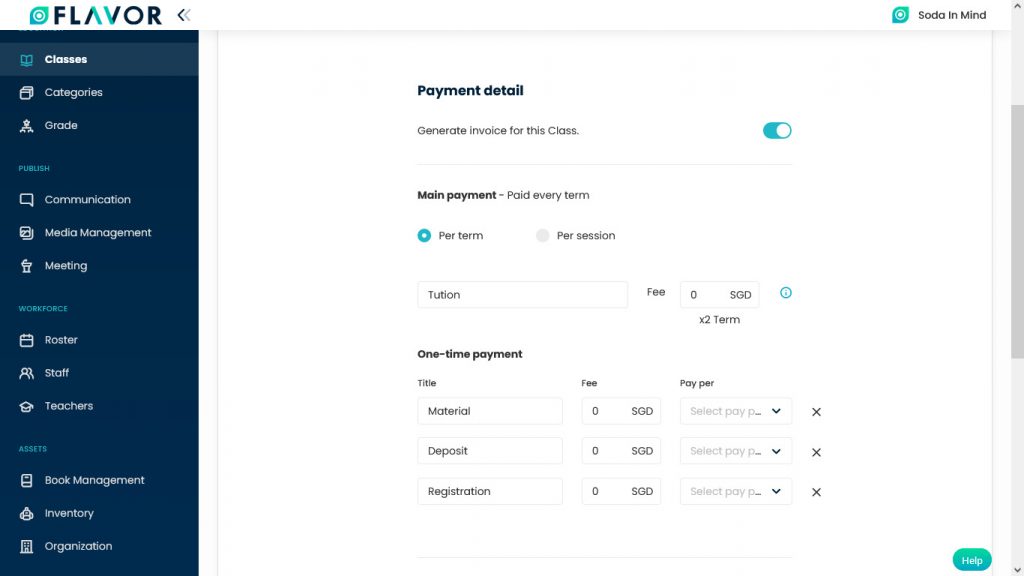
Fill Payment Details
- Generate Invoice for this class: By default, it is set on.
Main Payment
- Per Month: It is a setting for payment terms. Clients only pay tuition fees once.
- Per session: It is a setting for payment terms. Clients only pay tuition fees per session.
- Tuition: Users can edit the name but by default, it is named tuition fee. Enter the tuition fee.
- Fee: Total tuition fee, this field only allows numbers and points for decimal value. As default, it will fill 0. Currency can be set in class settings.
One Time Payment
- One time payment by default shows three fields, Material Fee, Deposit, Registration Fee.
- Fee: Total each fee, this field only allows numbers and points for decimal values. As default, it will fill 0. Currency can be set in class settings.
- Pay Per: Payment period dropdown which consists of First Month Only & Each Month.
- Delete: Delete button payment, if one field delete there will be showing a button to add another one-time payment
- Total payment: Total payment from the whole payment fee that the user has put.
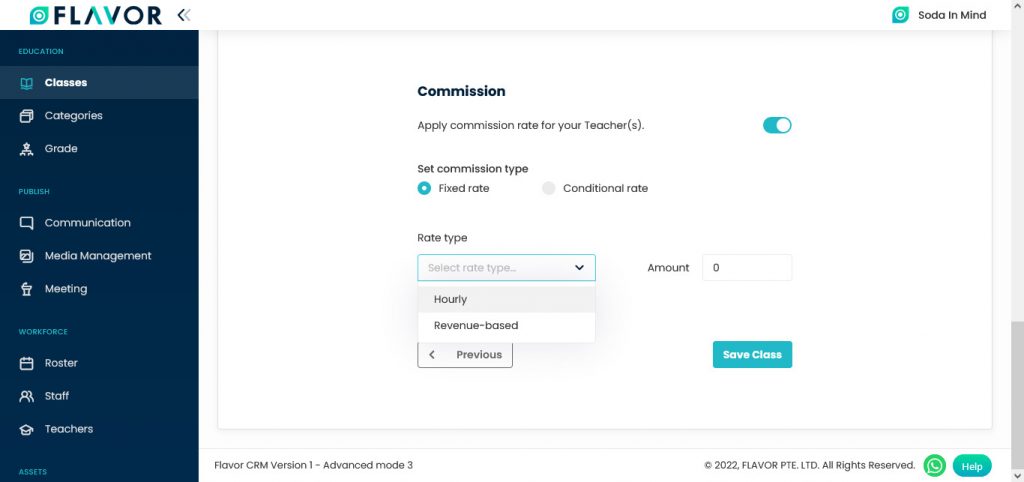
Commission
- Apply commission rate for your Teacher(s).: Enable this option by switching it. By default, it is off.

- Set Commission Type: Navigate to the Set Commission Type.
- Fixed-Rate: Fixed-rate will be chosen by default.
- Rate Type Drop Down: Rate type drop-down has two options: Hourly & Revenue.
- Amount: This field only allows numbers and points for decimal values. By default, it will fill 0. Currency can be set in class settings.
- Click on the Save Class button to create a class.
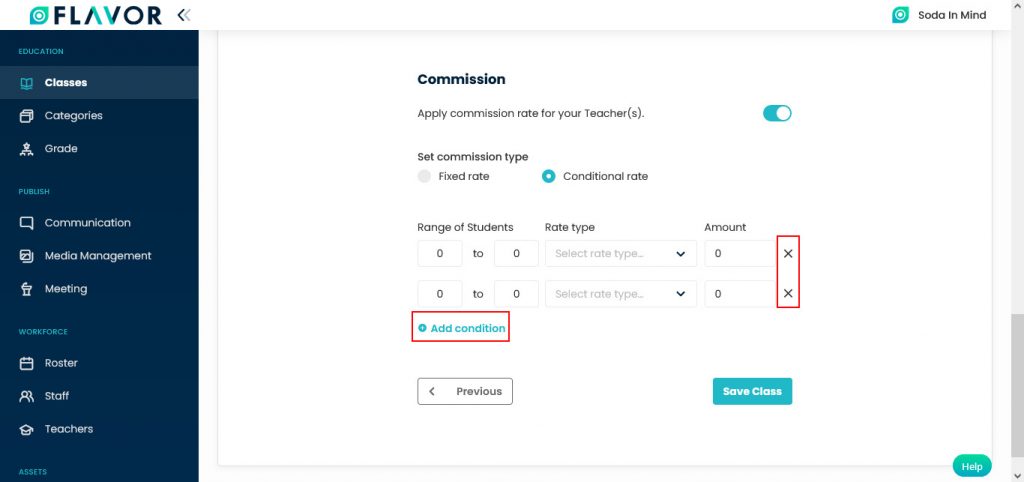
Conditional Rate
- Range of Students: Navigate to the Range of Students, here you can set the limit of the class. The Start field & End field is set as 0. The end field’s value needs to be greater than the start rate.
- Rate Type Dropdown: It consists of Revenue-based & hourly dropdown.
- Amount: This field only allows numbers and points for decimal values. By default, it will fill 0.
- If the Rate Type is Hourly, then it will be based on Currency.
- If the Rate Type is Revenue-Based, then it will be a Percentage of the revenue.
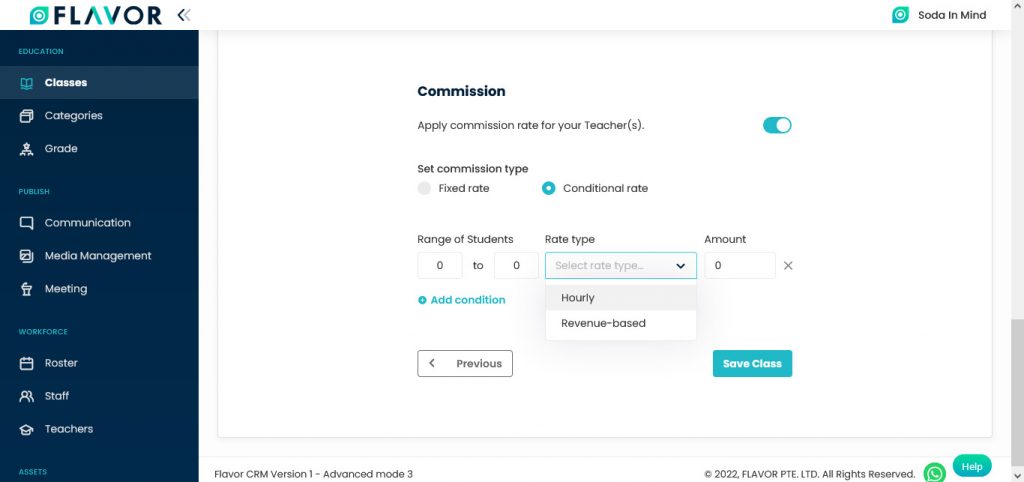
- Add condition: To add more conditions click on the + Add Condition button. After clicking a row will be added.
- Delete: To delete any condition click on the Cross X icon. But it will only allow deleting if there is more than one condition.
- Click on the Save Class button to create a class.
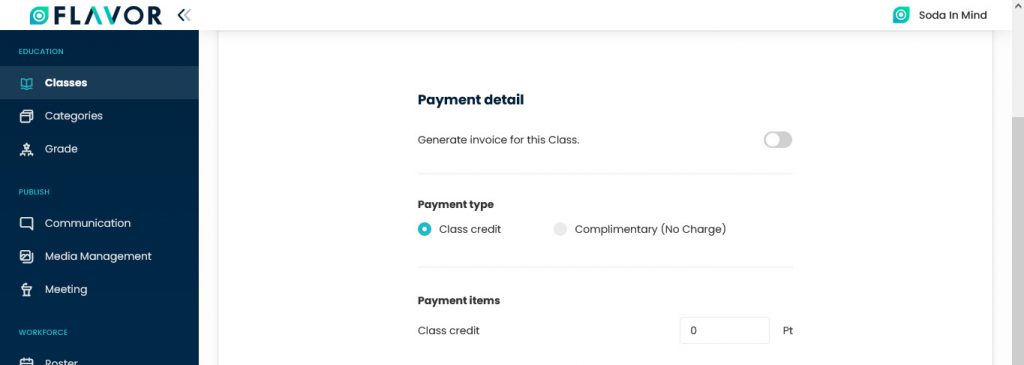
Not Generated Invoice
- Generate Invoice for this Class: You have to disable this option by switching it.
- Class Credit: Default value when slide generate invoice is off. Payment will be deducted from class credit. If a user chooses this type of payment, then the payment items field will show up.
- Complimentary (No Charge): There will be no payment for this type, if the user clicked it then the payment item will not appear.
- Class Credit: Total class credit which will be deducted.
- Click on the Save Class button.
Class Records
Column Sorting
All rooms will be shown in Tabular Format. You can sort the data by clicking on Column Sorting Arrows in Table’s Header.
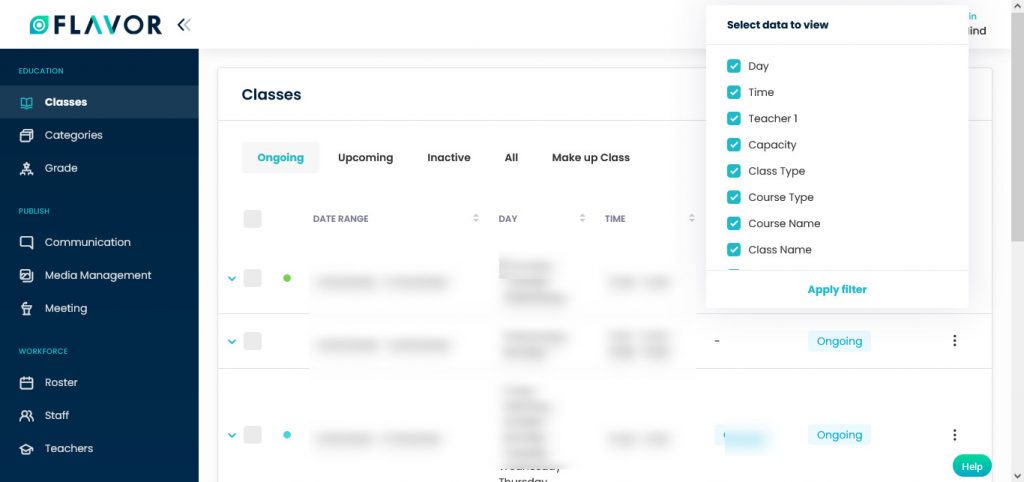
Column Visibility
You can sort columns by clicking on the Ellipsis Icon, you will get the pop-up form named Select Data to View. Mark the columns you want to see and unmark the ones you don’t want to see in the table. After this procedure click on the Apply Filter button.
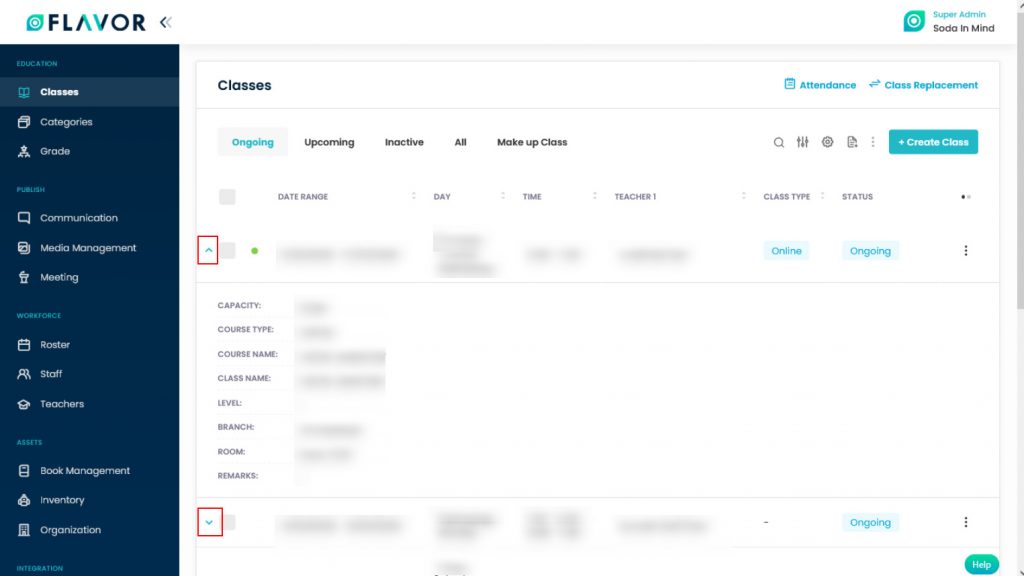
Expand Records
At the starting of all records, there is an Expand Button (Down Arrow), after clicking on this button a record will be expanded. From here will get the entire information of any class. You can collapse the record by clicking on the same button.
Action Buttons
Click on Action Button (Vertical Ellipsis), a popup box will appear on your screen with Stop Class, Duplicate Class, Registration Link & Delete Class options.
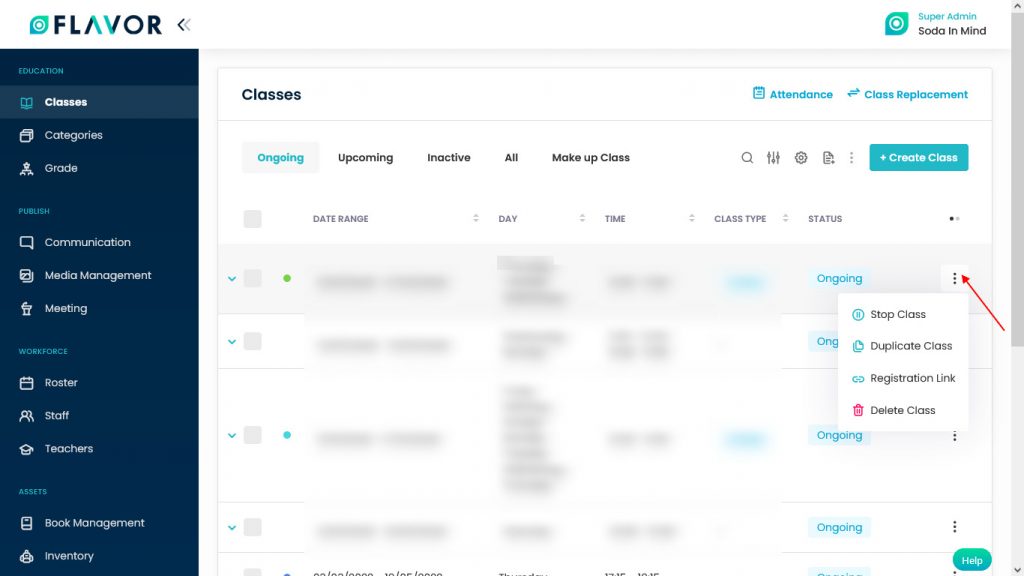
Stop Class
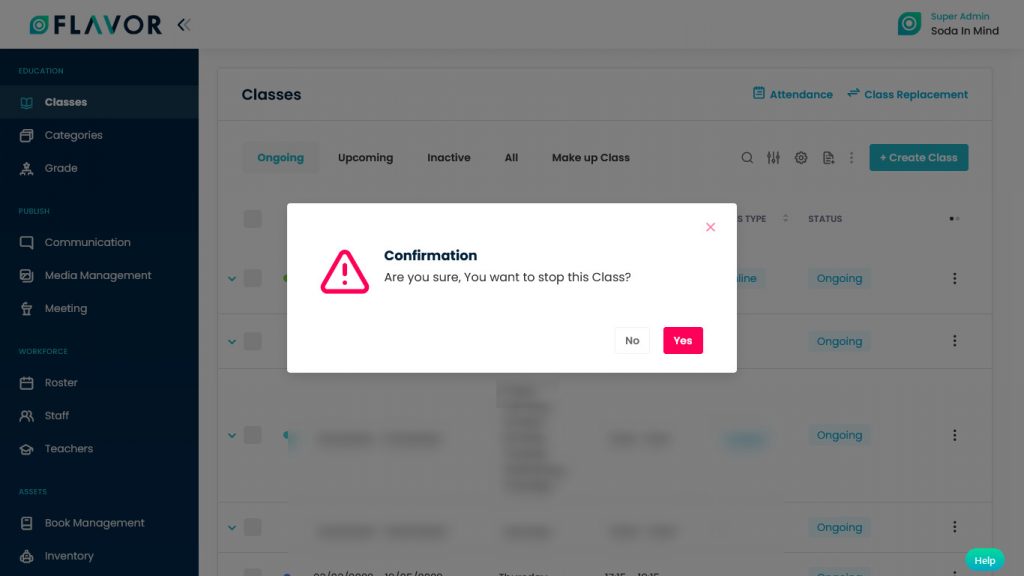
- If you want to stop any class, click on the action button, situated at the end of the row. A popup will appear on your screen, select the Stop Class button from the popup.
- A confirmation popup will appear on your screen, if you want to stop this class then click on the Yes button.
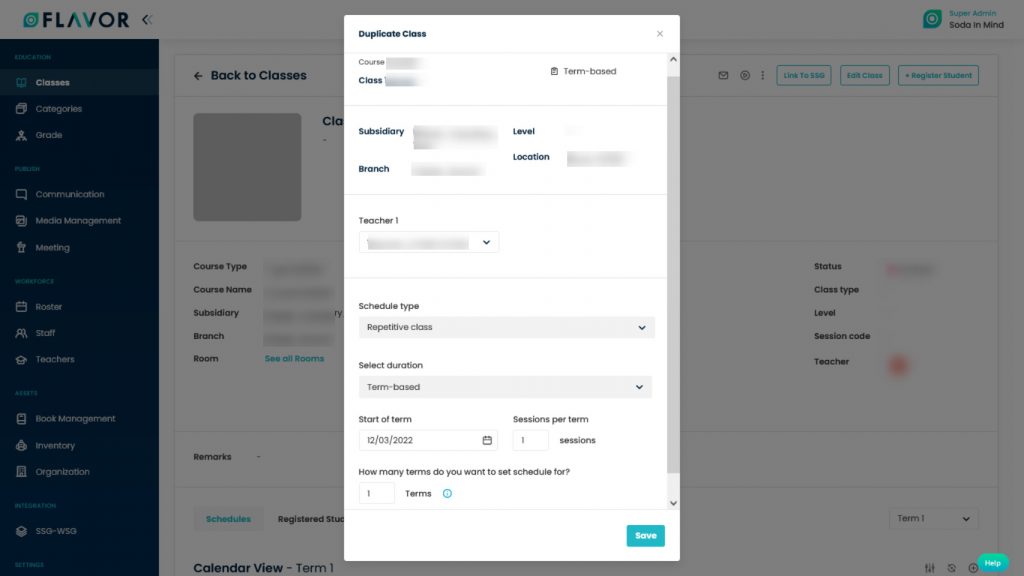
Duplicate Class
- If you want to create a duplicate class, click on the action button. A popup will appear on your screen, select the Duplicate Class option from the popup.
- A popup named Duplicate Class will appear on your screen.
- You can select Teacher, Date, Session and terms.
- Click on the Save button.

Registration Link
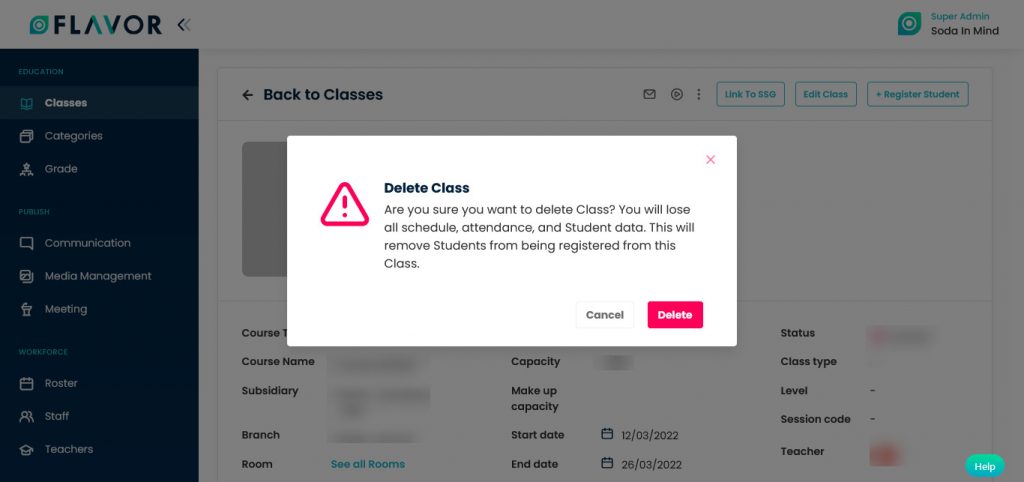
Delete Class
- Click on the Delete Class button.
- A confirmation box will appear on your screen. Click on the Delete button to delete the class.

Note: You will lose all schedule, attendance, and Students data. This will remove Students from being registered from these Classes.
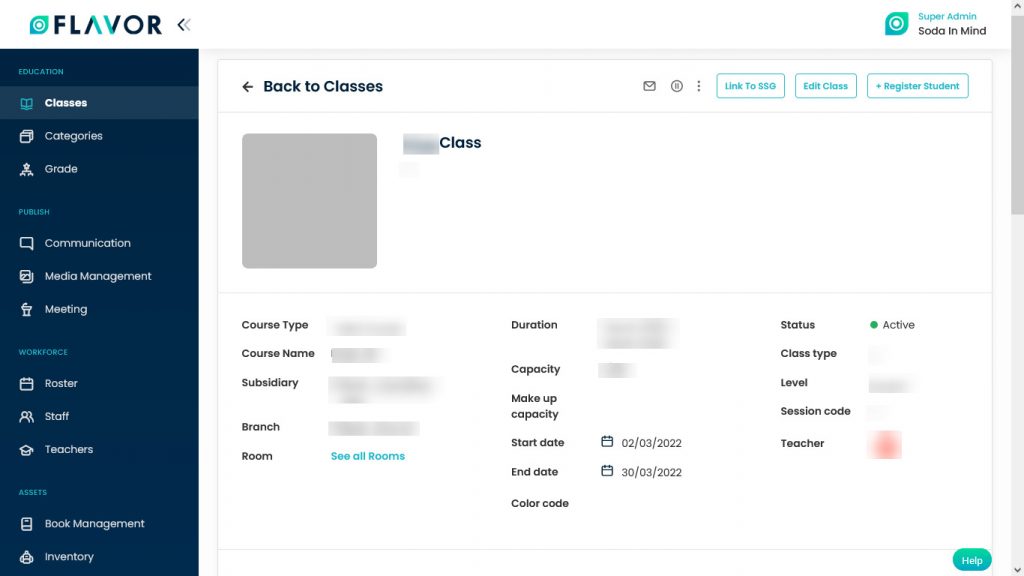
Class Details
Class Profile
Click on any class to check the details, you will be redirected to the Class Details page. Here, you will get the details of the class, students, attendance, payments & schedules, etc.
In the top right corner of the Class Details page, you can see the Email icon & Pause Session icon, Action Button, Link to SSG, Edit Class & Register Student buttons.
Email Icon
By clicking on this email icon, you will send the broadcast message.
- Navigate to the Email Icon. Click on that.
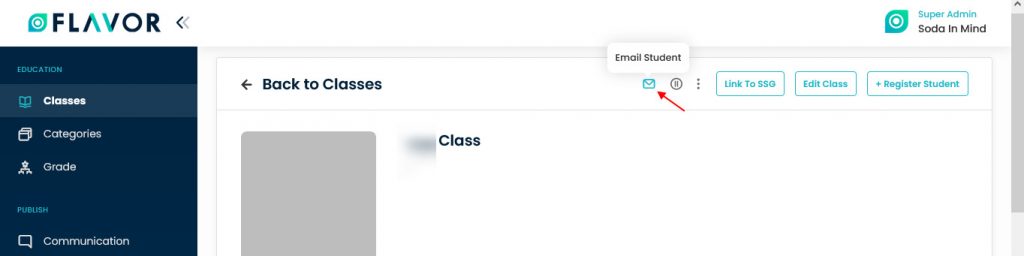
- After clicking on Email Icon, a popup named “Send a Message” will be open.

- Type: Here, you can choose which type of message you want to send to all recipients, it could be Email, SMS or Notifications. You can select your desired type of message by marking it on the check box.
- Recipient: Who should be the recipient of the email, SMS or notification, should be the student getting this email, or parents should also get this email or teachers of these students should get the emails. It depends on you to whom you want to send the email.
- Add Student: After clicking on the Add Student field, a modal named “All Students” will be open. Here, you can see All, Enrolled & Trial tabs.
- Select students from any tab. By marking the check box.
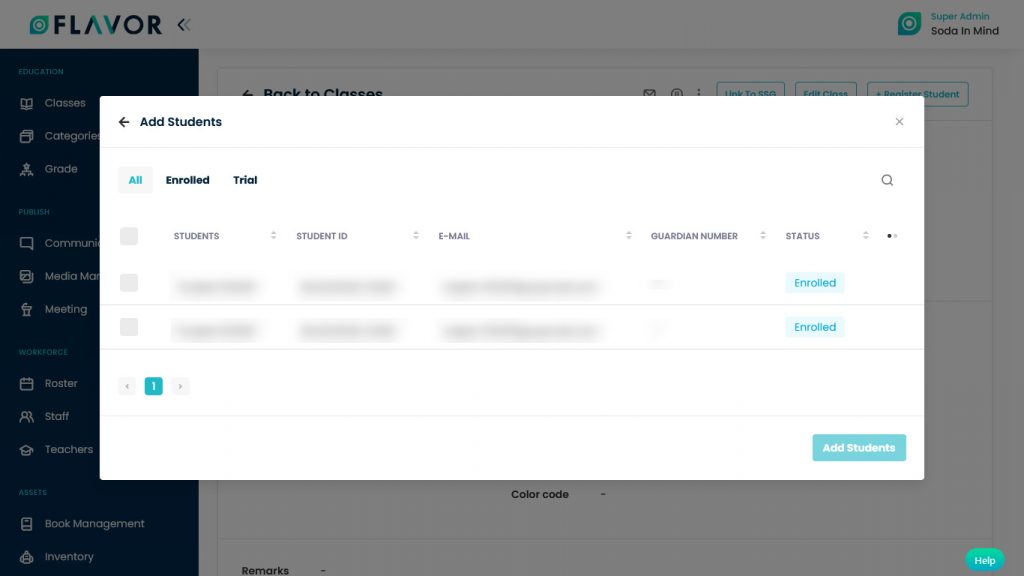
- Click on the Add Students button.
- Add Student filed will work as a To field. All selected students will be seen in this field.
- Title: Enter the subject of the Mail in the Title field.
- Message: Write a message in the message box.
- Attachment: Attach some relevant attachments.
- Click on the Send button.
Pause Session Icon
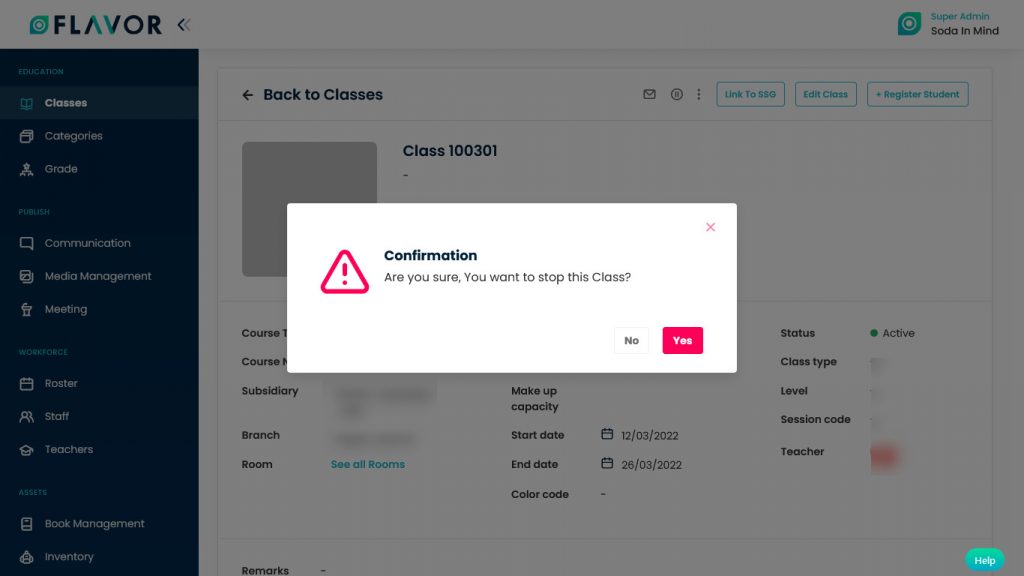
Navigate to the Pause Icon. By clicking on the Pause icon you can stop the entire session.
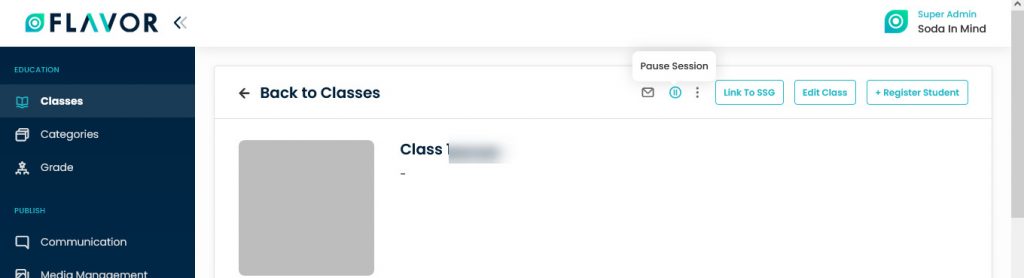
- Click on the pause icon.
- A confirmation popup will appear on your screen.
- If you want to stop this class then click on the Yes button.
- The session will be stopped and you can see the pause session icon will be changed into the Play Session icon.
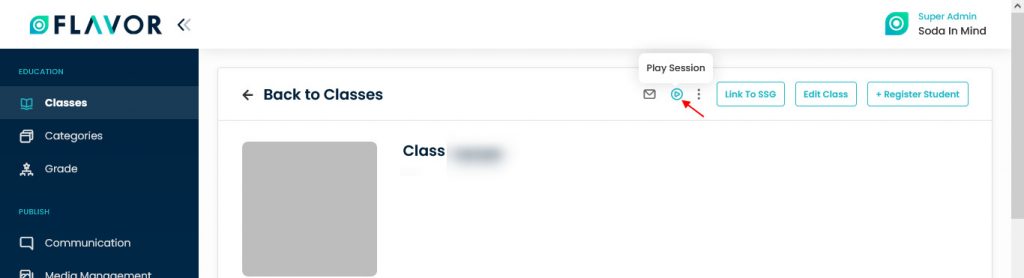
- To start this session again click on the Play icon.
- A confirmation popup will appear on your screen.
- If you want to start this class then click on the Yes button.
Action Button
Navigate to the Action Button. After clicking on the button a small popup will appear on the screen with Duplicate Class & Delete Class options.

Duplicate Class
- After clicking on the Duplicate Class option, a popup form named “Duplicate Class” will be open.
- You are going to create a Duplicate Class so there is no need to change the details.
- Click on the Save button to create the same class.
Delete Class
- If you want to delete the class, click on the Delete Class option.
- A confirmation popup will be open.
- Click on the Delete button to delete the class.
- Note: You will lose all schedule, attendance, and student data. This will remove Students from being registered from this Class.
Link to SSG
- Navigate to the Link to SSG, click on the button. You will be redirected to the Add Course Run page.
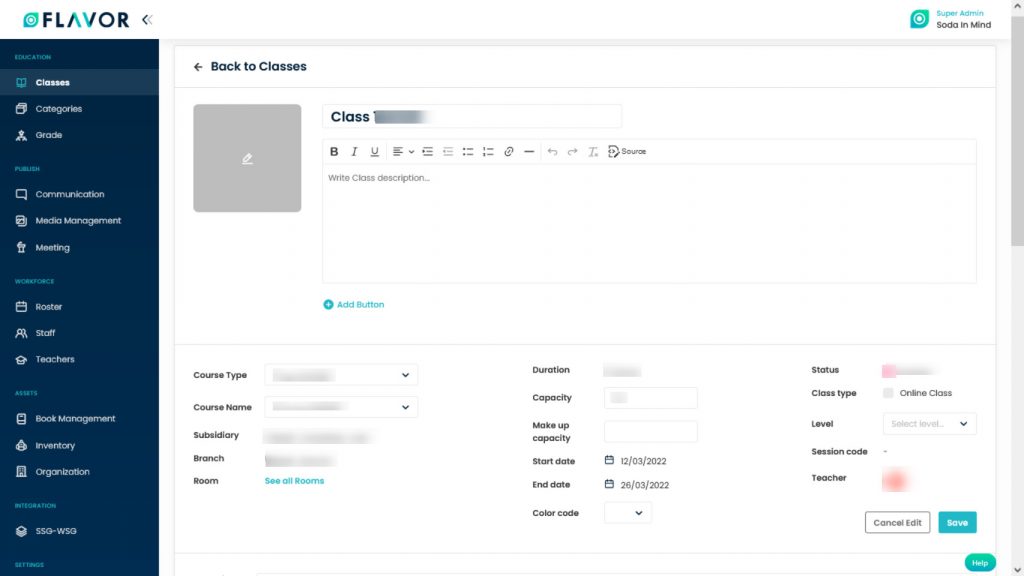
Edit Class
- Navigate to the Edit Class button. Click on that button. You will be redirected to the Edit Class Details page.
- From here, you can change the details of the class.
- After the changes click on the Save button.
Register Students
- Navigate to the + Register Students button.
- A modal named Add Students will be open.
- Here, you can see three tabs. All, Enrolled & Trial tabs. Same as Students List you can also see here, search, filter, column sorting & column visibility.
- Select students from any tab & then click on the Register Students button.

- After clicking, a new popup named Register Students will be open.
- Here, you can see the Name of the Class, Teacher Name. The number of students in the heading and at the right corner of the heading you can see currency dropdown. You can choose In which currency do you want to make payment.
- At the end of each row, you can see Delete Icon. To delete any student or term click on the Delete icon.
- A confirmation popup appears will on your screen, click on the Delete button.
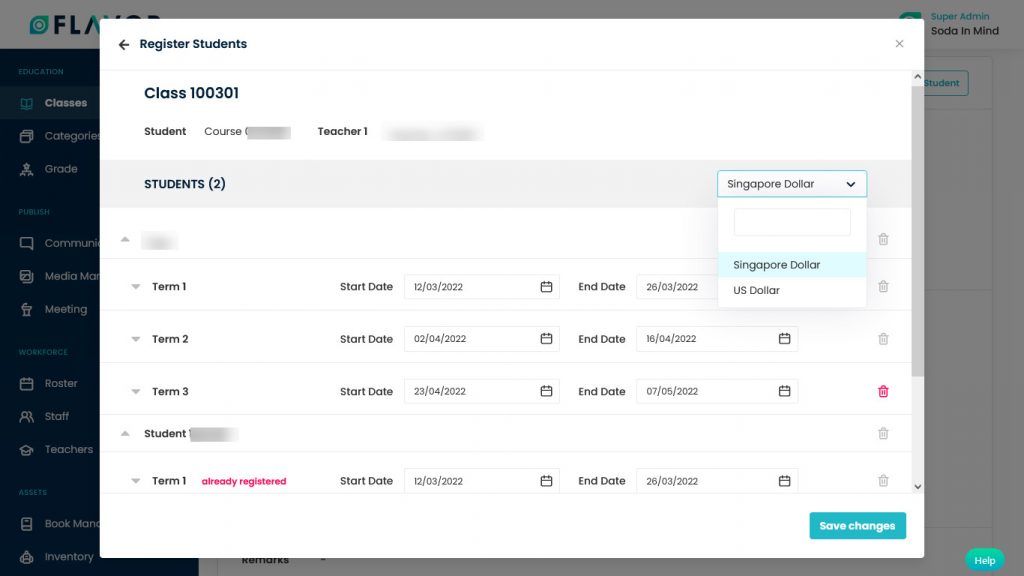
- At the starting of each student row, you can see a small down arrow button, click on that.
- A payment section will be open after clicking.
- From here, you can change or check the start and end date of the course. Check the payment details, and billing details.
- Click on the Save Change button to save the details.
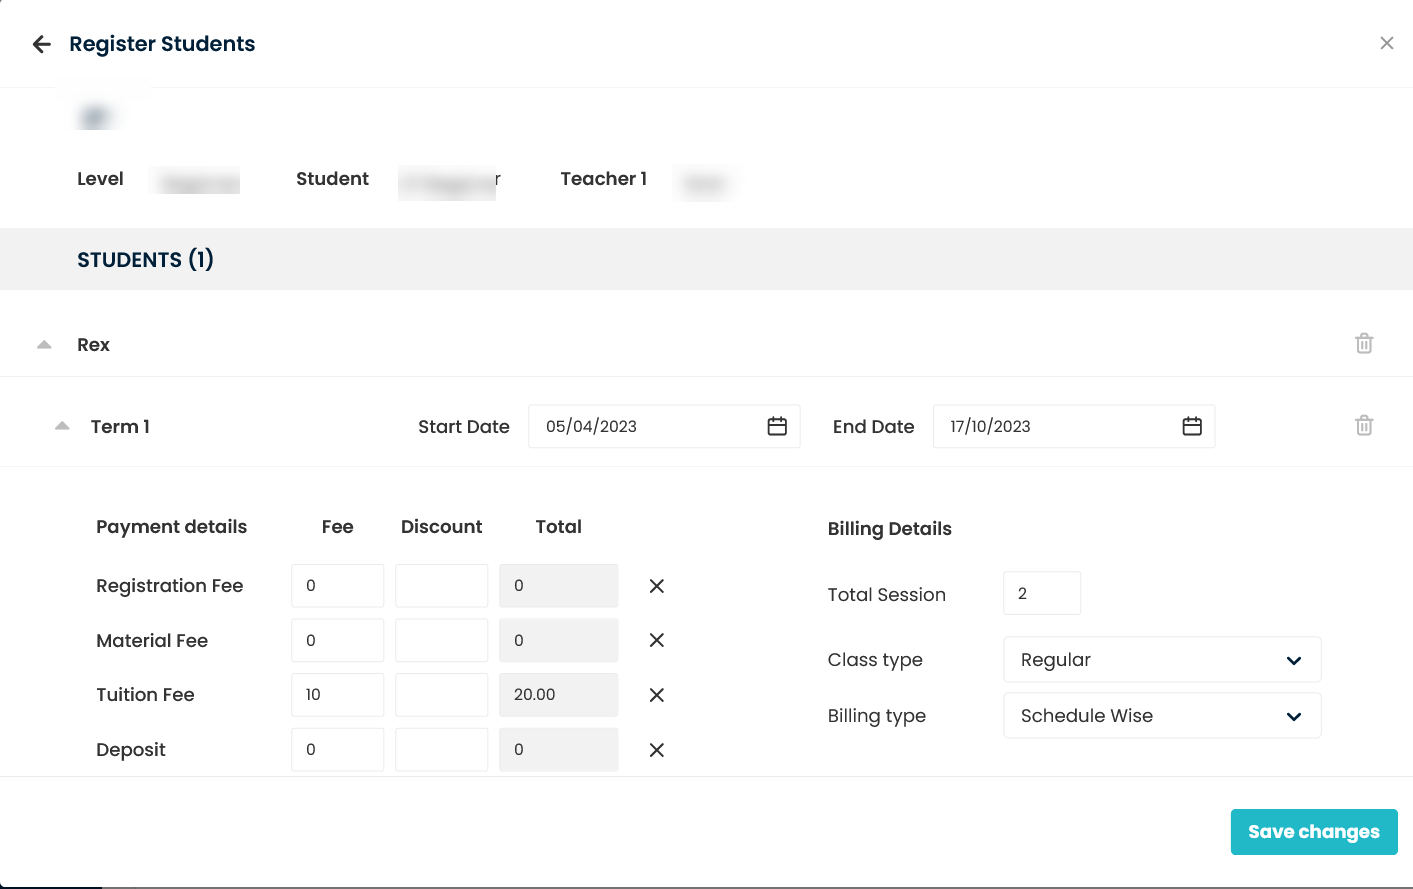
Note: For a session based class fee, when the number of session is edited( which cannot be greater than the class session count), it automatically update the end date.
Class Details
In Class Details, you can see the name of the class, course type, course name, duration, status, capacity of the class, subsidiary, branch, rooms, start & end date, type of the class, level & teacher, etc.
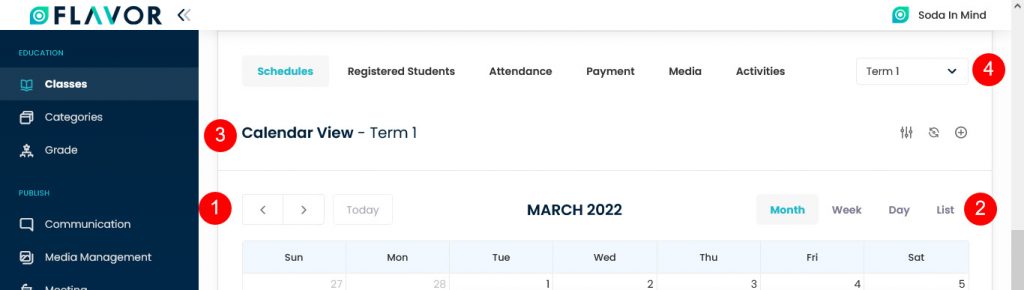
Schedules
Navigate to the Schedule tab. In Schedule, you can see the calendar view of the class. Here, you can see the list of holidays and on which day and on which date the class will be held.
- At the top left corner of the calendar view, you see the Calendar Navigation Button. Through this, you can check the classes of previous months.
- In the top right corner of the calendar view, you can see the Month, Week, and Day tabs.
- If you have created Monthly Smart Schedules and Term-Based classes then you can check the Schedule Calendar Term wise.
- Terms Dropdown: It consists of all Terms of its class. If this class doesn’t have a schedule set/term, then this filter will not appear.
Month Calender View
- In the month tab, you can see how many classes will be held in a month and at what time and on what date.
- List of sessions in a day, each card of sessions filled with the colour code of each schedule set or class colour code, the start time of the session – end time of session.
- Public Holiday information.
- Mark of the current date or today.
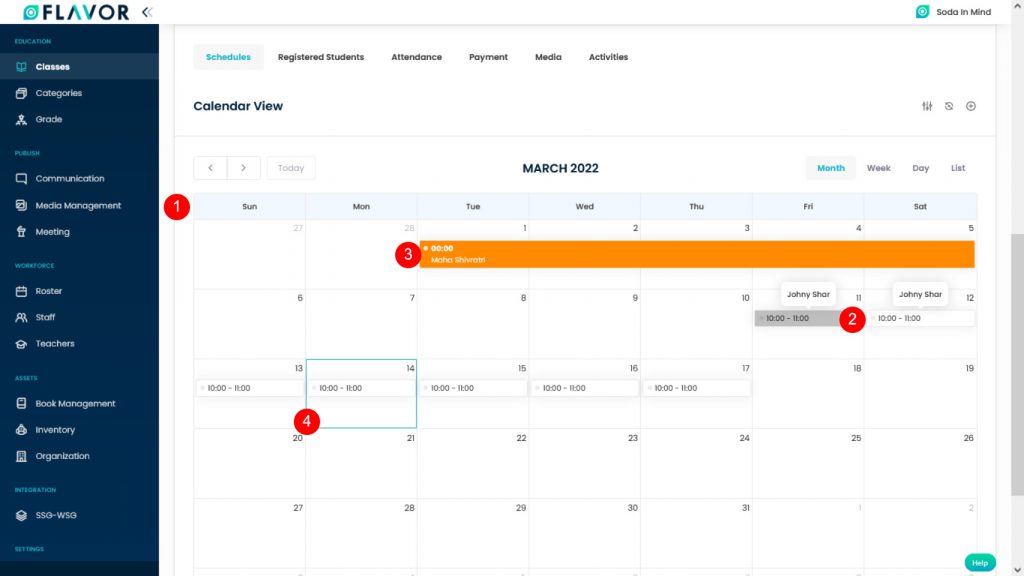
- When you click on any class, a popup of that particular class will be open having the details of the class.
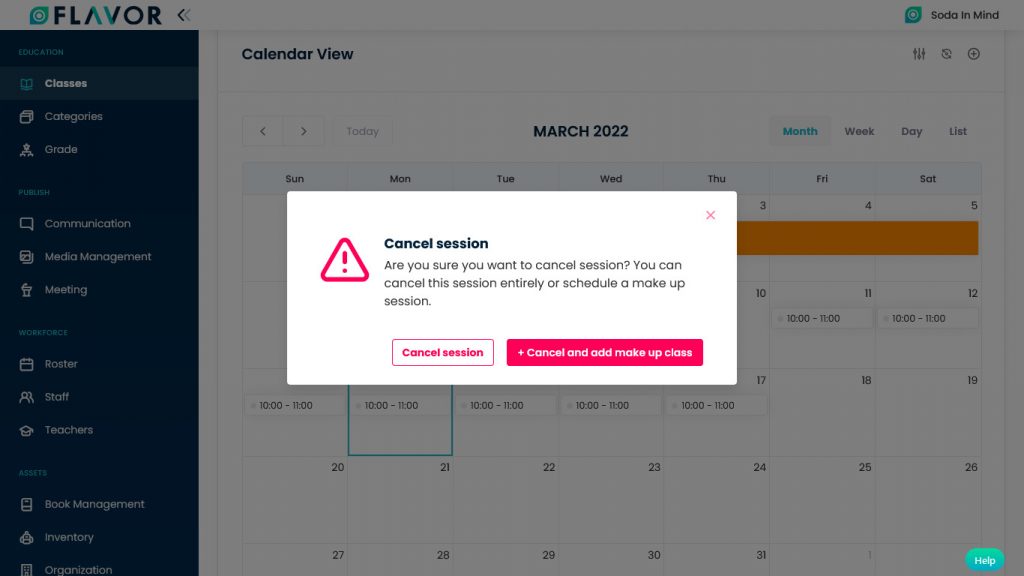
- You can see the 2 options on a popup, Cancel Session & Save buttons. If you want to cancel the session, click on the Cancel Session button.
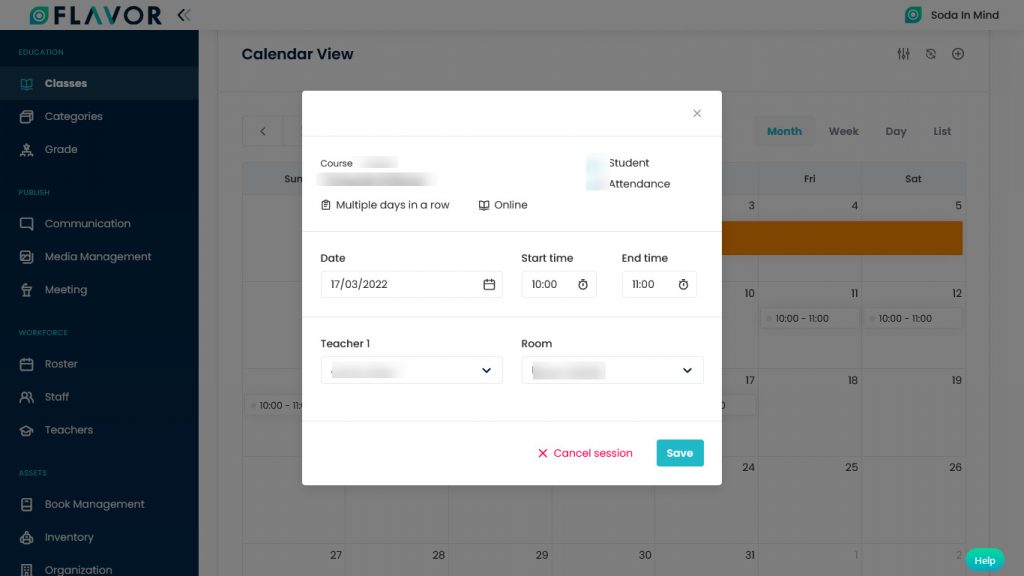
- A confirmation popup will open after the clicking. Here, you can see two more options. Cancel Session button & + Cancel and add makeup class button.

- If you want to cancel the class click on the Cancel Session button.
- If you want to add a make-up class, click + Cancel and add the makeup class button, you will be redirected to the Makeup class page.
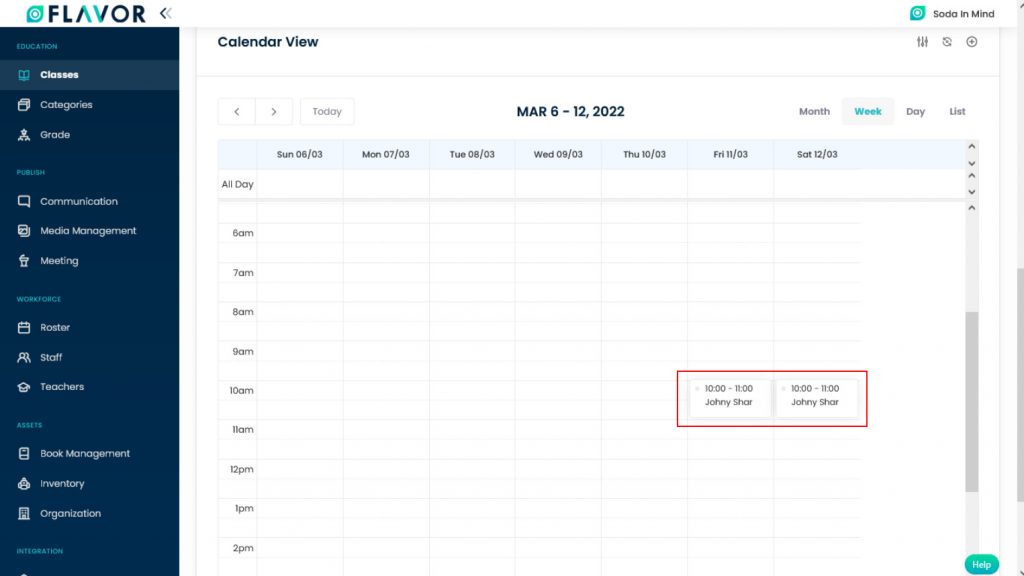
Week Calendar View
Session in specific hours, each card of sessions filled with the colour code of each schedule set or class colour code, the start time of the session – end time of the session, teacher.
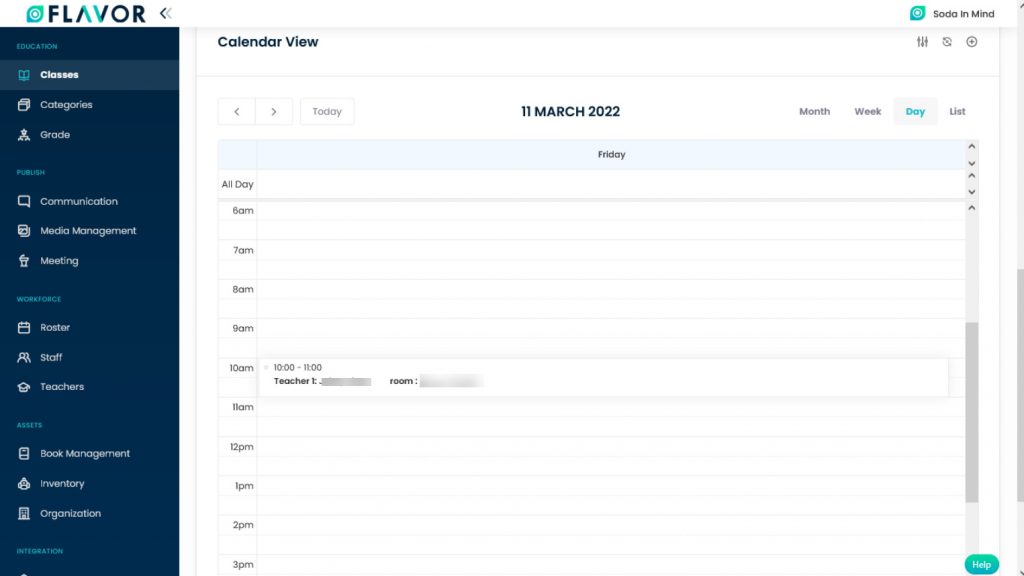
Day Calendar View
Session in a specific hour, each card of sessions filled with colour code of each schedule set or class colour code, the start time of the session – end time of the session, teacher 1 and room.
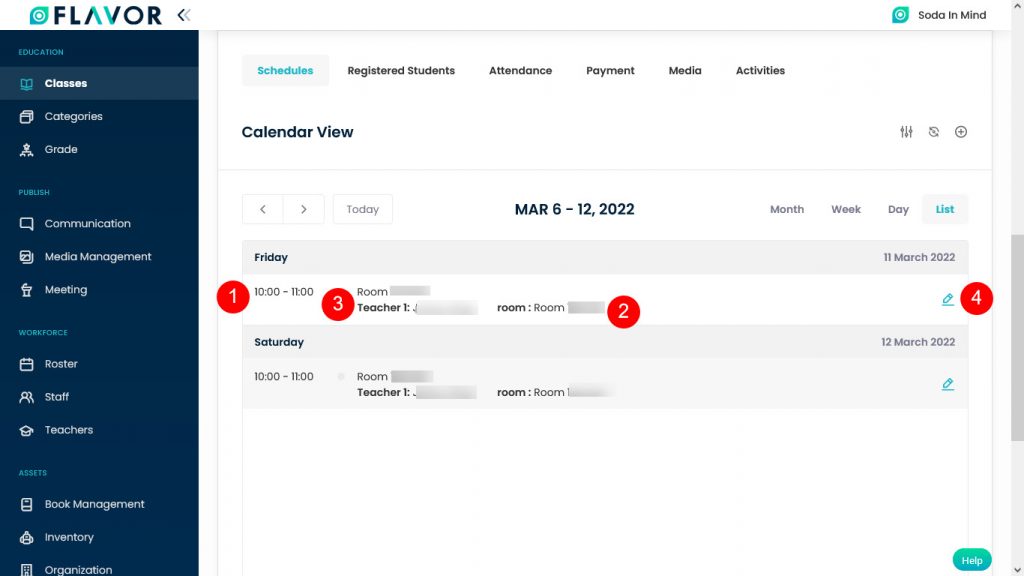
List Calendar View
- Start to end time of the session.
- Room of the session.
- Teachers of its session.
- Edit session
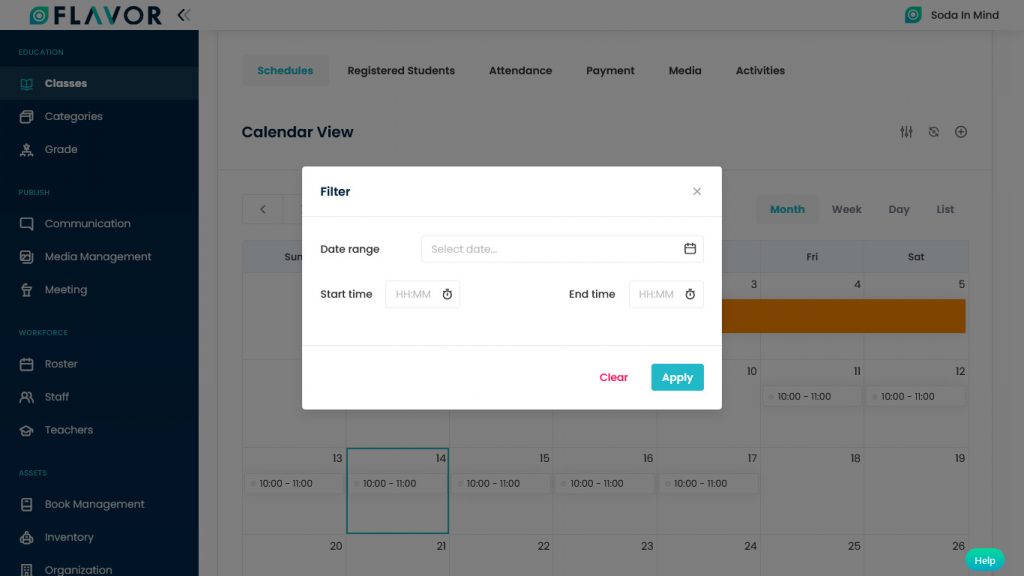
In the top right corner of the calendar, you can see Filter, Transfer Student, Update Schedule options.
Schedule Filter
- Enter the date range, to filter the start date of the class session.
- Enter the start time & end time of the session filter.
- Click on the Apply button to apply the filter.
Note: After the filter is applied, only the related date card will appear in the calendar.
Schedule Transfer Students
- To transfer the students, click on the Transfer Student Icon. You will be redirected to the Transfer Student page.
![]()
- Date: Select the session to which the user wants to transfer.
- Select the class to transfer from the drop-down.
- Student list which has enrolled to a class which has sessions included in the select session to reschedule from.
- Click on the Reschedule button.
- When it clicks, a particular student will be removed from the original class and moved to the transfer class. But even though this process won’t affect the student invoice.
![]()
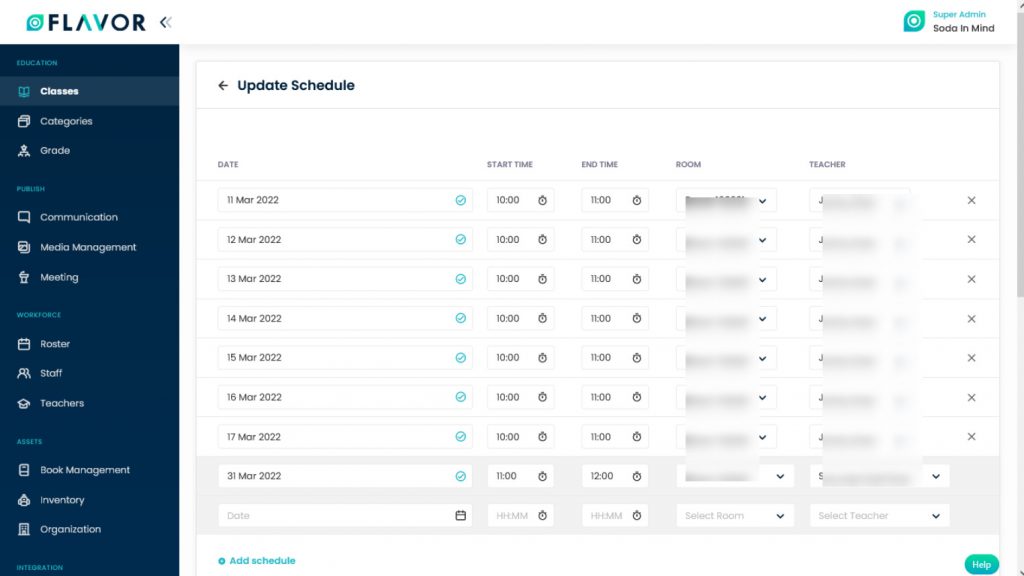
Update Schedule
- Navigate to the Update Schedule Icon to reschedule the schedule, click on the Update Schedule Icon.

- You will be redirected to the Update Schedule page.
- Date: Change the date from the Date field.
- Time: Enter your desired start time & end time.
- While you enter the time a small modal will appear on your screen with the question that Update all sessions time for this class? It depends on you what do you want. If you want to update the schedule only for one time then click on No, Only This One. If you want to update all schedules then click on the Update All option.
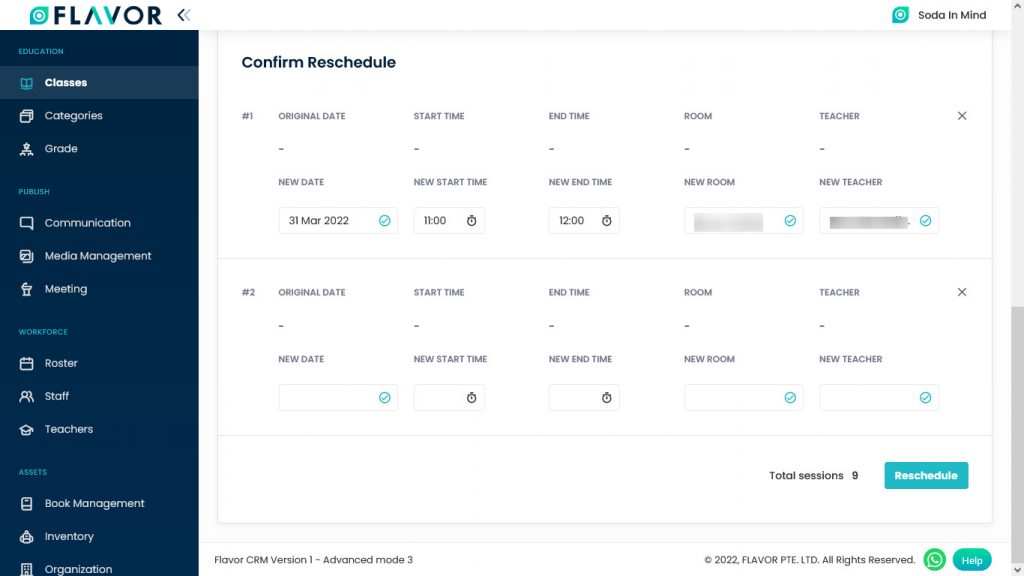
- Navigate to the Confirm Reschedule section.
- If you want to delete the schedule then click on the Cross X icon.
- A confirmation popup will be open, click on the Yes to delete. If you don’t want to delete then click on the Cancel button.
- Click on the Reschedule button.
Note: If you have created monthly smart schedules and term-based classes then you can Update Schedules Term wise.
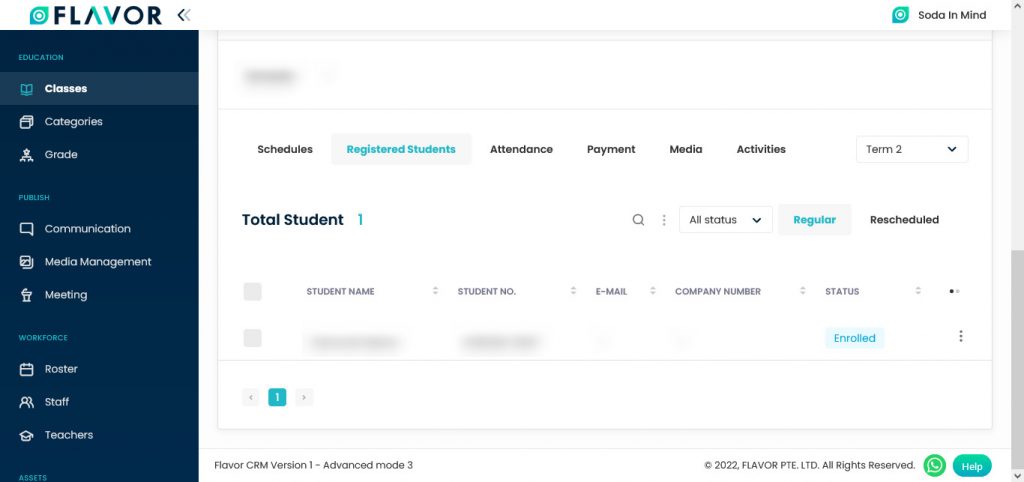
Registered Students
Navigate to the Registered Students. Here, you can see the list of those registered students who registered themselves for the particular class. Here, you can see two tabs, Regular & Rescheduled.
Search
By clicking on the Search Icon, you can search students by entering student name, student id or company number.
Bulk Action Button
- The Bulk Action Button is disabled by default. When you mark on the check box, which appears at the starting of each row, this action button will be enabled. You can select/deselect rows by marking the checkbox.
- After the selection of any record go to the Action Button, click on the button, a small popup will be open with the Transfer Student option. Click on the option.
- For further steps kindly check the Transfer Student section.
All Status
- You can check the list of students by their status Enrolled & Trial.
- If you want to see the list of all enrolled students select the Enrolled from the dropdown. You can get the list of all enrolled students.
- If you want to see the list of all trial students select the Trial from the dropdown. You can get the list of all trial students.

Regular Tab
In the regular tab, you can see the list of all students, irrespective of their Enrolled, Trial status.
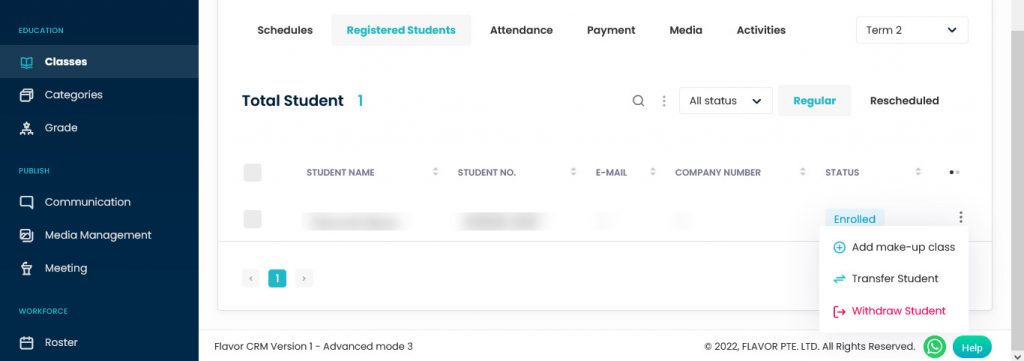
Registered Students Records
Action Button
Click on Action Button (Vertical Ellipsis), a popup box will appear on your screen with Add Make-up Class, Transfer Students, Withdraw Students.
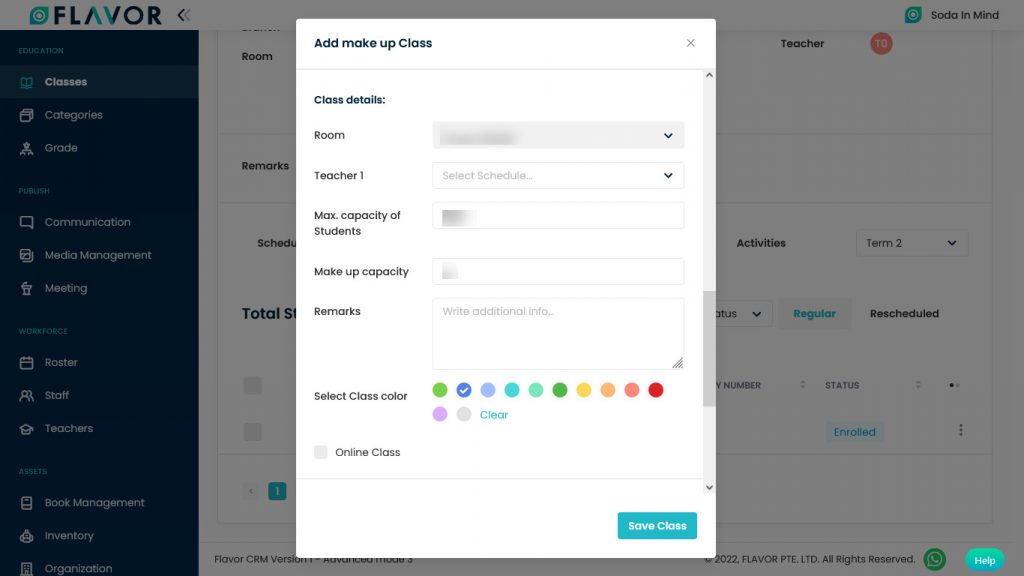
Add Makeup Class:
- To create a makeup class, click on the Makeup Class Option. A popup form named “Add Makeup Class” will be open.
- Here, you can see the class details. Class & Course details.
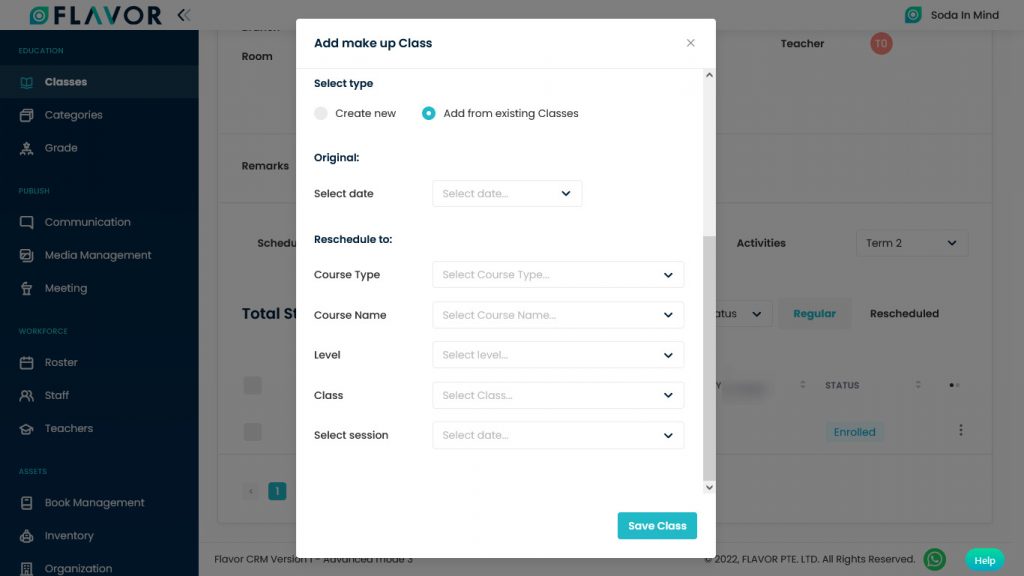
- Select Type: If you want to create a new class then enable Create New option by marking the radio button and if you want to add a student to the already created class then enable the Add from existing class option by marking the radio button.
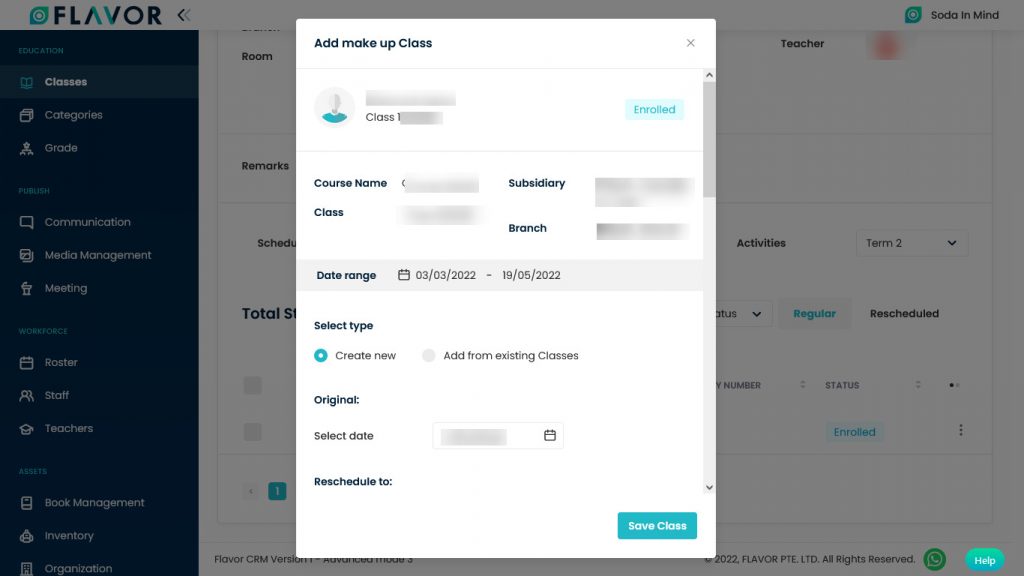
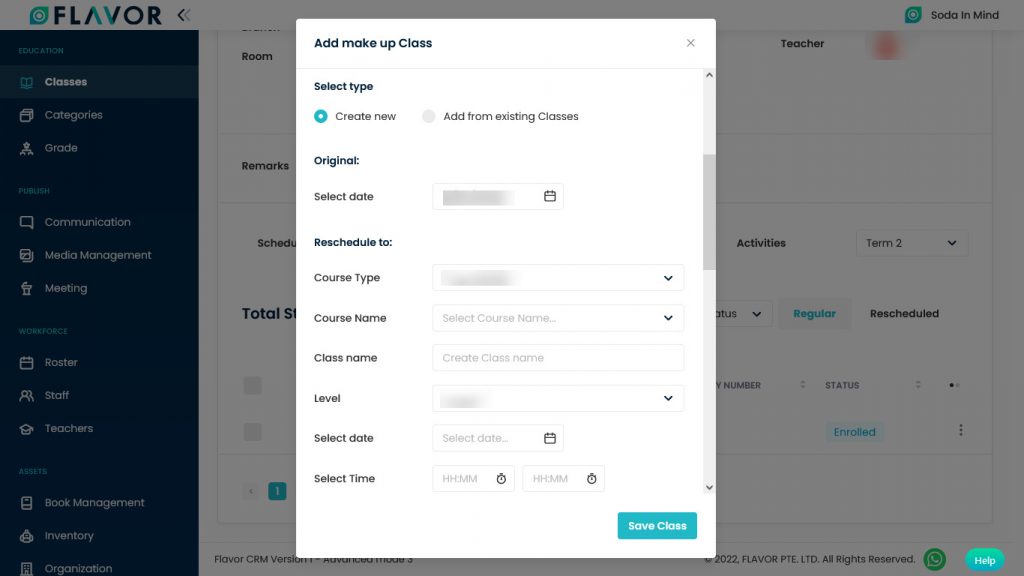
Create New Class:
- Original: Select the date from the date field.
- Course Type: select the type of course from the Course Type dropdown.
- Course Name: select the name of the course from the Course Name dropdown.
- Enter the Class Name.
- Select Level: Select the level of the class from the dropdown.
- Select date: Enter class start date.
- Select Time: Enter the start time and end time of the class.
Class Details
- Room: Select room from the dropdown.
- Teacher: Select the teacher from the dropdown.
- Max. capacity of students: Enter the number of students in a class.
- Remarks: Write a description of the class.
- Select Color: give colour to the class.
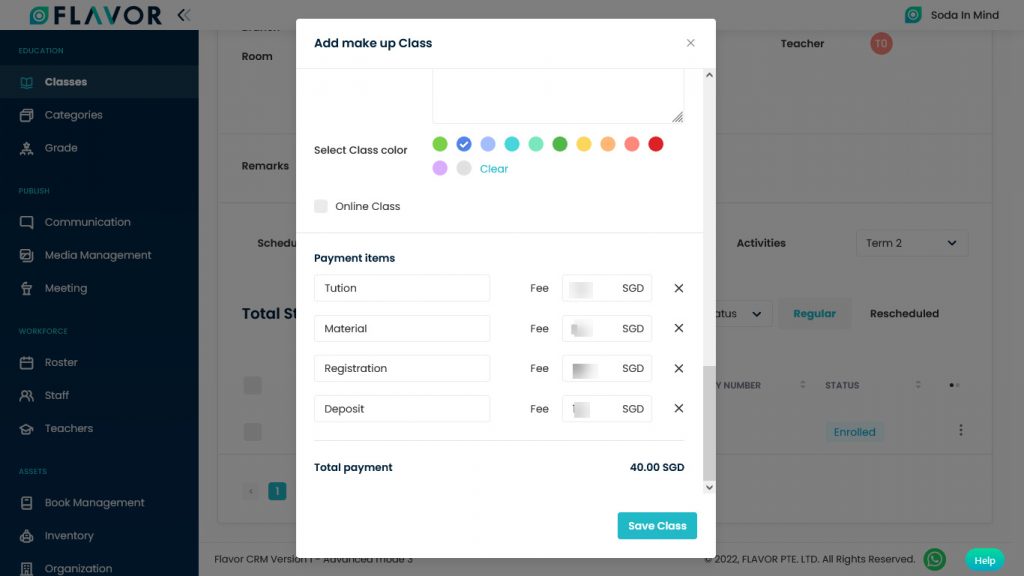
- Online Class: Enable the checkbox if the class is Online.
Payment Items
- Tuition: Enter the tuition fee.
- Material: Enter the material fee.
- Registration: Enter the amount of the registration fee.
- Deposit:
- Click on the Save button to save the class.
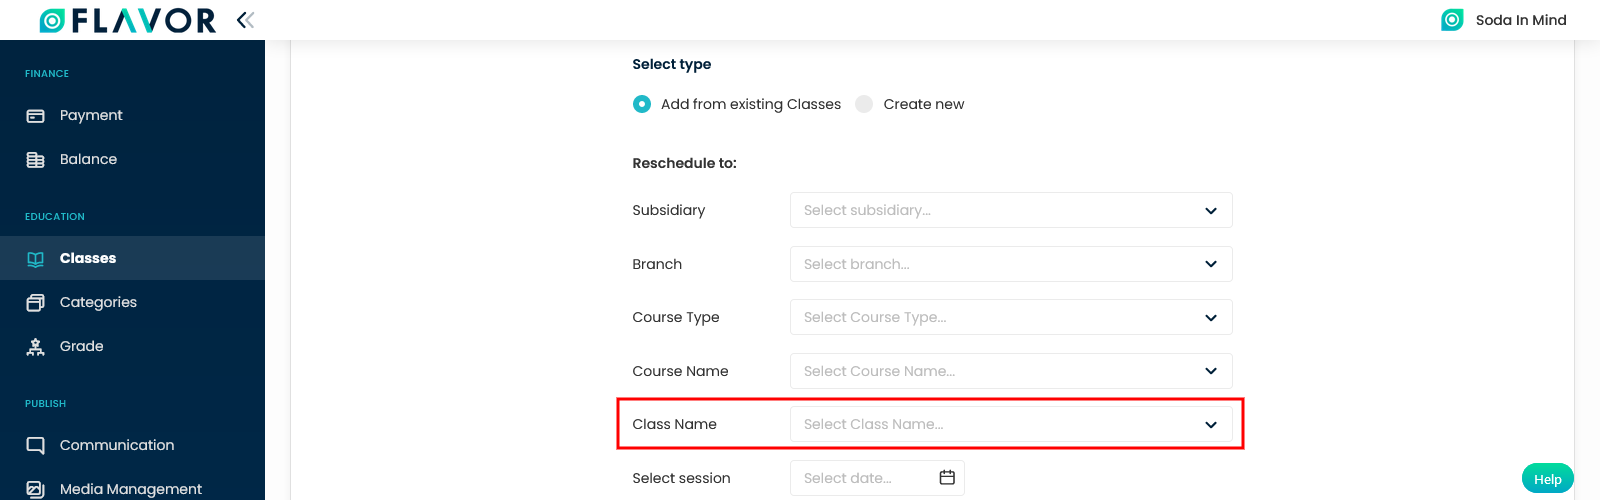
Add From Existing Class
- Original: Select the date from the date field.
- Course Type: select the type of course from the Course Type dropdown.
- Course Name: select the name of the course from the Course Name dropdown.
- Select Level: Select the level of the class from the dropdown.
- Select Session: Select the session from the dropdown.
- Click on the Save button to save the class.
Transfer Students
- To transfer the students, click on the Transfer Student option.
- A popup will open on your screen named “Transfer Students”
- Here, you can see the details of a student and class.
- Select Session to Reschedule From: Enter the date for from and to fields.
- Select Class to Transfer: Select the class to transfer from the class dropdown.
- Click on the Transfer Student button.
![]()
Withdraw Student
- To withdraw a student from the class click on the Withdraw Student option.
- A popup named “Withdraw Student” will be open.
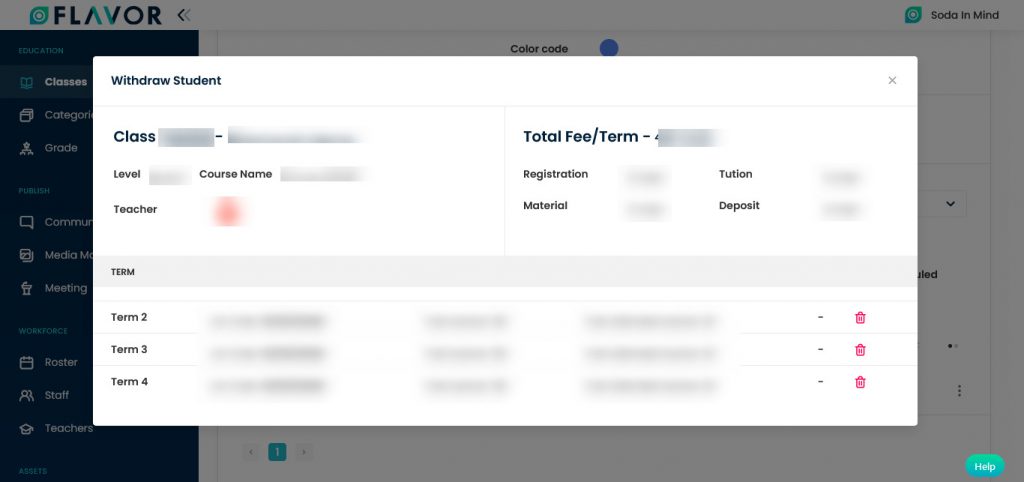
- Here, you can see the list of all terms of the session. You can also see the Delete Icon at end of each Term.
- To withdraw a student from any term click on the Delete icon, a popup will open.
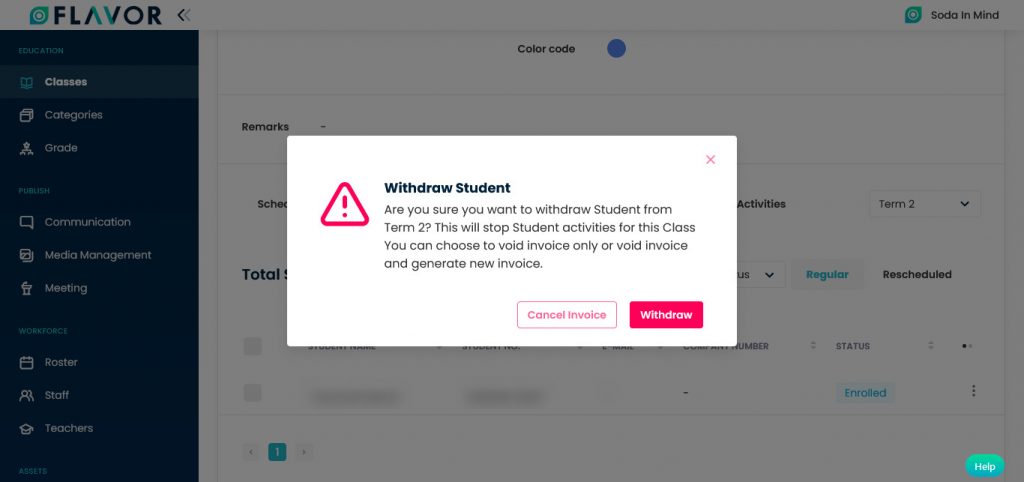
- Click on the Withdraw button, after clicking a popup named “Withdrawl” will be open.
- Here, you can see Student Name, enter the date of Withdrawl & write Remarks.
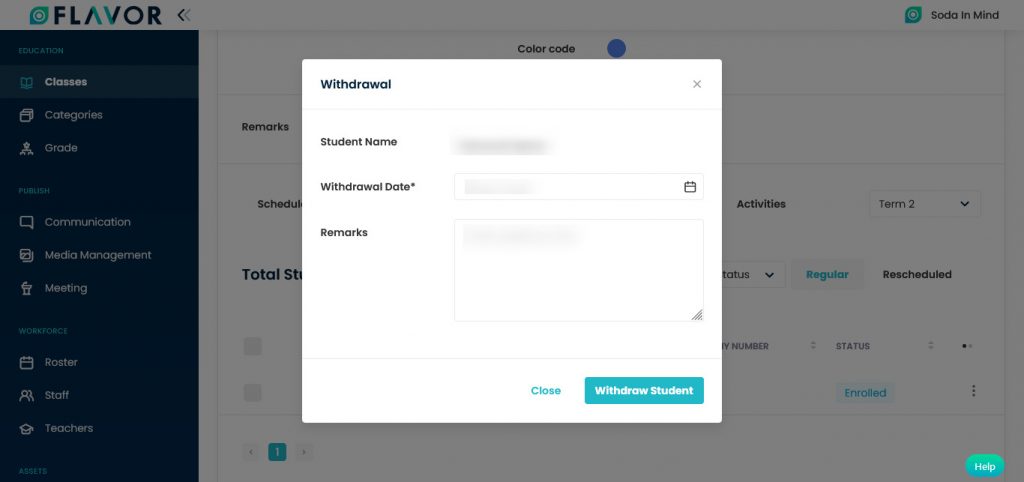
- Click on the Withdraw Student button.
Reschedule
Attendance
Navigate to the Attendance Tab. Here, you can see two sections, Pending Attendance & Attendance History.
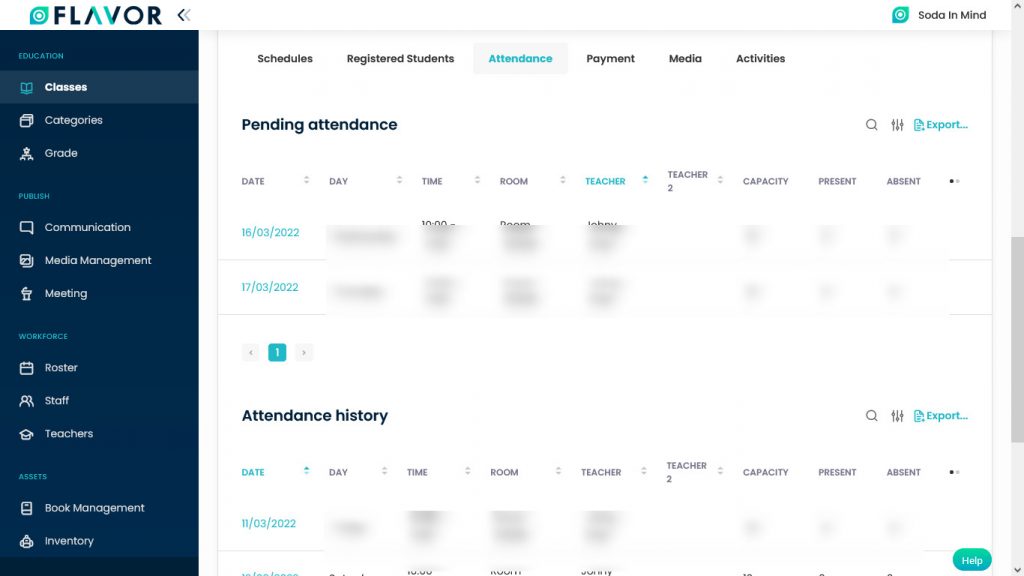
Pending Attendance
Here, you can see the list of upcoming attendances of the particular class.
Search
By clicking on the Search Icon, you can search the specific classes by entering day, room & teacher.
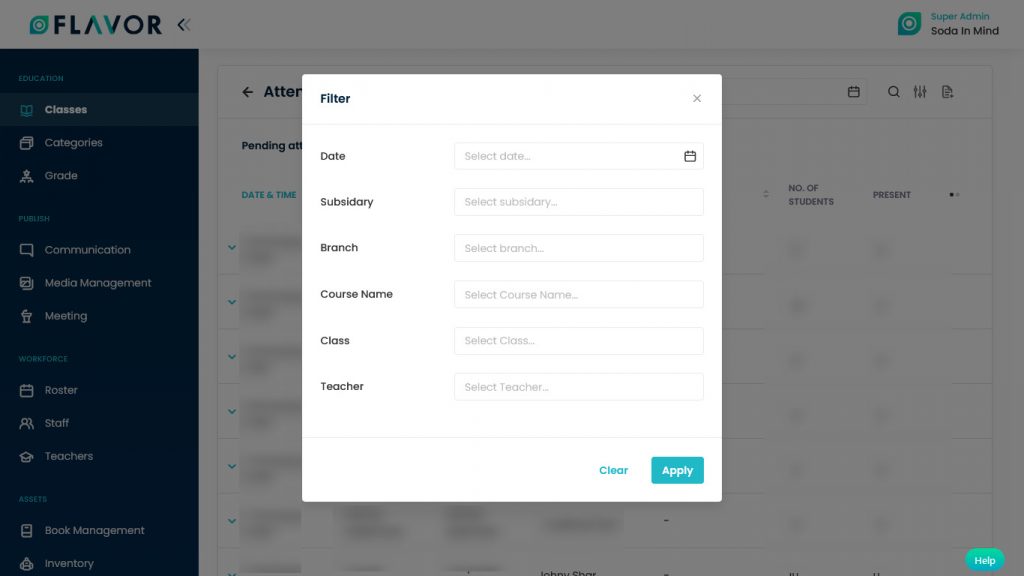
Filter
You can filter the classes based on specific parameters. Click on Filter Icon, after clicking, a popup form named “Filter ” will appear on your screen. Enter the Date, Subsidiary & Branch, Course Name, Class, Teacher. Click on Apply button to save parameters.
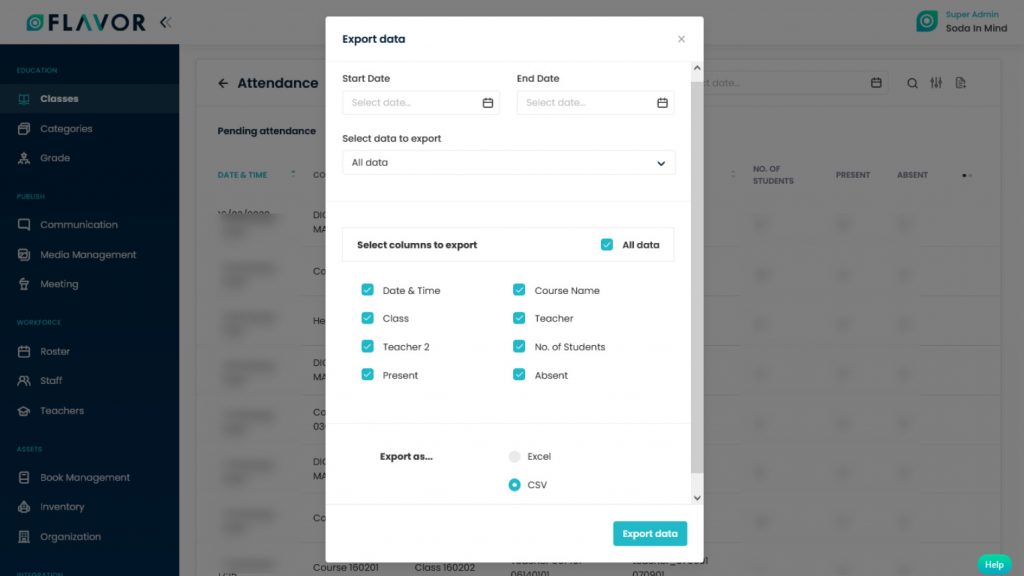
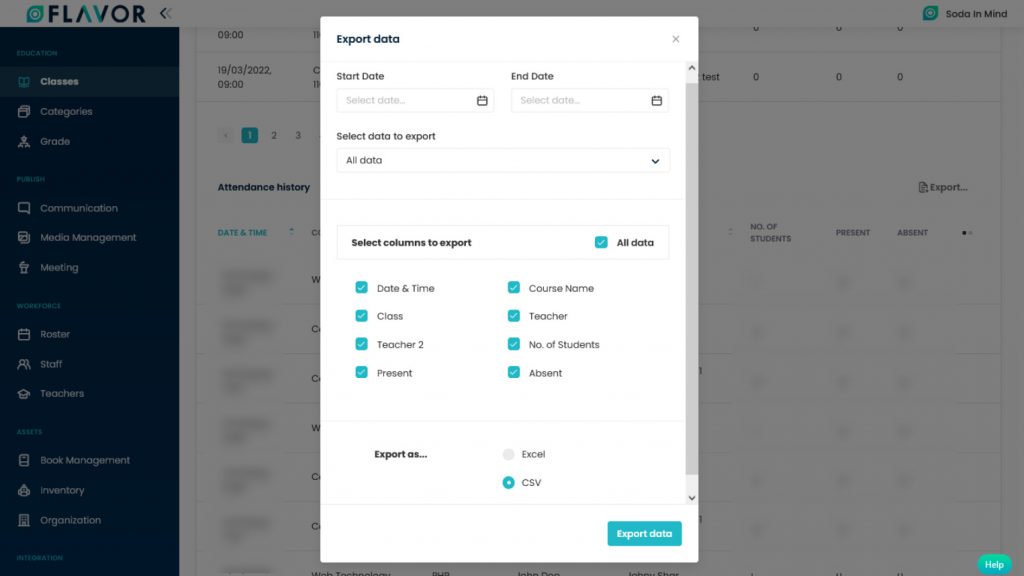
Export
- To export all data, you need to click on the Export Icon.
- After clicking on the Export icon, a pop-up form will appear on your screen.
- Start Date and End Date: Select the time period in the start date and end date column for which time period’s data you need.
- Select Data to Export: Here, you can export the data of all rows or 15 rows by simply clicking on the dropdown.
- Select Column to Export: Select columns which you need your data to export. Like if you want all the data of Attendance, then simply click on “ALL DATA” and you will get the data of Attendance in your exported file.
- Export as: Then select a format in which you want to export your data i.e (EXCEL or CSV).
- After selecting the relevant records/data, click on the Export Data button to export all the data in the selected file (Excel/CSV).
Pending Attendance Records
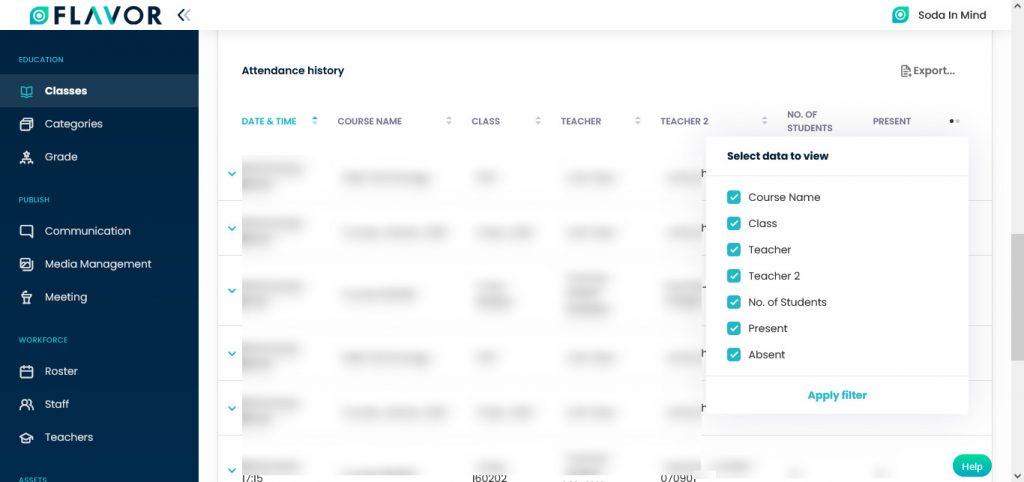
Column Sorting
All rooms will be shown in Tabular Format. You can sort the data by clicking on Column Sorting Arrows in Table’s Header.
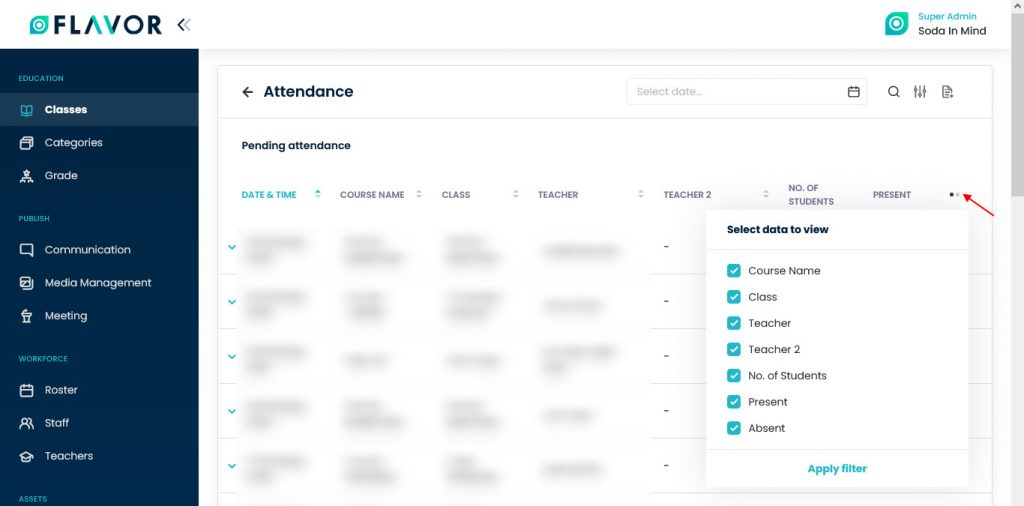
Column Visibility
You can sort columns by clicking on the Ellipsis icon, you will get the pop-up form named Select Data to View. Mark the columns you want to see and unmark the ones you don’t want to see in the table. After this procedure click on the Apply Filter button.
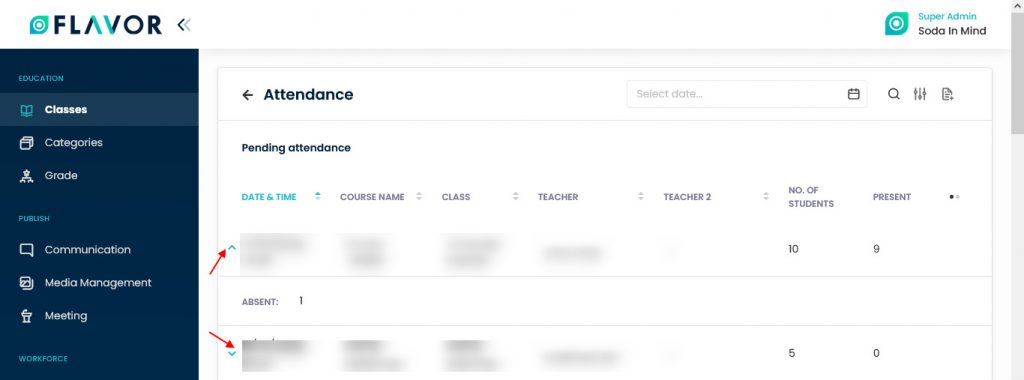
Date
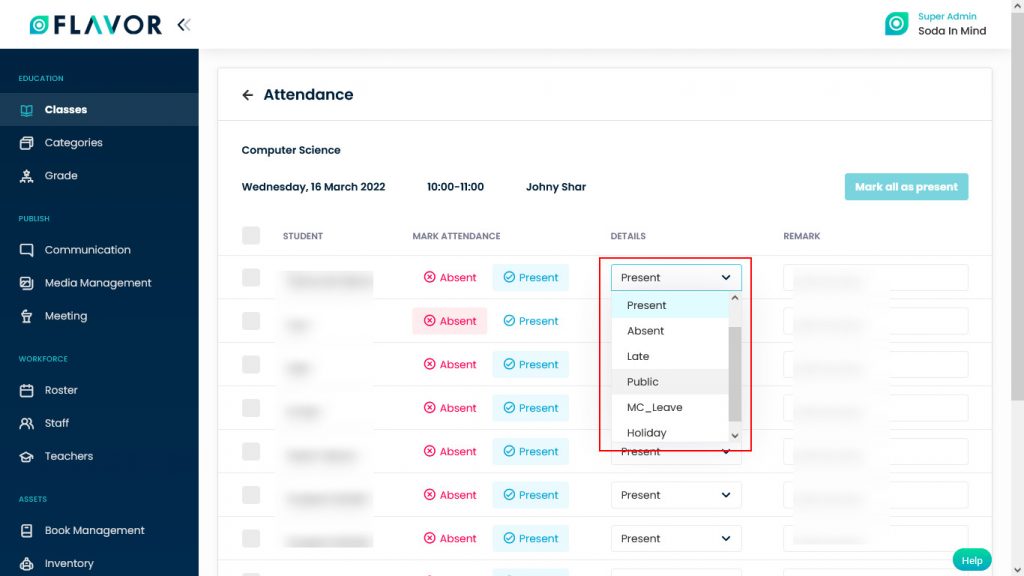
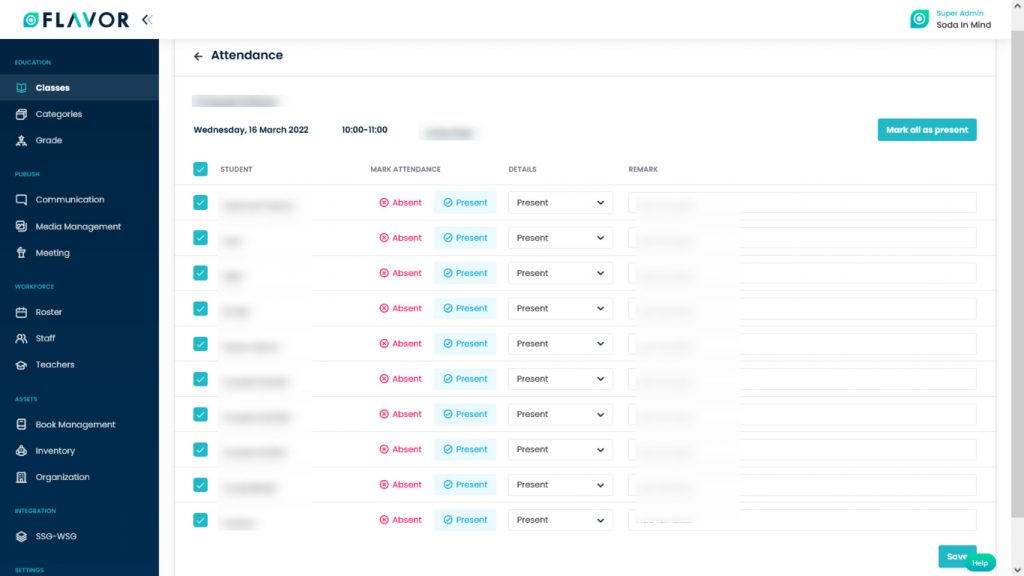
- Click on the date of any record to check the attendance.
- A popup of a particular class will be open.
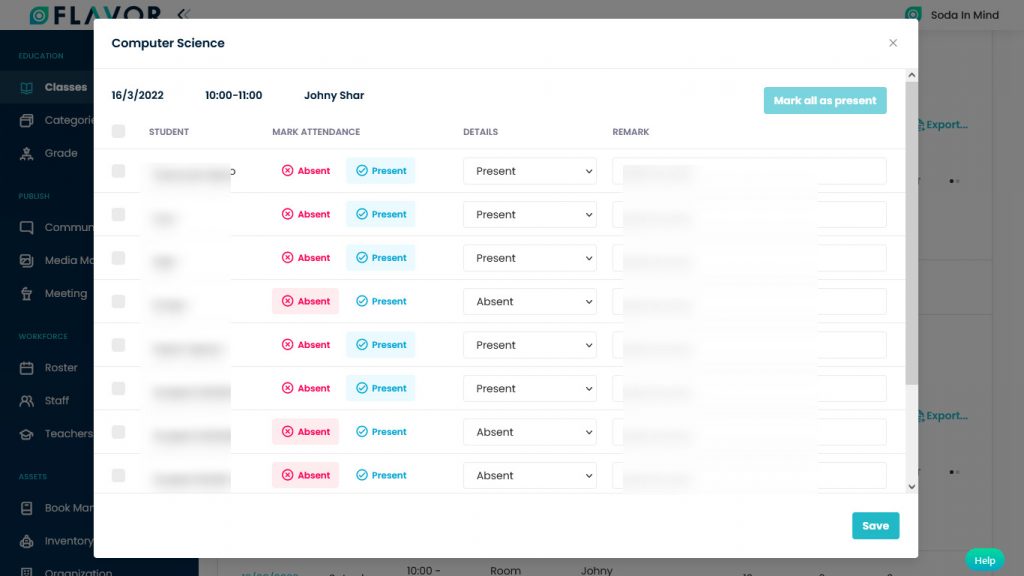
- If a student is absent, select the Absent option & if a student is attending the class, select the Present option.
- Mark all as Present: Select all students by enabling the check box if all students are present. Mark all as present button will be enabled and in the details column, all students’ attendance will be marked as present.
- Click on the Save button.
Attendance History
Attendance history will show you the attendance of all past classes.
Search, Filter & Export options of Attendance History will work the same as done in pending attendance.
Attendance History Records
Column Sorting & Column Visibility options of Attendance History will work the same as done in pending attendance.
Date
- Click on the date of any record to check the attendance.
- A popup of that particular class will be open.
- If a student is absent, select the Absent option & if a student is attending the class, select the Present option.
- Mark all as Present: Select all students by enabling the check box if all students are present. Mark all as present button will be enabled and in the details column, all students’ attendance will be marked as present.
- Click on the Save button.
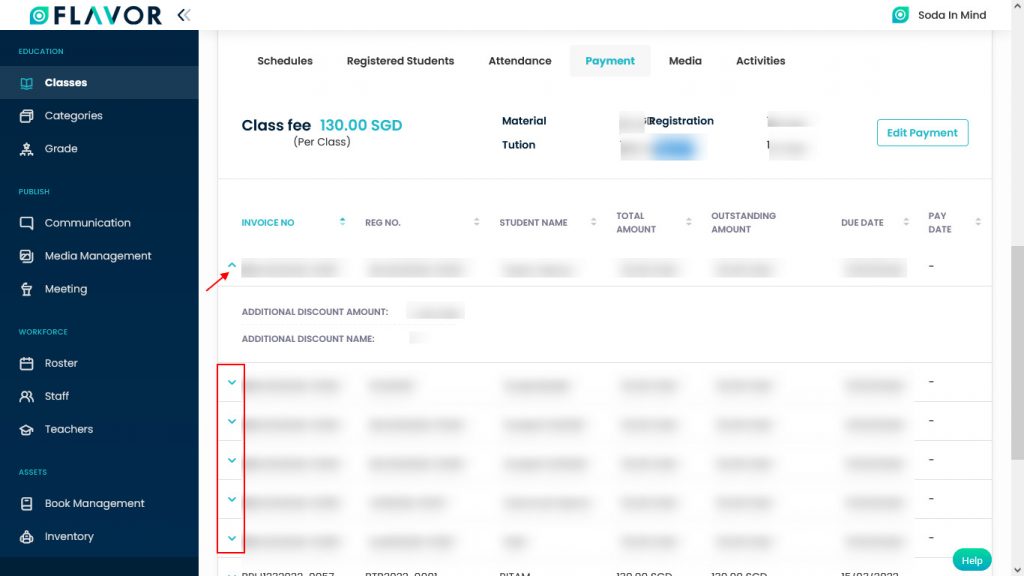
Payment
Navigate to the Payment tab. Here, you can see the list of payments of all students who paid for the class.
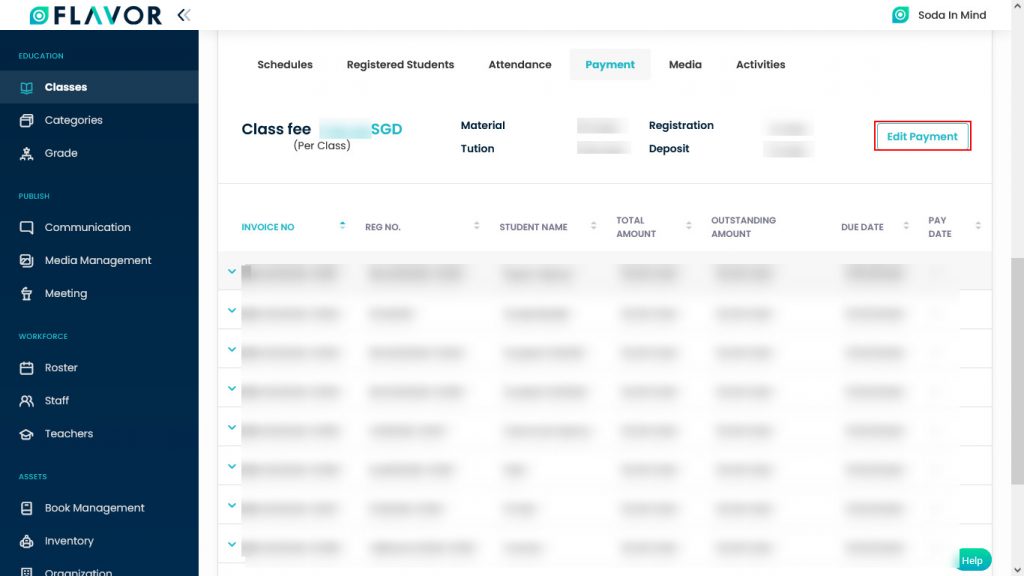
Edit Payment
- In the top right corner of the payment tab, you can see the Edit Payment button. From here, you can change the fee of the course.
- Click on that button, a popup named “Edit Payment” will be open.
- If you have created Monthly Smart Schedule and Term Based Classes, then you can change the payment details according to terms.
- If you want to change the fee of term 1 then you have to select Term 1from the Term dropdown.
- If you are in term 1 then after clicking on the edit payment button a popup for term 1 will be open, and if you want to change the payment details for term 4 then the popup for term 4 will be open.
Payment Details
Invoice Details
To check the details of invoices, click on any invoice record, you will be redirected to the Invoice page. From there, you can get the details of the Invoice.
Expand Records
At the start of each record, there is an Expand Button (Down Arrow), after clicking on this button a record will be expanded. From here will get the additional details. You can collapse the record by clicking on the same button.
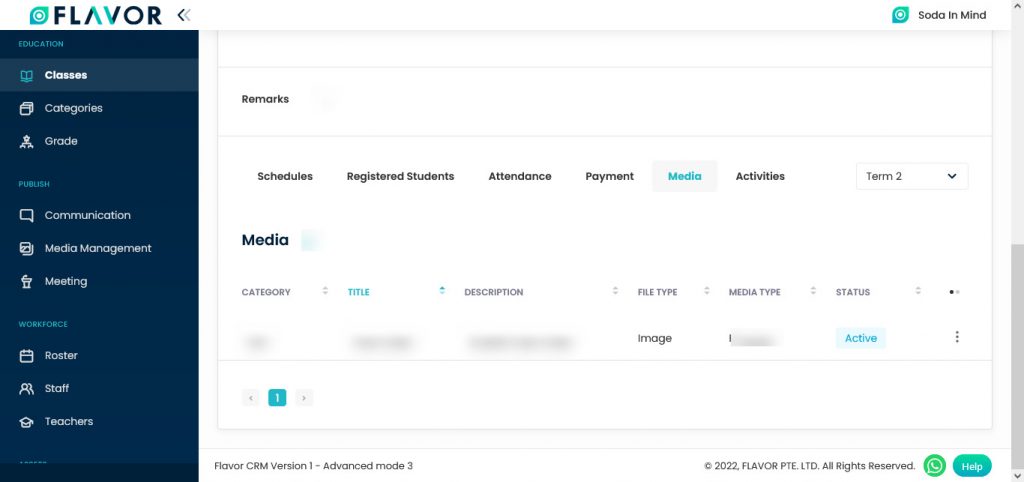
Media
- Navigate to the Media tab. Here, you can see the all uploaded media of the class.
- In the top right corner of the Media tab, you can see the Term dropdown, you can check the media according to terms.
- Note: If you have created a Repetitive Class, only in that case you can see Term dropdown.
Media Actions
Click on Action Button (Vertical Ellipsis), a popup box will appear on your screen with Edit, Create Link & Remove media from this class.
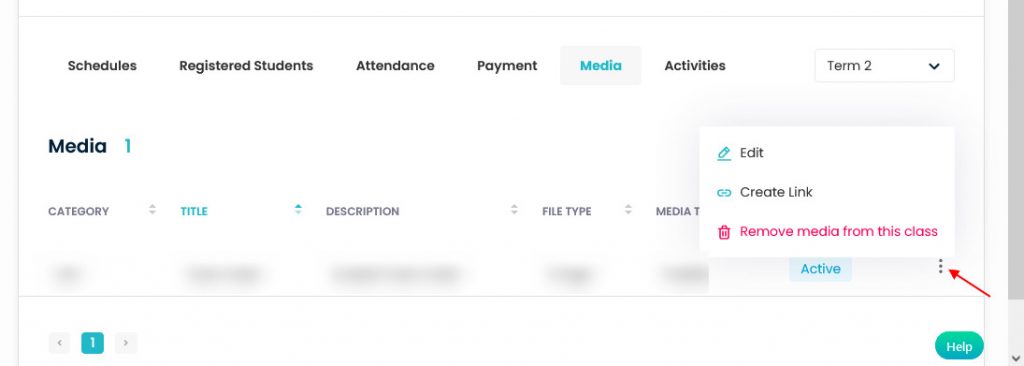
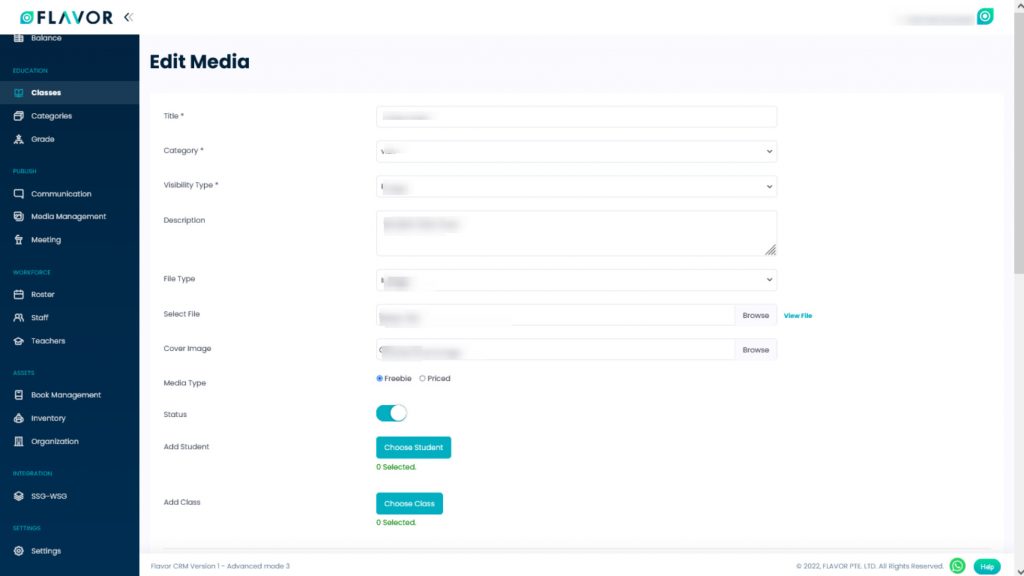
Edit
- Click on the Edit button.
- You will be redirected to the Edit Media page.
- Here, you can see three sections. Edit Media, Selected Students & Selected Classes.
- Edit media: From here, you can change the details of the media. Enter the Title, Category, Select the Visibility Type, Description, Choose the File Type, Select the file, select Cover Image, Choose the Media Type it could be Freebie or Priced.
- Add Student: You can select the student from here, after clicking on Choose Student button, a modal named “Student List” will be open. Top of the modal you can see the filters. You can select the student using the filter.
- Add Class: You can select the class from here, after clicking on Choose Class button, a modal named “Class List” will be open. Select the class from modal.
- Click on the Save button.
Create Link
To create a link of this media, click on the Create Link option. You will be redirected to the Create Media Link Page. Fill the details and then click on the Save botton.

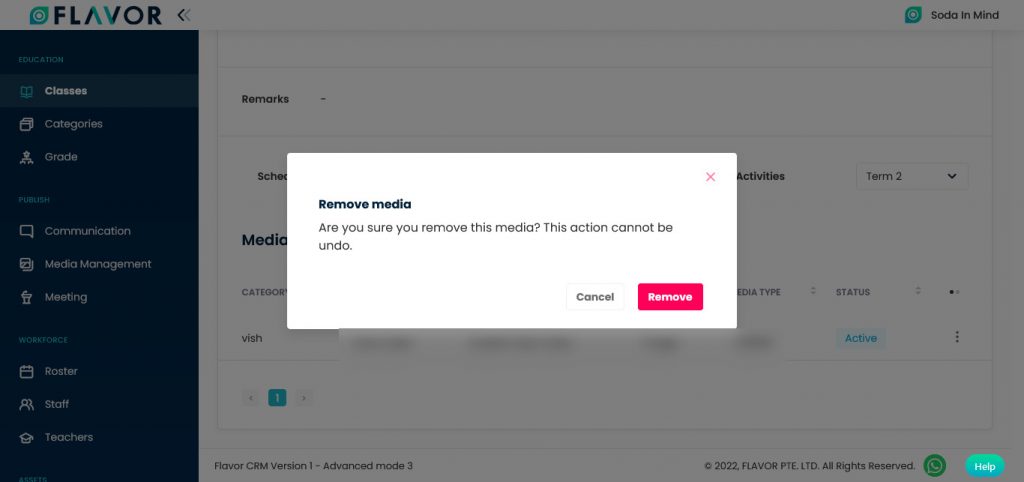
Remove Media From This Class
- To remove this from the class, click on the Remove Media From This Class option.
- A confirmation popup will be open.
- Click on the Remove button to remove media.
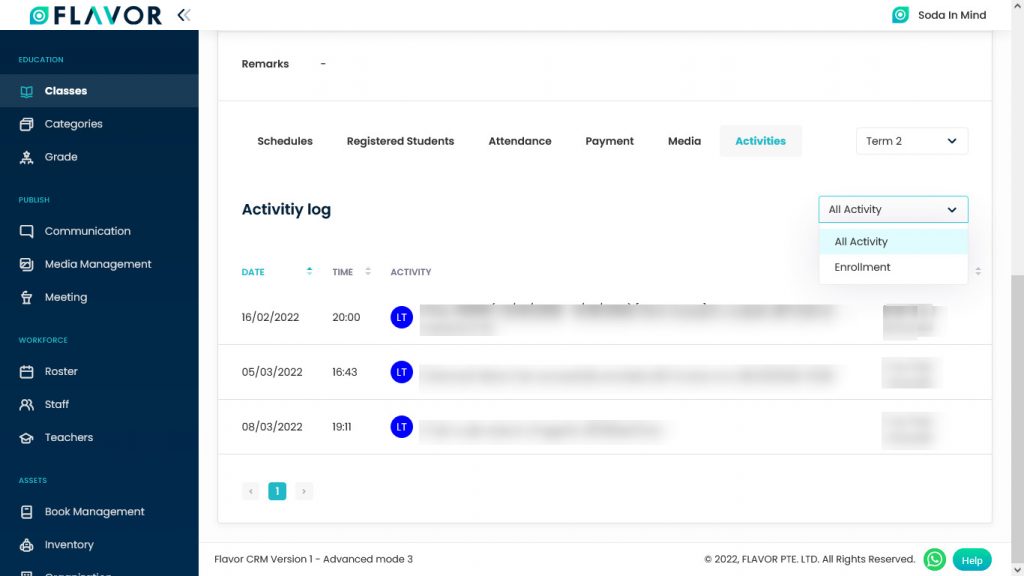
Activities
- Navigate to the Activities tab. From here, you can track the activity of registered students of a particular class.
- In the top right corner of the Activities tab, you can see a dropdown. If you want to track all activities then select All Activity from the drop-down.
- If you want to track the activity of enrolled students, select Enrolled from dropdown. You will get the list of all enrolled students.
Settings
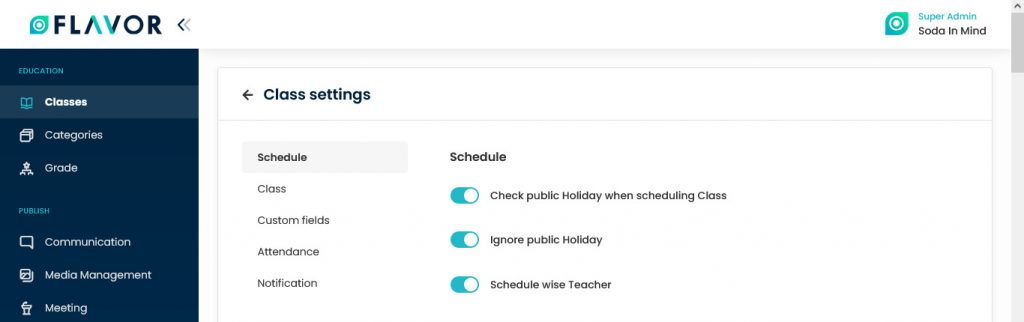
Navigate to the Settings. By clicking on the Settings icon, you will be redirected to the Classes’ Setting Page. Here, you will see Schedule, Class, Custom Fields, Attendance, Notification options.
Schedule
By default, all settings of the schedule section are off you can make them on by switching.
- Check public Holiday when scheduling Class: This option will display the public holiday while creating a schedule. This is only to check public holidays.
- Skip public holiday during schedule generate: This option is only for ignoring the public holidays. By enabling the switch you can make this field on.
Class
Navigate to the Class section in settings.

- Generate schedule shortcodes: To show class code in the view class you have to enable this option by switching. Session code is only for the client, who wants a unique code for the class.
- Enable Round Robin: This feature is introduced to add or edit course payment details while creating or editing the Course-name.
- Enable Standalone Make Up Class: Turn on enable standalone make up class setting to be separated between make up class and the original class when make up class capacity is filled or more then 0. By default this setting is off. The makeup class tab will be showing up in the class listing if standalone makeup class setting is on.
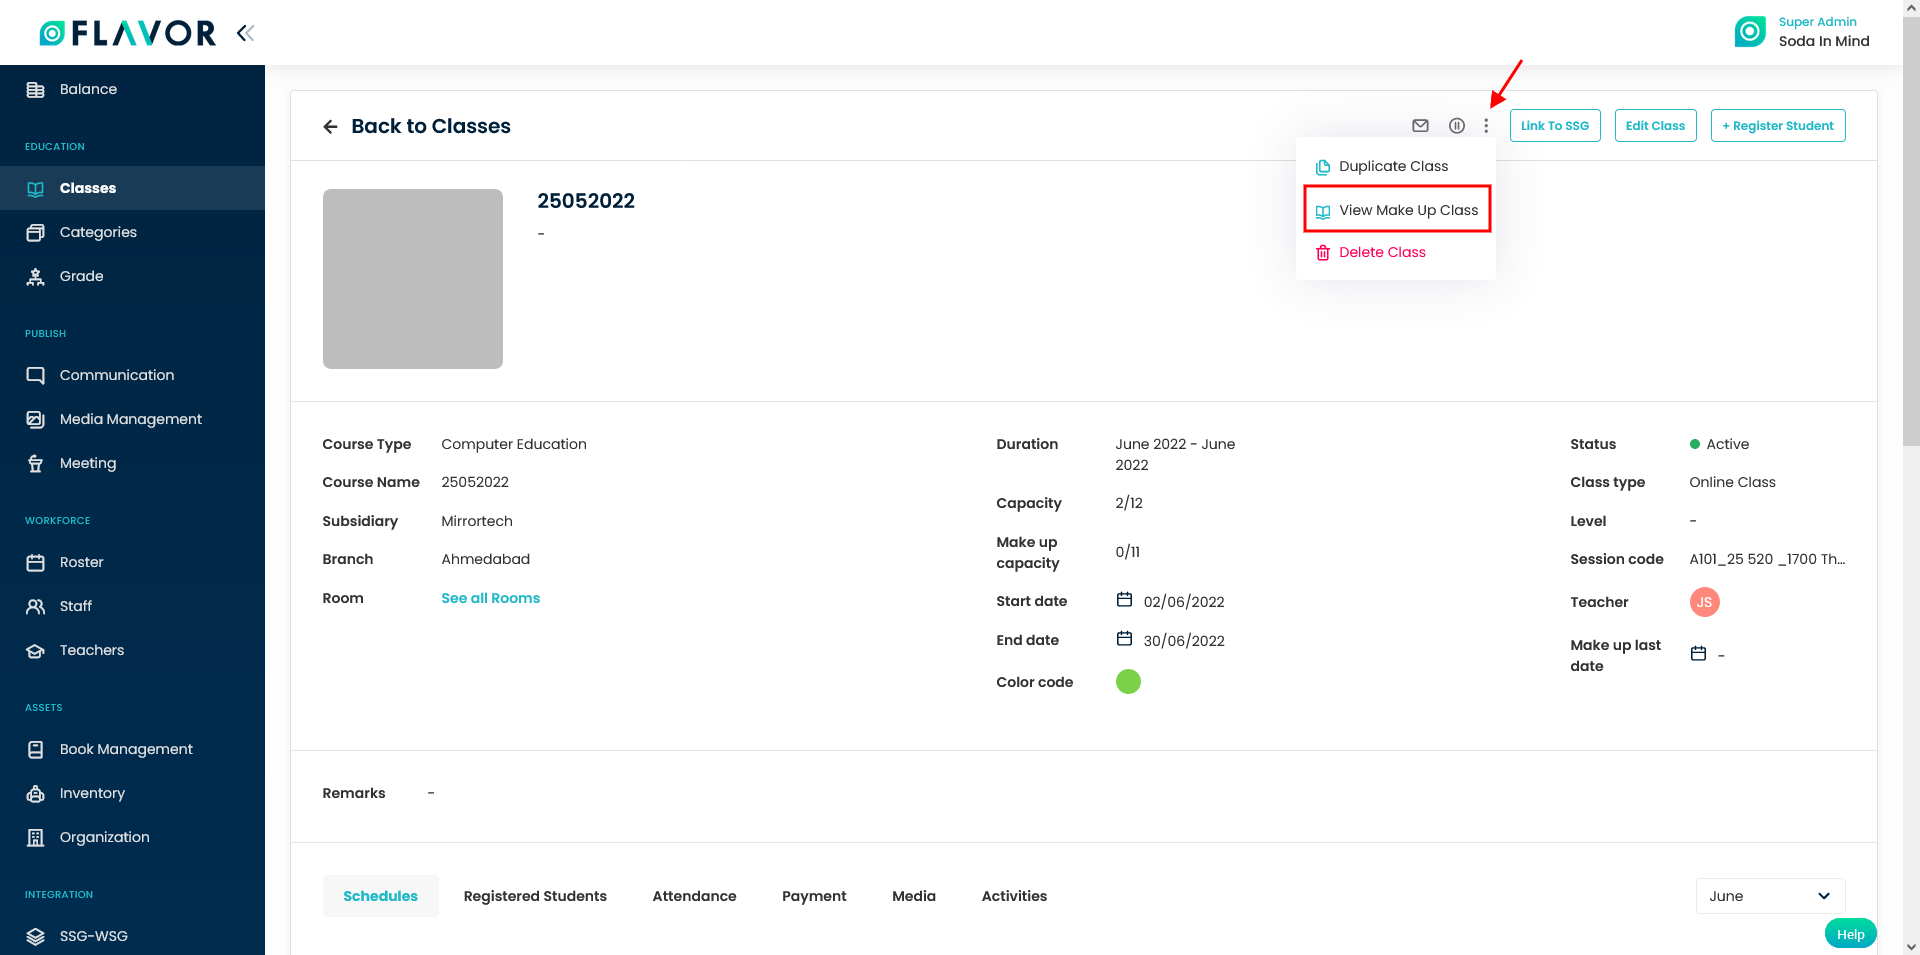
If this class is the original class, when the user clicks the view make up class it will redirect to the make up class page. If this class is the make up class, then this button will redirect the user to the original class. This button will be there If only the setting standalone make up class is on.
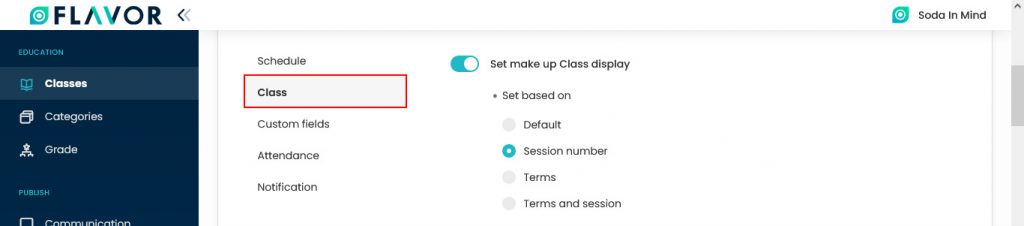
Set Makeup Class Display
This option is off by default, you can enable this option by switching it. After enabling this you can number of options through which you can set the makeup class based on these options.
- Default: To set admin can make up the class based on their preference. Admin will select the date and the reschedule class will be listed based on what session this class have which have the same date as admin choose. By clicking on the radio button you can enable this option.
- Session Number: When the admin chooses the session number, then the admin can choose the same session number as the original make-up class.
- Terms: When an admin choose a term, then admin can choose the same term for the reschedule class as the original make-up class term
- Terms & Session: When the admin chooses a term and session, then the admin can choose the reschedule class as the admin had in the original class.
Enable last make up date
This switch is disabled by default. When you enable this switch, then you have the option to set the last make up date. It can be set based on number of days or hours, after or before the class starts. For example, if it is set as 2 days before class starts, then you can create make up class till two days before the class starts. After that, the session will not be visible to the user.

Set Makeup Balance
Navigate to this setting. This is off by default, you can enable this option by switching it. To set up class payment. If it’s on then the user needs to pay for the makeup class with some restriction rule.
- Set no. of free reschedules allowed for each course: Total of free makeup class, by default it’s 0
- Set reschedule fee: Makeup class fee after the free makeup class ran out. By default, it will 0

Makeup Settings
From Class Settings
From the From Class Settings, you can enable/disable fields as per you need. While creating the makeup class, the Original Class section having Class field will have all the following fields as items in that field.
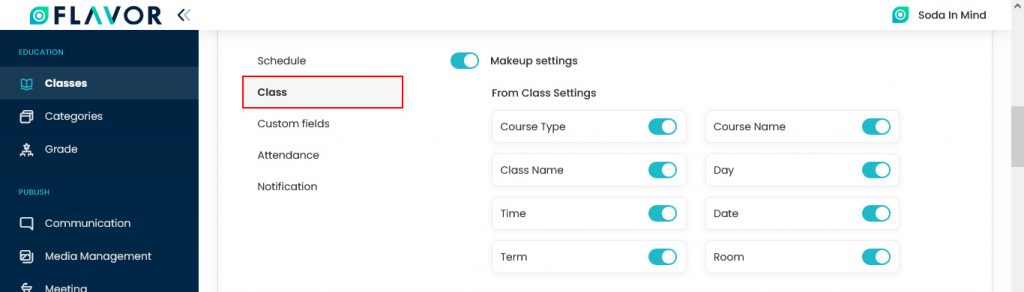
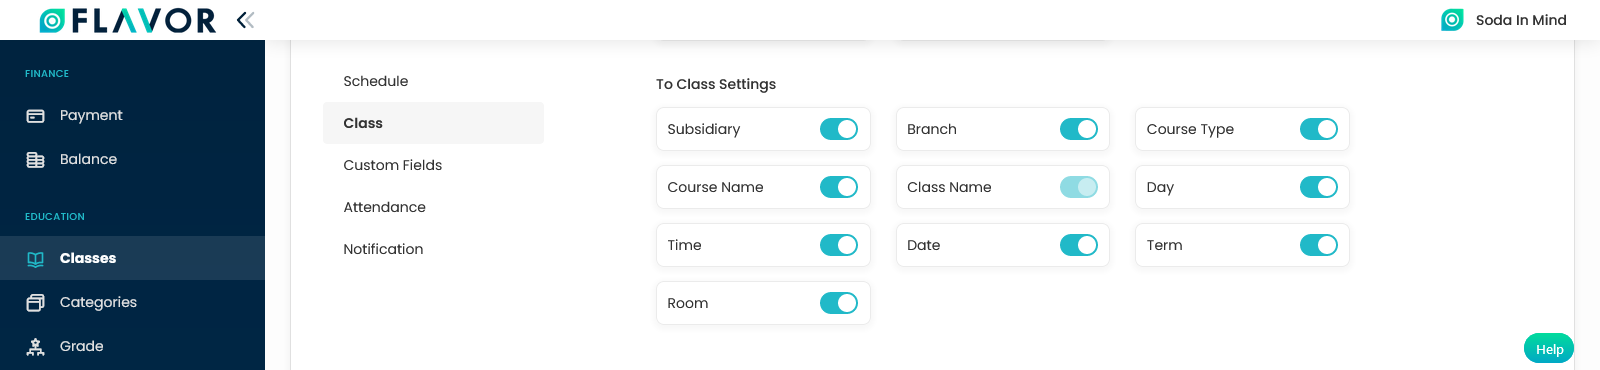
To Class Settings
From the To Class Settings, you can enable/disable field as per you need. While creating the makeup class and selecting type as Add from Existing Classes, the Reschedule to section having Class field will have all the following fields as items in that field.
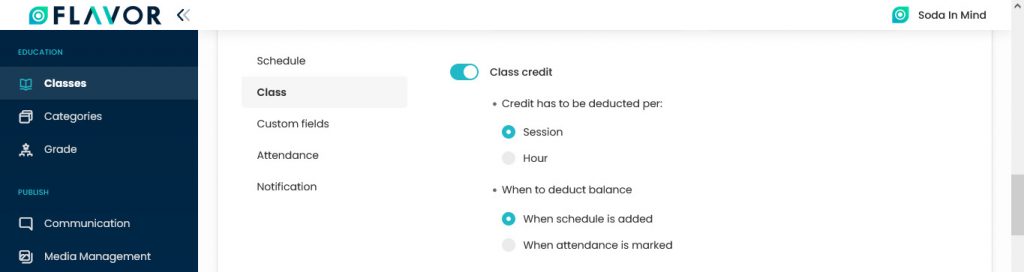
Class Credit
- To turn on the class credit system. If it is not set as on, then on create class > fill payment details > not generate invoice the class credit option will not appear and set complimentary (no charge) as default value.
- Session: To deduct the class credit per session of class that student enrolled.
- Hour: To deduct the class credit per hour of a session that student enrolled.
When to Deduct Balance
- When Schedule is Added: The class credit will be deducted once students enroll to the class.
- When Attendance is Marked: The class credit will be deducted once student marked their attendance.
Set Transfer Students
Navigate to the set transfer students settings. Enable this option by switching. After enabling you will see the list of options.
- Class: Enable this option to transfer students from one class to another.
- Course Name: Enable this option to transfer students from one course to another.
- Course Type: Enable this option to transfer students from one-course type to another.
![]()
Set Class Commission:
Navigate to the Set Class Commission section. By default, this option is off you can make this on by switching. You can see this option in the Fill Payment Details. This is for a specific class for a specific teacher.

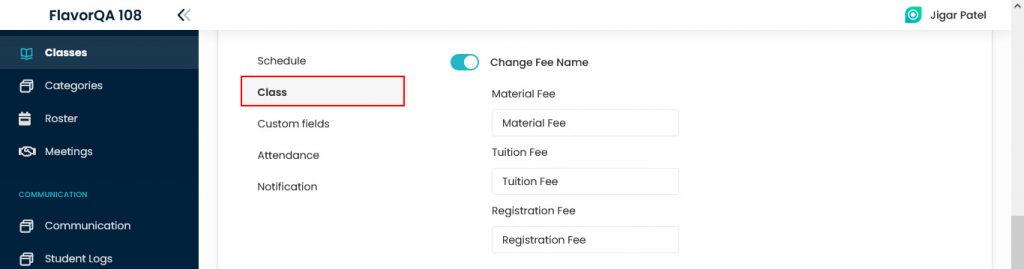
Change Fee Name
Navigate to the Change Fee Name. You can enable this option by switching. From here, you can change the name of the One-time payment fields.
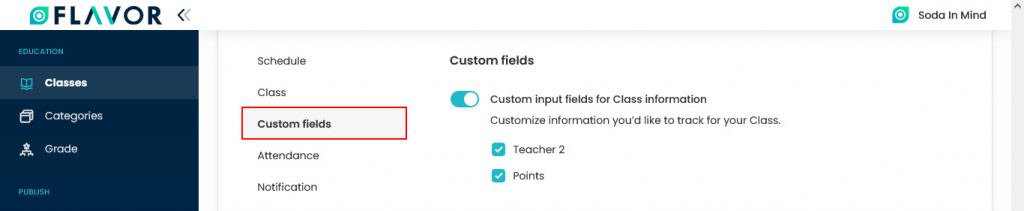
Custom Fields
Navigate to the Custom Fields. You can enable this option by switching. To set on additional fields in creating a class.
- Teacher 2:To add teacher 2 when creating a class.
- Points: To add max. point field in creating a class.
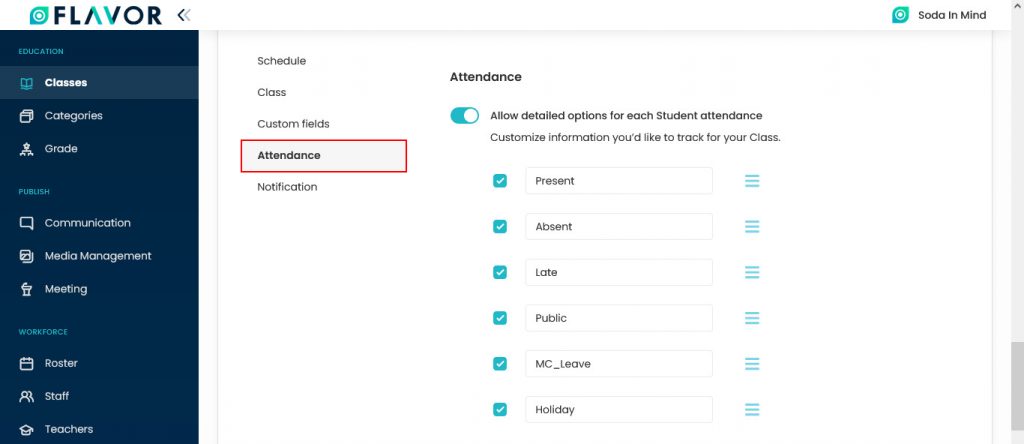
Attendance
- Navigate to the Attendance Section. You can enable or disable this field by switching.
- You can customize information you’d like to track for your Class.
- Here, you can see the list of relations Present, Absent, Late, etc.
- You can enable and disable these options by marking the checkboxes.
- You can change the sequence of the status of the attendance by clicking on the drag & drop icon.
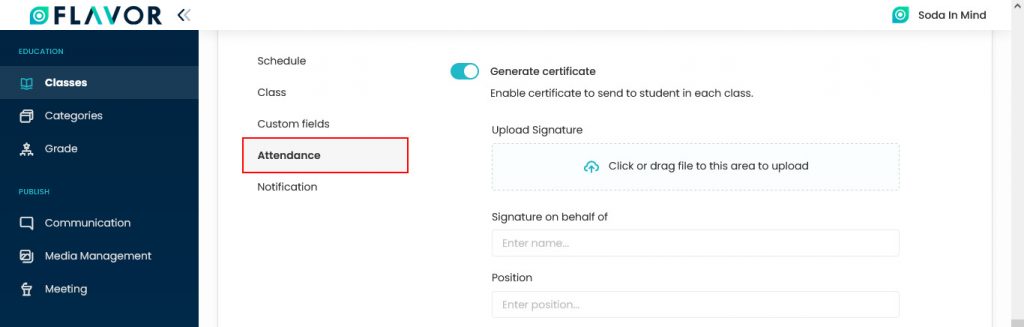
Generate Certificate
Navigate to the General Certificate. If you want to send certificates to students in each then enable this option by switching.
- Upload Signature: Upload the signature here.
- Signature on behalf of: Enter the name of the person on whose behalf will be signed.
- Position: Here, enter the position of the signatory.
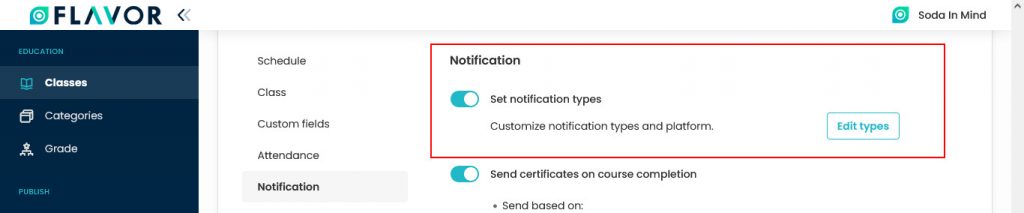
Notification
Navigate to the Notification section.
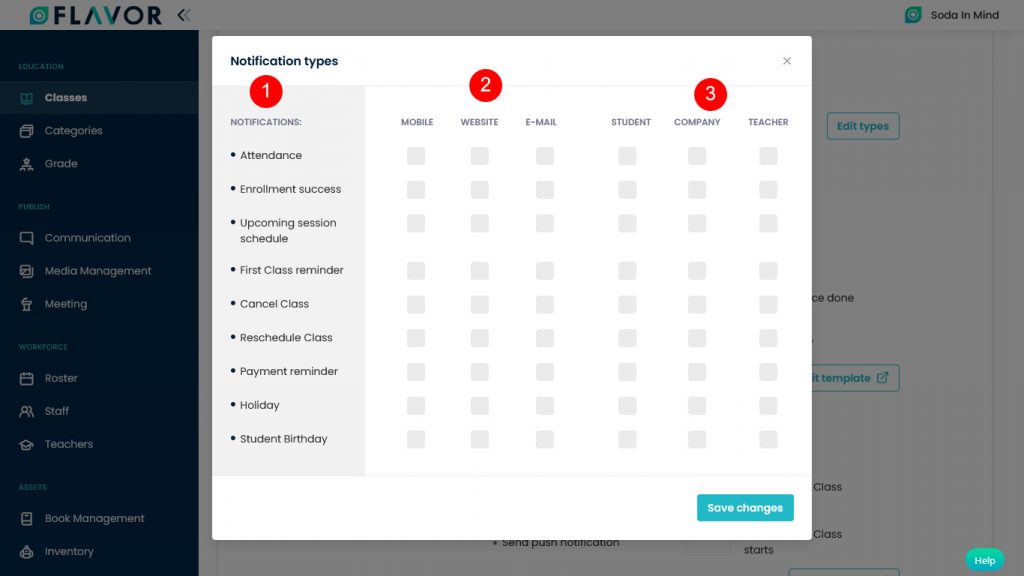
Set Notification Types: You can enable & disable this option by switching.
- Edit Types: Click on the Edit types button to customized to whom the notification is for and, what platform should it be sent.
- After clicking on the Edit Types a popup named Notification Types will be open.
- This popup is divided into three columns.
- Notifications Column: In this column, you can see the list of types of notifications.
- A platform where the notification will send: In the second column you can see Mobile, Website & Email options.
Mobile to mobile phone student.
Website to send the notification to app.flavorcrm.com.
Email to a sent notification to student or parents or teacher email. - 3rd Column: The one who will receive the notification.
- After the setting click on the Save Changes button.
Send Certificates on Course Completion
Navigate to Send Certification Course Completion, enable and disable this by switching. To send the certification when the course has finished.
Send Based on: On which basis the student and client have to give the certificate, it is decided here.
Attendance: Parameter of certification which will send based on attendance student.
Session Number: Parameter of certification which will send based on the total session on which students enrolled.
Percentage of when the parameter will be valid and the certificate will send:
- If the setting is based on attendance the percentage will be based on attendance students.
- If the setting is based on session number the percentage will be based on the session number of students enrolled.
Edit Template: To change the settings click on the Edit Template button you will be redirected to the Flavor’s Notification Settings page.
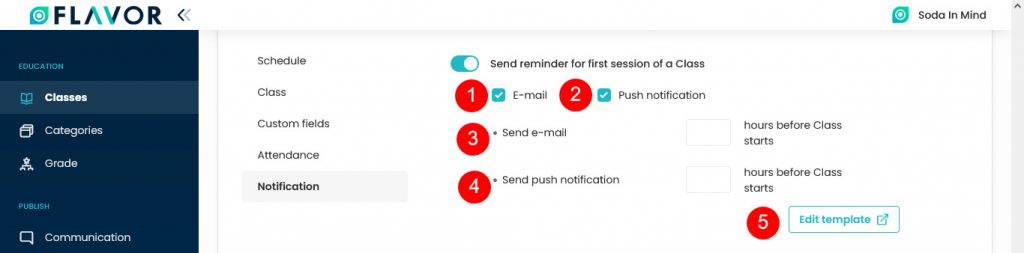
Send Reminder for First Session of a Class: Setting to send a reminder when the first session of a class will occur.
- Email: The reminder will be sent to the email.
- Push Notification: The reminder will be sent to the mobile notification.
- Send Email: Parameter of the number of hours to send the email.
- Send Push Notification: Parameter the number of hours to send the notification.
- Edit Template: To change the settings click on the Edit Template button you will be redirected to the Flavor’s Notification Settings page.
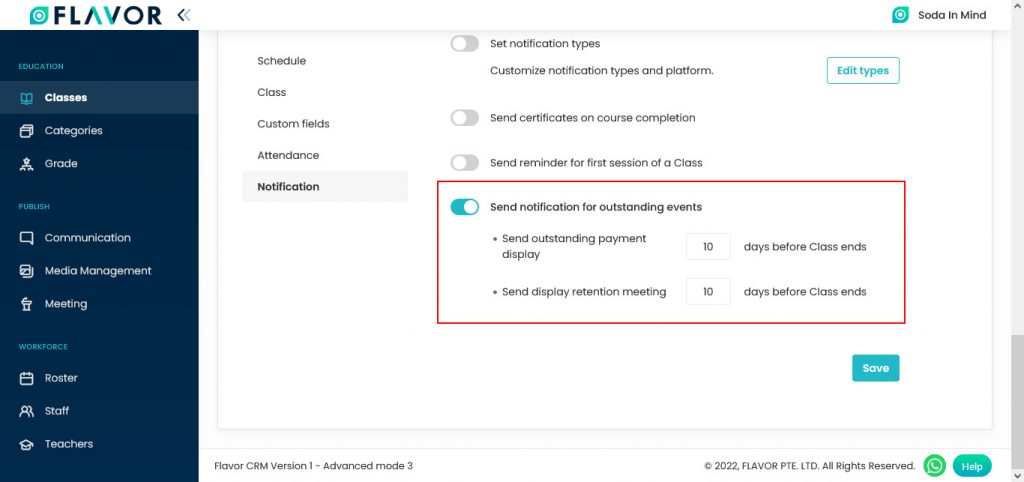
Send Notification for Outstanding Events
Navigate to the Send Notification for Outstanding Events, enable or disable this option by switching. This option is used to send a notification if a school have outstanding events.
- Parameter to remind payment before the events.
- Parameter to remind before the event.
Attendance
In the top right corner of the Class Module, you can see the Attendance button. After clicking you will be redirected to the Attendance page. This page has two sections, Pending Attendance & Attendance History. Here, you can see the listing of all attendance per session which has students enrolled inside the particular session.
Pending Attendance
Here, you can see the list of upcoming attendance of students of all classes.
Date
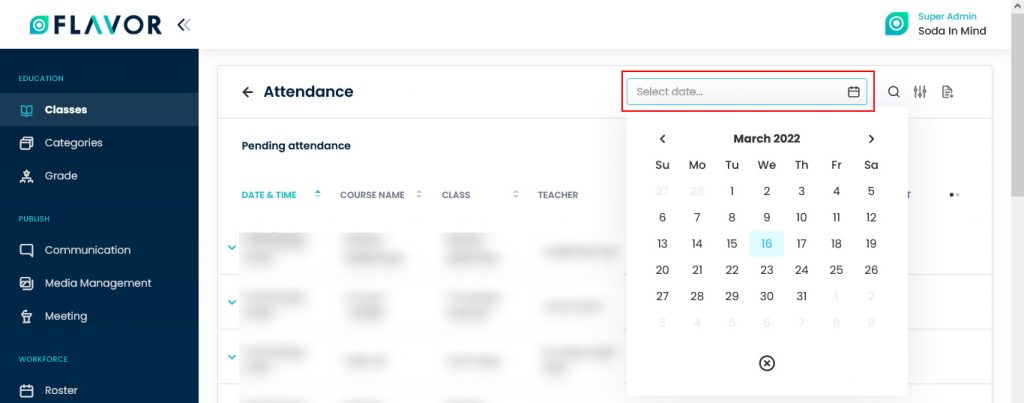
Navigate to the Date Picker, click on it, a calendar will be open, select the date and month for which the attendance is to be checked. Here, you can check the attendance of Classes by the date.
Search
By clicking on the Search Icon, you can search the specific classes by entering the course name or teacher name.
Filter
You can filter the classes based on specific parameters. Click on Filter Icon, after clicking, a popup form named “Filter ” will appear on your screen. Enter the Date, Subsidiary & Branch, Course Name, Class, Teacher. Click on Apply button to save parameters.
Export
- To export all data, you need to click on the Export Icon.
- After clicking on the Export icon, a pop-up form will appear on your screen.
- Start Date and End Date: Select the time period in the start date and end date column for which time period’s data you need.
- Select Data to Export: Here, you can export the data of all rows or 15 rows by simply clicking on the dropdown.
- Select Column to Export: Select columns which you need your data to export. Like if you want all the data of Attendance, then simply click on “ALL DATA” and you will get the data of Attendance in your exported file.
- Export as: Then select a format in which you want to export your data i.e (EXCEL or CSV).
- After selecting the relevant data, click on the Export Data button to export all the data in the selected file (Excel/CSV).
Attendance Records
Column Sorting
All sources will be shown in Tabular Format. You can sort the data by clicking on Column Sorting Arrows in Table’s Header.
Column Visibility
You can sort columns by clicking on the Ellipsis icon, you will get the pop-up form named Select Data to View. Mark the columns you want to see and unmark the ones you don’t want to see in the table. After this procedure click on the Apply Filter button.
Expand Records
At the start of each record, there is an Expand Button (Down Arrow), after clicking on this button a record will be expanded. From here will get the entire information of any class. You can collapse the record by clicking on the same button.
Attendance Details
- Click on any record to check the details. A Class Profile will be open, here you can see the number of students and set the status of their attendance.
- If a student is absent, select the Absent option from the dropdown & if a student is attending the class, select the Present option.
- If a student is on leave because of any reason or is late then go to the Details Column. Here, you can see a dropdown, click on that. There, you will see various options. Mark the attendance accordingly.
- Mark all as Present: Select all students by enabling the check box if all students are present. Mark all as present button will be enabled and in the details column, all students’ attendance will be marked as present.
- Click on the Save button.
Attendance History
Navigate to the Attendance History. The Attendance History section will show you the attendance of all past classes.
Attendance History Options
Export
- To export all data, you need to click on the Export Icon.
- After clicking on the Export icon, a pop-up form will appear on your screen.
- Start Date and End Date: Select the time period in the start date and end date column for which time period’s data you need.
- Select Data to Export: Here, you can export the data of all rows or 15 rows by simply clicking on the dropdown.
- Select Column to Export: Select columns which you need your data to export. Like if you want all the data of Attendance History, then simply click on “ALL DATA” and you will get the data of Attendance History in your exported file.
- Export as: Then select a format in which you want to export your data i.e (EXCEL or CSV).
- After selecting the relevant records/data, click on the Export Data button to export all the data in the selected file (Excel/CSV).
Attendance History Records
Column Sorting
All sources will be shown in Tabular Format. You can sort the data by clicking on Column Sorting Arrows in Table’s Header.
Column Visibility
You can sort columns by clicking on the Ellipsis icon, you will get the pop-up form named Select Data to View. Mark the columns you want to see and unmark the ones you don’t want to see in the table. After this procedure click on the Apply Filter button.
Attendance History Details
- Click on any record to check the details. An Attendance Profile of the selected class will be open. Here you can see the attendance history of students of that class.
- If a student is absent, select the Absent option & if a student is attending the class, select the Present option.
- If a student is on leave because of any reason or is late then go to the Details, a dropdown will be open. There, you will see various options. Mark the attendance accordingly.
- Mark all as Present: Select all students by enabling the check box if all students/customers are present. Mark all as a present button will be enabled and in the details column, all students’ attendance will be marked as present.
- Click on the Save button.
Class Replacement
Navigate to the Class Replacement link. Click on that link. After clicking you will be redirected to the Class Replacement page. Here, you can see the Transfer Class & Makeup Class tabs.
Transfer Class Tab
The transfer class tab listed all students who have transferred to another class.
Makeup Class Tab: The makeup class tab which listed all students who have done make up class.
Transfer Class Options
Search
Search By clicking on the Search Icon, you can search the specific class by entering the class name.
Filter
- You can filter the classes based on specific parameters. Click on Filter Icon, after clicking, a popup form named “Filter ”will appear on your screen.
- Enter the level, Status, Subsidiary & Branch, Course type, teacher.
![]()
- Select the date range, start time and end time of the class, select the day, mark the check box online class and select the class colour.
![]()
- Click on Apply button to save parameters.
Export
- To export all data, you need to click on the Export Icon.
- After clicking on the Export icon, a pop-up form will appear on your screen.
- Enter the Level, Status, Subsidiary, Branch, Category, Subject, etc fields.
![]()
- Date Range: Select the date.
- Enter the start time and end time of the class.
- Select the day
- Select the class colour.
![]()
- Select Column to Export: Select columns which you need your data to export. Like if you want all the data of the transfer class, then simply click on “ALL DATA” and you will get the data of all classes in your exported file.
- Export as: Then select a format in which you want to export your data i.e (EXCEL or CSV).
- After selecting the relevant records/data, click on the Export Data button to export all the data in the selected file (Excel/CSV).
![]()
Transfer Class
- To transfer the class click on the + Transfer Class. You will be redirected to the Transfer Class page.
- Here, top of the form you can see the message “Withdraw Student XYZ from this Class to enroll in another class.”
Select Class to Transfer
- Select Subsidiary, Branch, Course Type, Course Name, Class from the dropdown & Enter the Start Date & End Date of the Session.
![]()
Select Transfer’s Class
- Select Subsidiary, Branch, Course Type, Class Name & Class from the dropdown.
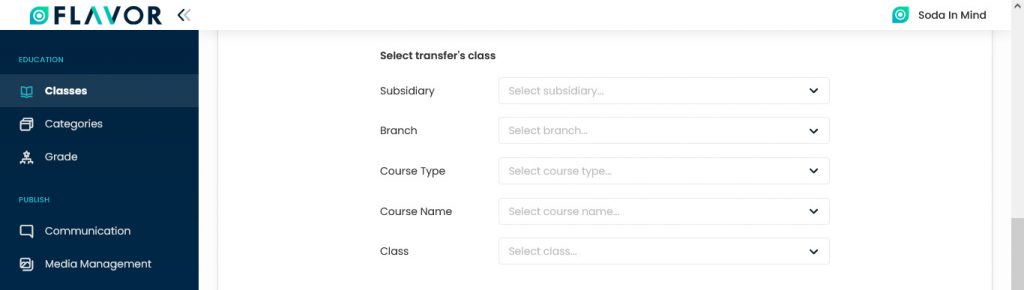
- After entering all the details you will see the dates and select session dropdown.
![]()
- Select Session: Select the date for the new session.
- If you want to remove any session click on the Cross X icon.
- A confirmation popup will appear.
- If you want to delete click on the Delete button.
![]()
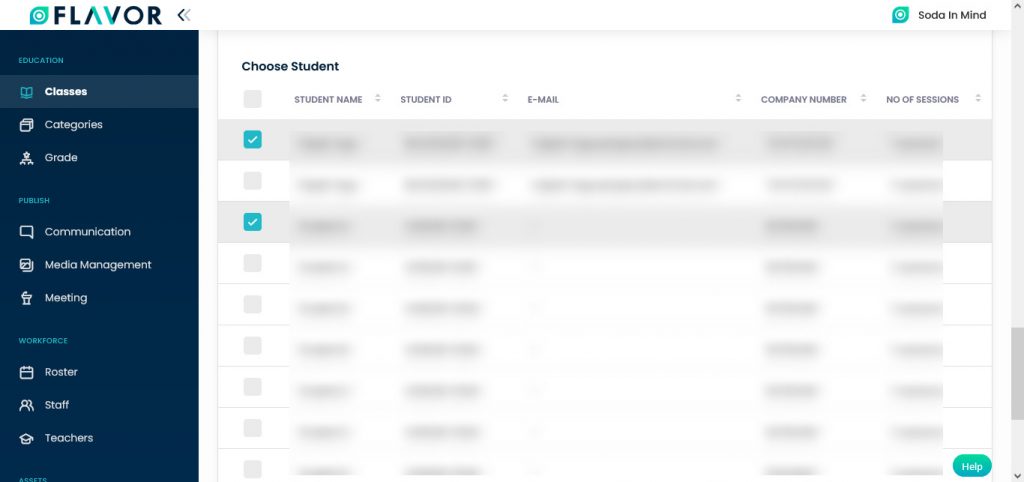
Choose Students
- Navigate to the Choose Student section.
- Select students from the list who wants to transfer their class.
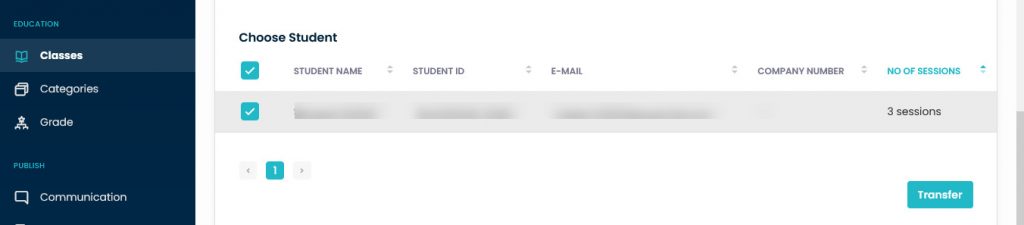
- After selecting students from the list click on the Transfer button, the student will be transferred to the desired class.
Transfer Class Records
Column Sorting
All rooms will be shown in Tabular Format. You can sort the data by clicking on Column Sorting Arrows in Table’s Header.
Column Visibility
You can sort columns by clicking on the Ellipsis icon, you will get the pop-up form named Select Data to View. Mark the columns you want to see and unmark the ones you don’t want to see in the table. After this procedure click on the Apply Filter button.
![]()
Expand Records
At the start of each record, there is an Expand Button (Down Arrow), after clicking on this button a record will be expanded. From here will get the entire information of any class. You can collapse the record by clicking on the same button.
![]()
Action Buttons
Click on the Action Button (Vertical Ellipsis), a popup box will appear on your screen with the Cancel Transfer option.
![]()
Cancel Transfer
- If you want to cancel the class transfer, click on the Cancel Transfer button.
- A confirmation popup will appear on your screen.
- Click on the Ok button to cancel the transfer.
![]()
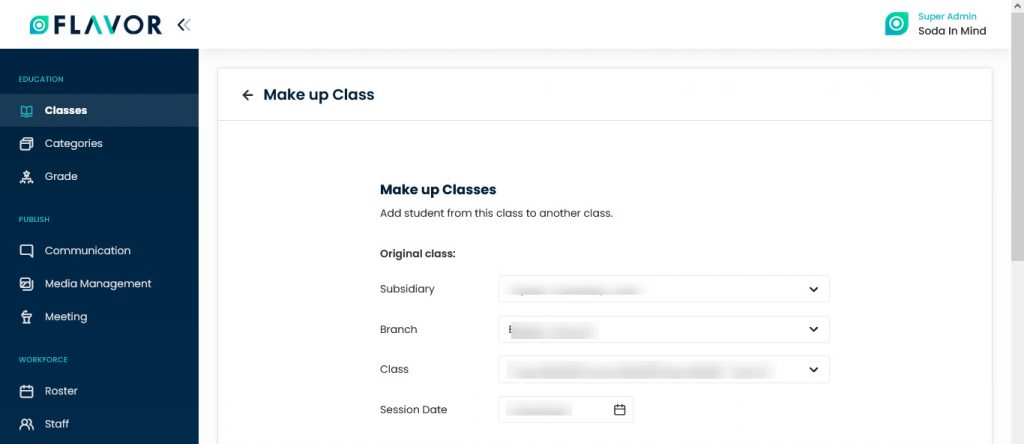
Create Makeup Class
To create a Makeup Class, click on the + Makeup Class button. You will be redirected to the Makeup Class page.
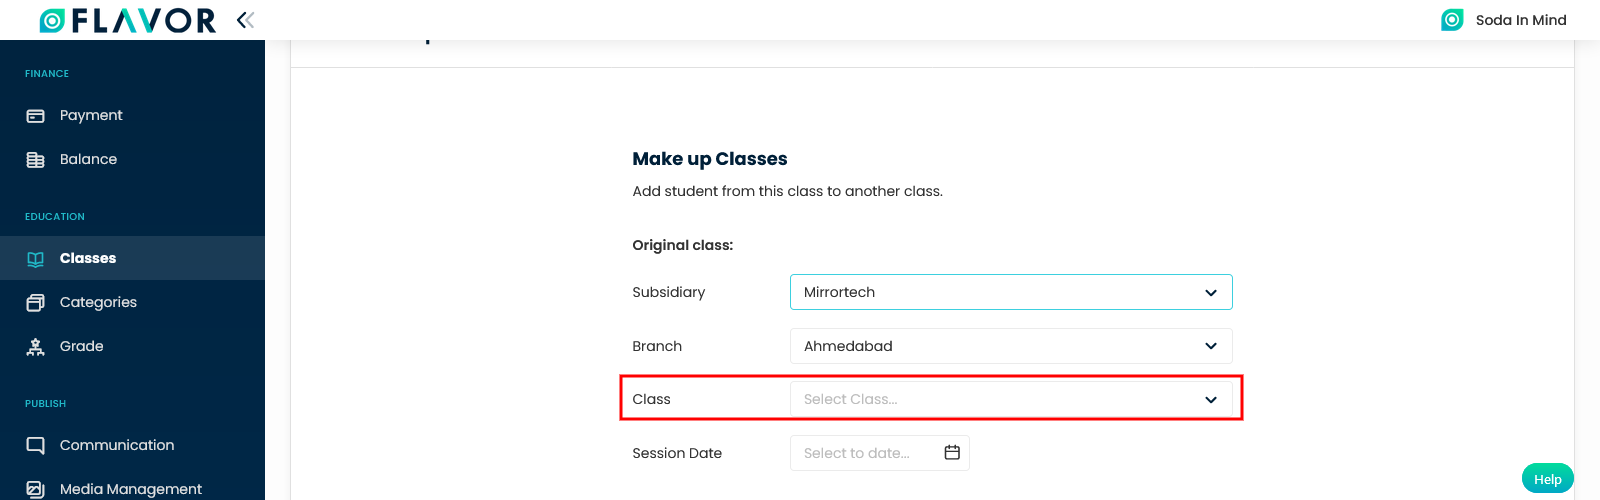
Original Class
- Select Subsidiary, Branch, Class from the dropdown.
- Select the date of the session.
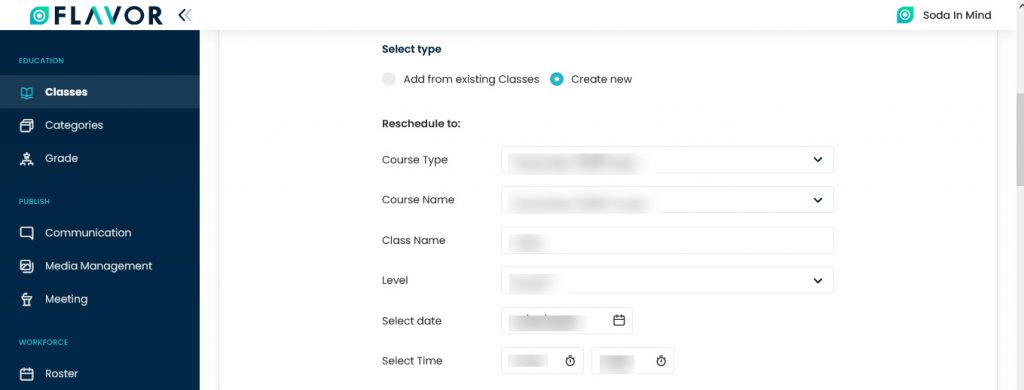
Select Type
In the Select Type, you can see two options, Add from existing Class & Create New.

Add From Existing Class
- Select Add From Existing Class by marking on the radio button.
Reschedule To:
- Select Subsidiary, Branch, Course Type, Course Name, Class Name & Class from the dropdown.
- Select the desired date for the new session.

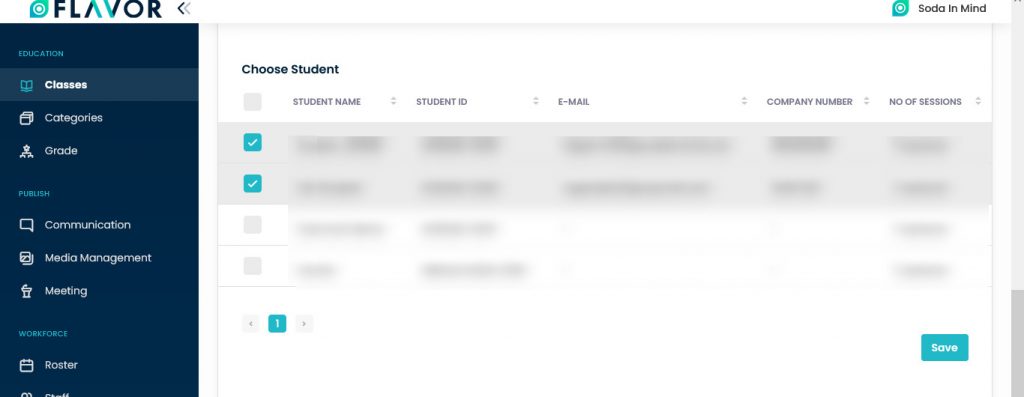
Choose Students
- Navigate to the Choose Students section.
- Select students from the list
- Click on the Save button.
Create New
If you want to create a new class then select the Create New option by marking on the radio button.
- Select the Course Type & Course Name from the drop-down.
- Enter the Class name.
- Select Level from the dropdown.
- Select Date.
- Select Time: Enter the start & end time of the class.
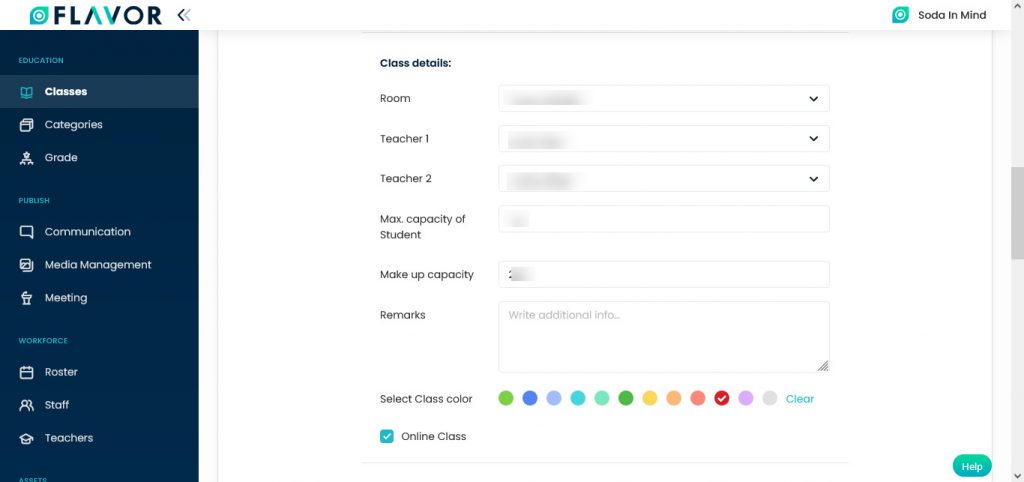
Class Details
- Navigate to the Class Details.
- Room is by default selected.
- Select Teacher 1 & teacher 2 from the dropdown.
- Enter the max. capacity of student & makeup capacity.
- Remarks: Write the description.
- Select the class colour.
- Mark the check box to make this class an online class.
Main Payment
- Enter the payment titles in the fields and enter the amount in Fee fields.
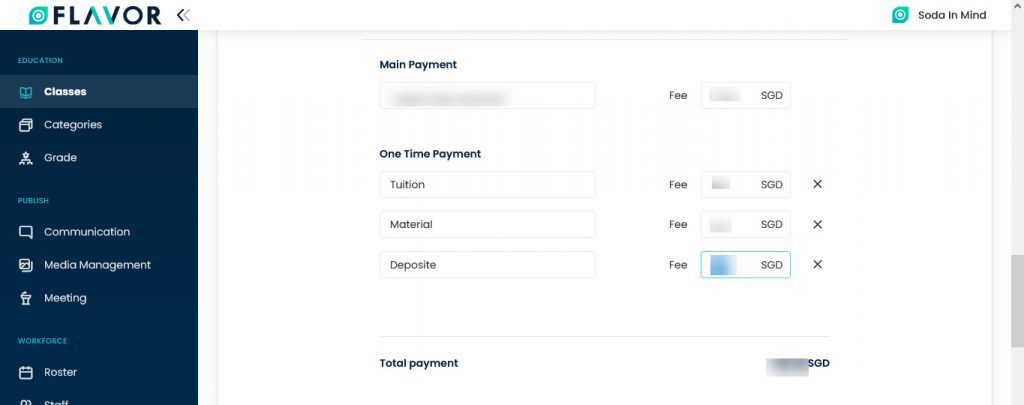
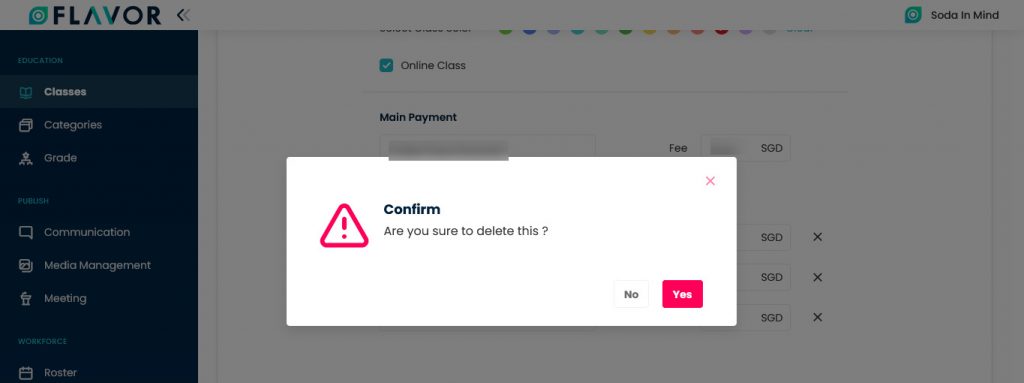
- If you want to remove any field click on the Cross X icon.
- A confirmation popup will be open.
- Click on the Yes button to remove the field
Choose Payment
- Navigate to the Choose Students section.
- Select students from the list
- Click on the Save button.
Need more help? Ask us a question
Please let us know more of your details and our team will reach out to you very shortly.