
Table of Contents
Introduction
The Settings module contains a wealth of different features for managing Flavor System. It can be found in the bottom left corner. By clicking on Settings, it will redirect you to the settings page. In this introductory article, we’ll go over what you can find in the Settings module.
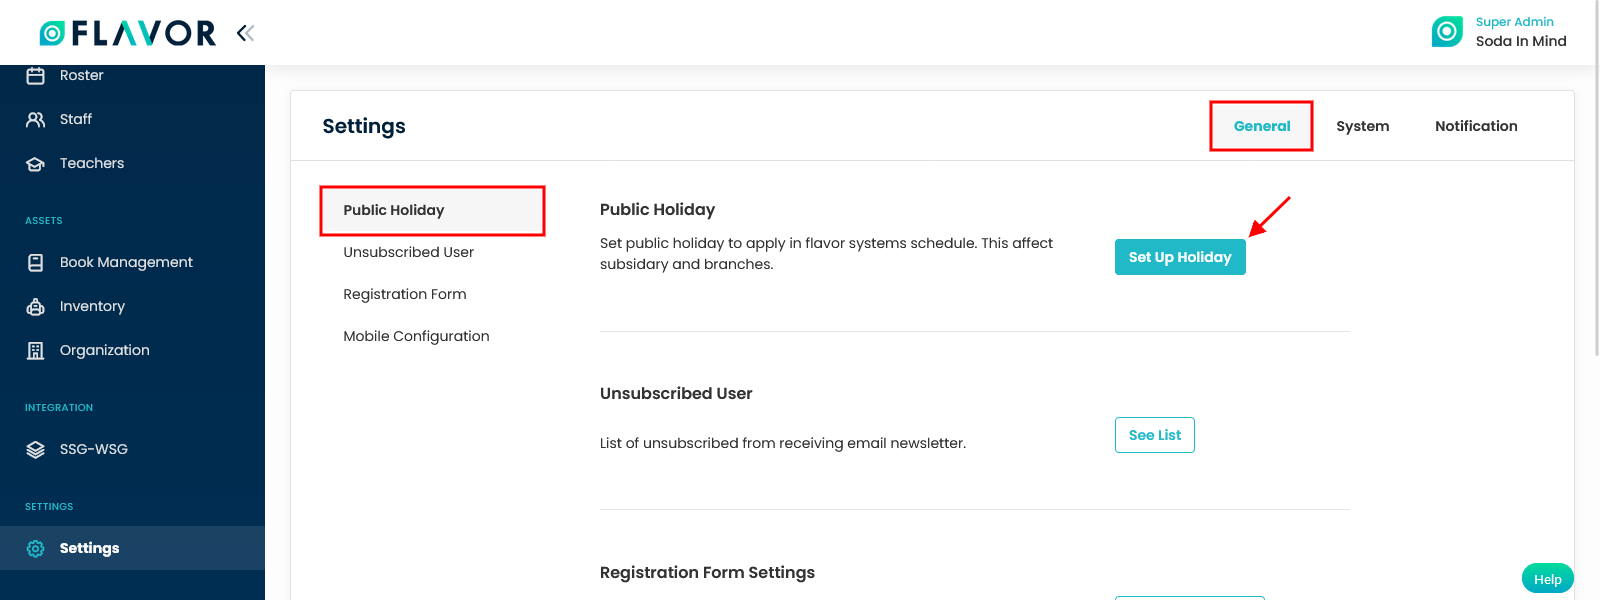
Here you can see the General, System and Notification Tab.

General
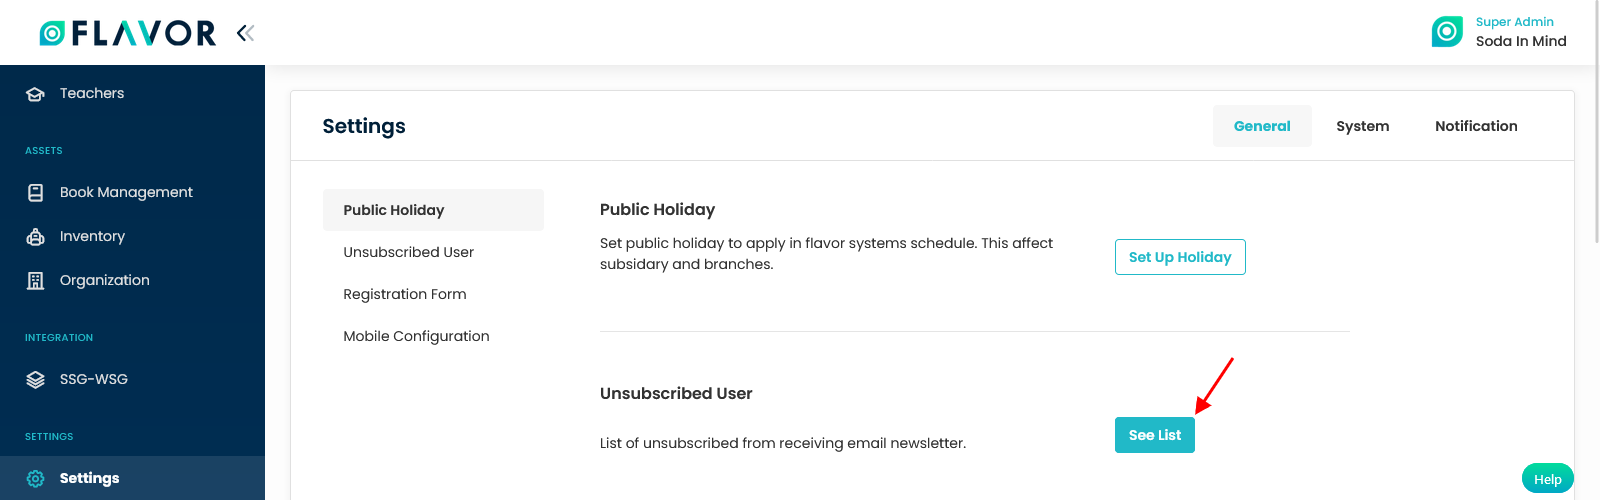
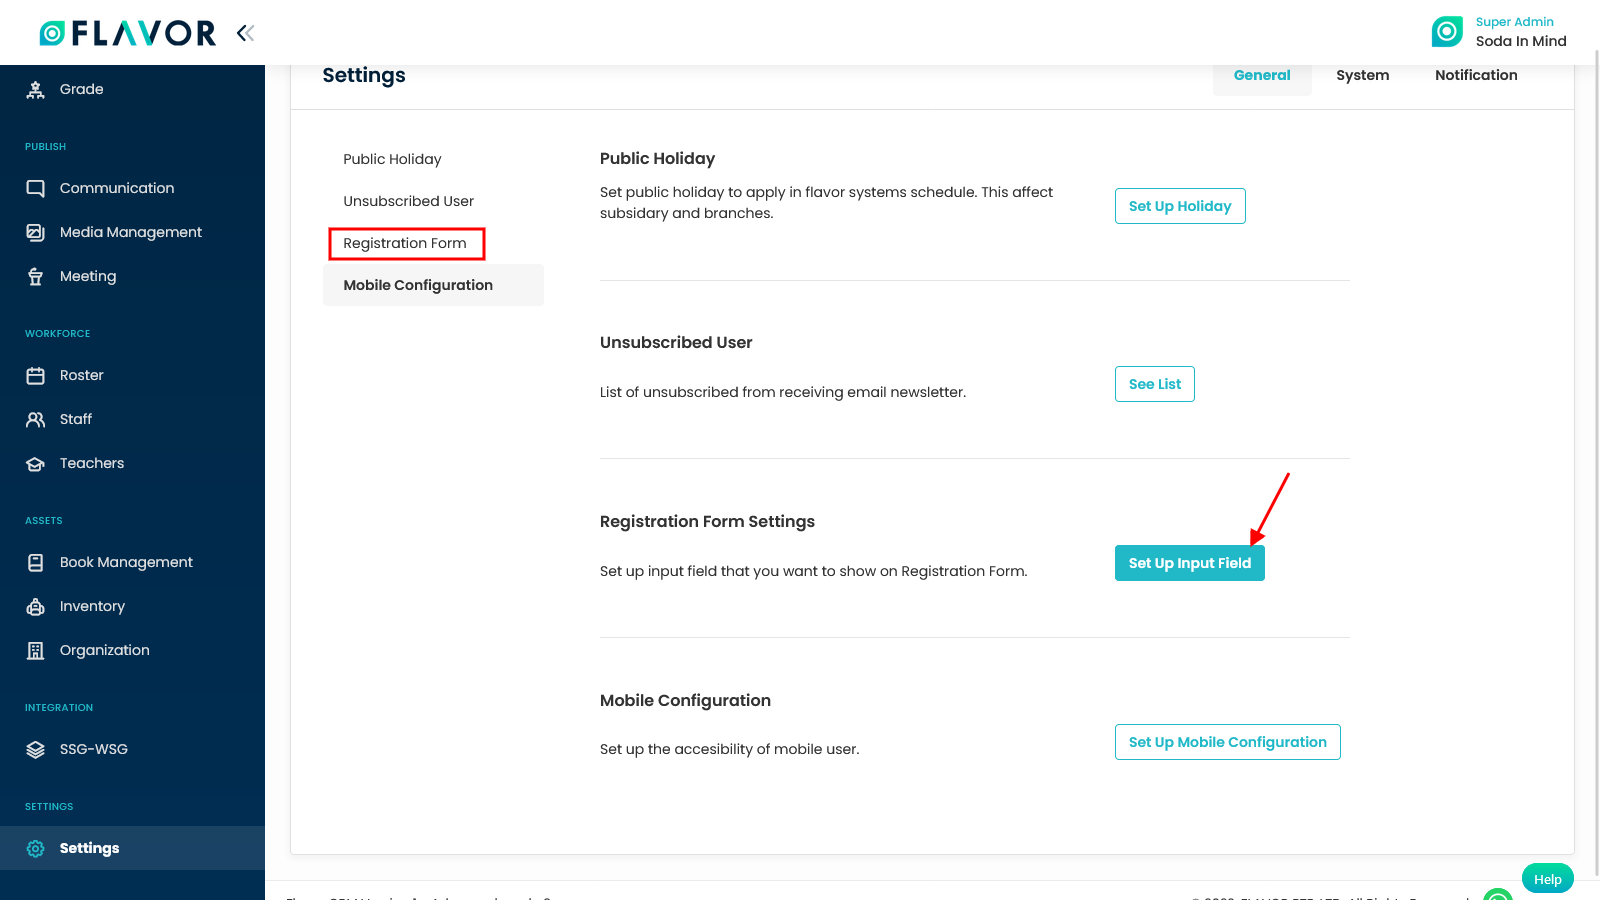
Under the general tab, we have settings for Public holiday, Unsubscribed User, Registration Form Settings and Mobile Configuration.
Public Holiday
Flavor System have a list of public holidays. Here, you can add public holidays which will be applicable in the flavor systems schedule. You can add subsidiary and branch wise public holidays.
Click on the Set Up Holiday button. It will navigate to the Public Holiday page.
Public Holiday Options
Search
You can search the public holiday records based on holiday name. To Search, click on the search icon. Enter the Holiday Name and press enter. Then you can see the search results in the list.

Filter
You can filter the public holiday records based on specific parameters like Subsidiary, Branch, Status, From date and To date. To open the filter pop up, click on Filter Icon. Select the data according to your need, then click on the Apply button to get filtered records.

Import/Export
To Import & Export holiday data, click on the Import/Export icon. By clicking on the icon you will see the Import Data & Export Data options.

Import Data
You can add public holidays in bulk. To do so, you can use the Import Data feature. To import data, click on the import data option, a popup named Import data will appear on your screen.

- Download the sample file: If you want to download the sample file, click on the Download button. A template will get downloaded on your device. The template has two format options viz. CSV and XLSX.
- Upload your file: Click on the Upload File button. A File Selector Window will be open, choose a .CSV or .XLSX file to upload. Then, click on Save, a popup window named Import data will appear on your screen. Click on Submit, and the data will be added in the list.
Export Data
To export the Holiday Data you need to click on the export icon. After clicking on the Export Data button, a popup named Export data will appear.

- Start Date and End date: Select the time period in the start date and end date fields for which data is required.
- Select Data to Export: Here, you can export all rows or 15 rows to 1000 rows based on selection from the dropdown.
- Select Column to Export : Select columns which you need to export. But if you want all the columns of Holiday, simply click on All data checkbox and you will get all the records of holiday in your exported file.
- Export as: Here, you need to select a format in which you want to download your data i.e. (EXCEL or CSV).
- After selecting the relevant options, click on the Export data button. A popup named Export data confirm will appear on your screen. You need to enter the email address where you want to send the file. And then click on the Submit button.

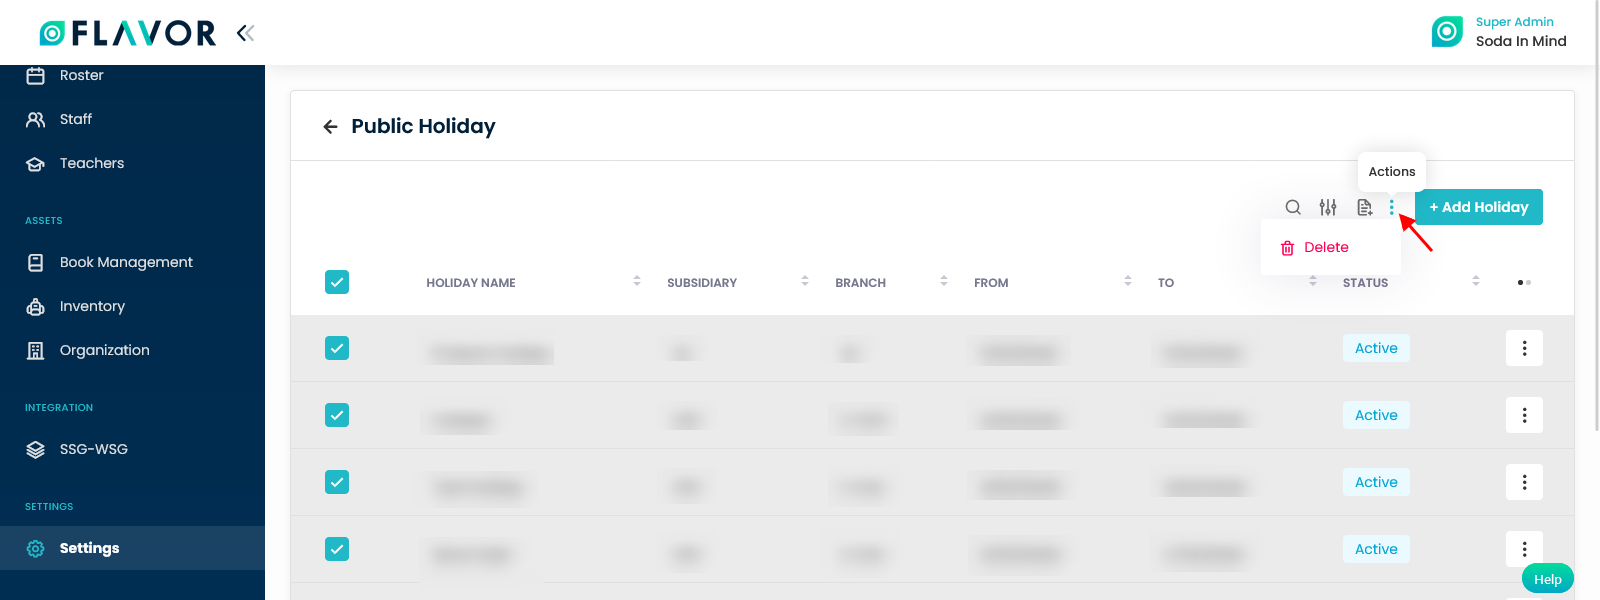
Bulk Action
Bulk action gets enabled if we check one or more public holidays from the list. Bulk action gives us the flexibility to delete records at a time.

Add Public Holiday
To Add a new holiday, click on the Add Holiday button. You can see a new popup form named Add Public Holiday on your screen.

You need to enter the details like Holiday Name, Subsidiary, Branch, From date, To date and Status. Then, click on the Create button and the new holiday will be added to the list.
Public Holiday Records
Column Sorting
Public Holiday records is shown in the tabular format. You can sort the data by clicking on the column sorting arrows in the Table Header.
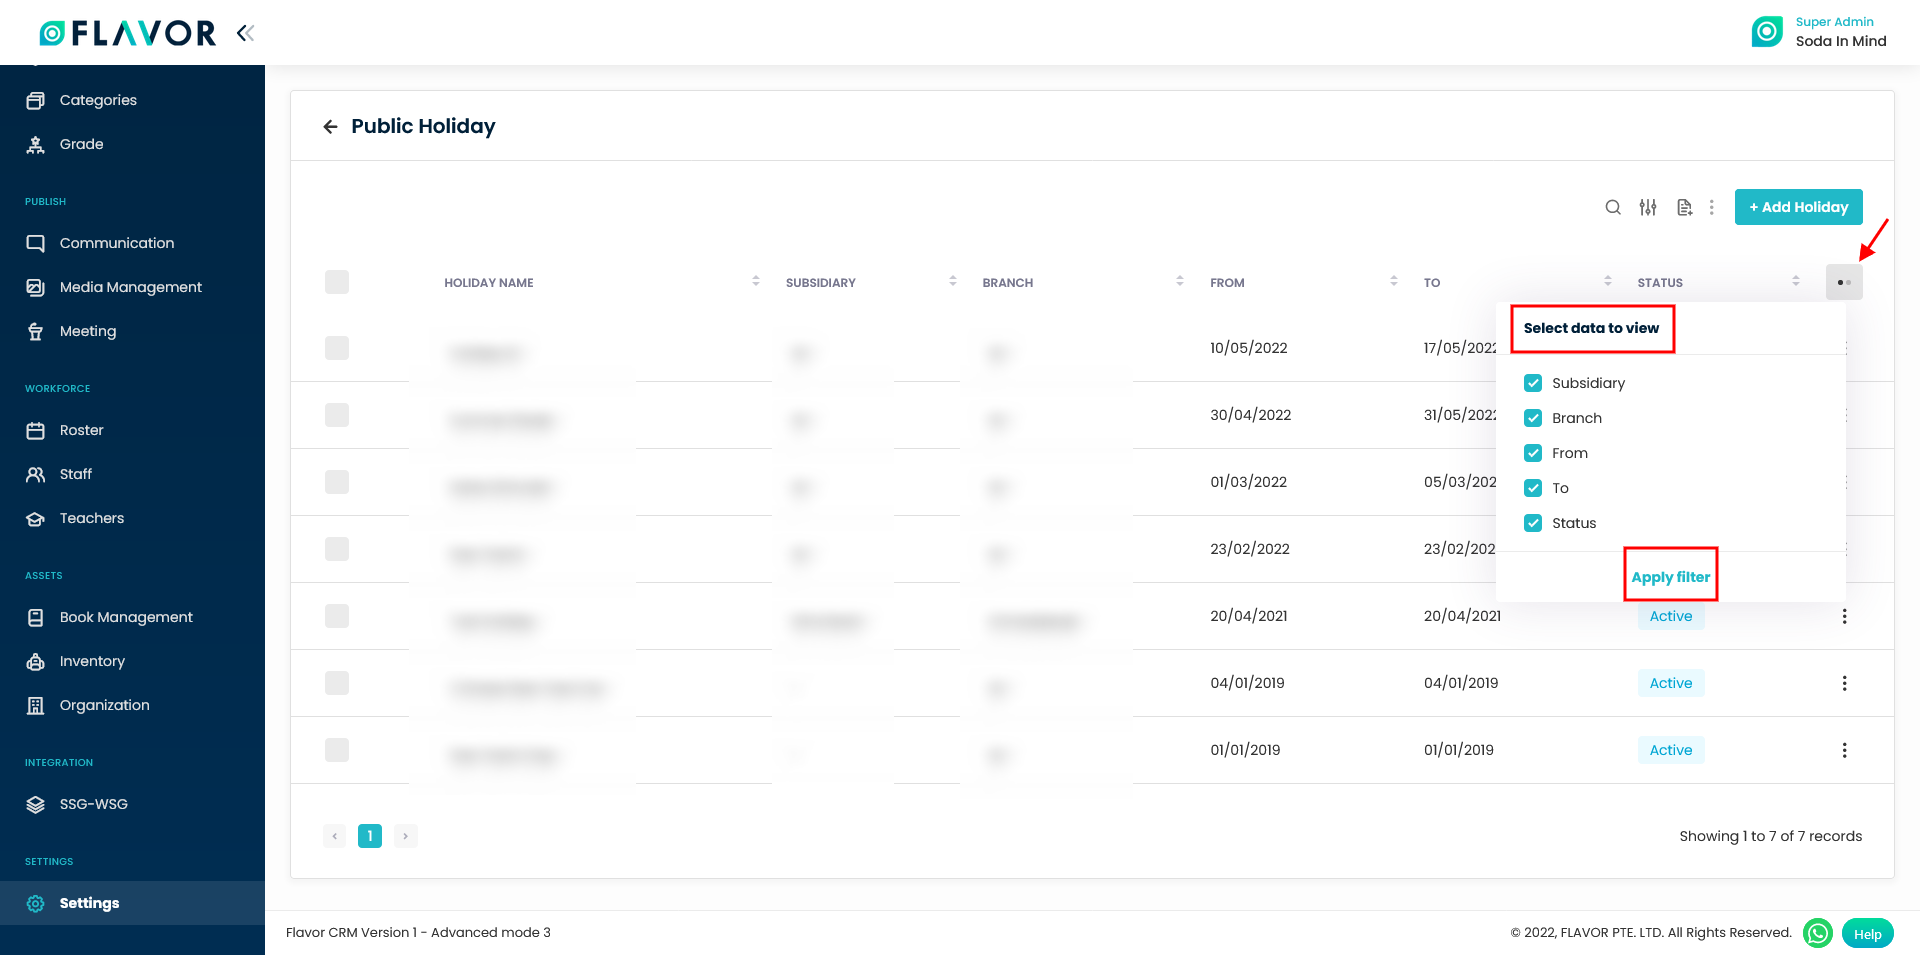
Column Visibility
You can sort the column visibility by clicking on the Ellipse icons. You will get a popup form named Select data to view. Mark the columns you want to see and unmark the ones you don’t want to see on screen. After this procedure click on the Apply filter button.
Expand Record
If you shrink the window size of the browser, then at the starting of all the records, there is an expand button(Down Arrow). Click on this expand button, the record will be expanded. You can see the rest of the columns here. You can collapse the record by clicking on the same button.
Record’s Actions
Click on the action button (Vertical ellipses), a popup box will appear on your screen with the Edit & Delete options.
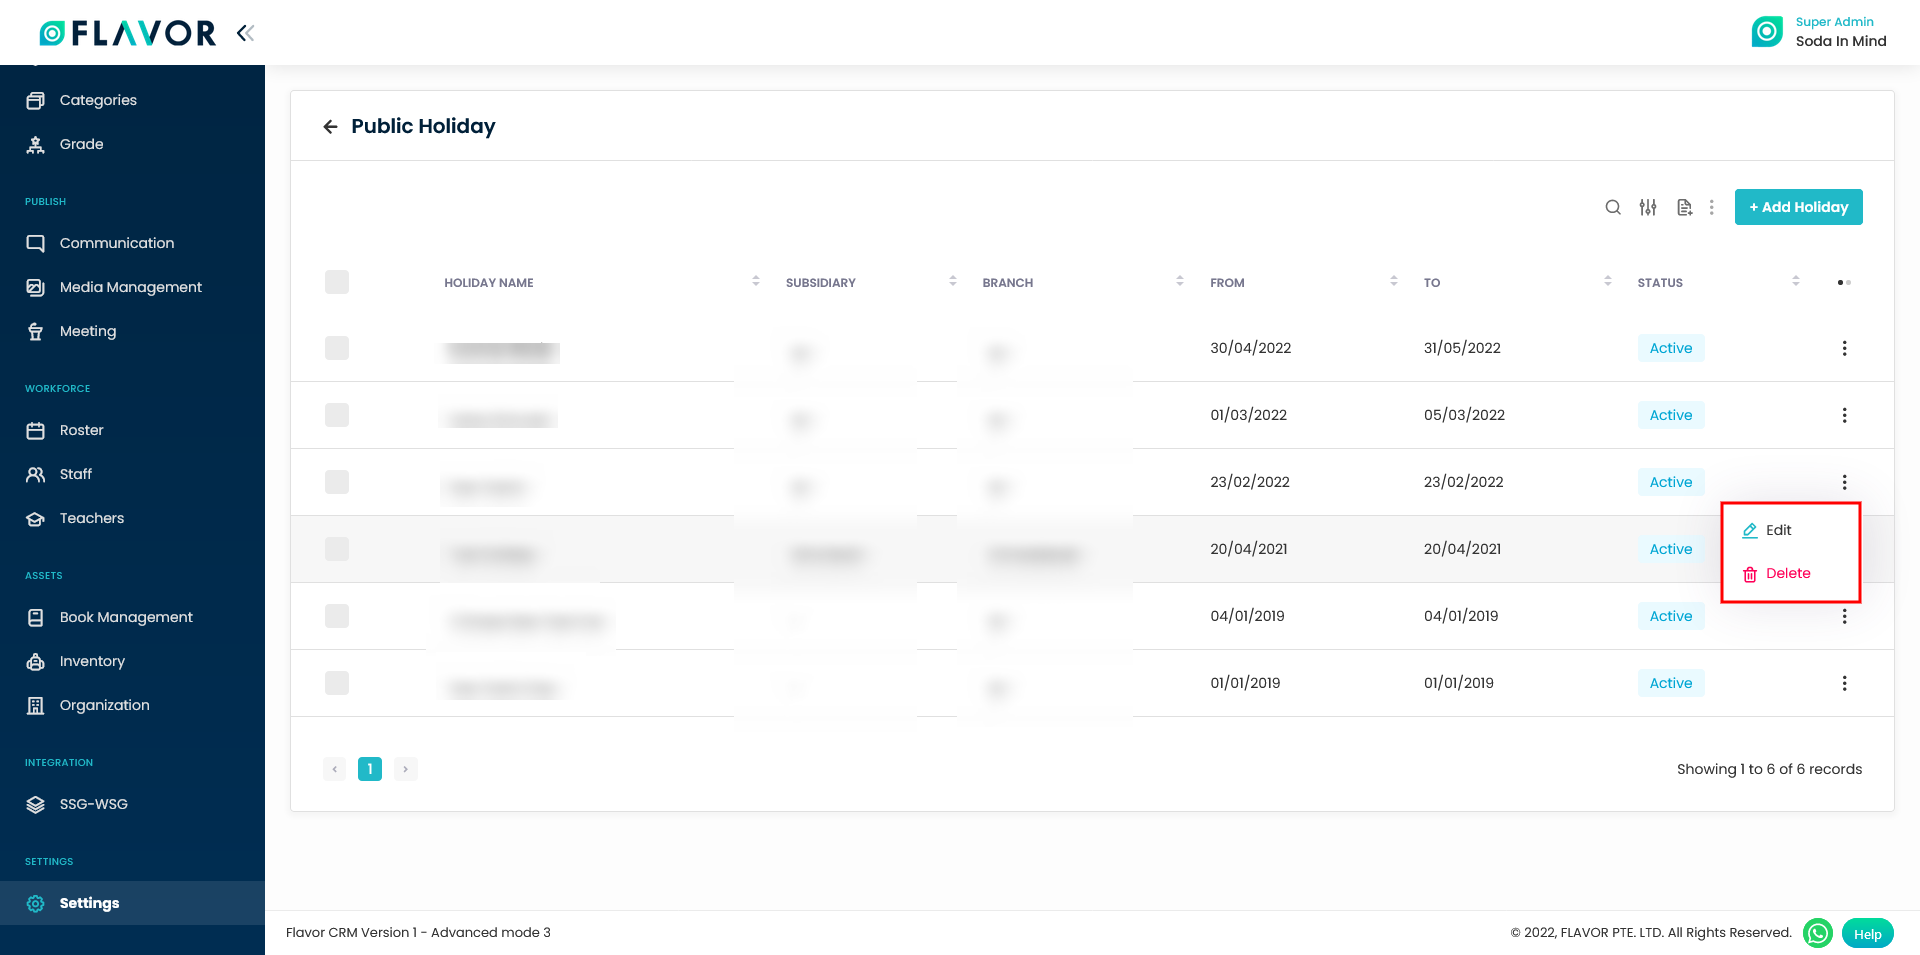
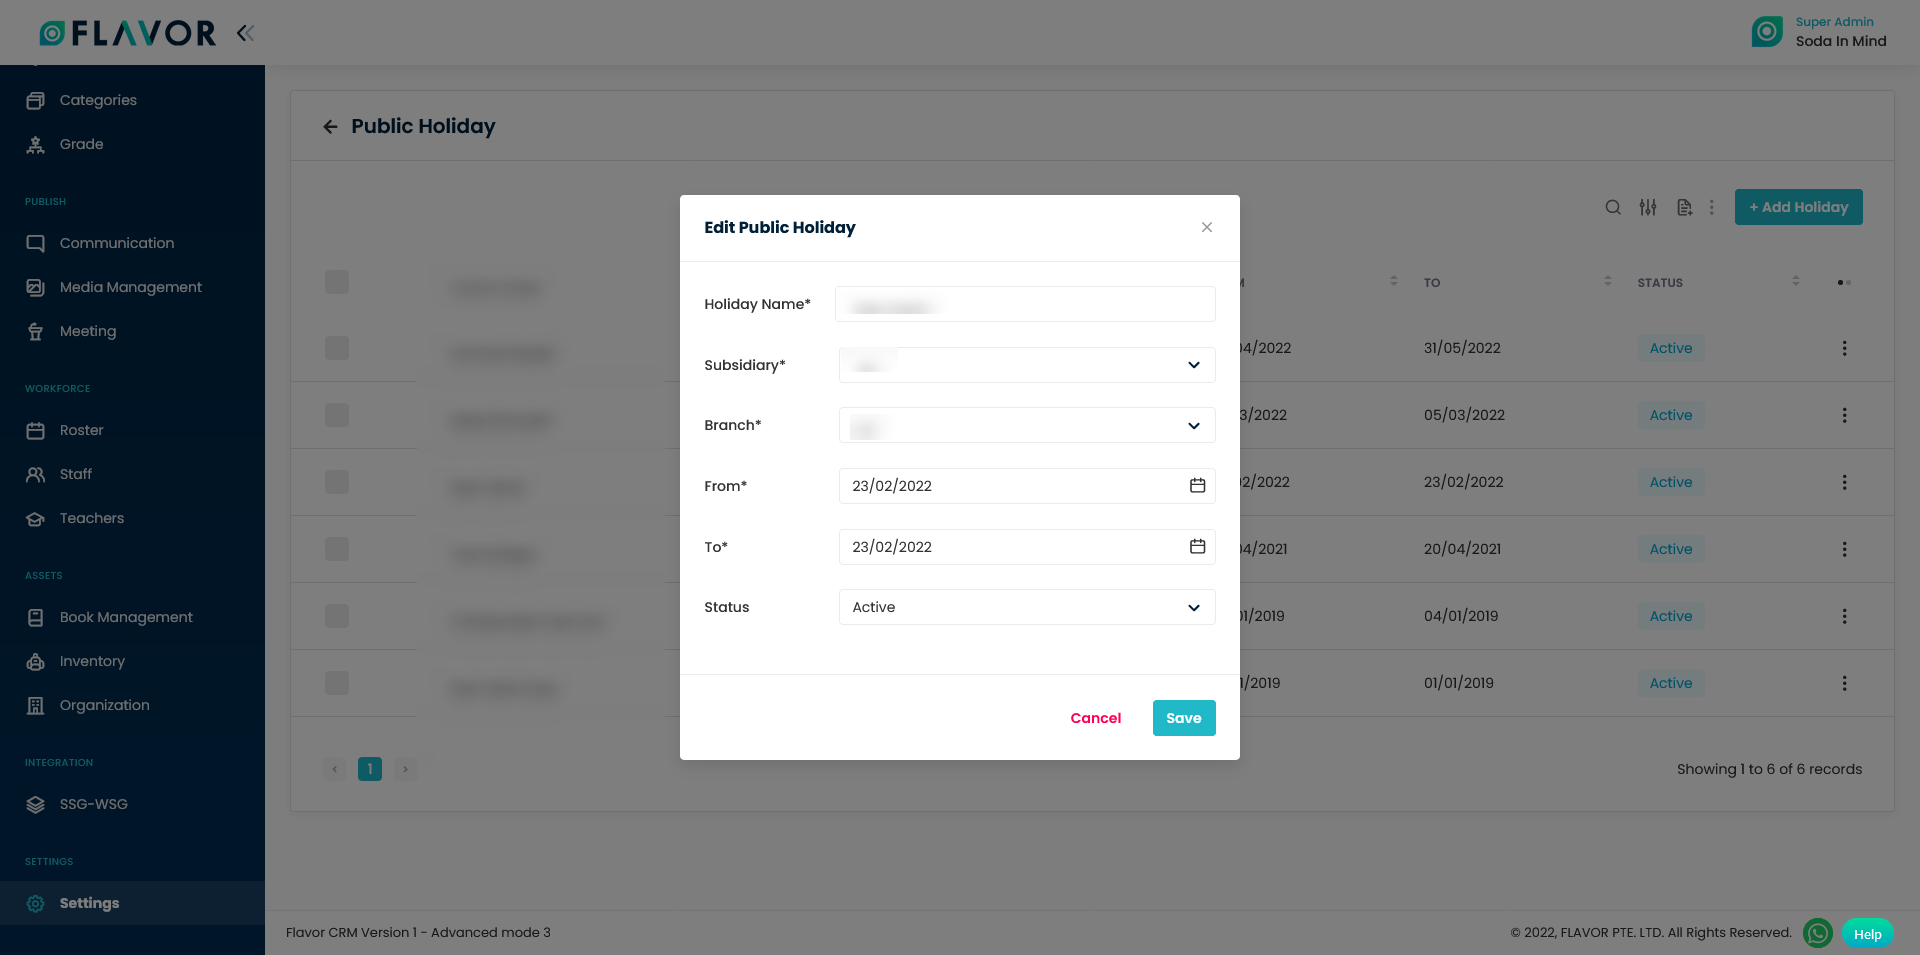
Edit
You can edit the details of any public holiday listed here. To do so, click on the edit option from the action popup and a popup form named Edit Public Holiday will appear on your screen. You can edit the details as per your need and click on the save button.
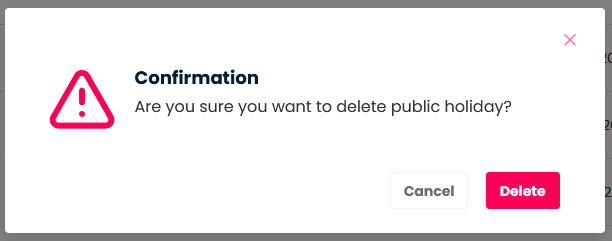
Delete
Click on the Delete option to delete that particular record from the list. A confirmation message will come up, then click on the Delete button.
Unsubscribed User
Flavor Edu Portal also provides various newsletter. User can unsubscribe from newsletter anytime. All the unsubscribed users is list out here.
Unsubscribed User Options
Search
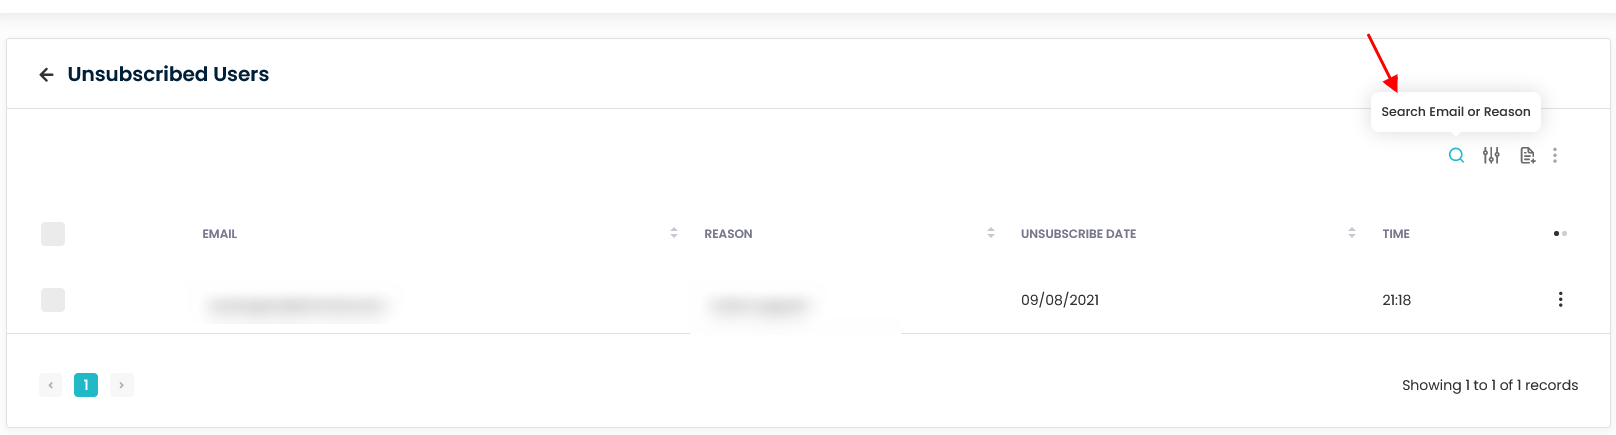
You can search the Unsubscribed Users records based on Email or Reason. To Search, click on the search icon. Enter the Email or Reason and press enter. Then you can see the search results in the list.
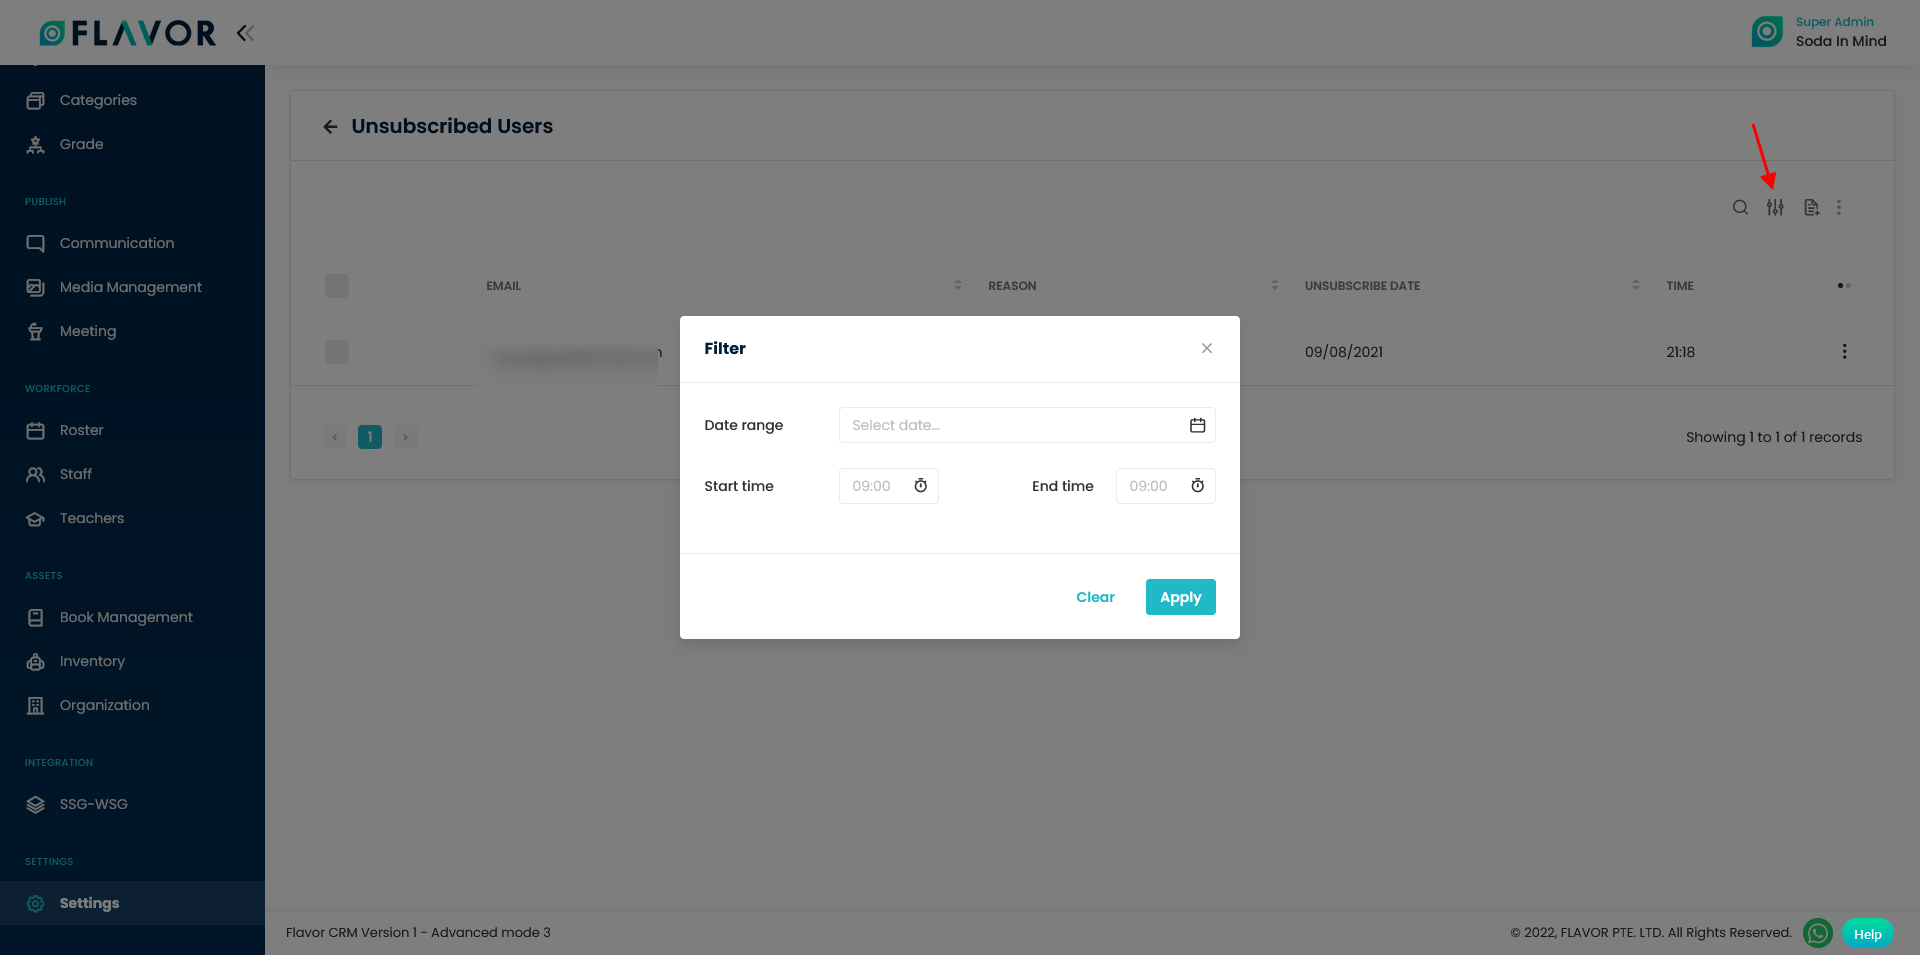
Filter
You can filter the Unsubscribed user records based on specific parameters like Date Range, Start Time and End Time. To open the filter pop up, click on Filter Icon. Select the data according to your need, then click on the Apply button to get filtered records.
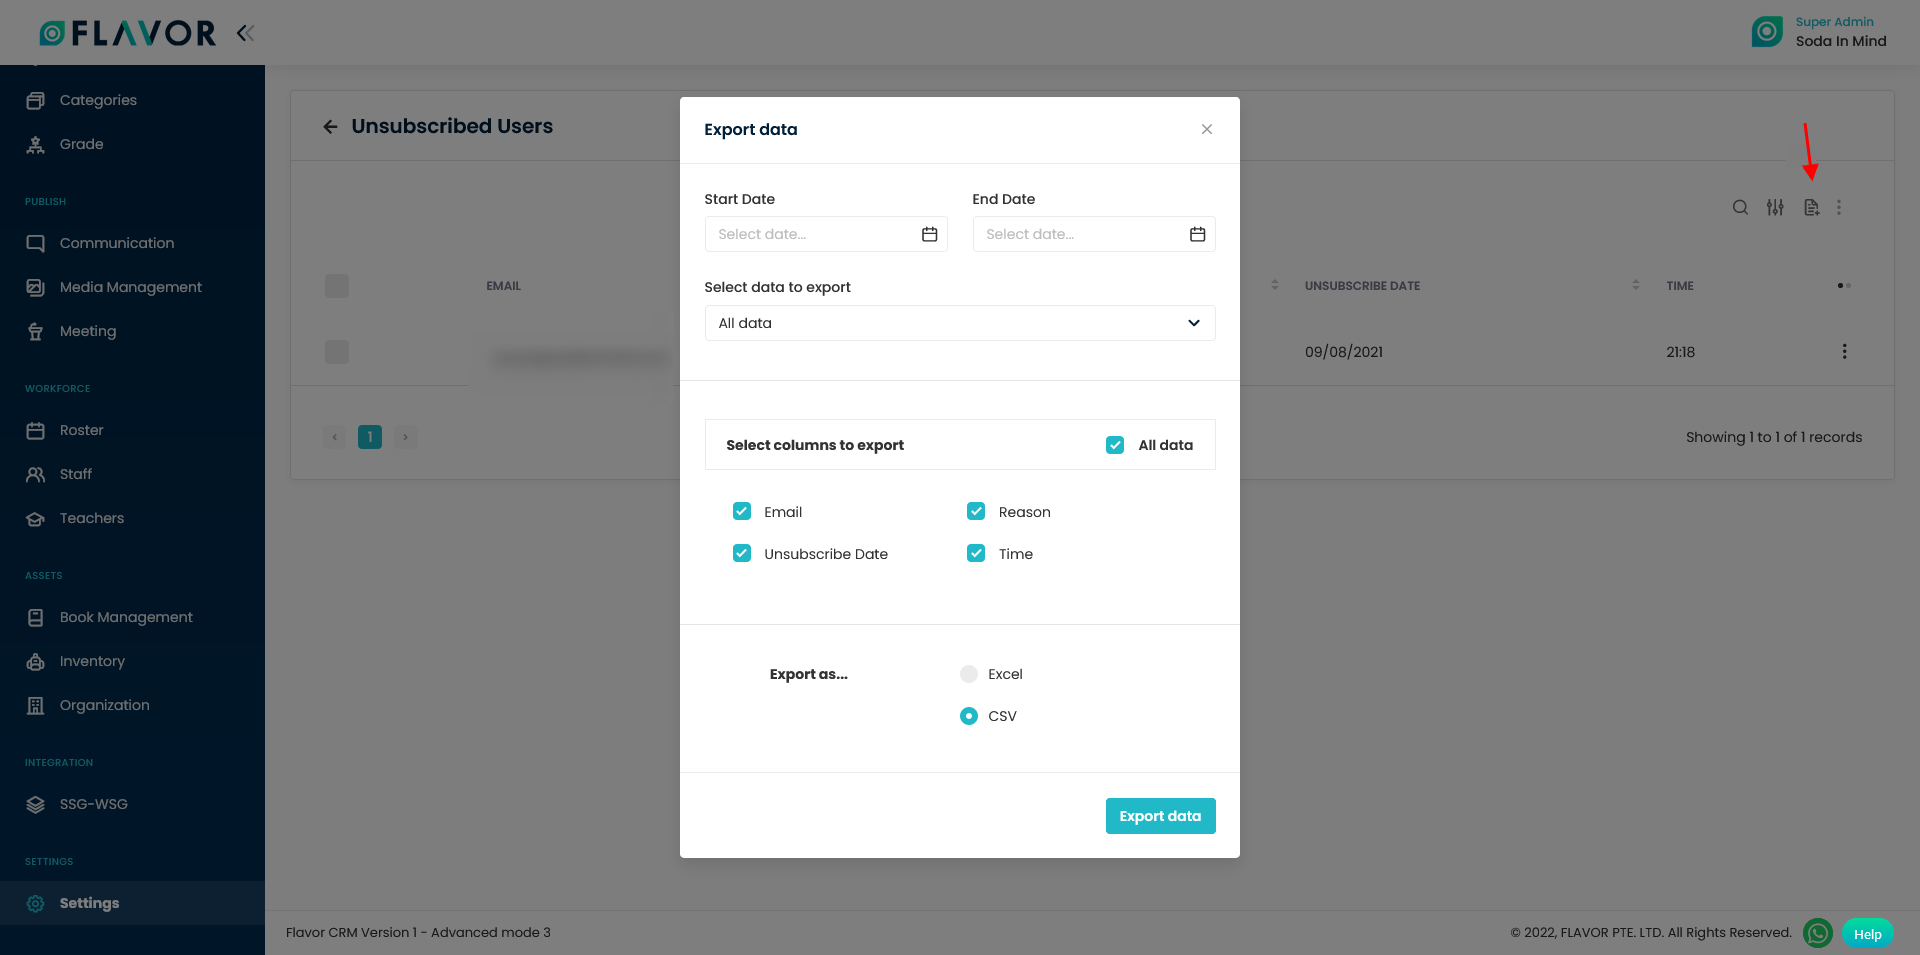
Export
To export the Unsubscribed user Data you need to click on the export icon. After clicking on the Export Data button, a pop-up named “Export data” will appear.
- Start Date and End date: Select the time period in the start date and end date column for which data is required.
- Select Data to Export: Here, you can export all rows or 15 rows to 1000 rows based on selection from the dropdown.
- Select Column to Export: Select columns which you need to export. But if you want all the details of Unsubscribed User, simply click on “ALL DATA” and you will get all the records of Unsubscribed User in your exported file.
- Export as: Then select a format in which you want to download your data i.e. (EXCEL or CSV).
- After selecting the relevant options, click on the Export data button. A popup named Export data confirm will appear on your screen. You need to enter the email address where you want to send the file. And then click on the Submit button.
Bulk Action
Bulk action gets enabled if we check one or more records. Bulk action gives us the flexibility to delete records at a time.
Unsubscribed User Records
Column Sorting
Unsubscribed User records is shown in the tabular format. You can sort the data by clicking on the column sorting arrows in the Table Header.
Column Visibility
You can sort the column visibility by clicking on the Ellipse icons. You will get a popup form named Select data to view. Mark the columns you want to see and unmark the ones you don’t want to see on screen. After this procedure click on the Apply filter button.
Expand Record
If you shrink the window size of the browser, then at the starting of all the records, there is an expand button(Down Arrow). Click on this expand button, the record will be expanded. You can see the rest of the columns here. You can collapse the record by clicking on the same button.
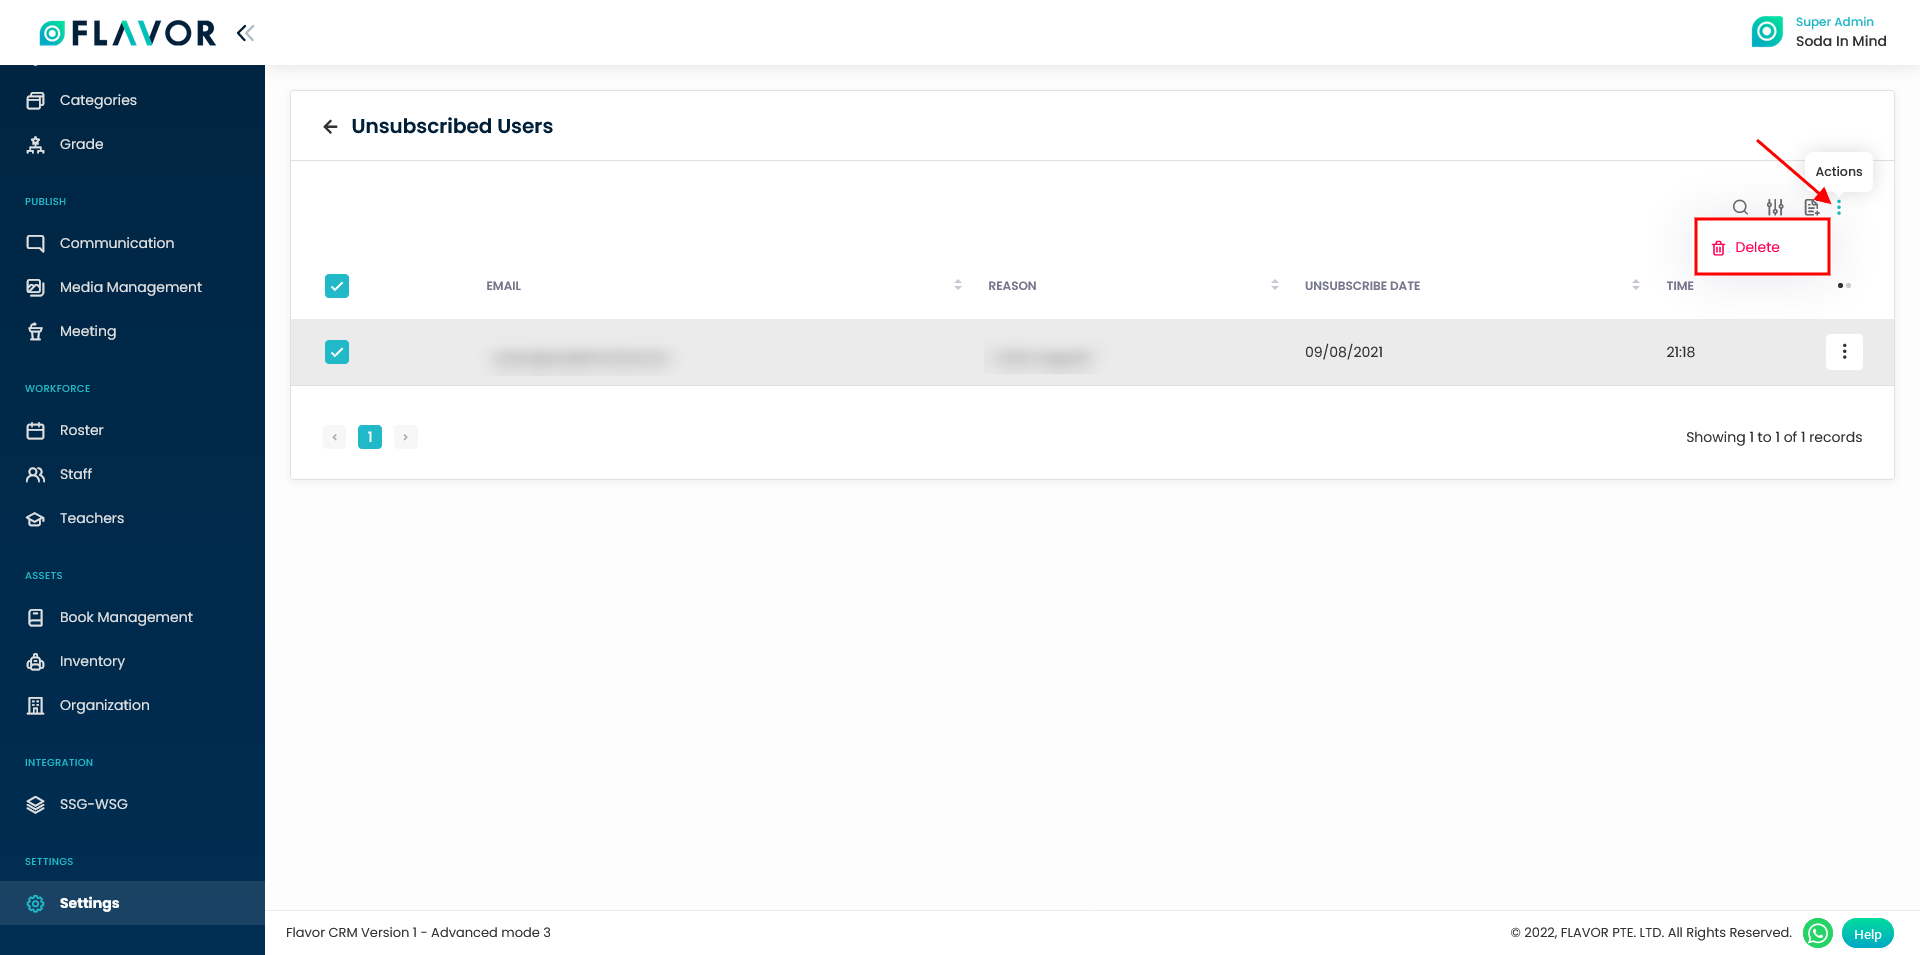
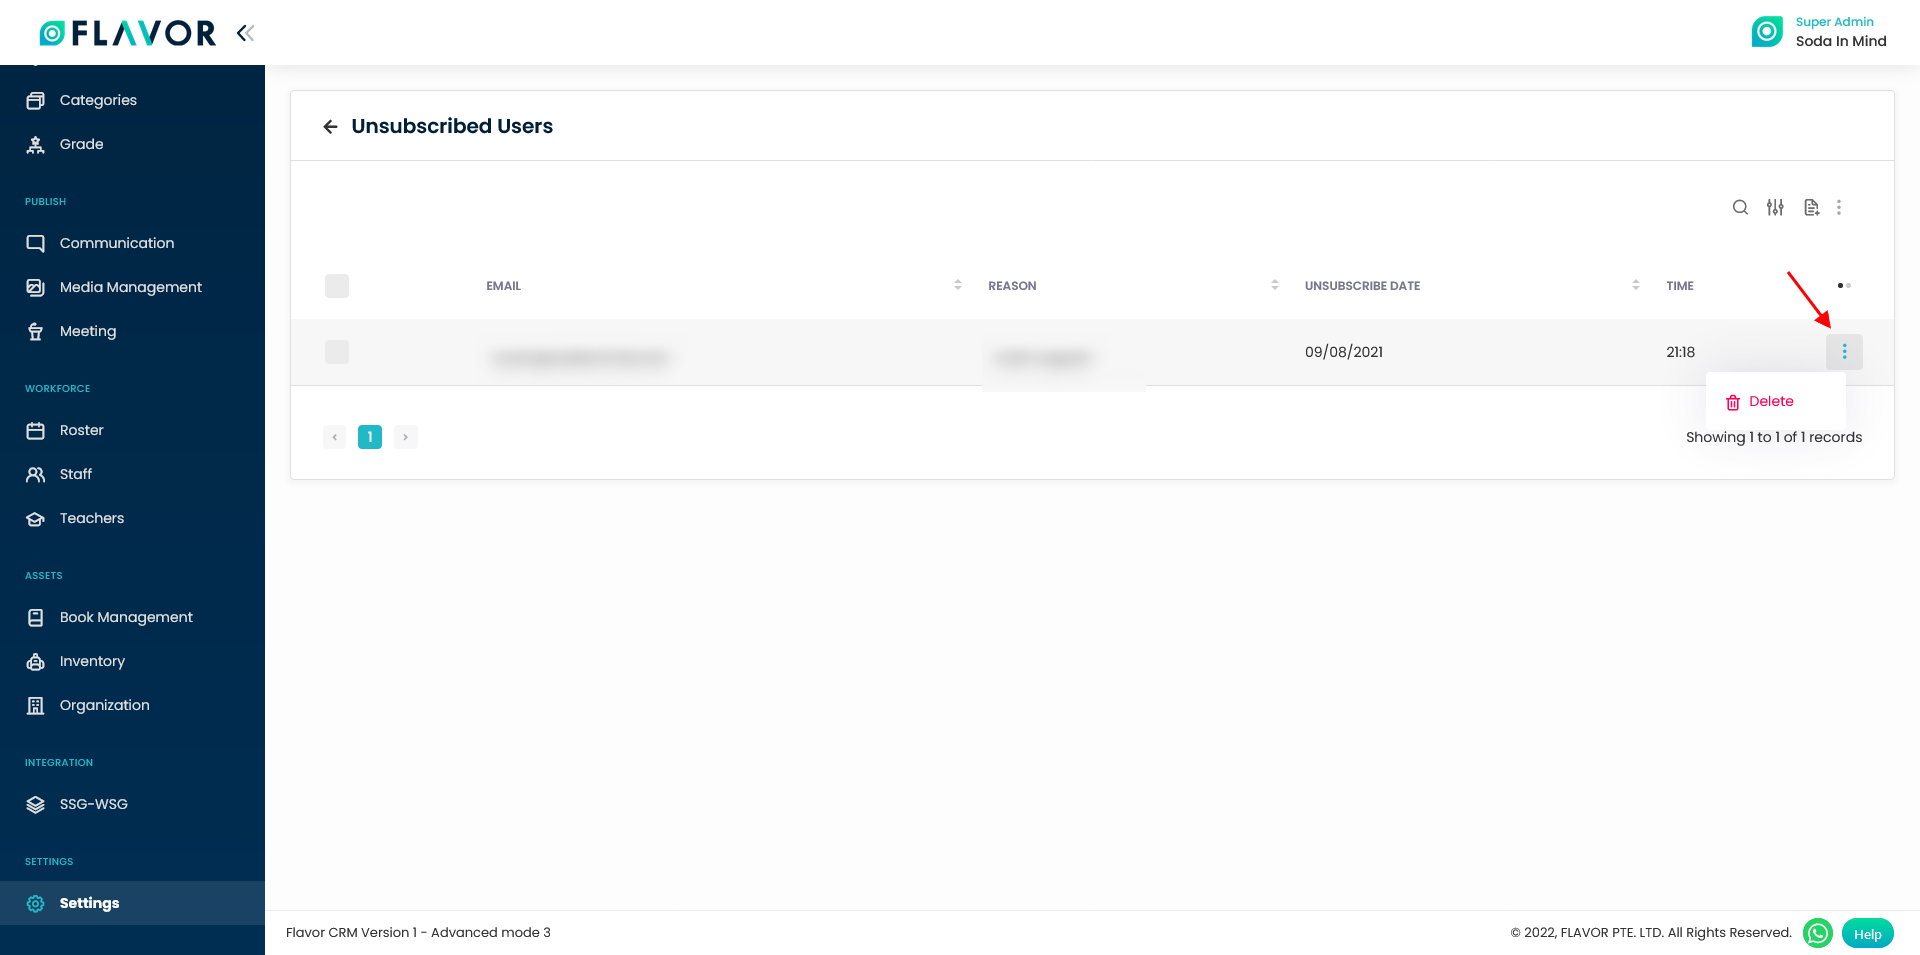
Record’s Actions
Delete
Click on the action button (Vertical ellipses), a pop up box will appear on your screen with the Delete option.
Click on it to delete that particular record.
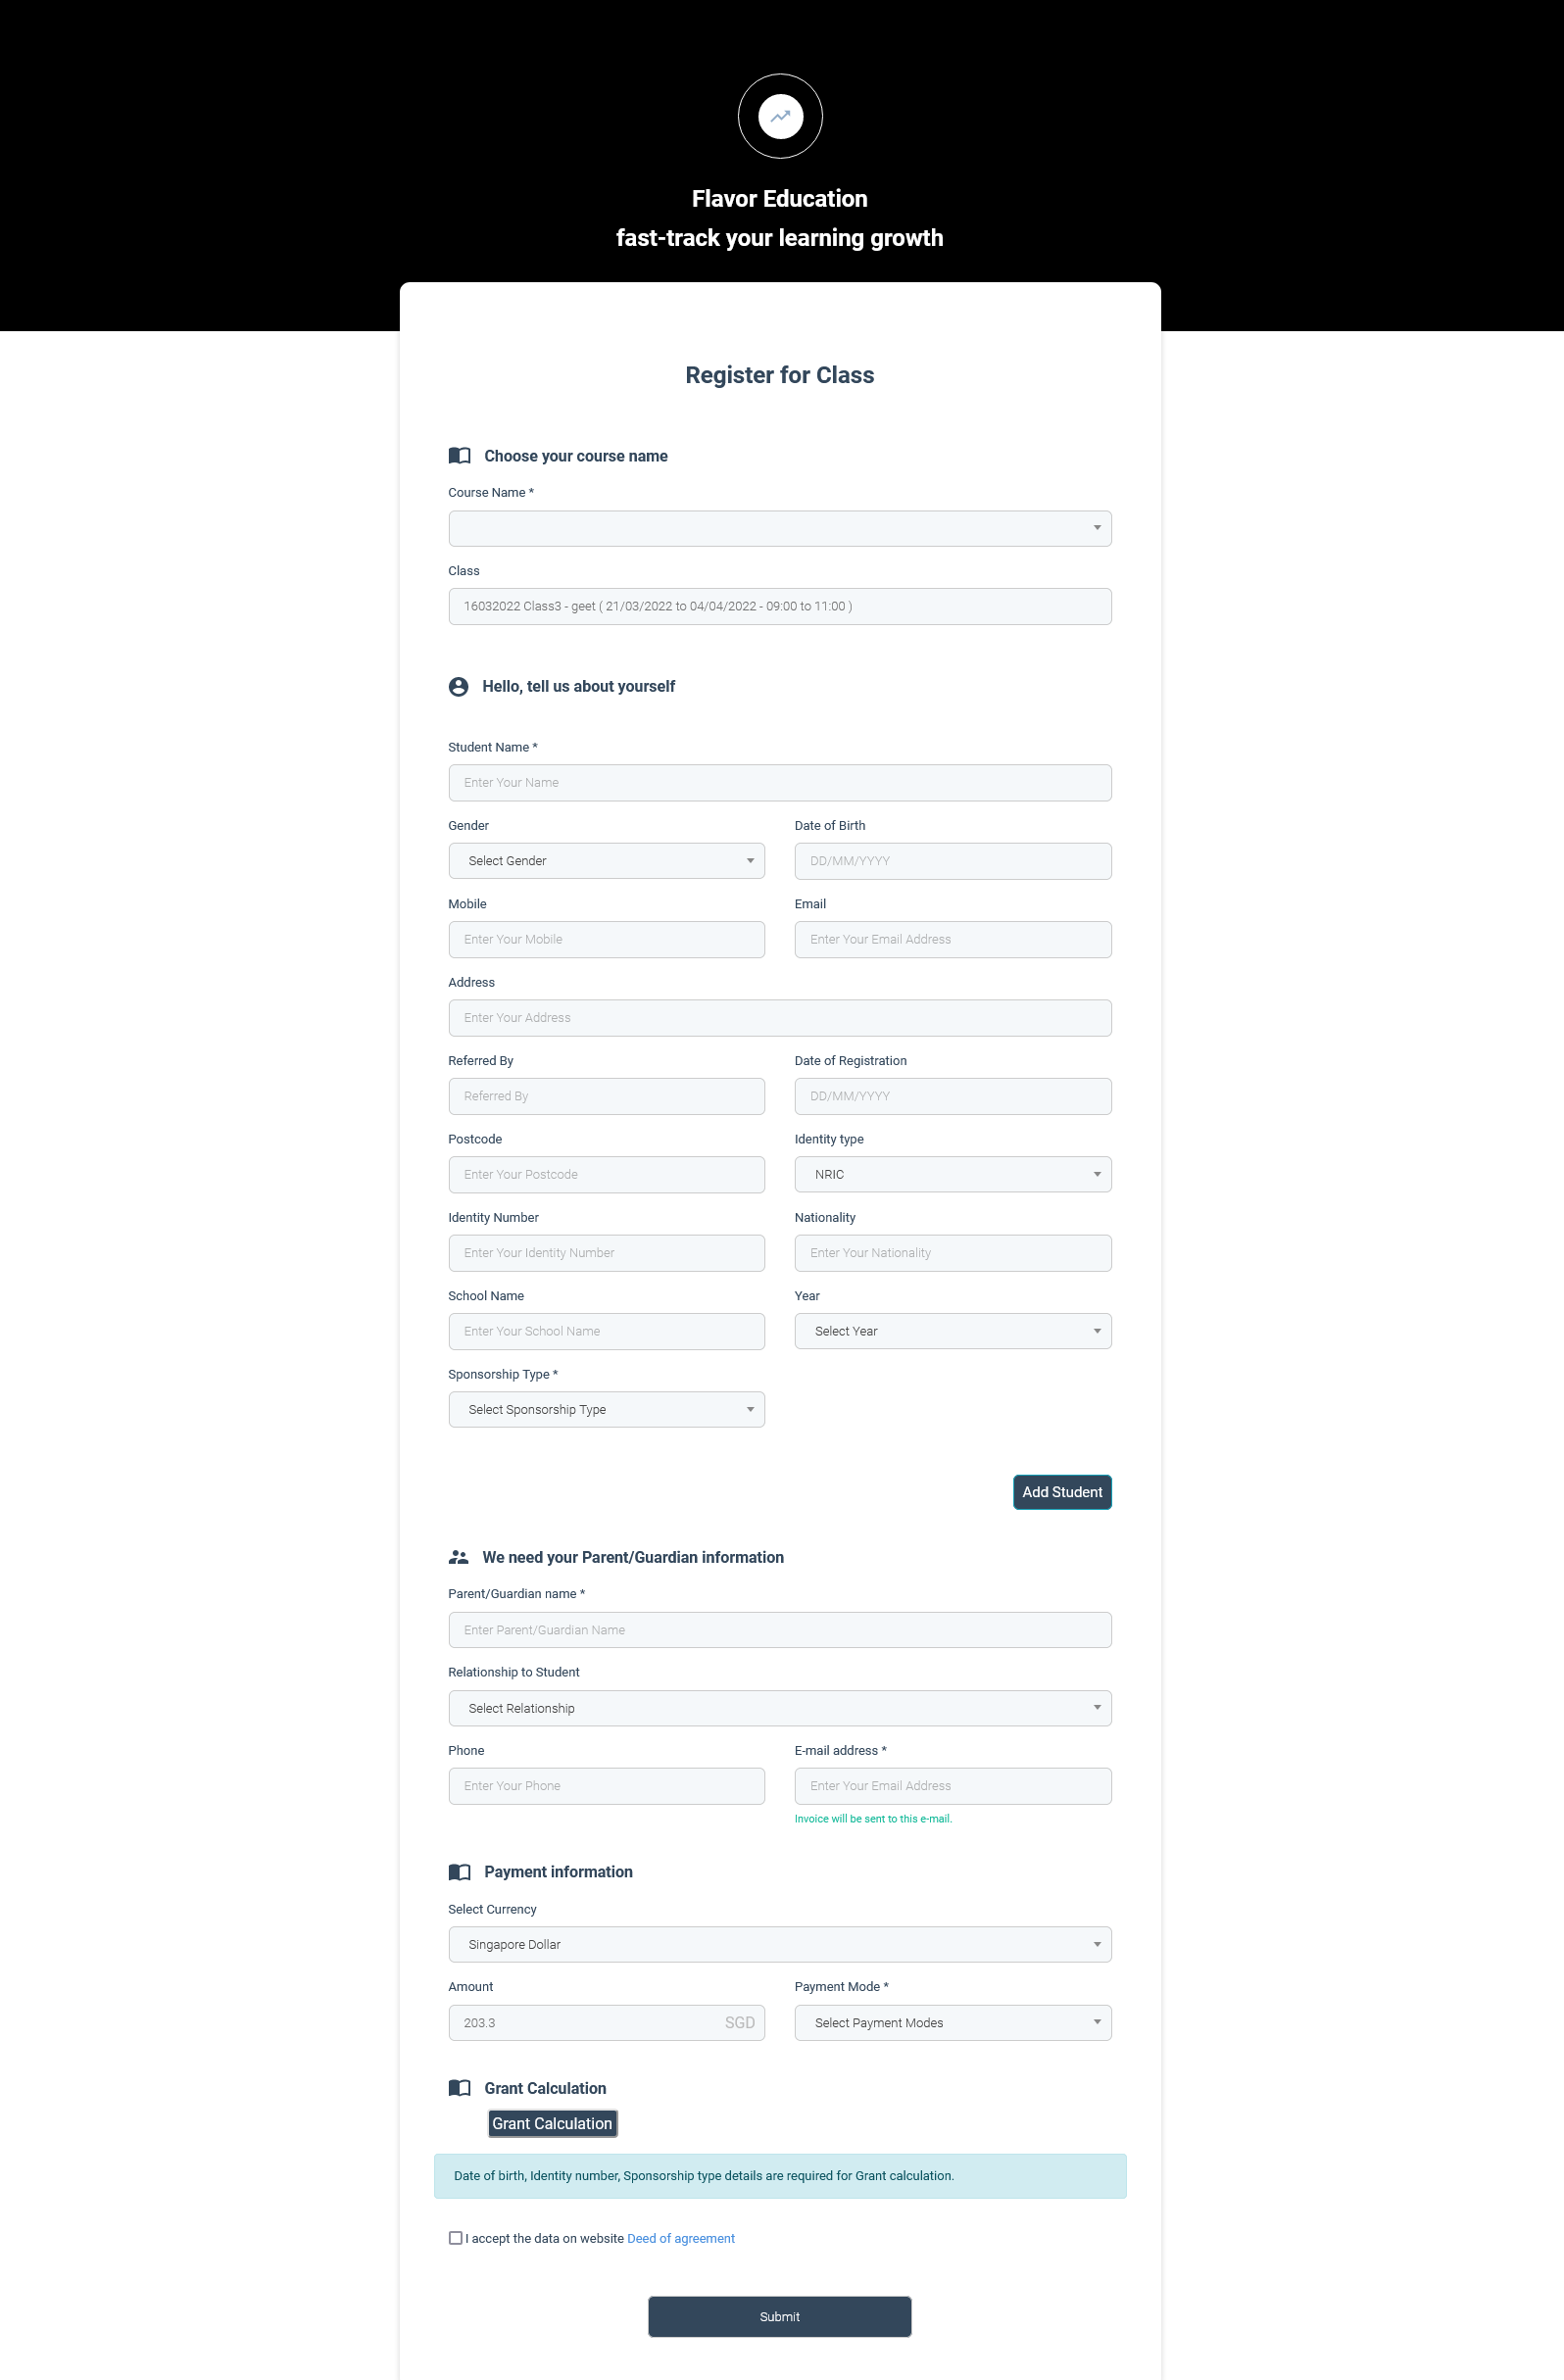
Registration Form
This is used to set up the input field that you want to show on the Registration Form. Click on the Set up Input field. It will navigate to the Registration Form Settings page.
Input Fields
Edit Section Heading
Click on the personal information and Parent/Guardian information edit icon. This is to edit the section heading of Personal and Parent/Guardian Information and then save.
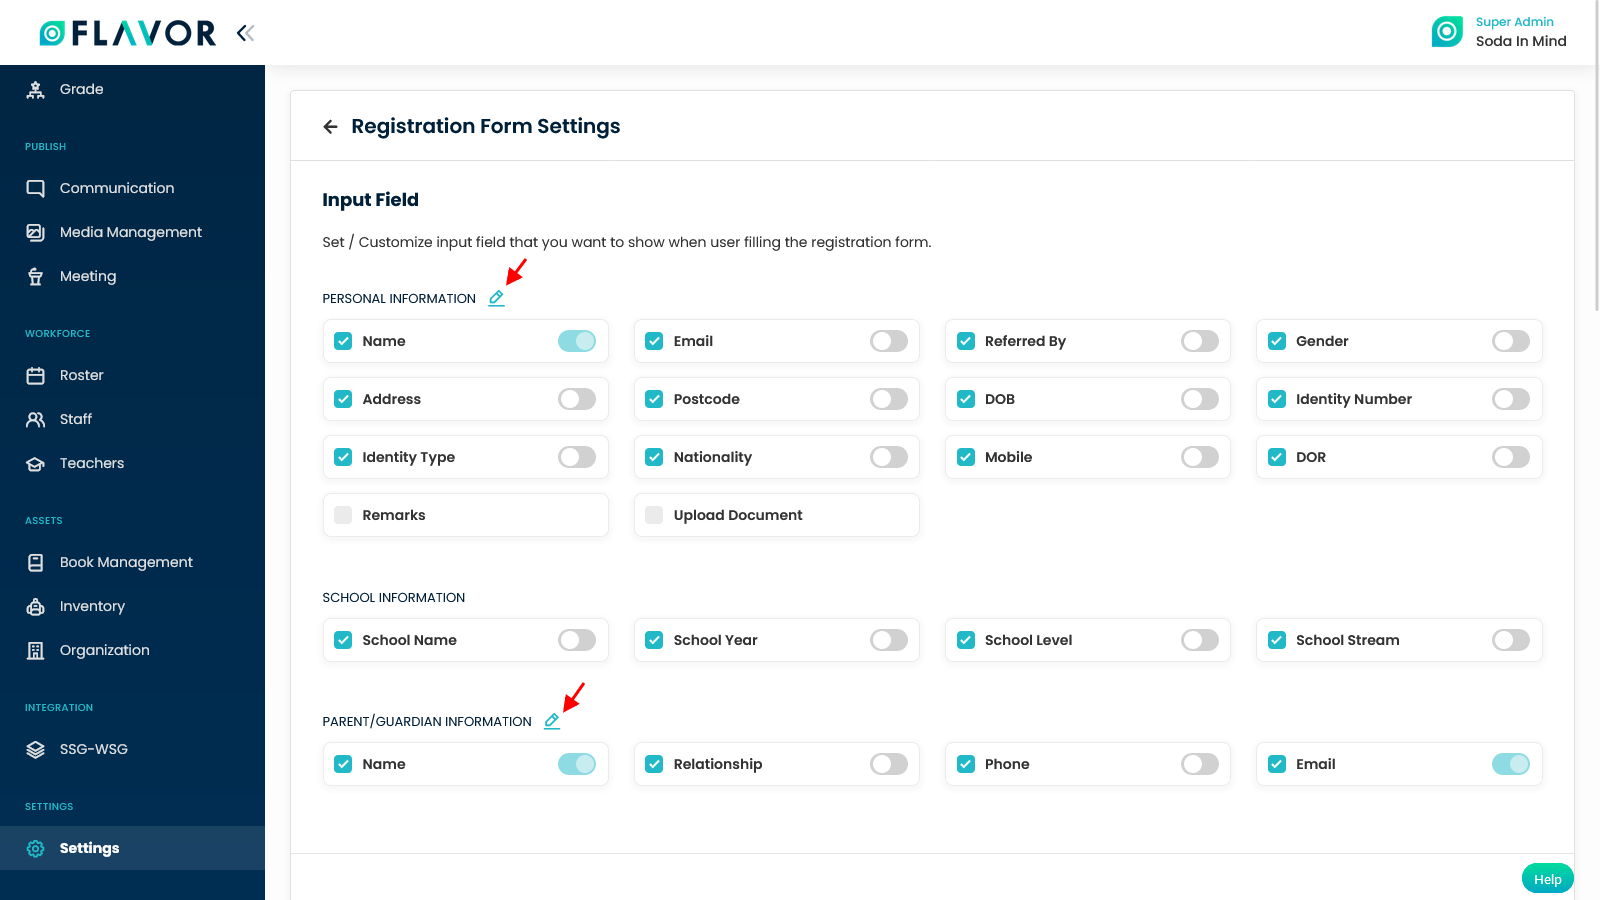
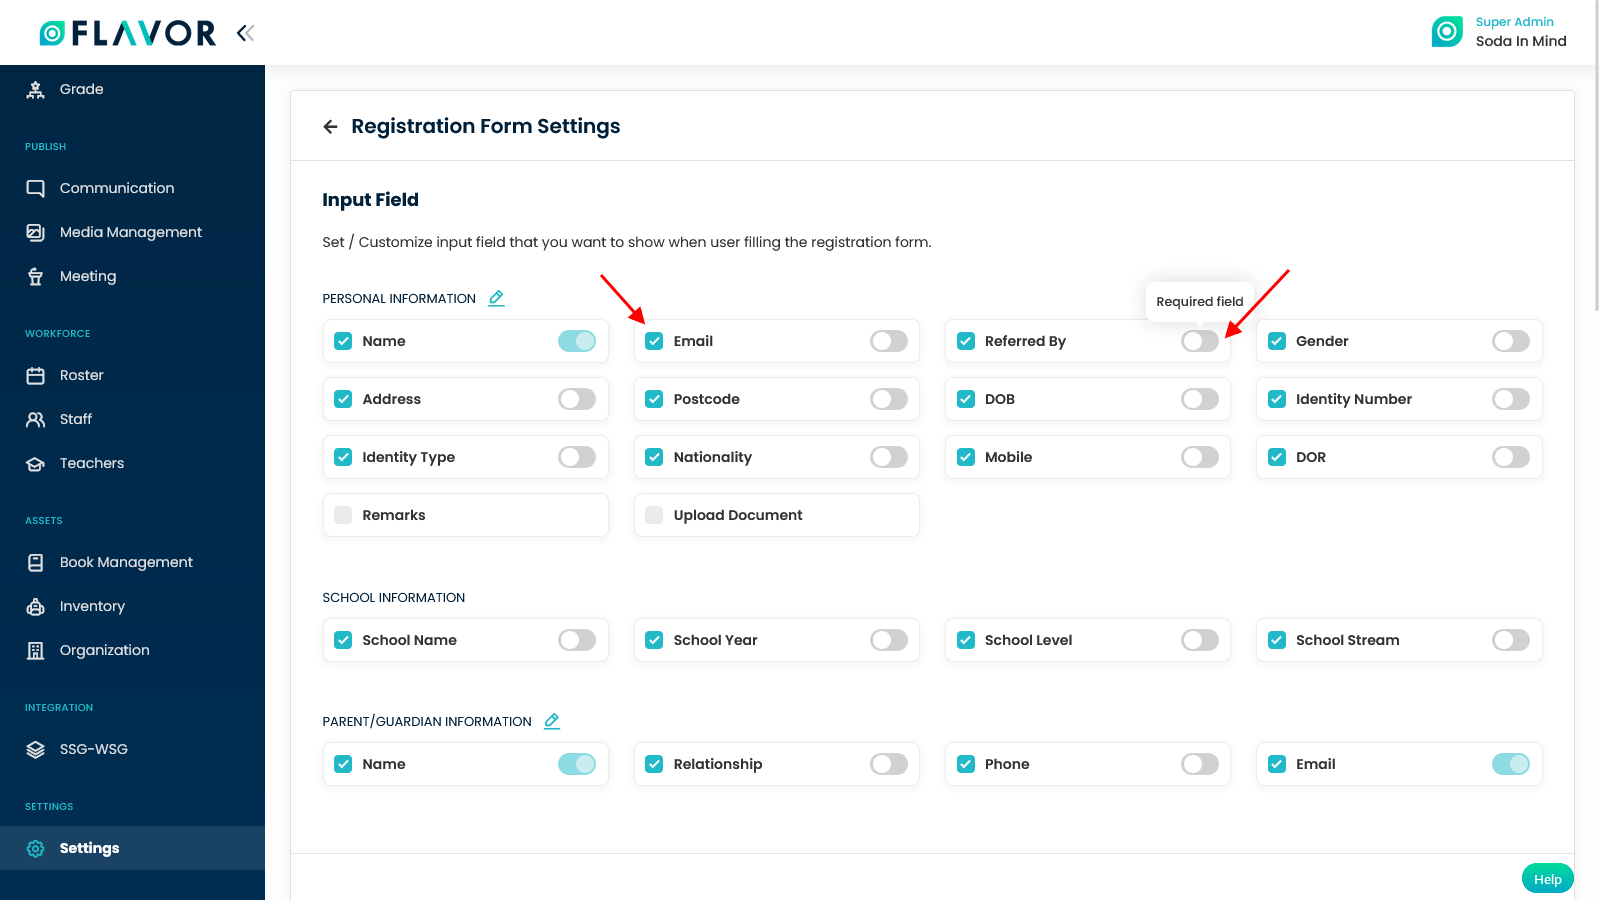
You can click on checkbox to Set / Customize the input field that you want to show when the user fills the registration form. You can mark the field mandatory by enabling the switch.
Form Settings
Other Settings

-
- Use Singpass : Singpass retrieves personal data from relevant government agencies to pre-fill the relevant fields, making digital transactions faster and more convenient. This digital service is requesting the relevant information from Singpass, for the purpose of form filling. If it is enabled, then in the registration form there comes a Singpass Login button. You can click on that button and can select the student from the drop down. A new popup appears on your screen with the details of that particular student. Click on I Agree, the data will get auto filled in the form.

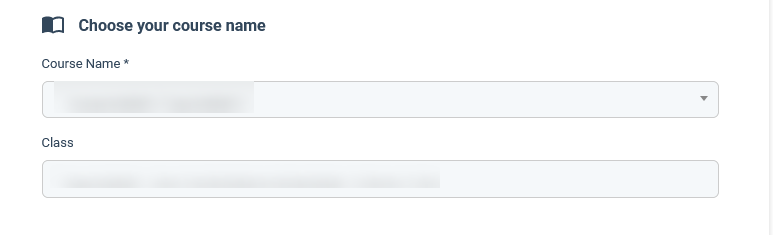
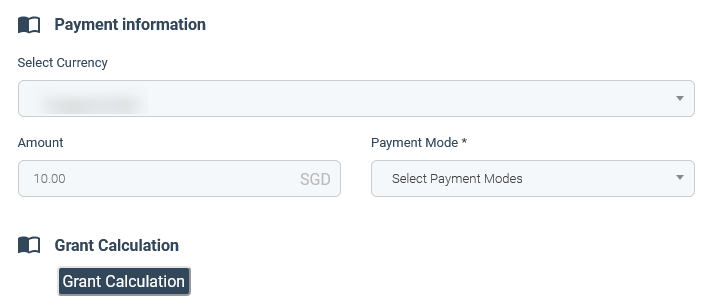
- Enabled Class Signup: If it is enabled, then in the registration form Choose your course name section and Payment information section will be shown. Also the different payment mode settings will be shown in Settings.
- Enable auto enrolment: While filling up registration form, if the payment mode is Stripe / Wallet, the student approval status gets approved automatically while in other cases it remain as pending.
- Enable Redirect URL after submission: If it is enabled, a text box will appear to enter the URL. So, after the registration form is submitted, the page will redirect to the URL specified in the text box.
- Enable register multiple Student when accessing registration form from Branch module: If it is enabled, and the registration form is opened from the Branch module, then multiple students can be registered from a single registration form.
- Allow users to choose registration on behalf of (Individual / Parent/Guardian): If it is enabled, then in the registration form, there will be a dropdown option to select either “individual/parent/guardian” to fill the registration form.
- Required 2 Parent/Guardian details when filling Parent/Guardian section: If it is enabled, then 2 Parent/Guardian details can be entered in the registration form.
- Enable Registration form sub description: If it is enabled you can customize the sub description in the Registration form.
- Enable Auto-populate Parent/Guardian data: If it is enabled, the Parent/Guardian data is auto populated in the registration form if the data is stored.
Upload Document Label: Here there is an option to edit the label for Upload Document.

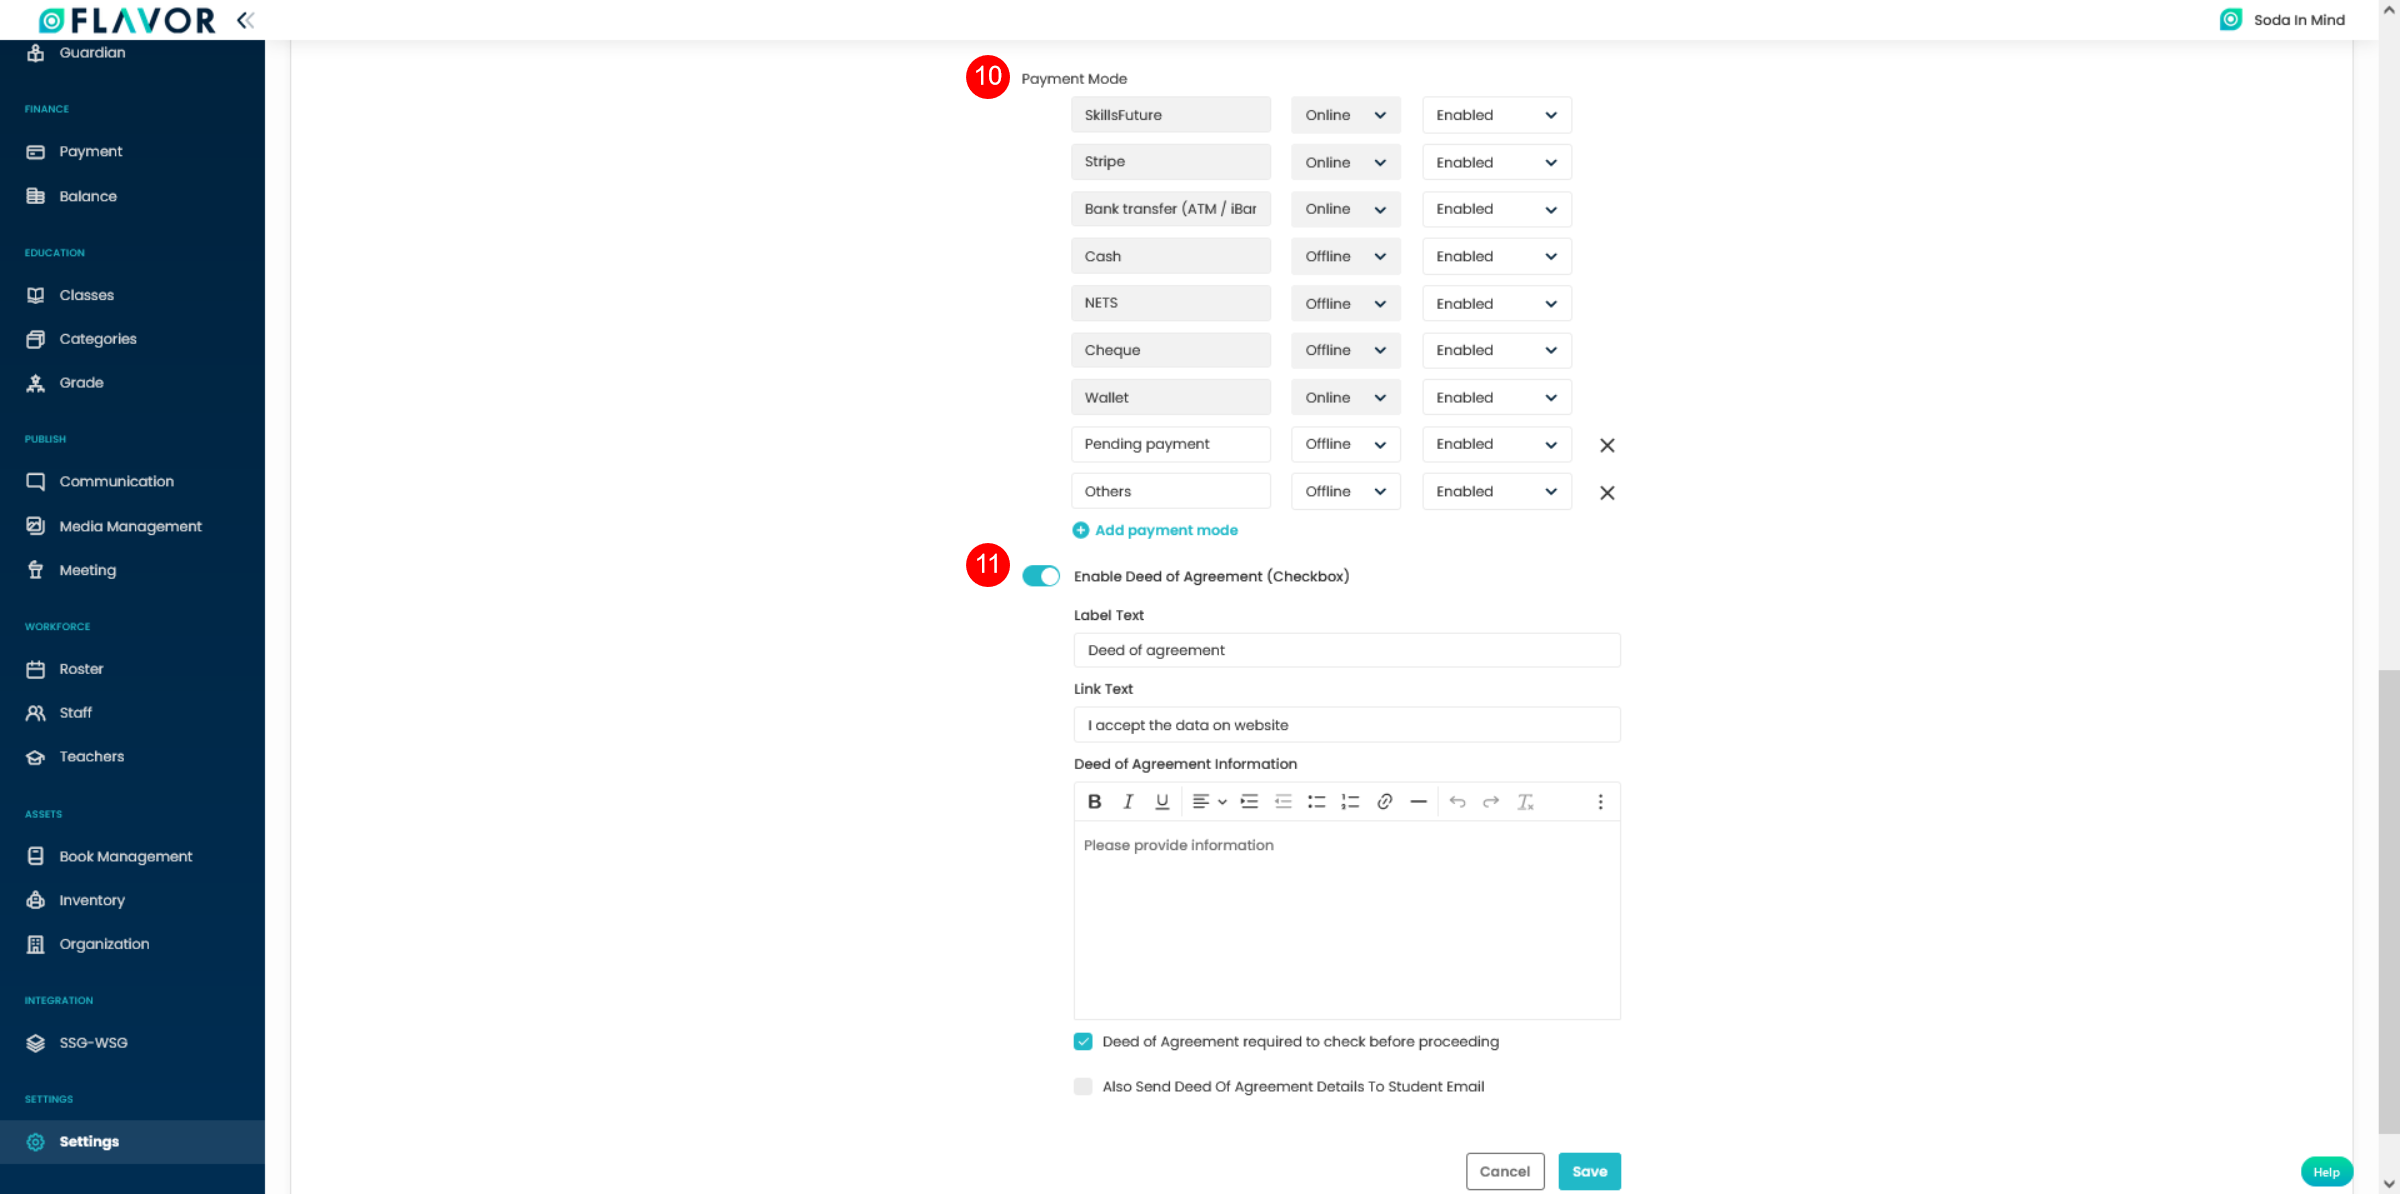
Some other options under other settings is Payment Mode and Enable Deed of Agreement.
- Payment Mode: These are the various payment mode available in the registration form under payment information. This is shown if and only if the Enabled Class Signup is switched on.
- Enable Deed of Agreement: If it is enabled , then the checkbox for accepting the deed of agreement is shown in the registration form. Also, the deed of Agreement details can be customized as per the requirement.
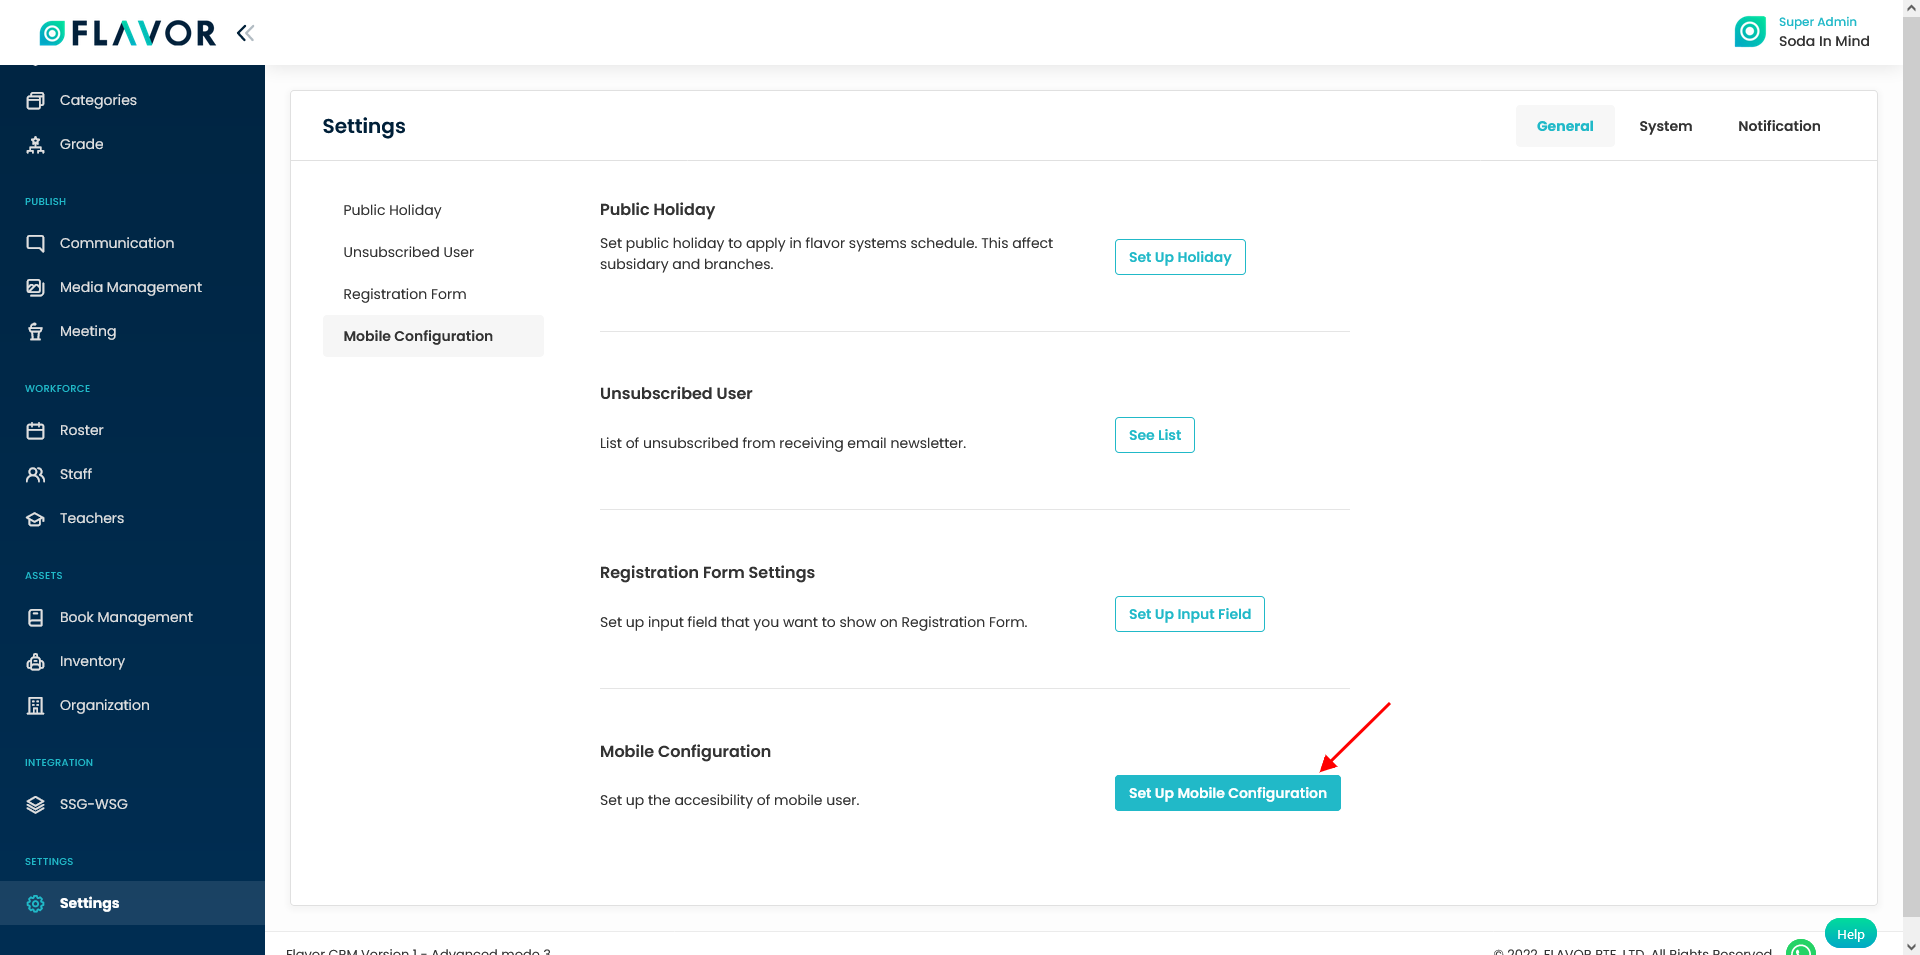
Mobile Configuration
The Flavor Eduportal application has got the mobile app too. There are two mobile apps viz. Flavor Scholar and Flavor Professional. Flavor Scholar is for the parents and Flavor Professional is for the Teachers. Under Mobile configuration you can do the setting for the mobile app to access certain features.
Menu Settings
This gives you the accessibility to set up menu.

When the switches under Menu Settings are on, then in the Flavor Scholar App, there will be a plus sign at the bottom right of the mobile screen. If we click on the plus sign, a menu with the different options will open up. And a minus sign replaces the plus sign.
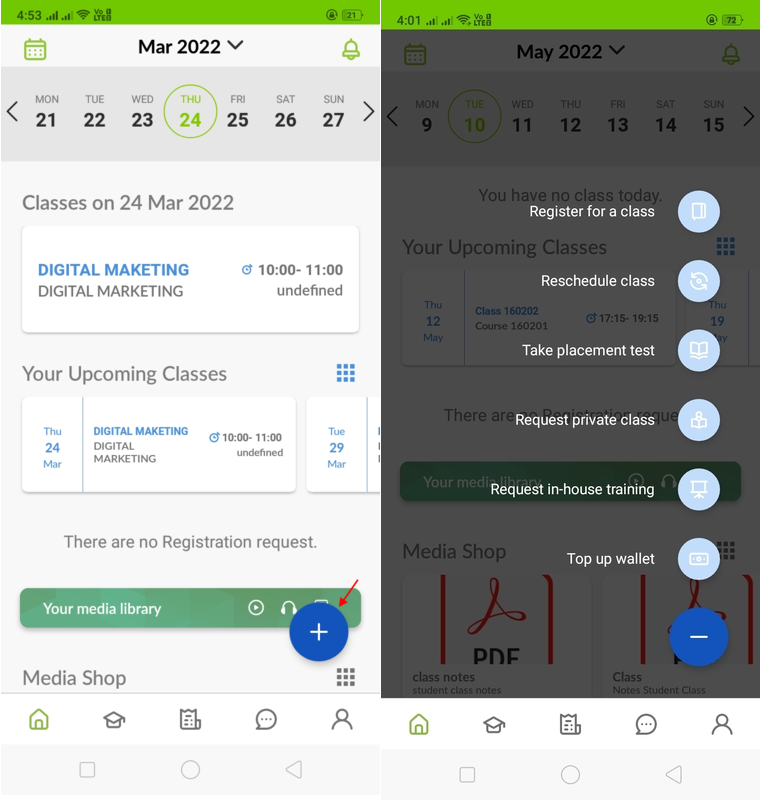
- Register for a class: Parents can register for class by clicking on it. It will navigate to Register for a class screen on mobile.
Steps to register for a class:
-
- Choose a course.
- Choose a class (The list of available schedules will be displayed. This can be sorted by Teacher, Date and Day.)
- Choose a particular schedule.
- Click on Confirm.
- Choose the payment method and press Confirm payment.
- A notification message will be displayed.

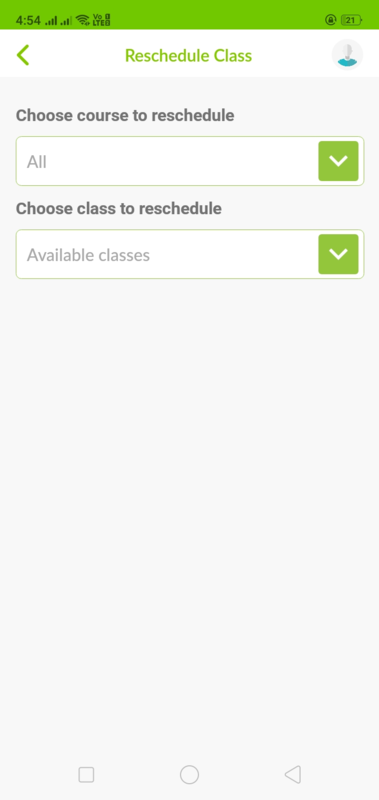
- Reschedule a class: Parents can reschedule a class by clicking on it. It will navigate to Reschedule class screen in mobile.
Steps to Reschedule a class:
-
- Choose course to reschedule.
- Choose class to reschedule.
- Once the class is selected to reschedule, then the list of available schedules will be displayed. This can be sorted by Teacher, Date and Day.
- From there, choose a new class.
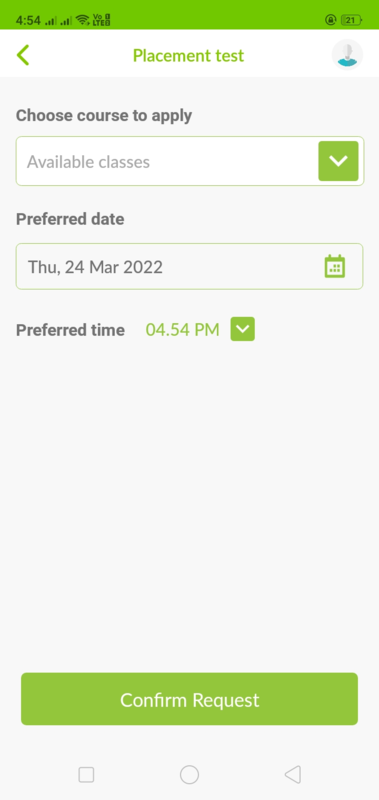
- Take placement test: Parents need to click on this. It will navigate to Placement test screen in the mobile.
Steps to Take placement test:
-
- Choose course to apply.
- Choose the preferred date.
- Choose the preferred time.
- Press Confirm Request.
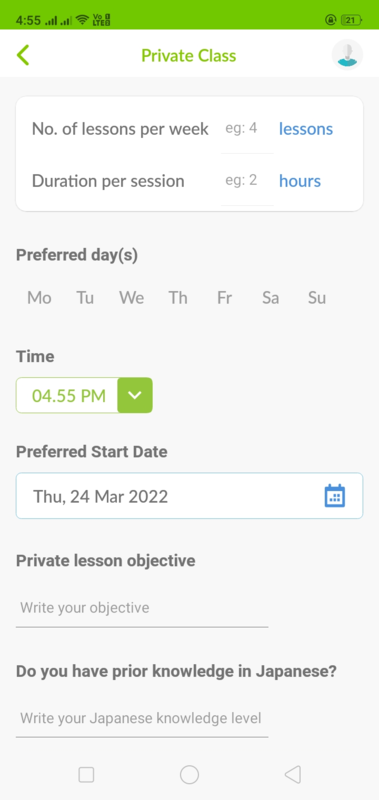
- Request private class: Parents can request for a private class by clicking on this. It will navigate to Private class screen in the mobile.
- Request in-house training: It will navigate to the In-House Training screen in the mobile app. Enter the details in the form and press confirm.

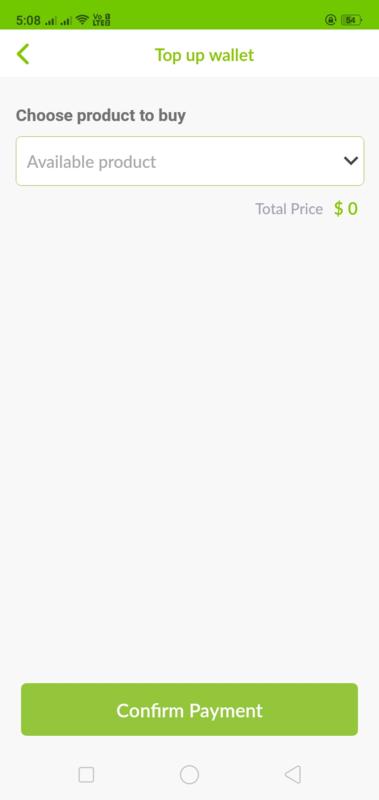
- Top-up wallet: It will navigate you to the Top Up wallet screen. Here we have the option to buy a different credit wallet, which is listed under the credit listing in the invoice preset under the payment module.
Class Settings
Class settings switch is to show switches for show class name & course for different classes in the Flavor Scholar app.
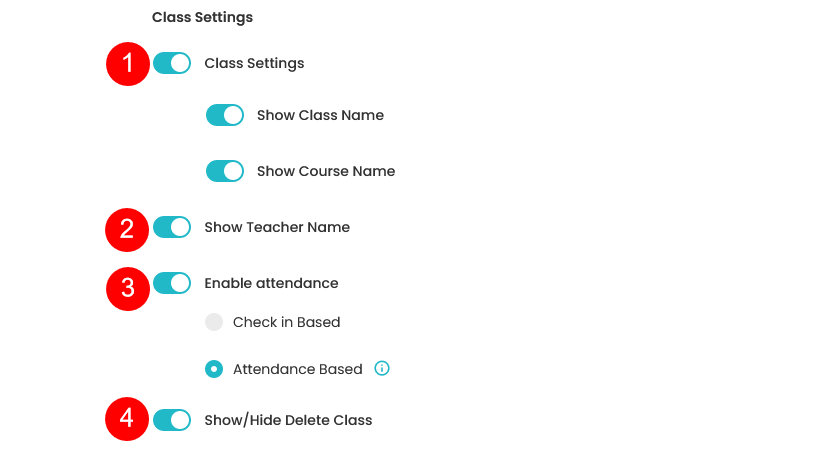
- Class Setting: Class setting switch can be enabled to show the Class Name & the Course Name options.
-
- Show Class Name
- Show Course Name
When these are enabled, then in the Flavor Scholar app, the class name and the course name are visible in the listing.
- Show Teacher Name: This can be enabled to show the teacher name in the class listing in the flavor scholar app.
- Enable Attendance: Enable Attendance setting option is for Teacher professional app. This option has two options. viz. Check in Based and Attendance based.
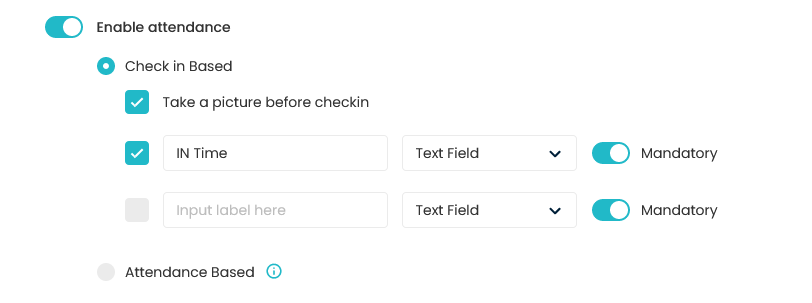
- Check-in based: In check in based setting, you can set the fields that will be shown in the Flavor Professional app.
- Attendance based: When the attendance based switch is enabled then the option for marking present and absent comes in in the Flavor Professional App.
- Show/Hide Delete Class: If you enabled this switch then in Flavor scholar app, the class delete button will be shown in the each class in the listing.
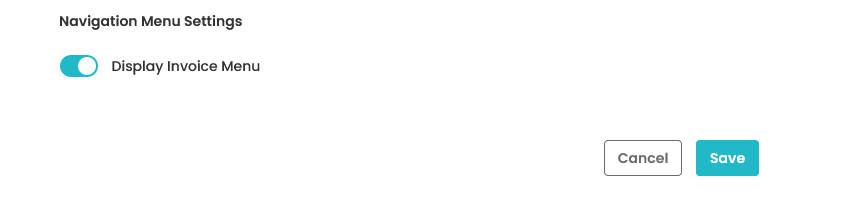
Navigation Menu Settings
When the display invoice menu is on, then in the menu, option for invoice will appear in the Flavor Scholar app. When the invoice menu is clicked, the list of invoices will appear on the Flavor Scholar app.
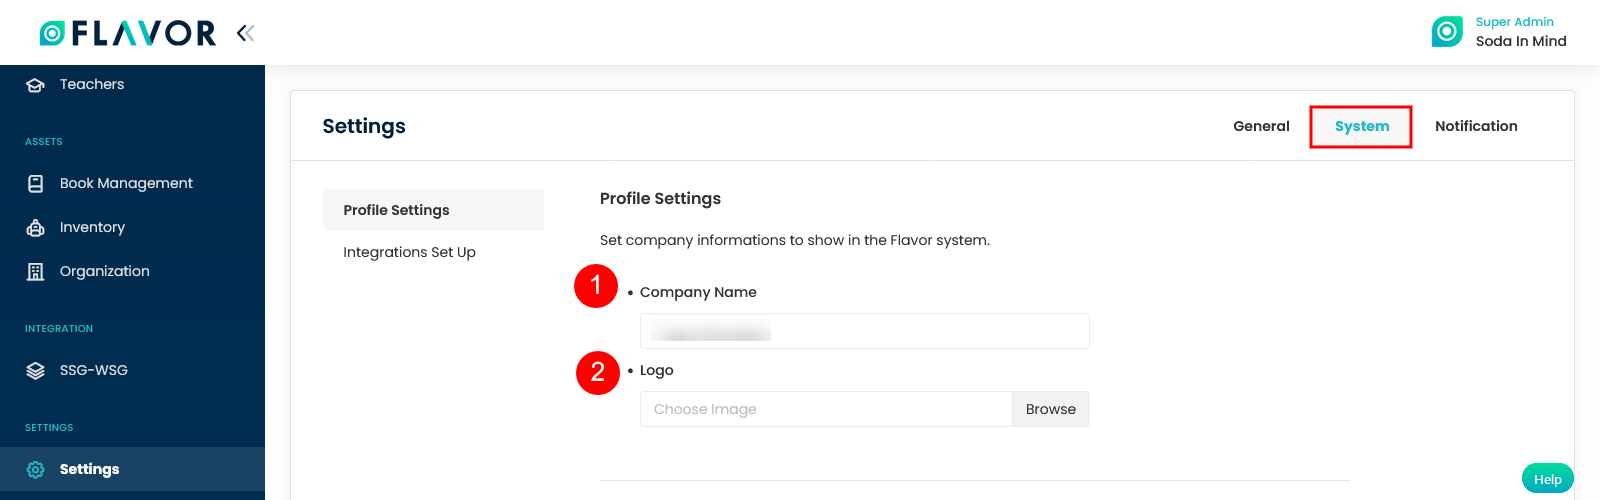
System
Under the system tab, we have profile settings and Integration set up.
Profile Settings
In profile settings, we can set up the company information to be shown in the Flavor System.
- Enter the Company name in the text box.
- Set the logo of the company to be shown in the Flavor System.
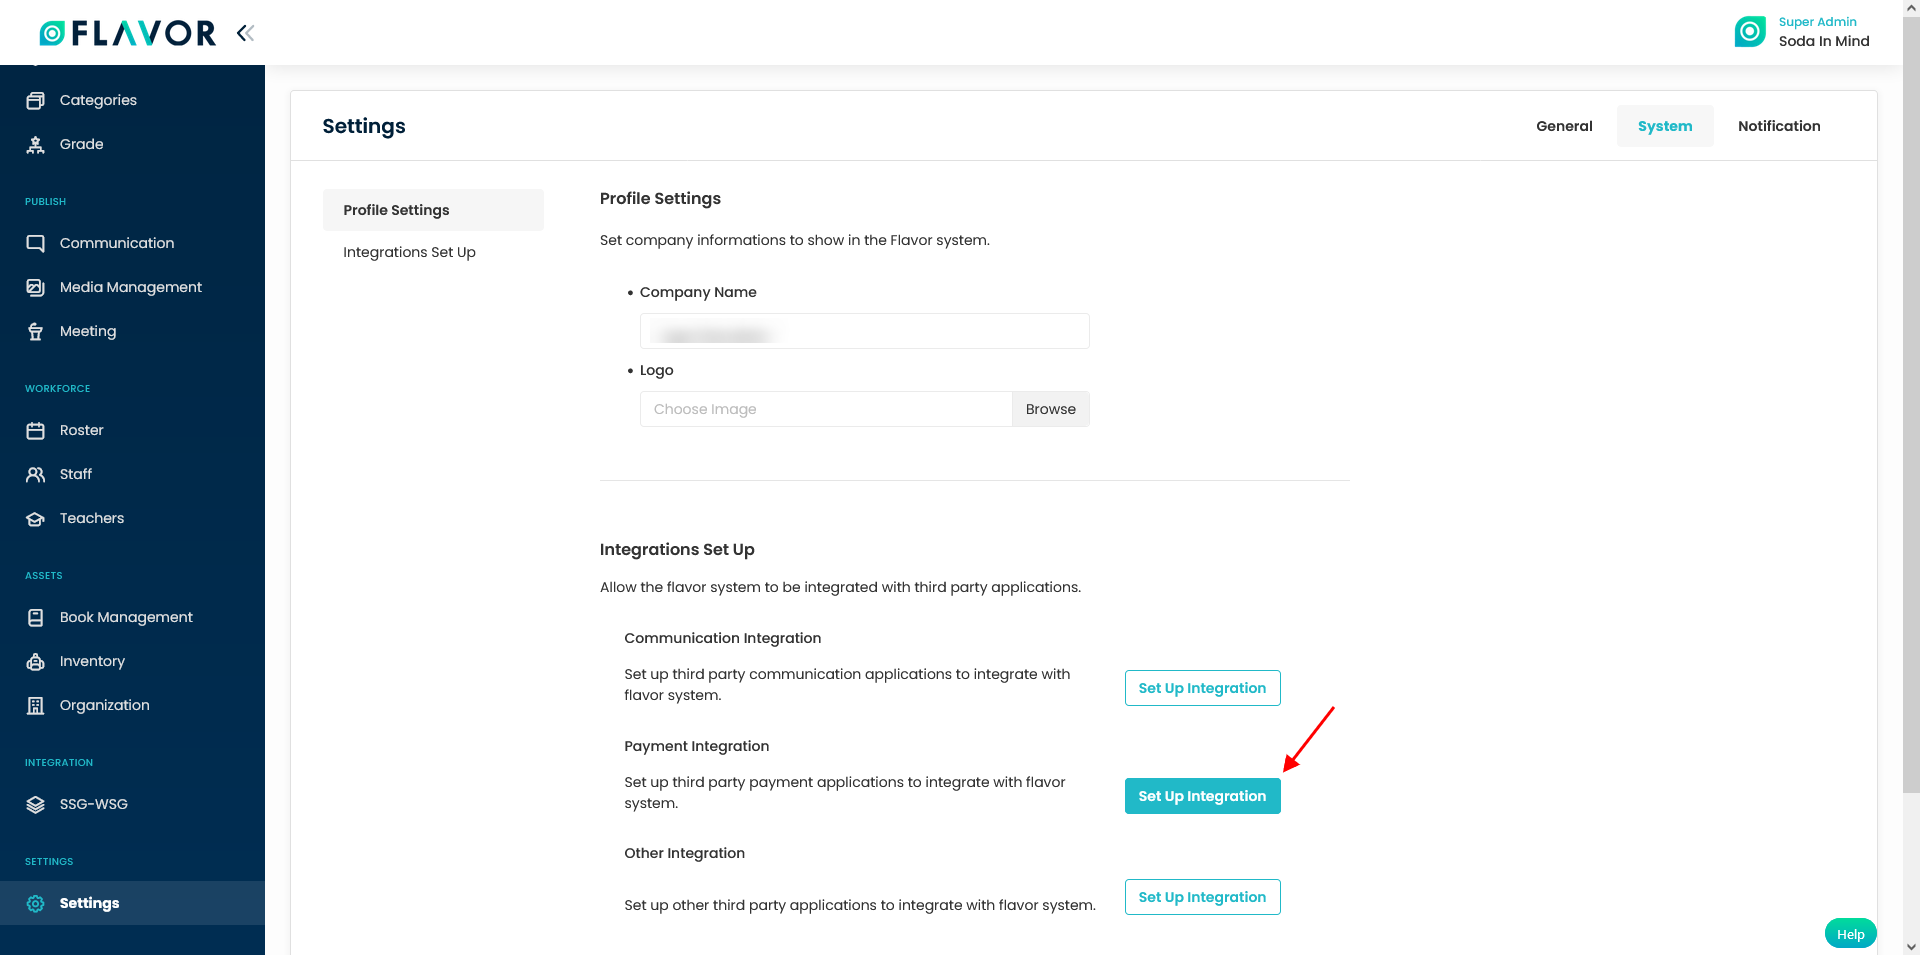
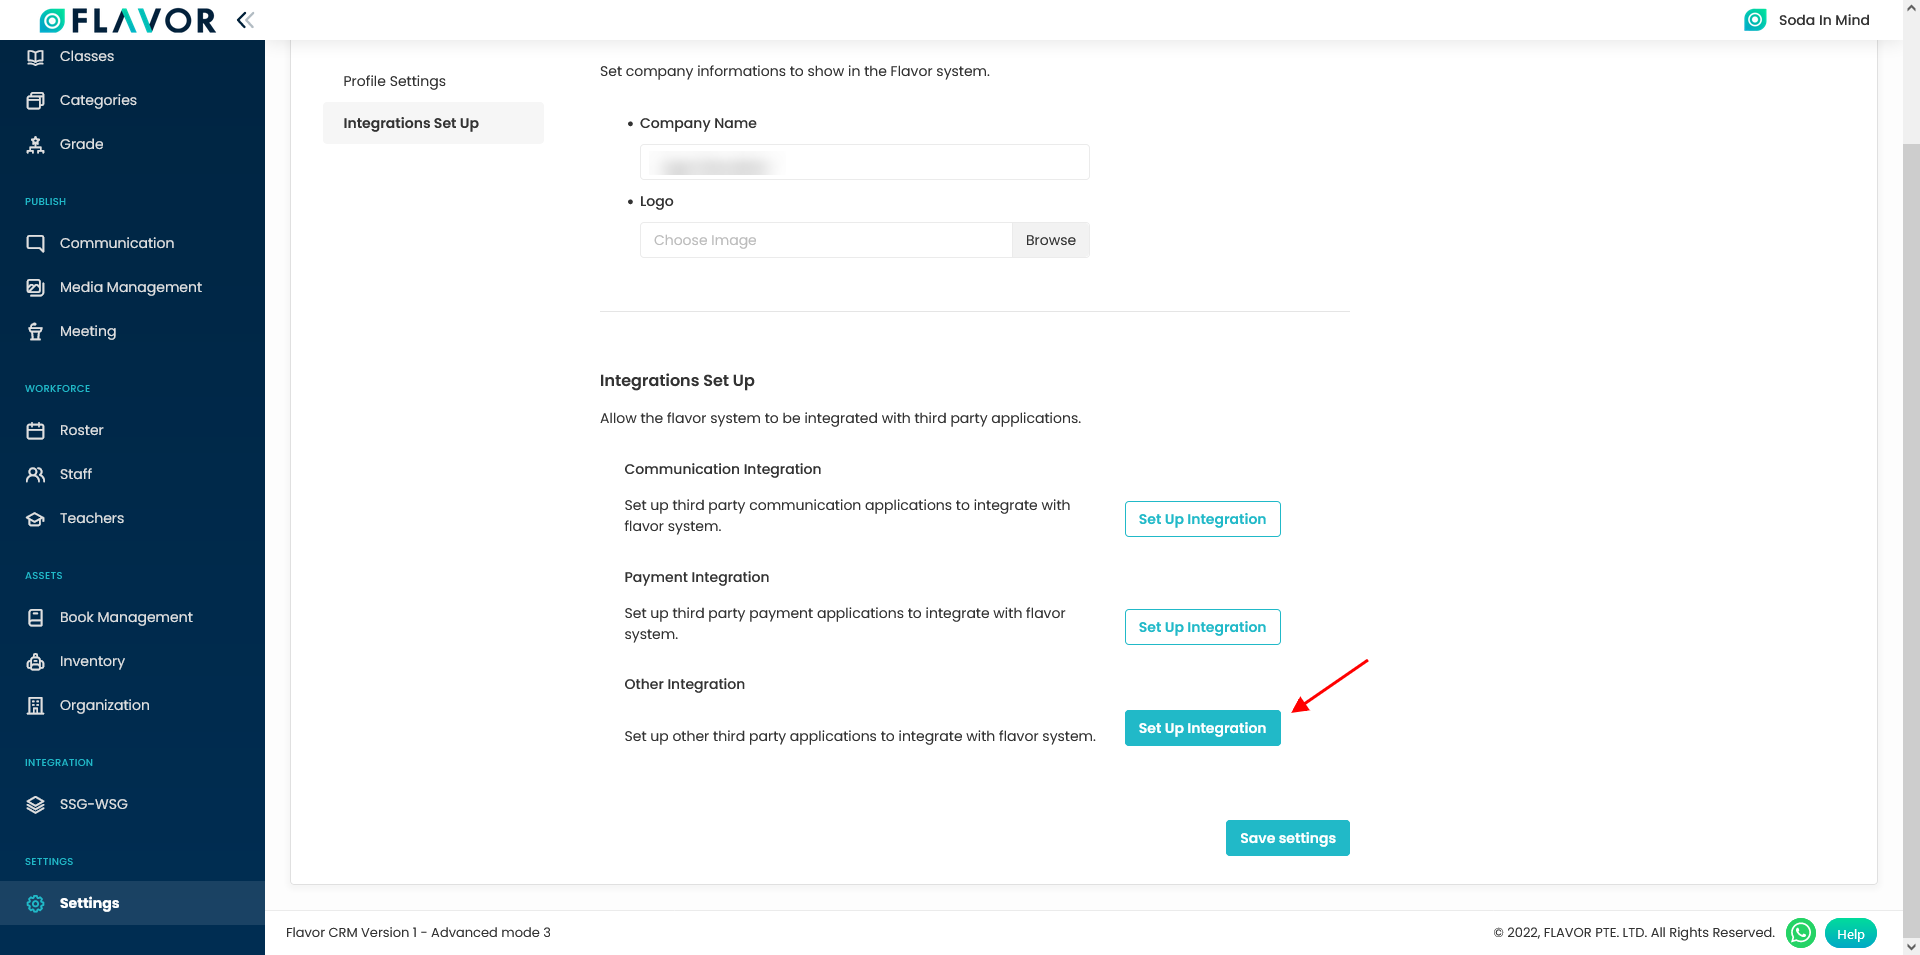
Integration Setup
Integration set up allow the Flavor system to be integrated with third party applications. Under the integration set up , you can see three options, viz. Communication Integration, Payment Integration and Other Integration.

Communication Integration
The communication integration is to set up a third party communication application to integrate with the Flavor System. Click on the Set up Integration to do the communication Integration settings.

- Email(SMTP): To communicate via mail, it is mandatory to do Email(SMTP) set up. To set up the email, we need to enter the details like Email address, Name, SMTP host, SMTP user Name etc. Click here To check the how to configure SMTP
- Grand Stream
- Nautilus: If you enable this, then in the student listing you can send a call to the student directly. Click here To check how to connect Nautilus
- Twilio: If you enable this, then in the student listing you can send SMS to the student directly. Click here To check how to connect Twillio
- Zoom Integration: You can use zoom meetings to conduct the classes. Click here To check How to integrate with Zoom.
Enable the above third party communication application to get integrated with the Flavor System.
Payment Integration
You can set up third party payment applications to integrate with the flavor system. Here, various third party payment integration applications are listed which can be integrated with the Flavor System.

- Enets : eNETS Credit allows your customers to make payments online using their international (Visa/Mastercard/AMEX) Credit/Debit Cards. Enable the switch and enter the details and save. Here, Environment has two options viz. Sandbox and Live. Sandbox is for testing and Live is for live accounts.

- PayNow: PayNow is a secure funds transfer service that allows customers to receive money into their participating bank account via NRIC/FIN and/or mobile number. Enable the switch and enter the PayNow UEN and save. To know more about PayNow Click Here.

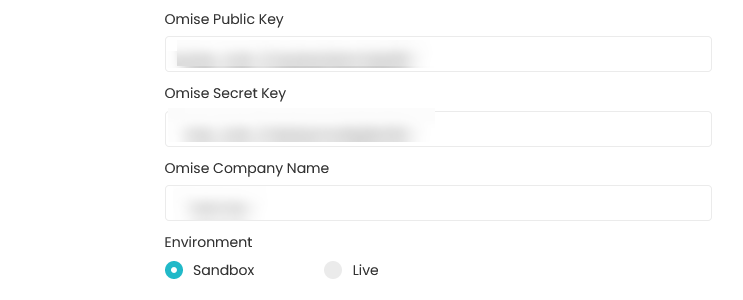
- Omise: Omise is a full-featured payments solution for accepting, processing and sending payments online. Enable the switch on and enter the details and save. When this is enabled, in the invoice configuration under payment instruction in the payment setting, we will have a QR code option for Omise.
- QuickBooks: QuickBooks is a popular accounting software system for small and medium-sized businesses. It’s an ideal way to keep business finances organized and accurate.
- Stripe: Stripe’s software and APIs can be used to accept payments, send payouts, and manage their businesses online.
- Xero: Xero is an accounting software.
Other Integration
Click on the set up integration to set up other third party applications to integrate with the flavor system.
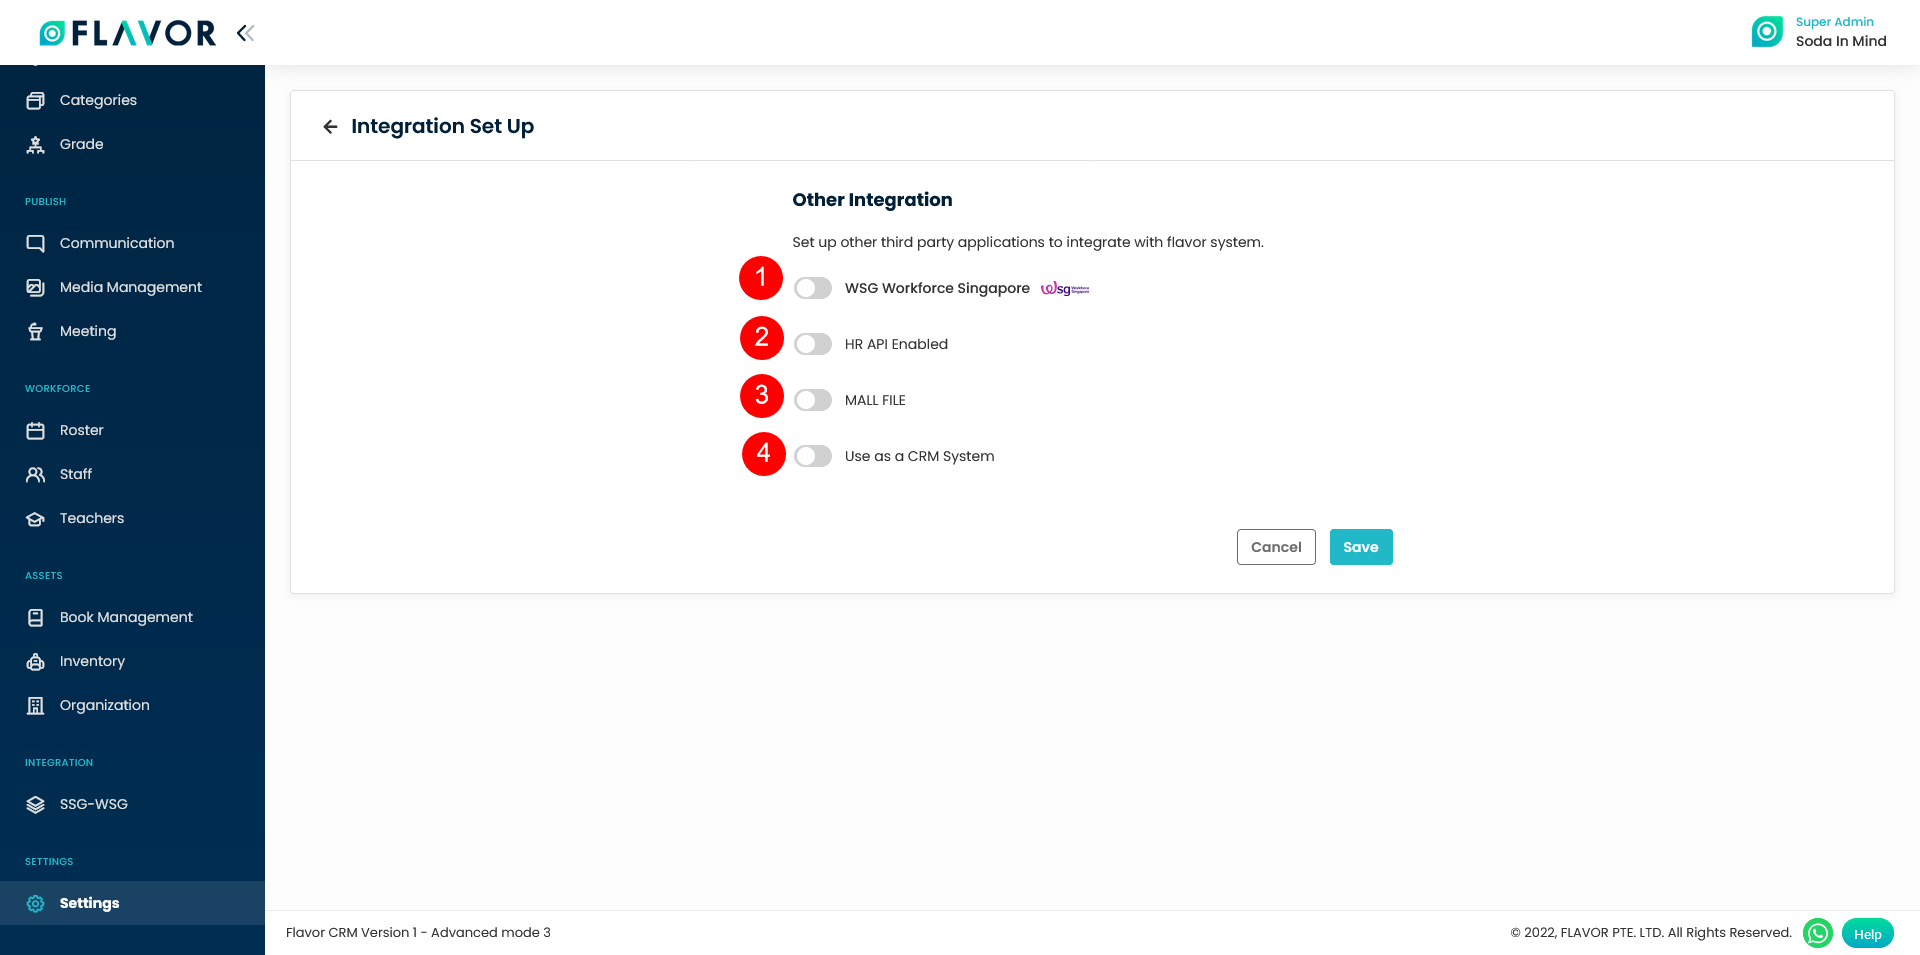
- WSG Workforce Singapore: Enable the switch to get connected with the TP Gateway. Under Environment there are two options viz. UAT and production. UAT is for testing and production is for live accounts. Enter the UEN Number, Training Partner Code, Corppass id, key base etc and click on the Save button.
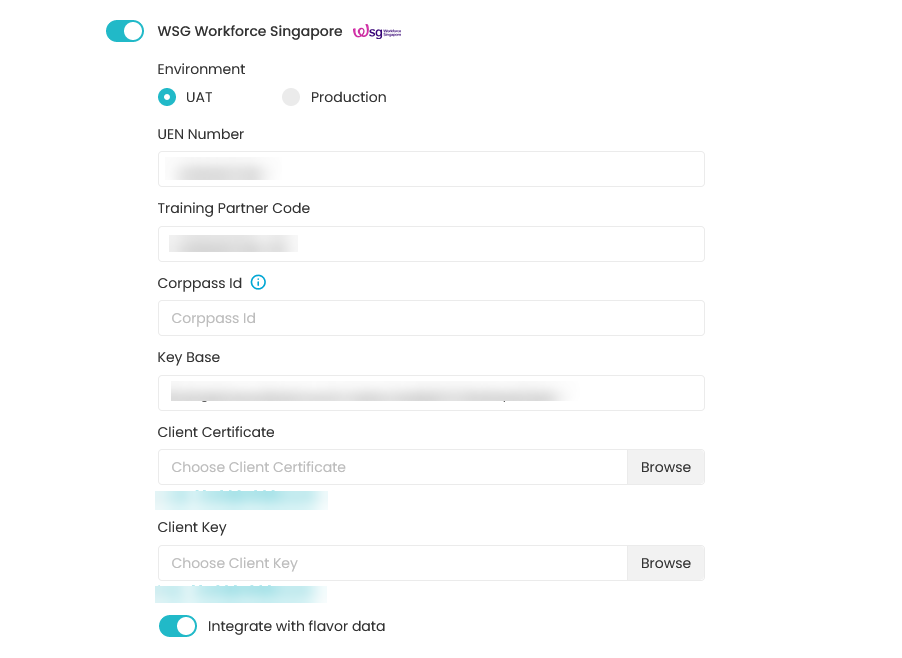
Integrated with Flavor Data: This option is off by default, you can make it on by switching. If this option is off then the courses of the Flavor system will not see in the Course Run.
- HR API Enabled: This is used to sync the data from flavor to Carbonate.
- MALL File: –
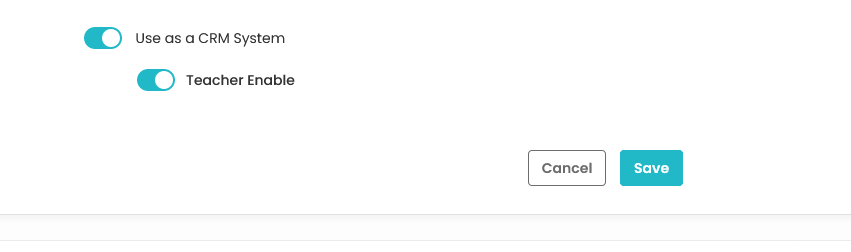
- Use as a CRM system: To use the Flavor System as a CRM system, enable the switch. Also, enable teacher if teacher is required in the menu.
Notification
The Notification setting is the system notification setting for the whole application.
Under the Notification Tab, you can see Class Notification, Student Notification and Payment Notification.
Class Notification
Class Notifications are the settings for type of the notification being sent, type of receiver, send date and the message template.

Note: There is a subsidiary drop-down. You can select the subsidiary and then do the notification setting for that subsidiary.
Lesson resume after term break/Before class begin:
The notification setting regarding messages being sent to notify the starting of the lesson after the term break/Before class begins are the same.
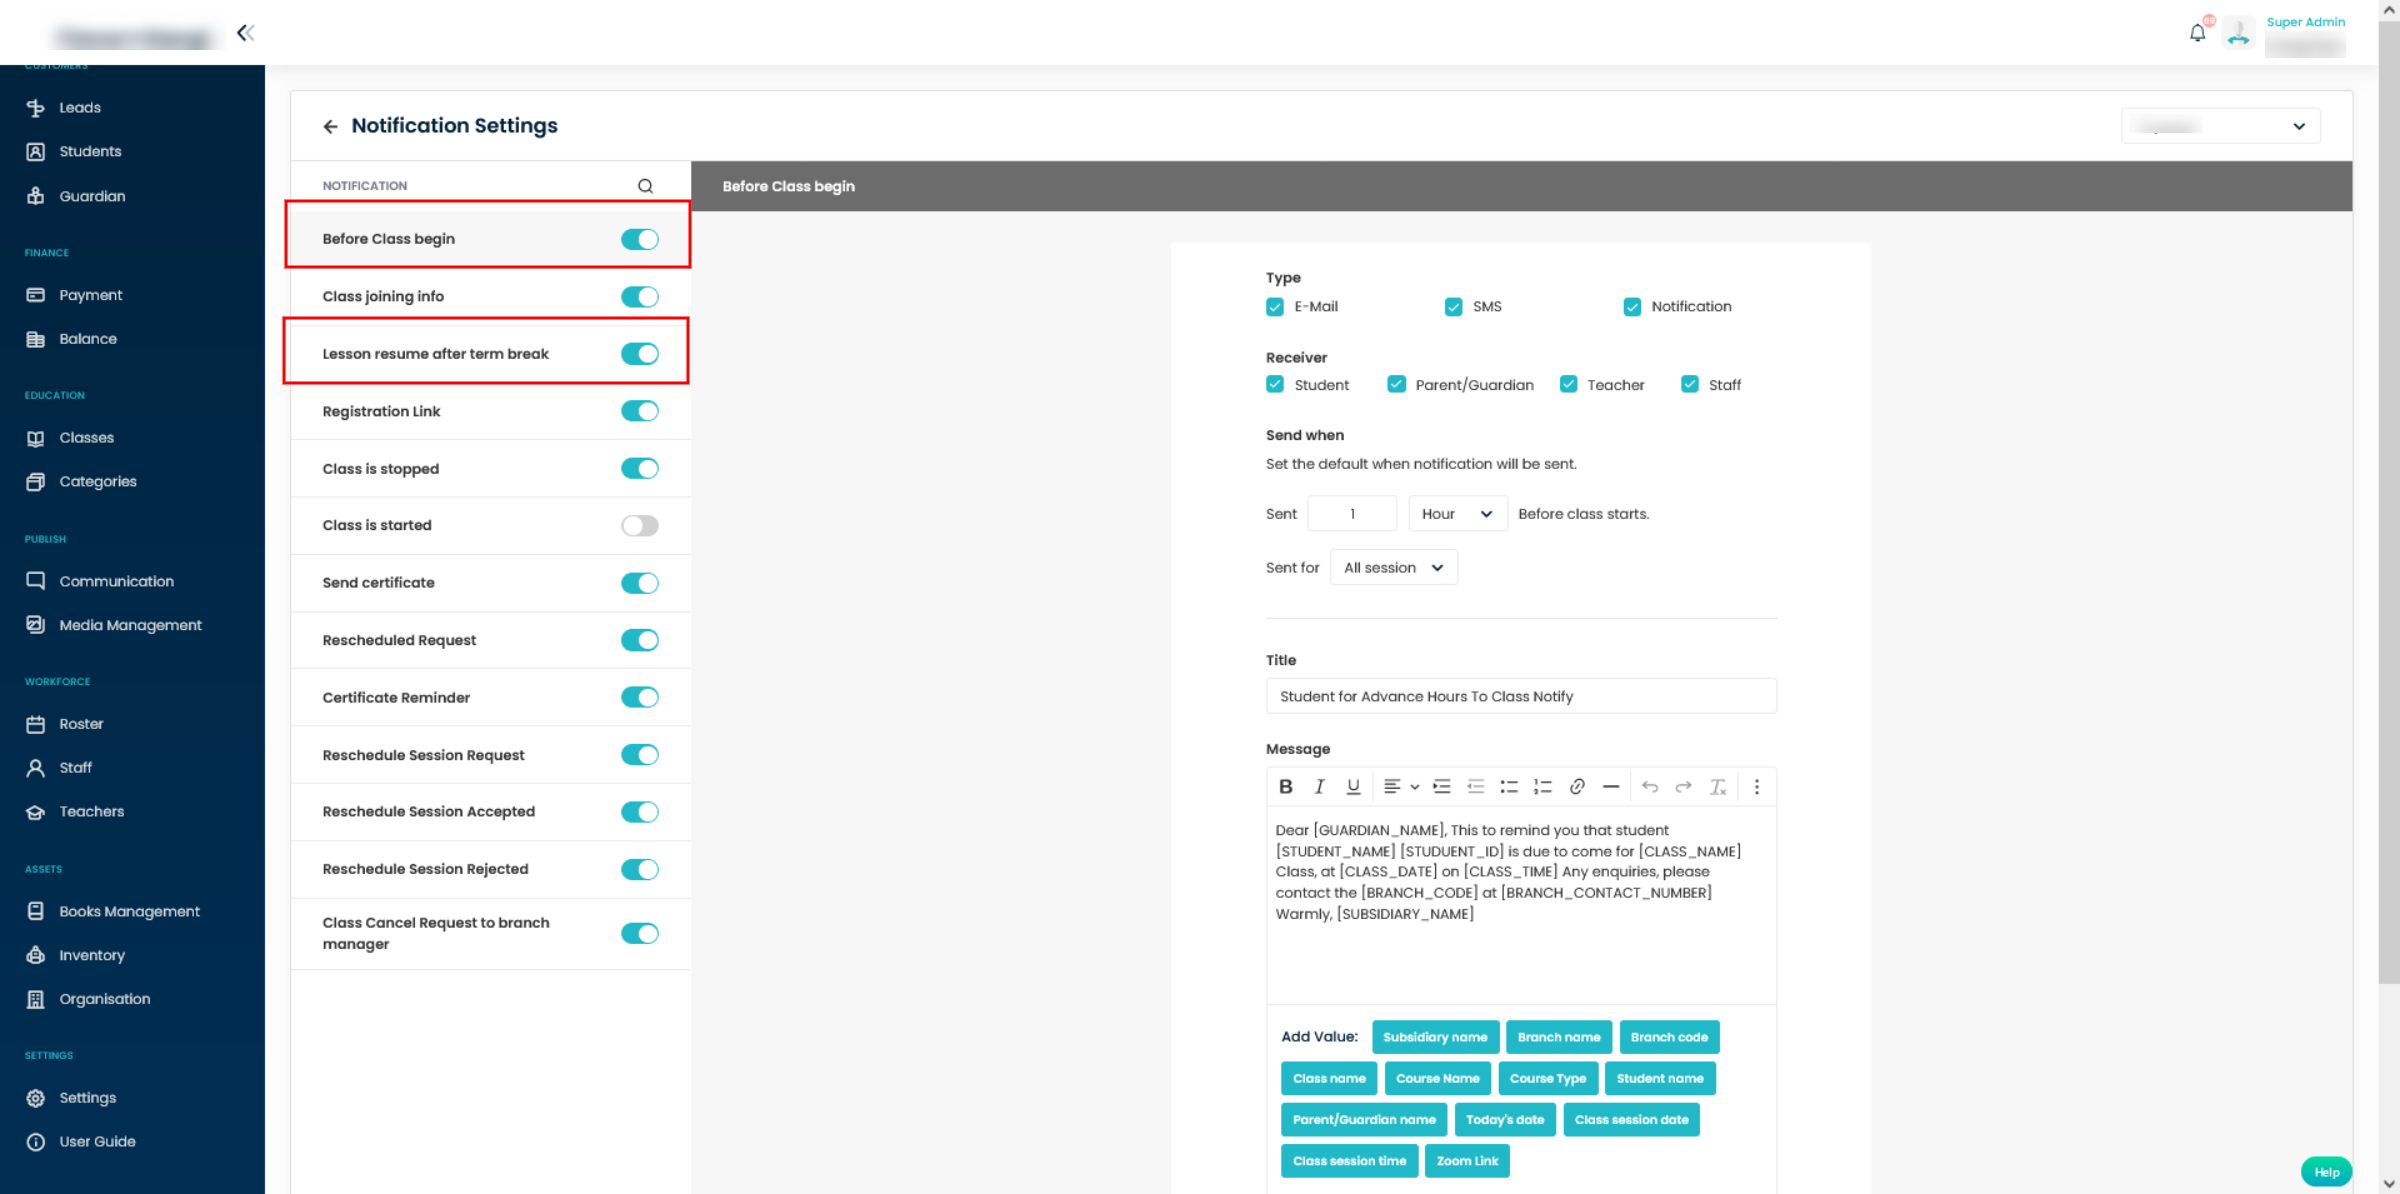
- Type: Here, type refers to ways for sending messages. The notification messages can be sent by Email, SMS and by giving notifications. All these settings are reflected in the Communication module.
- Receiver: It refers to the persons who will receive the messages. It can be Student, Parent/Guardian, Teacher and Staff.
- Send When: It sets the default number of days before the lesson starts when the notification to be sent.
- Title: You can set the title for the notification to be sent.
- Message: You can set and format the messages for the notification to be sent. Also, while composing the message template you can Add value to the message.
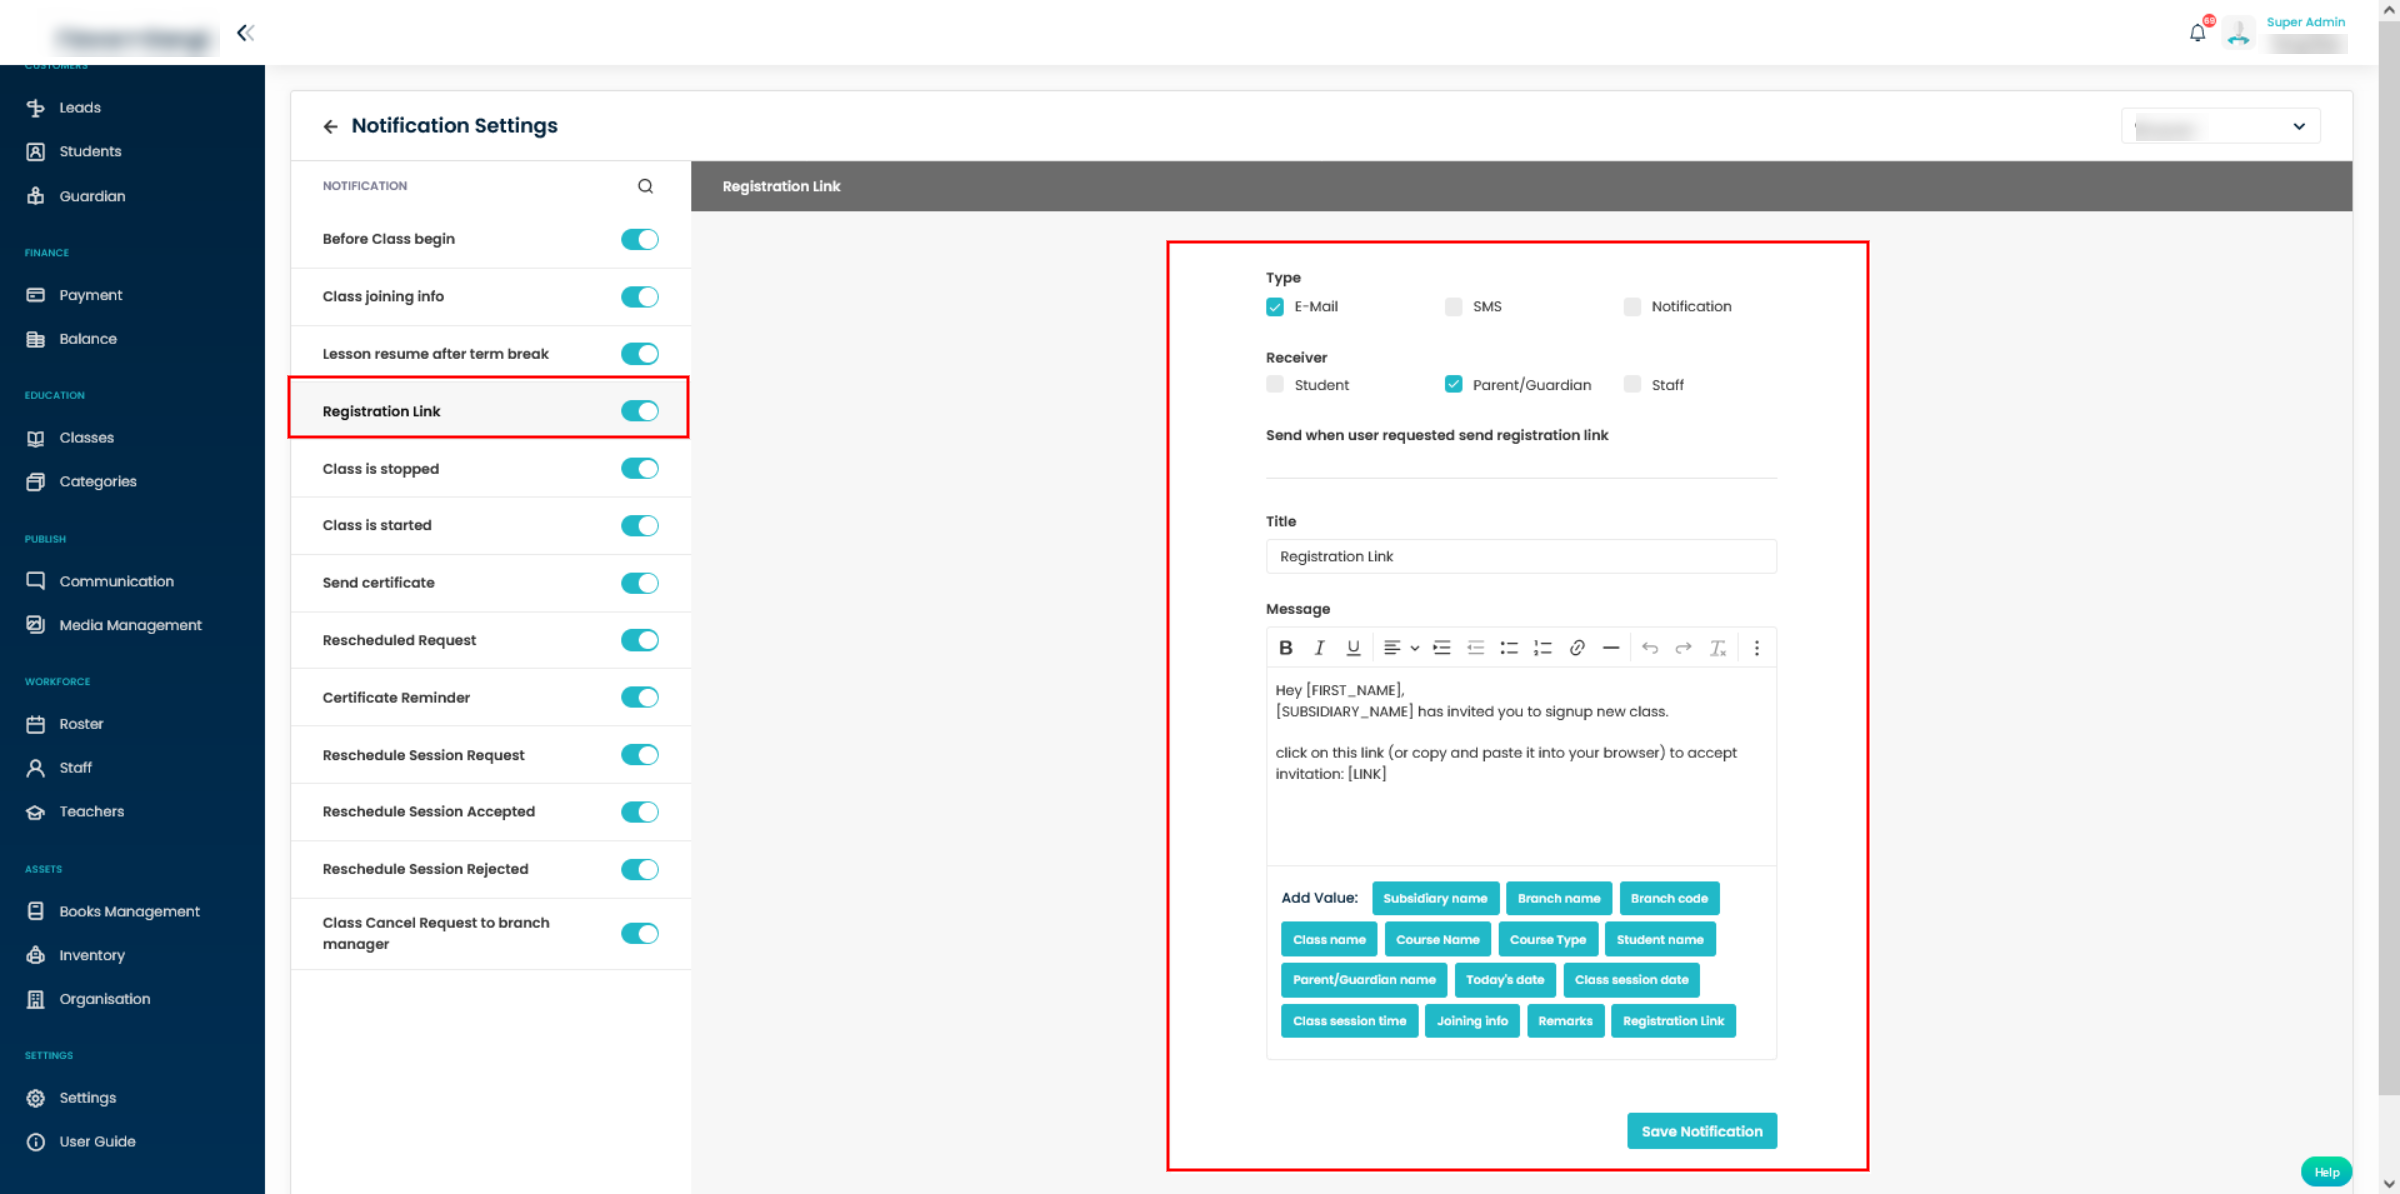
Registration Link:
It is the link sent to register for the ongoing or upcoming classes. The registration link is sent from the student list module.
- Type: Here, type refers to ways for sending messages. The notification messages can be sent by Email, SMS and by giving notifications. All these settings are reflected in the Communication module.
- Receiver: It refers to the persons who will receive the messages. It can be Student, Parent/Guardian and Staff.
- Title: You can set the title for the notification to be sent.
- Message: You can set and format the messages for the notification to be sent. Also, while composing the message template you can Add value to the message.
Class Joining info/Class is stopped/ Class is started:
The settings under these three are the same. These are the notifications settings for sending messages regarding Class joining info, Class is stopped and Class is started.
Send Certificate:
You can do the notification settings for sending certificates. Also can design and format the content of the certificate.
Rescheduled Request:
This is to set template for reschedule request.
Click on this link to know more on Rescheduled Request.
Certificate Reminder:
This is to set template for certificate reminder.
Click on this link to know more about Certificate Reminder.
Reschedule Session Request /Reschedule Session Accepted /Reschedule Session Rejected:
This is to set template to set the template for Notification for Rescheduled Session.
Class Cancel Request to branch manager :
This is to set template for class cancel request to branch manager.
Click on this link to know more about Class cancel request to branch manager.
Student Notification
You can set the student notification information to the user. The settings are done subsidiary wise.

Registration Success with payment/Registration Success without payment:
The setting for Registration Success with payment and Registration Success without payment are the same. The only difference is in Registration success with payment the receipt can be attached and in Registration Success without payment the invoice is attached.
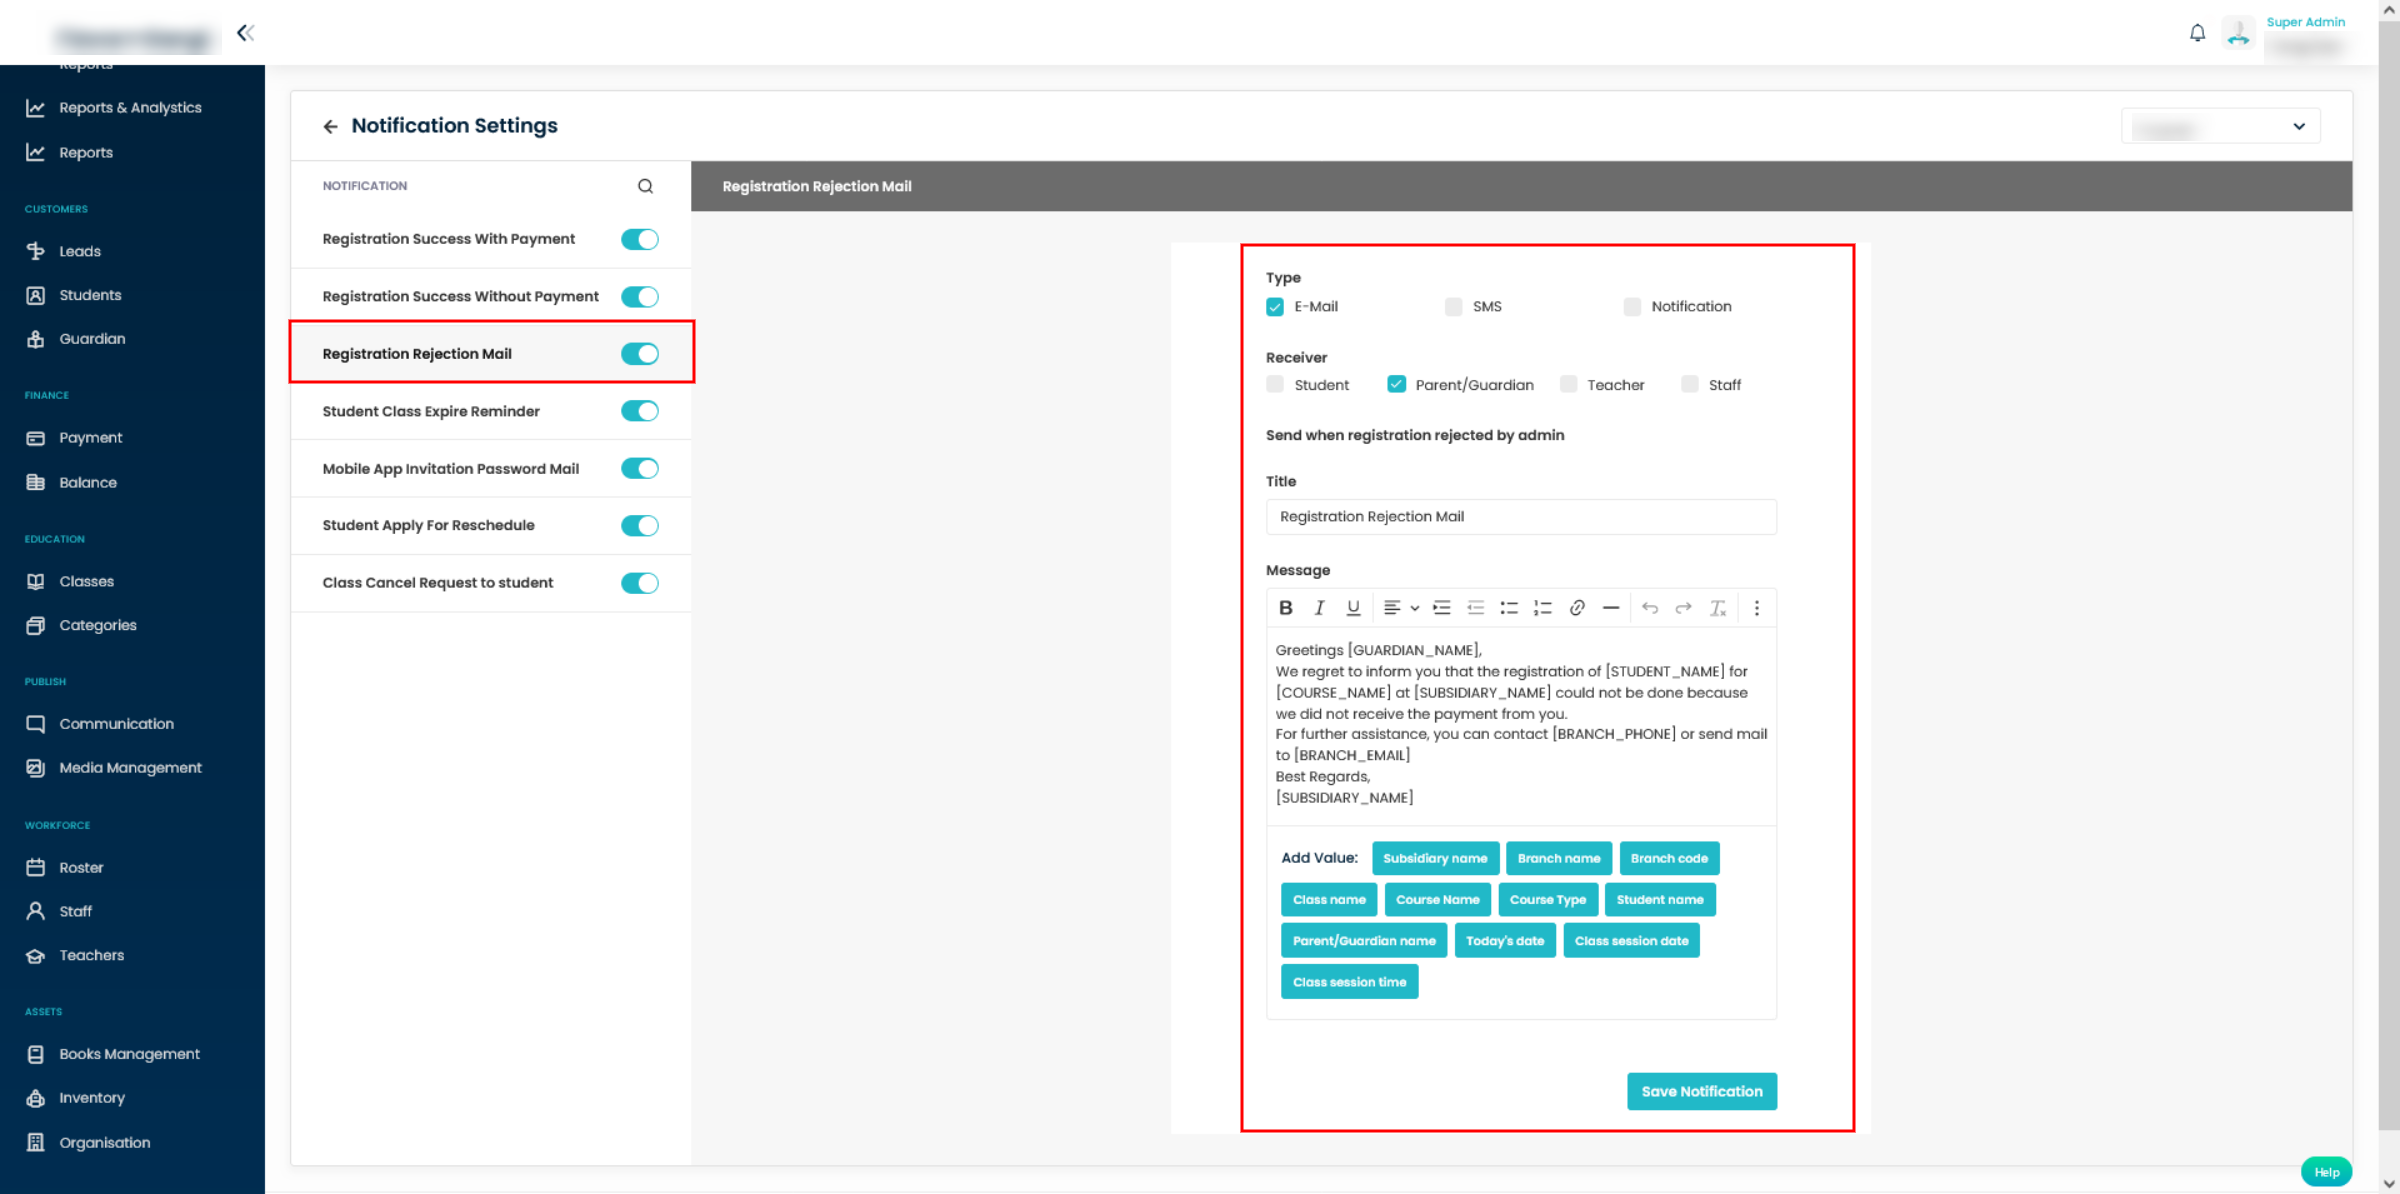
Registration Rejection Mail:
This is the notification setting when the registration is rejected by the admin.
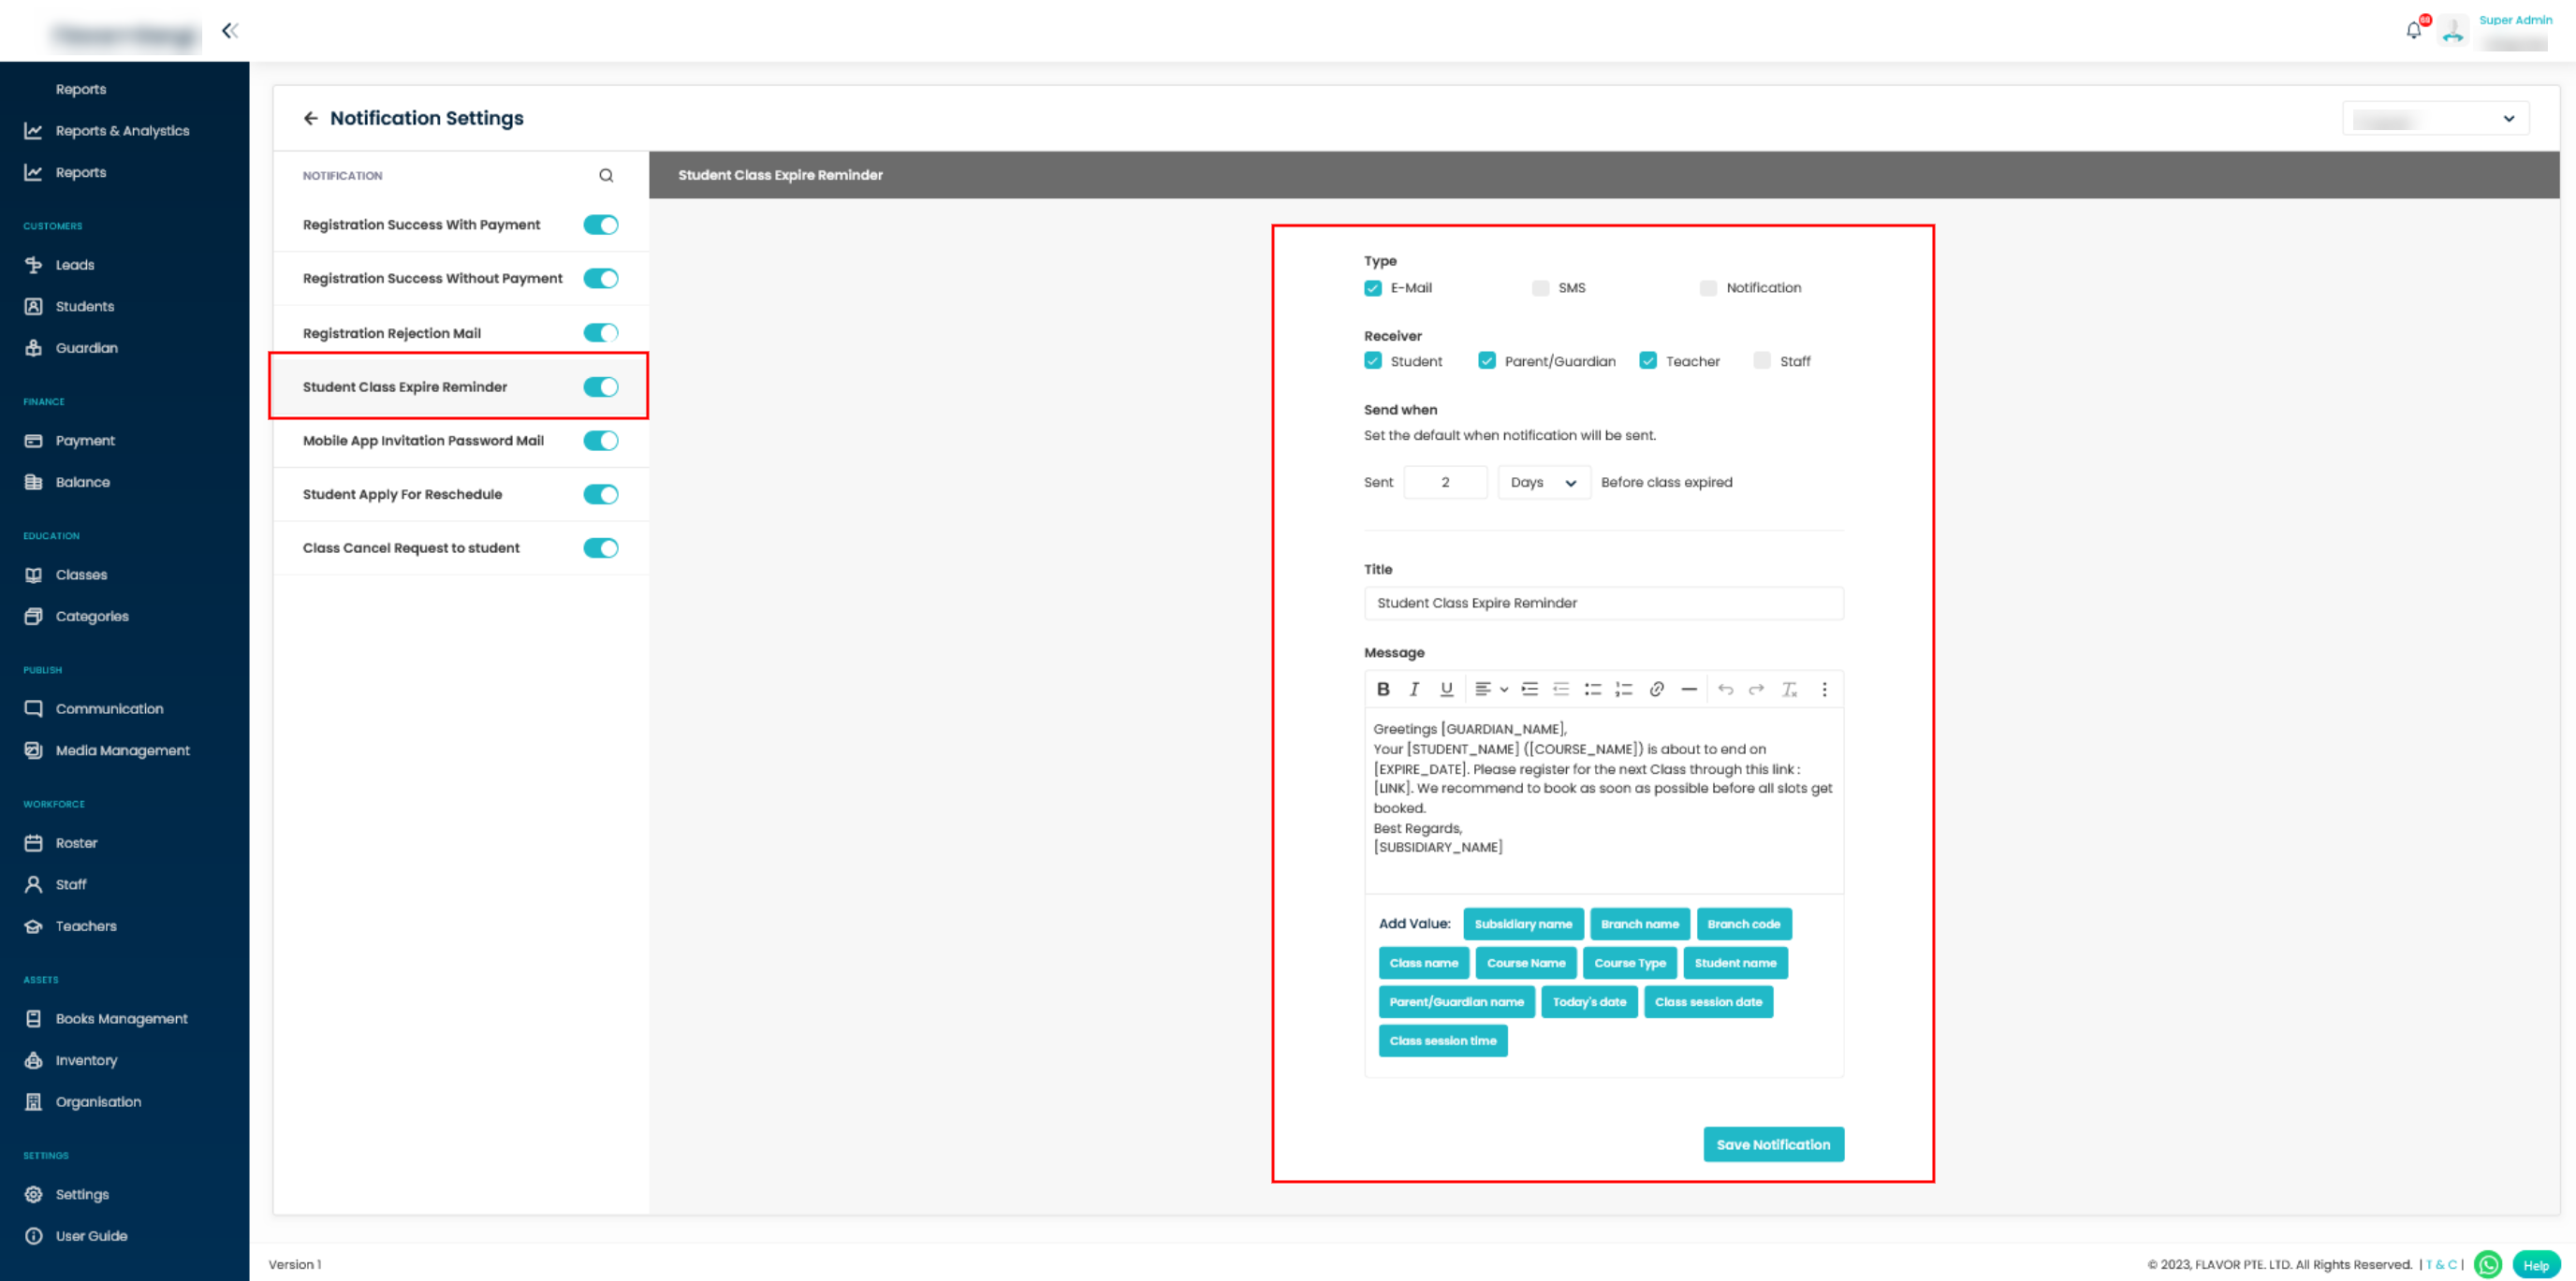
Student class expire reminder:
This is the notification setting to send messages to the receiver regarding the expiry of the class. And also can book the next class with the given link in the message template.
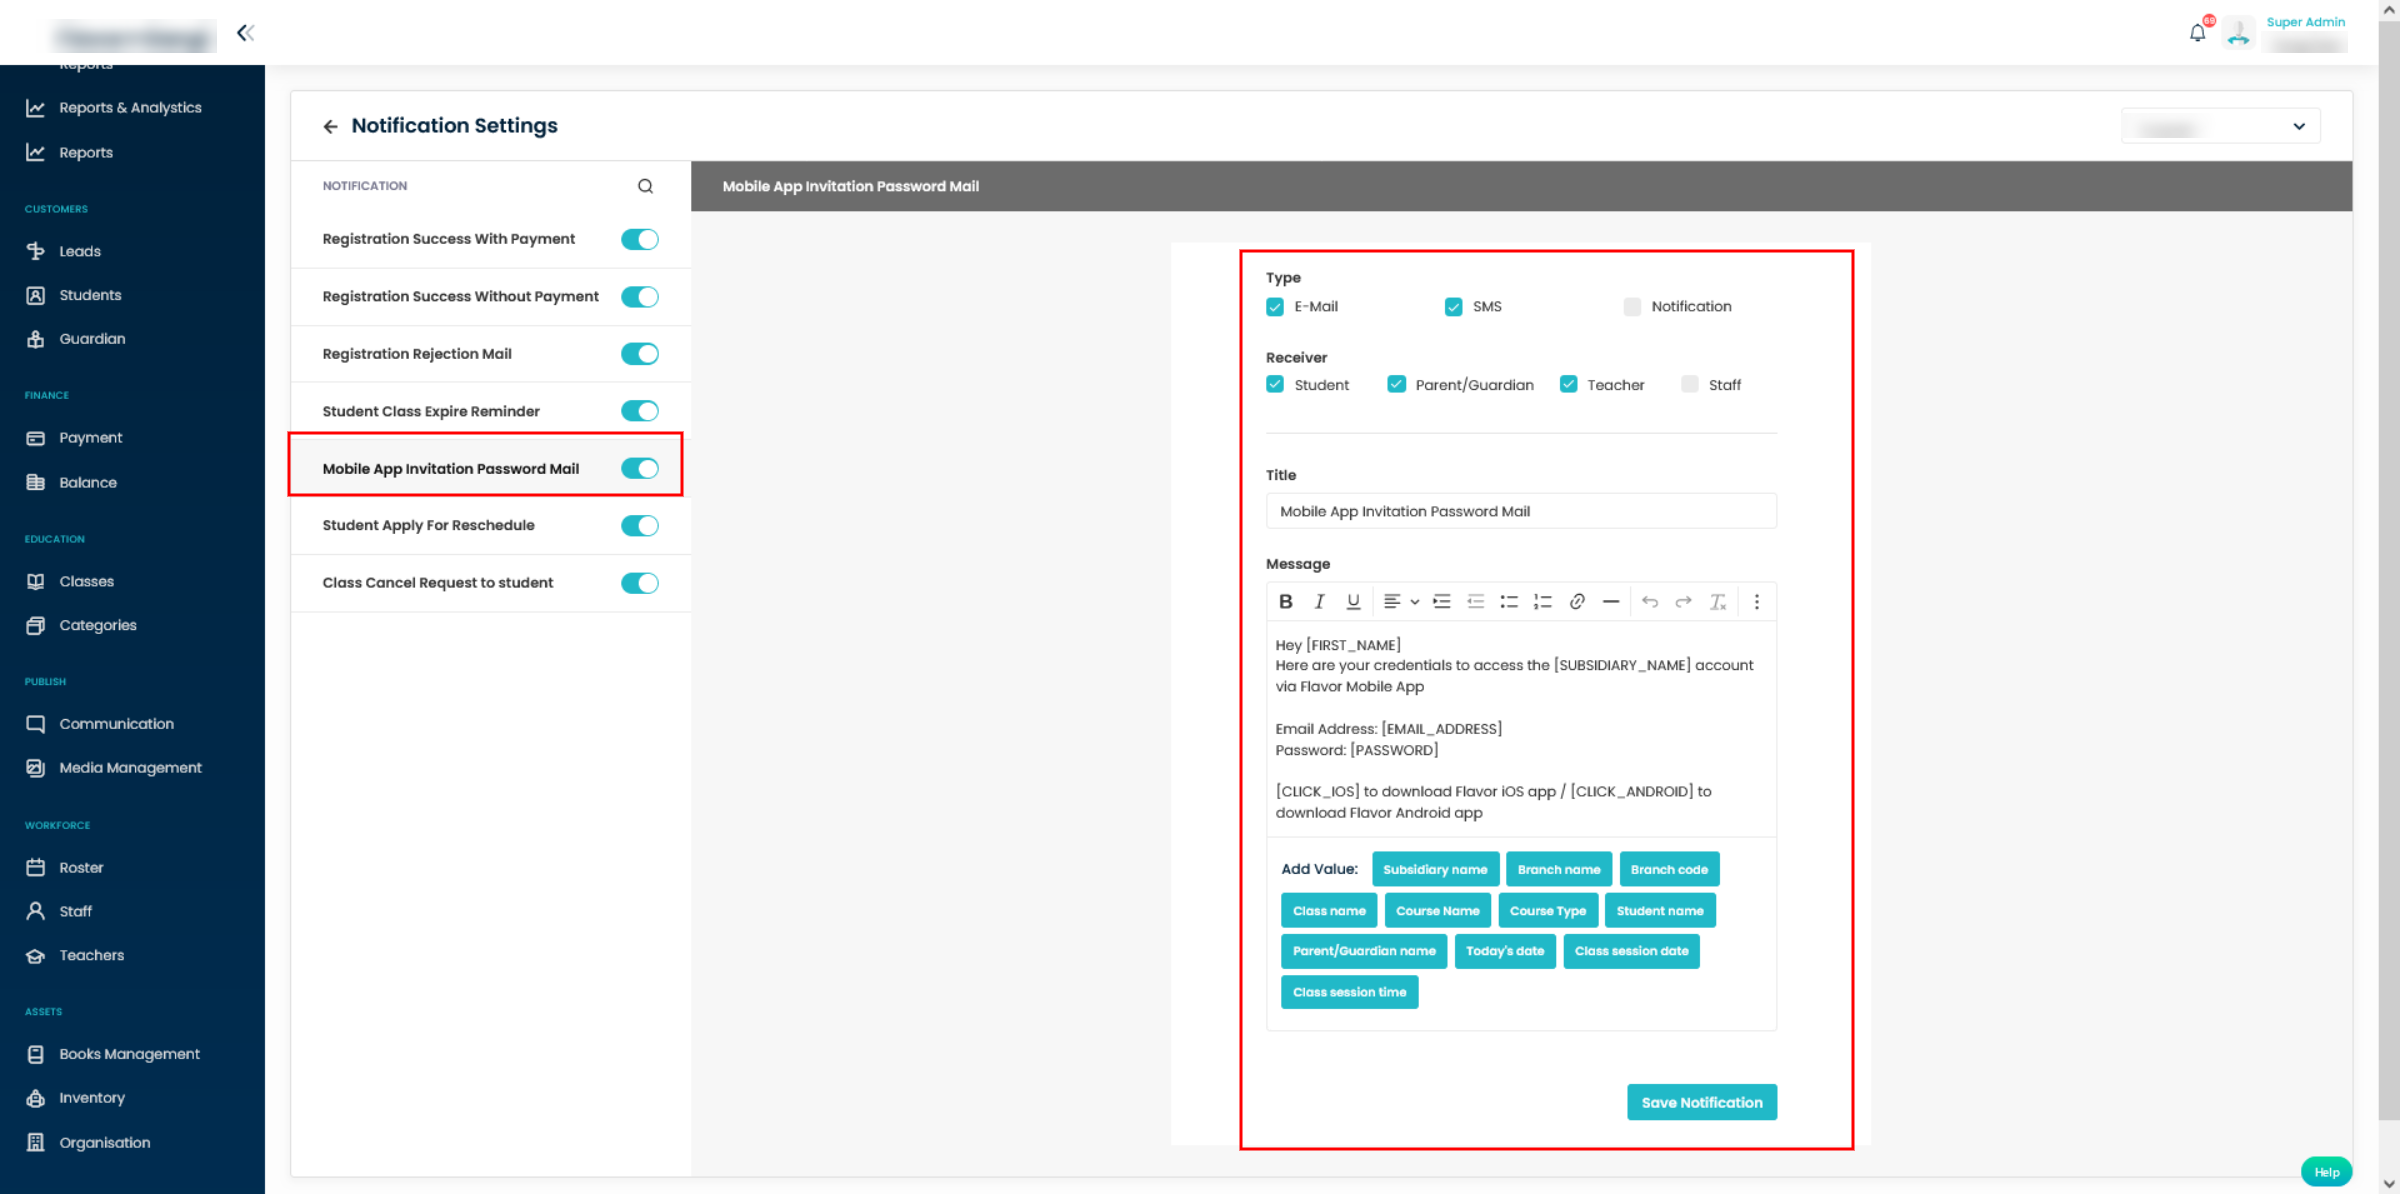
Mobile App Invitation Password Mail
This is the notification setting to send messages to the receiver regarding the credentials and the link for the mobile app.
Student Apply For Reschedule
This is to set template and send notification to students, parents/guardian and teachers regarding the approval for the rescheduled classes.
Click on this link to know more about Student Apply for Reschedule.
Class Cancel Request to student
This is to set the template for Student Notification for Class cancel request to student.
Click on this link to know more about Class Cancel Request to student.
Payment Notification
Student Payment Reminder:
This is the auto notification setting to send messages to the receiver regarding the invoice.
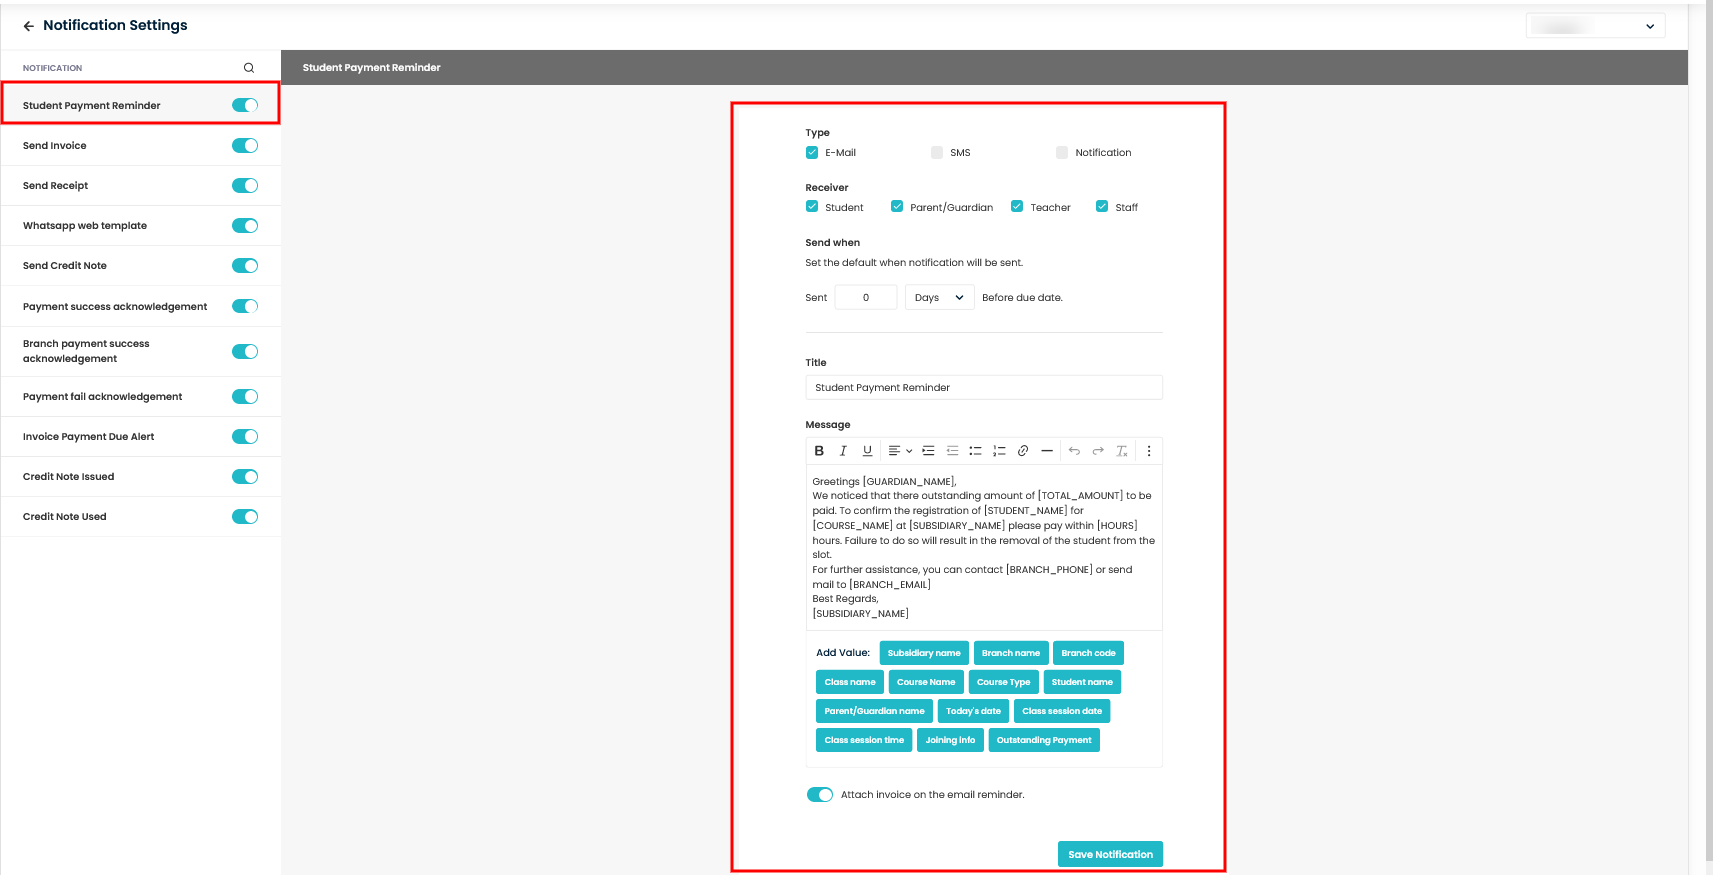
- Type: Here, type refers to ways for sending messages. The notification messages can be sent by Email, SMS and by giving notifications.
- Receiver: It refers to the persons who will receive the messages. It can be Student, Parent/Guardian, Teacher and Staff.
- Send When: It sets the default number of days before the due date when the notification to be sent.
- Title: You can set the title for the notification to be sent.
- Message: You can set and format the messages for the notification to be sent. Also, while composing the message template you can Add value to the message.
- Attach invoice on the email reminder: can enable the switch to attach the invoice with the email.
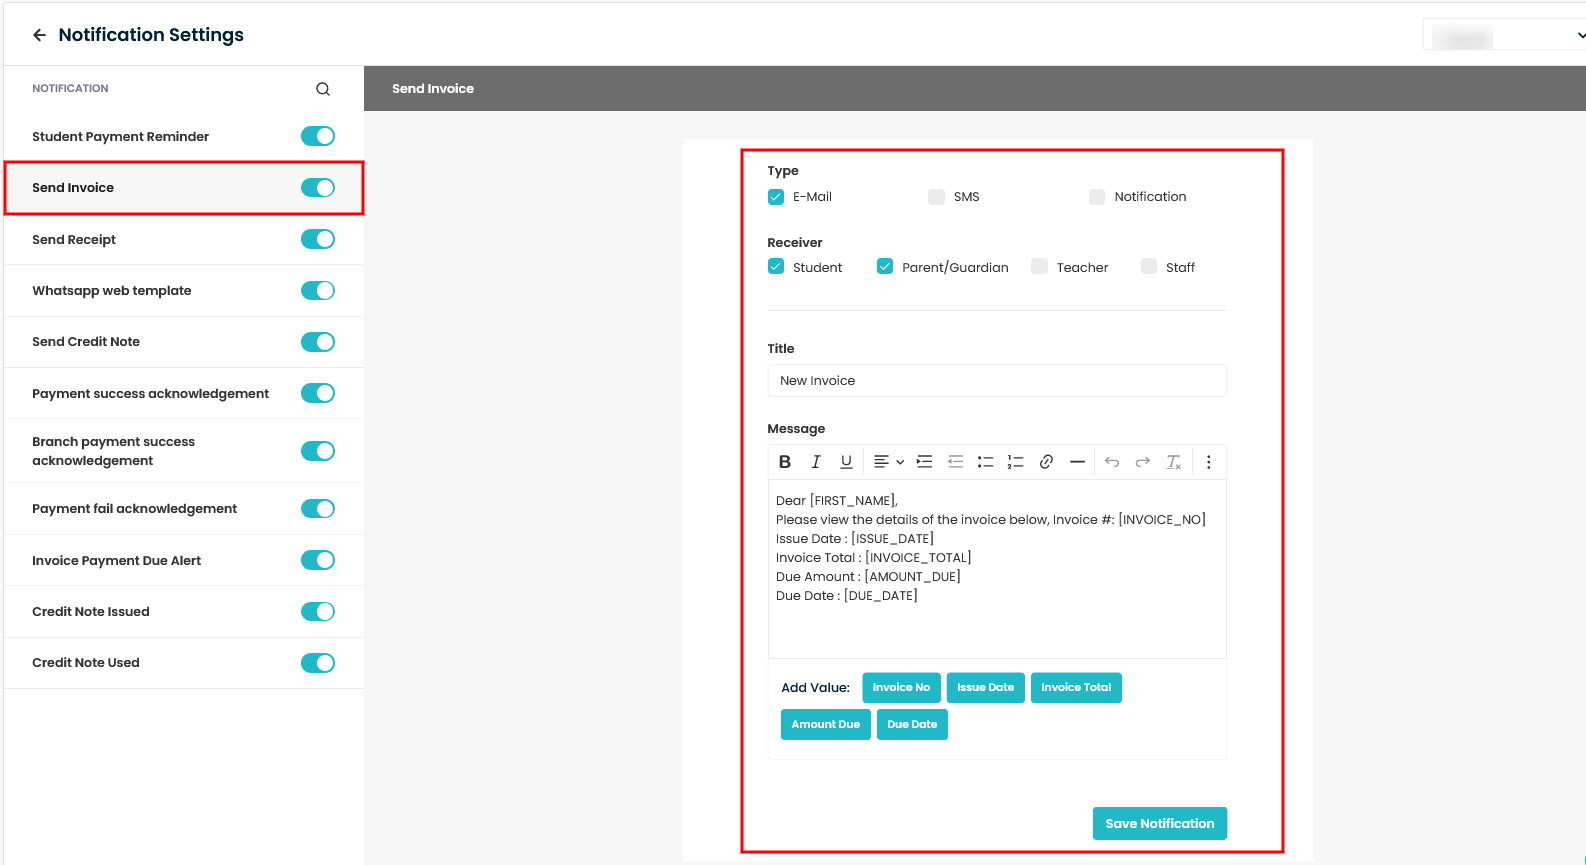
Send Invoice
This is the notification setting for sending messages to the receiver when sending reminders.
Send Receipt
Send Receipt template is set for the emails which are send from receipts listing/view.
Check this link to know more about Send Receipt.
Whatsapp web template
Whatsapp web template is to set template for Whatsapp messages provided this feature is activated.
Check this link to know more about Whatsapp.
Send Credit Note
This is to set template while sending email via send credit note option.
Click here to know how credit note works.
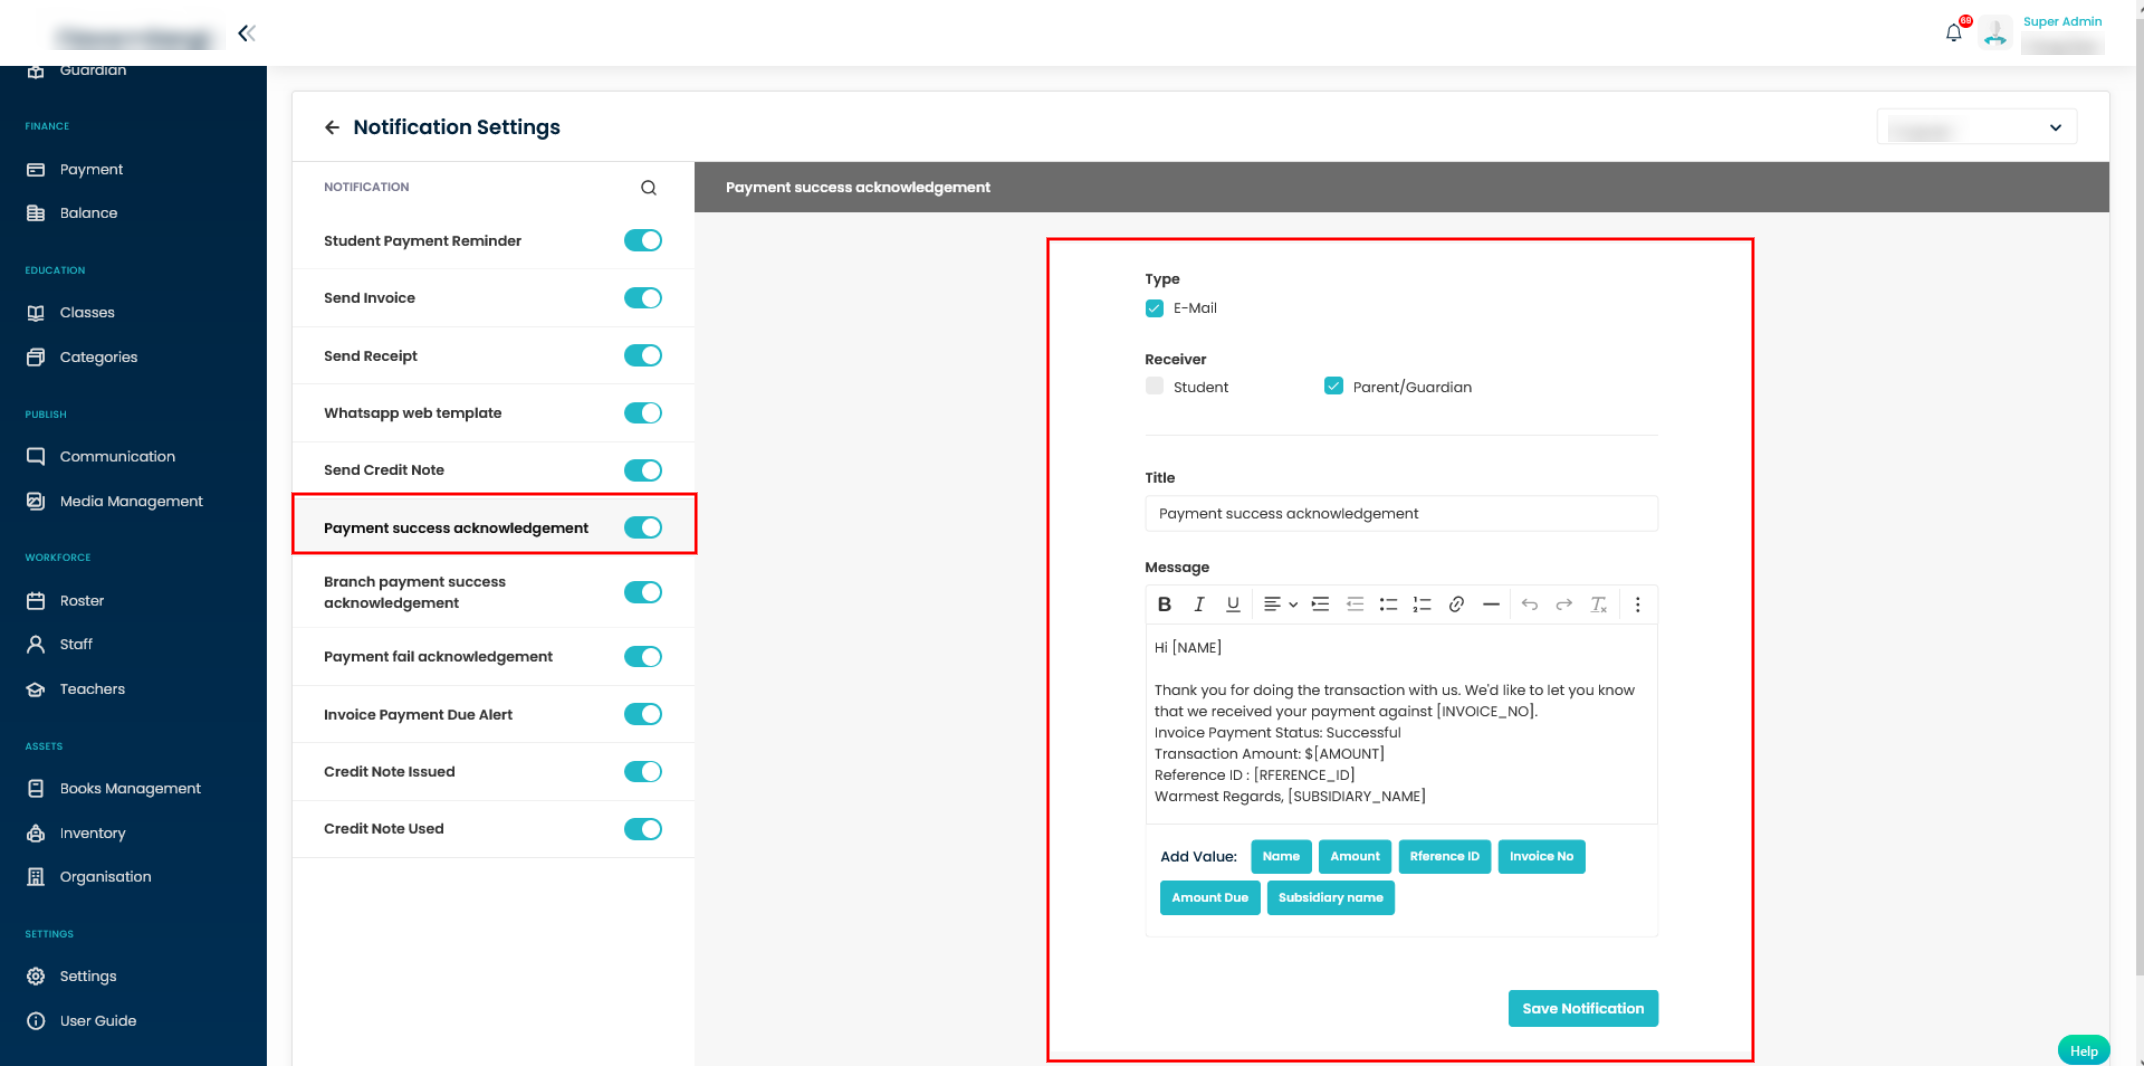
Payment success acknowledgement
Payment success acknowledgement template is to set template for email while invoice payment is successful.
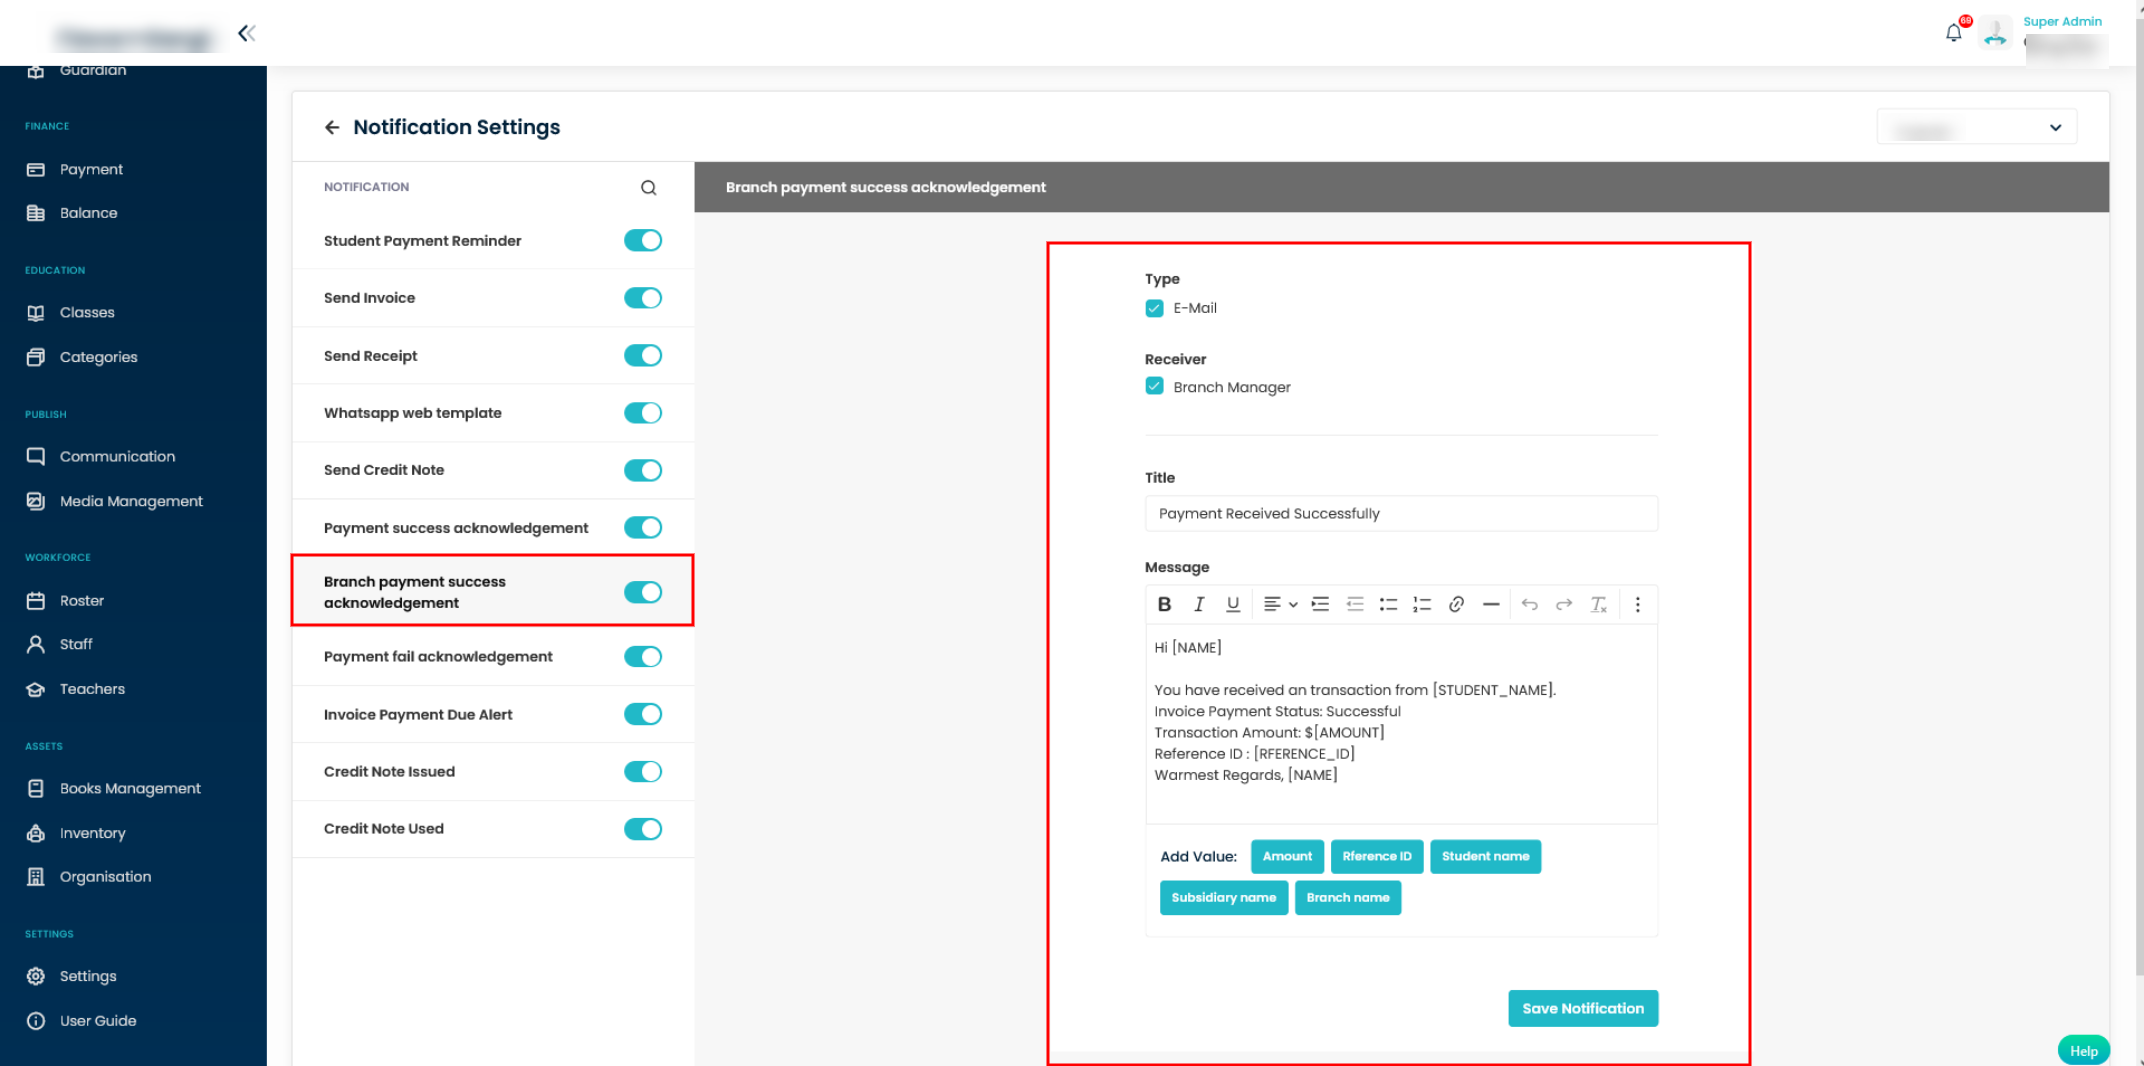
Branch payment success acknowledgement
If branch email is set in Organization/branch, then this template works and email will be sent to the branch manager as invoice payment success acknowledgement.
Payment fail acknowledgement
If an invoice payment fails, an email is sent using this template.

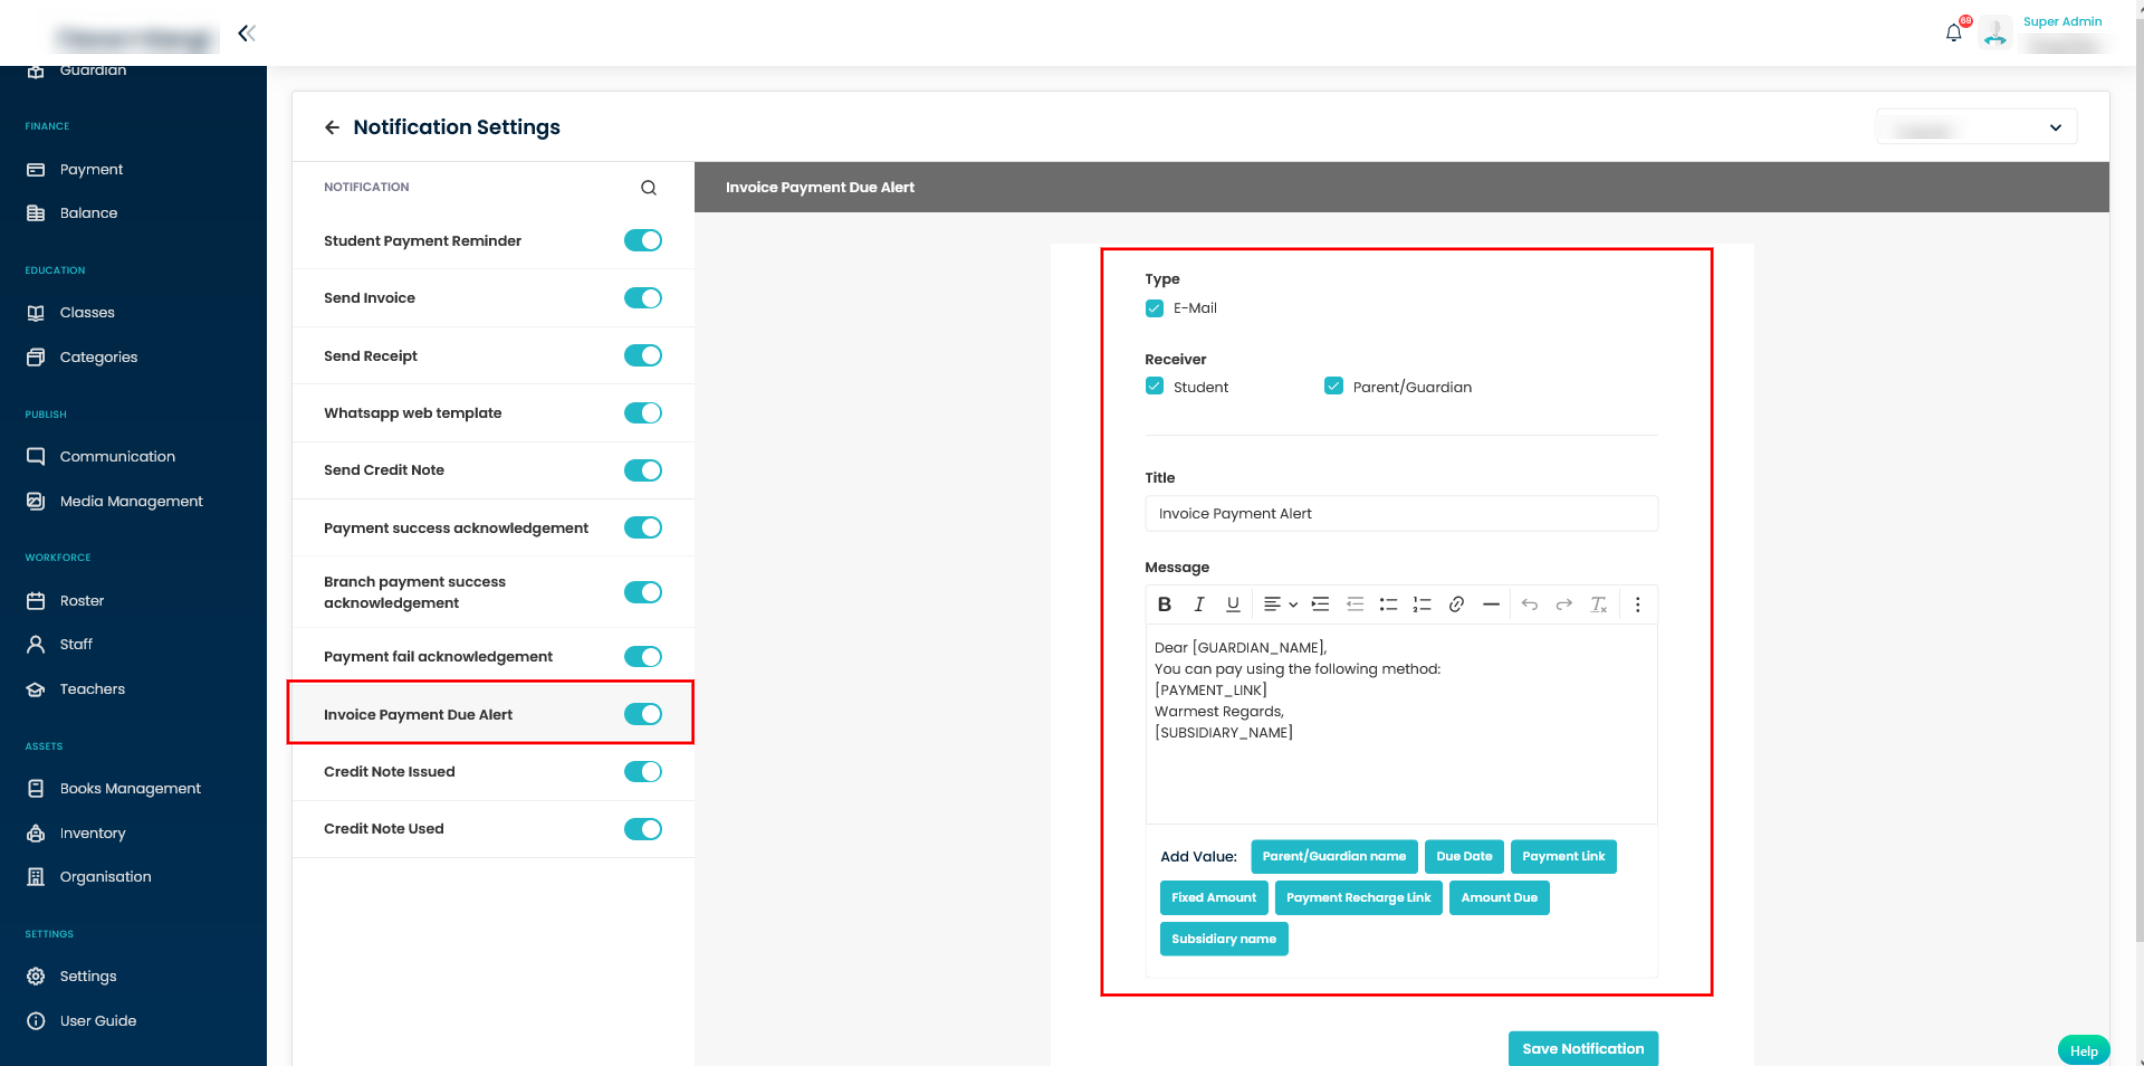
Invoice Payment Due Alert
This template is configured for emails sent when sending payment reminders.
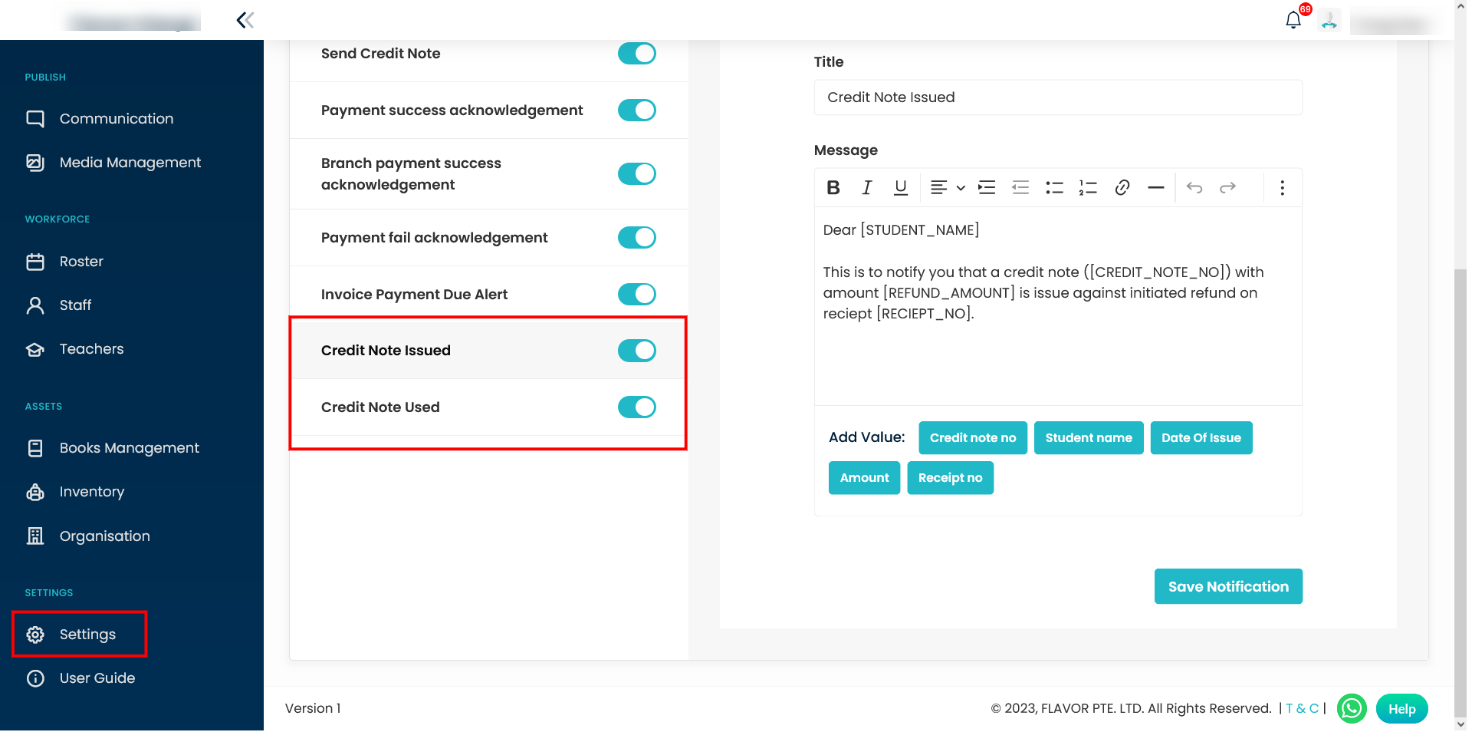
Credit Note Issued/Credit Note Used
This is to set template for emails when credit note is issued while refund and Credit note used while making payment through credit note respectively.
Lead Notification
Follow up Reminder
For the new, the Assigned Staff will receive the email on the follow-up date.
Click on this link to know more about Follow up Reminder.
Balance Notification
Class Credit Expired Date /Class Credit Has Been Deducted
This is used to establish the notification template for class credit notifications.
Click on this link to know more on Class Credit Expired Date /Class Credit Has Been Deducted.
Announcement
This is for configuring announcement/notice information to display on the mobile app.
Need more help? Ask us a question
Please let us know more of your details and our team will reach out to you very shortly.