
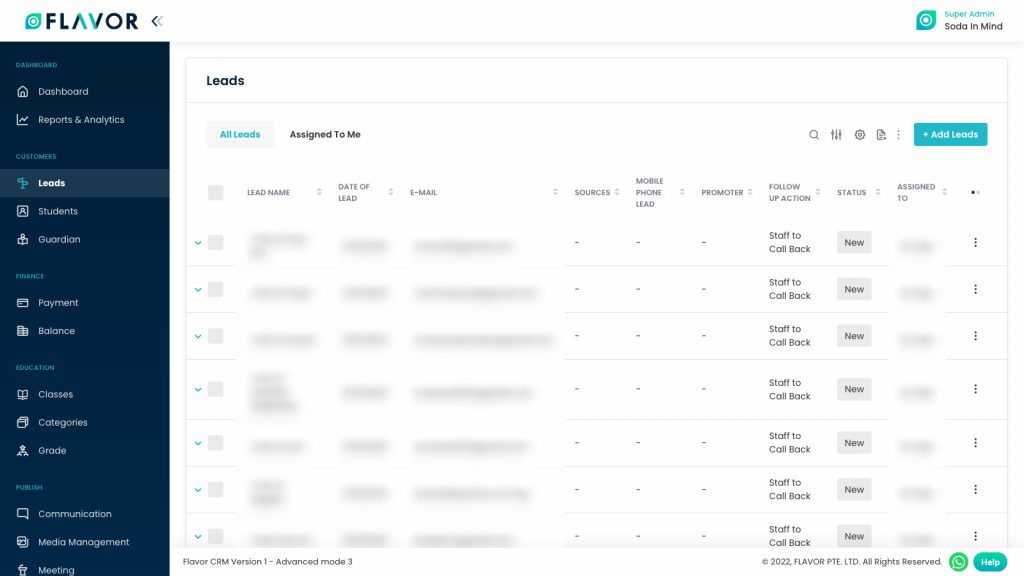
You can check the leads by clicking on the Leads from the main navigation panel of the Flavor EduPortal. The “Leads” menu is provided under the “Customers” section in the navigation panel.
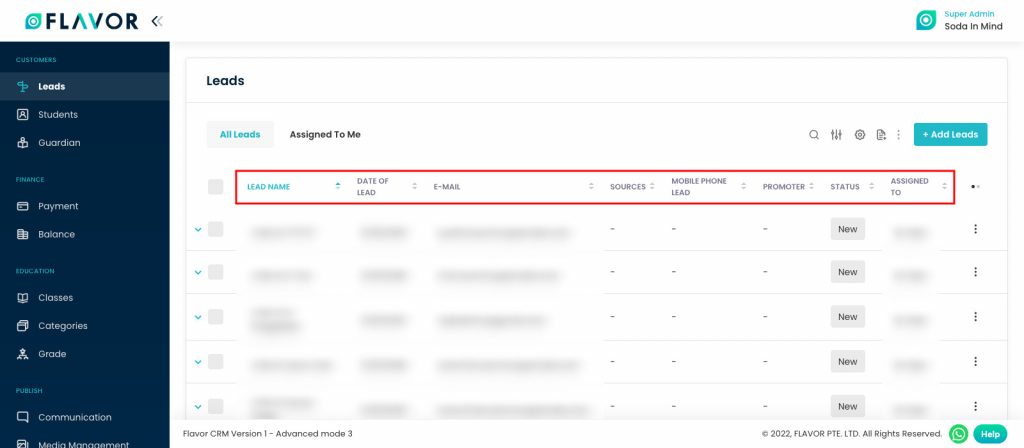
By clicking on the “Leads”, from the left menu you will be redirected to the Leads page where you will see the listing of all Leads in the grid view. You can check, manage and create a new lead from this page.
All Leads Tab
Here, you can see two tabs: All Leads and Assigned To Me.
All Leads
When you are redirected to the leads page, by default, you will see the records of all the leads.
Assigned To Me
By clicking on the “Assigned To Me”, you will see the leads that are assigned by the admin users to the currently logged in user.
Leads Options
Here, you will see the records of all the leads, you can add new leads, search them, filter them, edit & delete them.
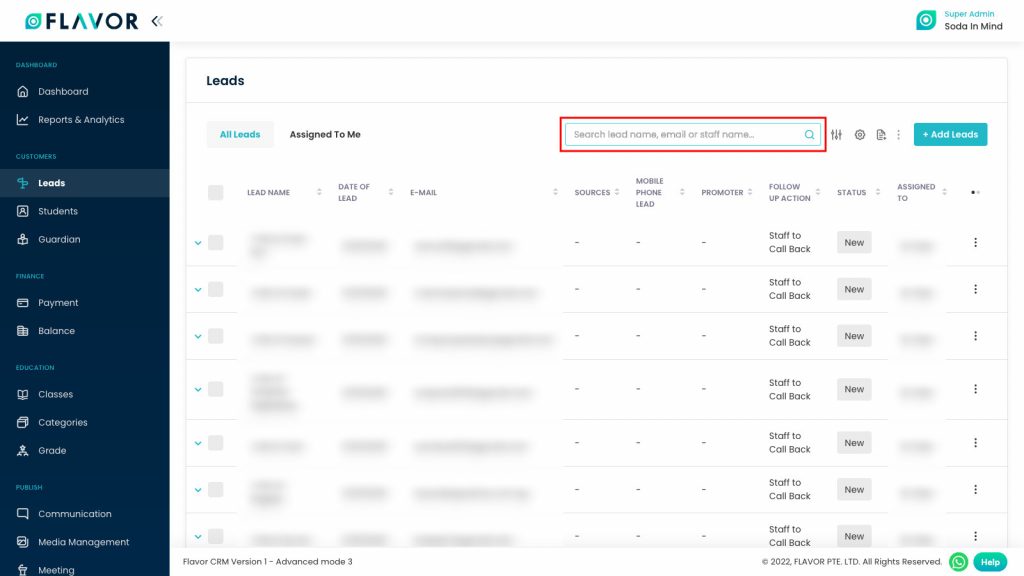
Search
By clicking on the Search Icon, you can search the specific leads’ record by entering the leads name, email or staff name.
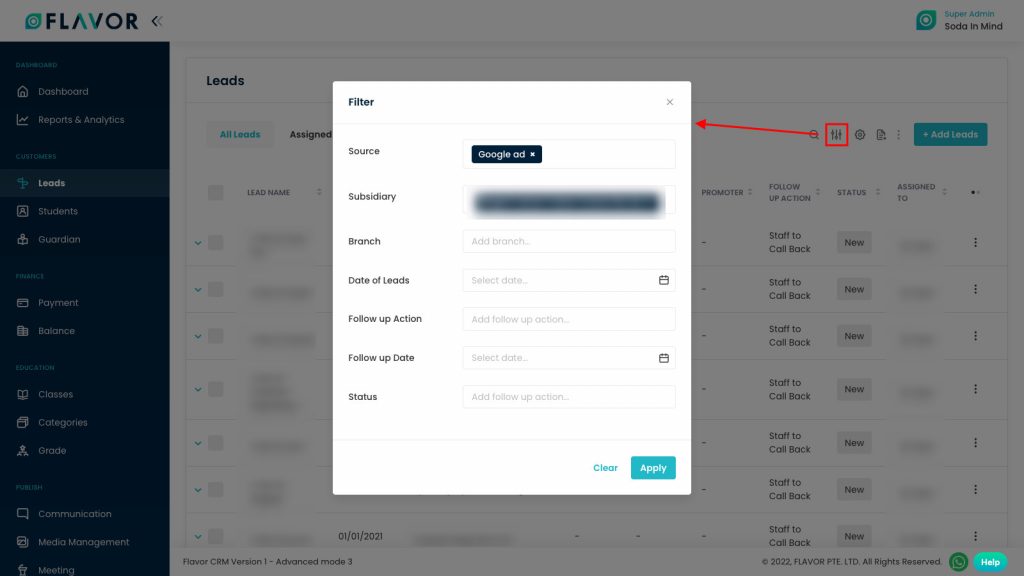
Filter
You can filter the leads based on specific parameters like source, subsidiary, branch, date of leads, etc. To open the filter popup, click on the Filter Icon. Select the data according to your need, then click on the Apply button to get the filtered records.
Settings
By clicking on the Settings icon, you will get a small popup having two options Leads Settings & Leads Presets.
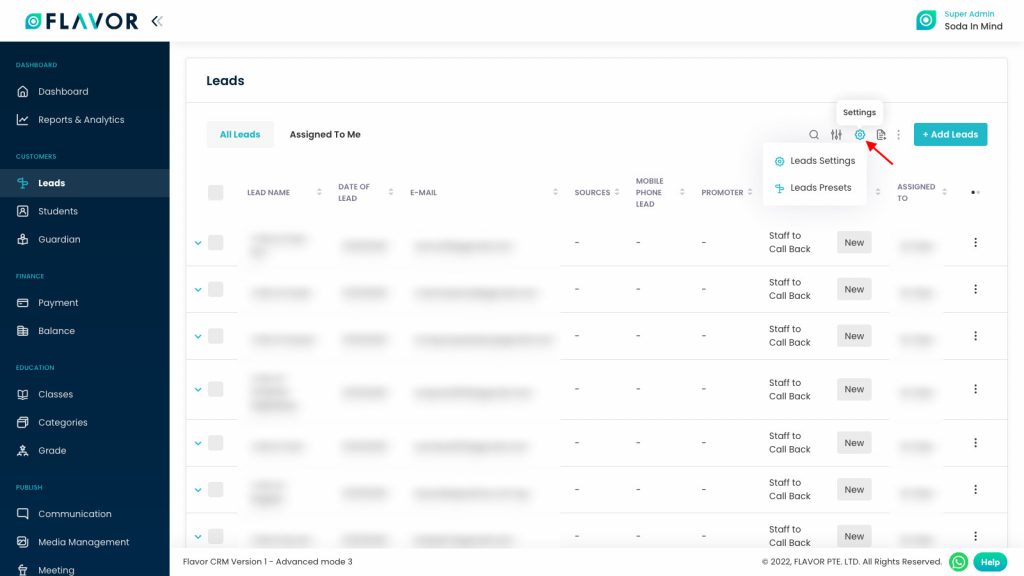
Leads Settings
After clicking on the Lead Settings you will be redirected to the Lead Setting’s page. Here, you will see two options General Settings & Field Options.
General Settings
- Show Lead Module to All Users: By enabling the switch, you can show the “Lead” module to all the users. So here, the accessibility is provided for the “Leads” module visibility to the users.
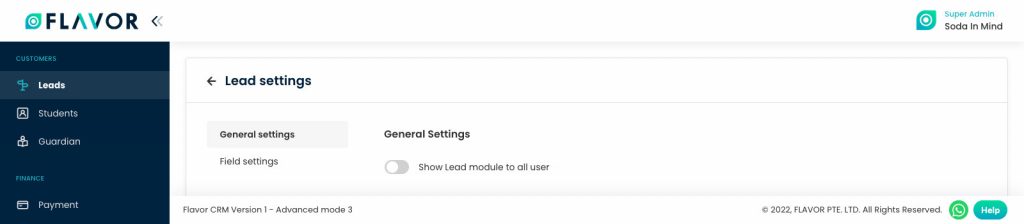
Field Settings
User information
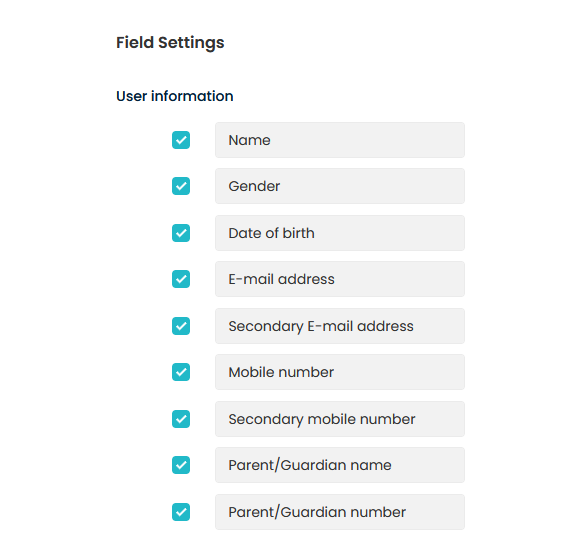
You can customize the user information based on User information settings under Field Settings. By default, all the listed information will be checked. You can check or uncheck the user information fields based on your requirement.
Note: Name field is the mandatory field. You cannot uncheck the said field.
Follow up Option
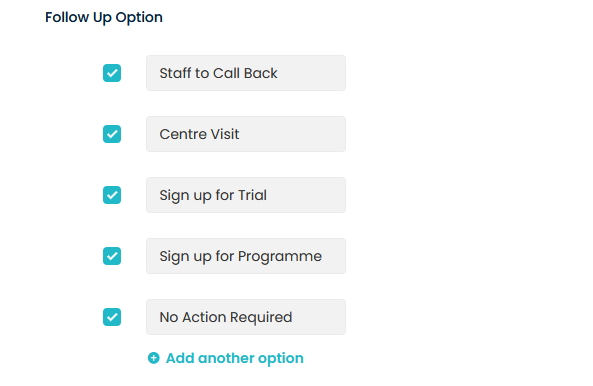
You will see the default fields of the Follow-up Options that are already added for the leads. You can enable/disable the fields by ticking the checkbox of the follow-up fields.
- + Add another option: By clicking on the “+ Add another option”, you can add more custom follow-up fields.
Note: You can remove/delete only the newly added follow-up fields of the lead. But, you can’t remove the default follow-up fields.
Status
- You can configure the status of the leads. You will see the default fields of the “Status” options that are already added. You can enable/disable the fields by ticking the checkbox of the fields. You can also select the “Status” label with the specific colour that identifies the action of the leads.
- You can also add the new field of the “Status” by clicking on the + Add another status text label. You need to insert the name of the status and select the status with the relevant colour.
- You can remove the status just by clicking on the Cross (x) icon of the added status. By clicking on the ‘remove’ icon, you will see the confirmation popup to remove the added status.
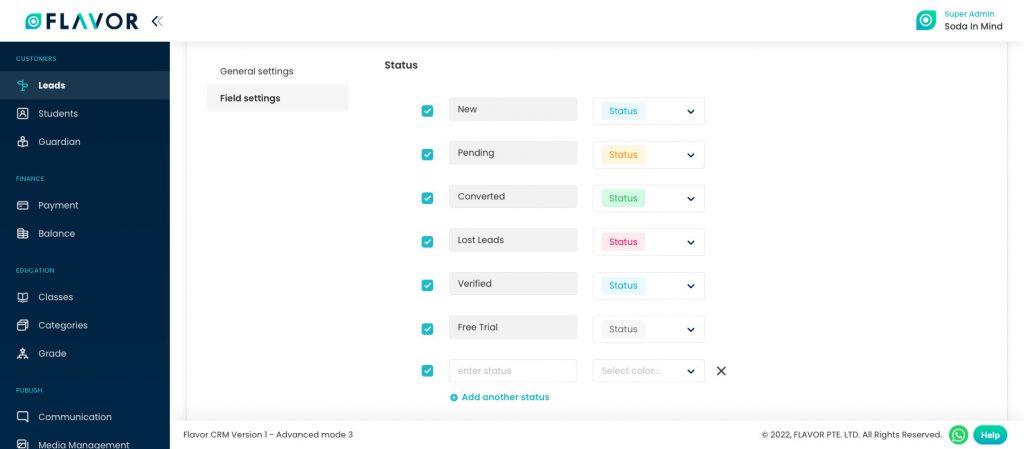
Note: You can remove/delete only the newly added status of the lead. But, you can’t remove the default status.
Custom Text Field

You can insert the Custom Text Field as per your requirement. You need to enable the switch of the “Add custom text field #1” to insert the custom text field for the Lead.
- Label: Insert the label name of the custom field for the lead.
- Show in listing: Enable the switch to be displayed the custom text label during the lead management (creating & editing).
Note: You are allowed to insert a maximum of two custom text fields (#1 & #2). To insert the 2nd custom text field, you need to enable the switch of “Add custom text filed #2”.
Custom Dropdown Fields
You can insert the Custom Dropdown Field as per your requirement. You need to enable the switch of the “Add custom dropdown field #1” to provide the multiple selection list to insert the record for the Lead.
- Label: Insert the label name of the custom dropdown field for the lead.
- Show in listing: Enable the switch to be displayed the custom text label during the lead management (creating & editing).
- Values: Insert the values that you want to provide as a drop-down selection for the lead.
Note: You are allowed to insert a maximum of two custom drop-down fields (#1 & #2). To insert the 2nd custom drop-down field, you need to enable the switch of “Add custom text filed #2”.
Lead Presets
Sources Options
Search
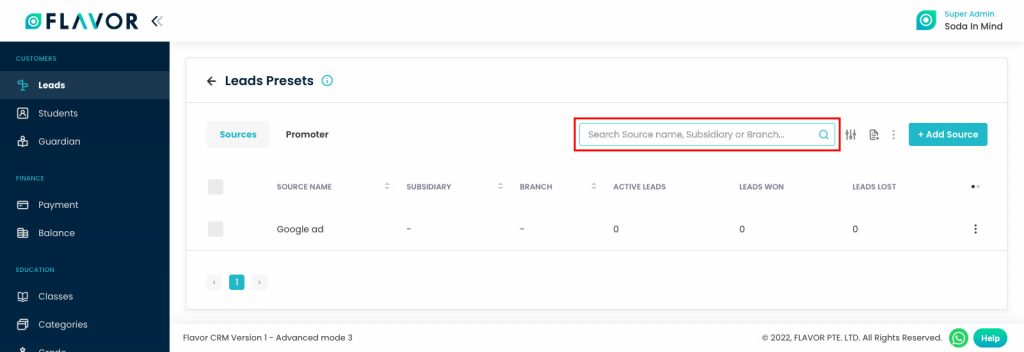
By clicking on the Search Icon, you can search the particular Source by entering source name, subsidiary or branch.
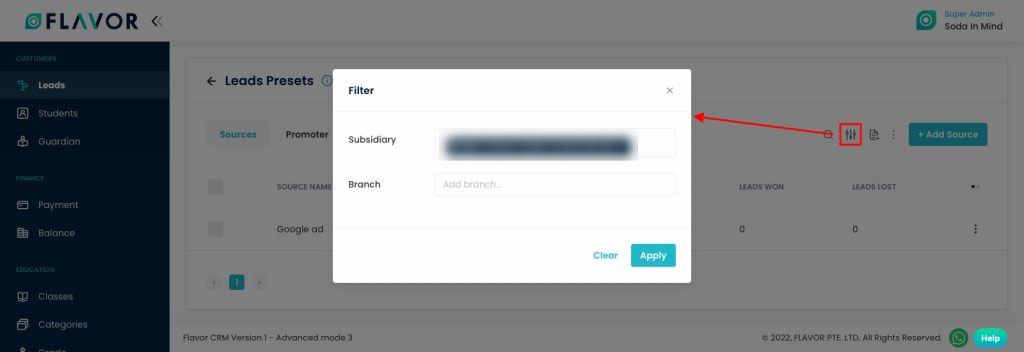
Filter
You can filter the sources based on specific parameters. Click on Filter Icon, after clicking, a popup form will appear on your screen. Select the data according to your need then click on Apply button to save parameters.
Export
To export all source data, you need to click on the Export icon.
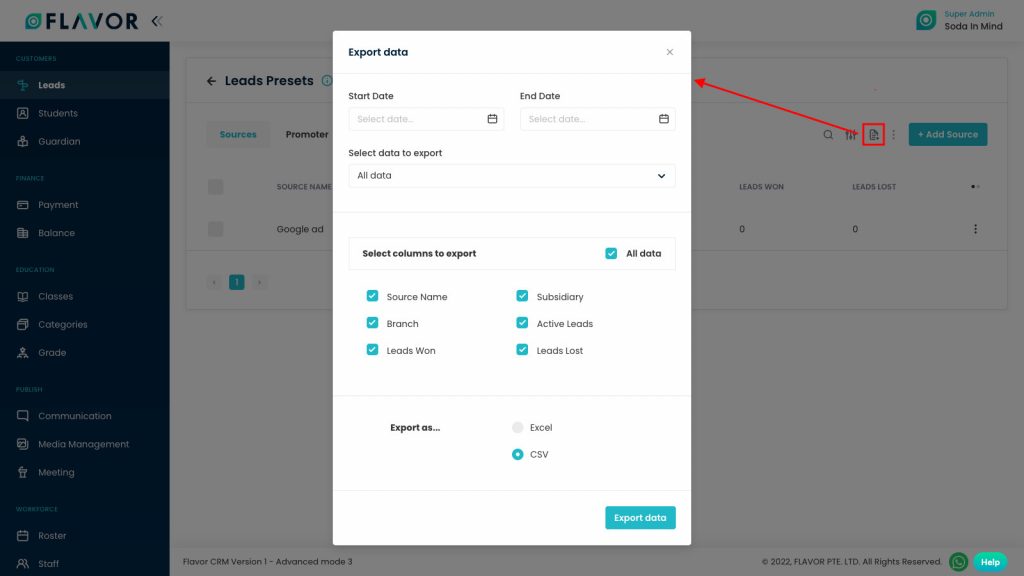
After clicking on the Export icon, a pop-up form will appear on your screen. Having these options:
- Start Date and End Date: Select the time period in the start date and end date column for which time period’s data you need.
- Select Data to Export: Here, you can export the data of all rows or 15 rows by simply clicking on the dropdown.
- Select Column to Export: Select columns which you need your data to export. Like if you want all the details of all sources, then simply click on “ALL DATA” and you will get all desired row’s information of sources in your exported file.
- Export as: Then select a format in which you want to export your data i.e (EXCEL or CSV).
After selecting the relevant records/data, click on the Export Data button to export all sources data in the selected file (Excel/CSV).
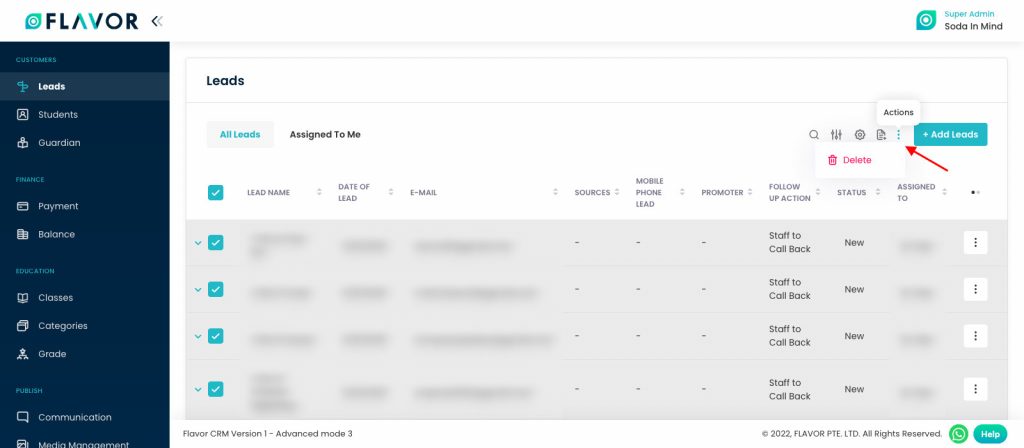
Bulk Action Button
- The Bulk Action Button is disabled by default. When you mark on the check box, which appears on the starting on each row, this action button will be enabled. You can select/deselect rows by ticking the checkbox.

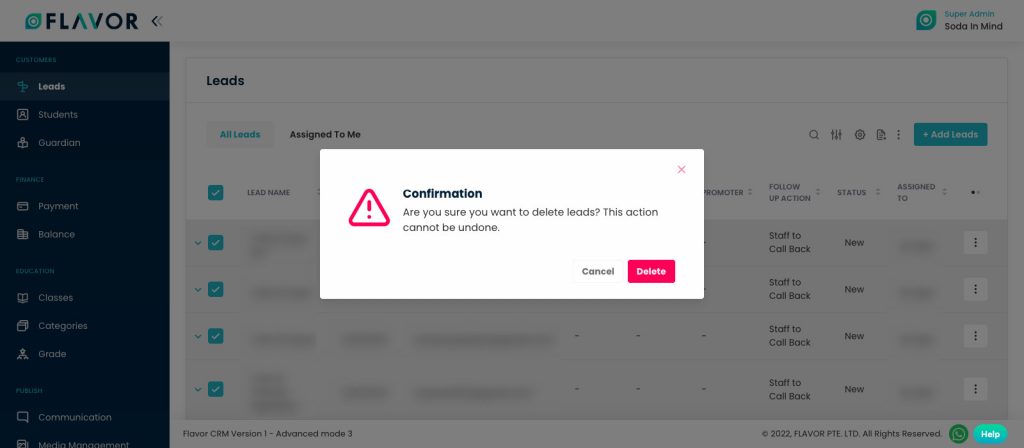
- After the selection of any record go to the Action Button, click on the button, a small popup named “Delete” will appear. Click on Delete Button to delete the record, you will see the confirmation popup to delete the record.
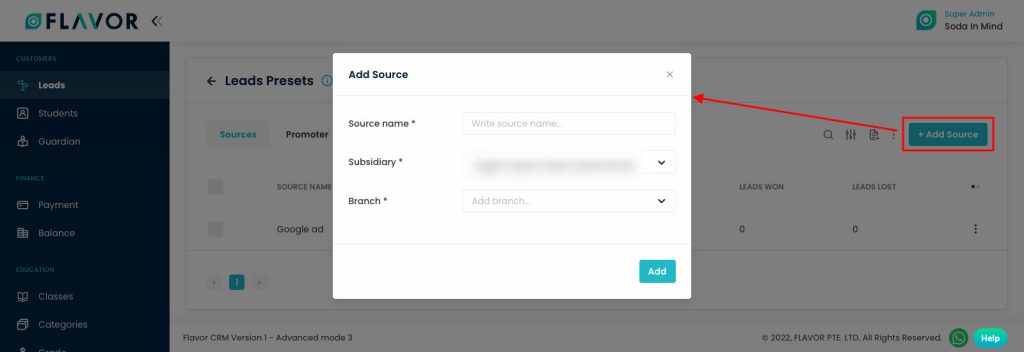
Add Source
From here, you create a source, click on the Add Source button. After clicking a popup form named ”Add Source” will be open. Fill in the Source Name, Subsidiary & Branch, all fields are mandatory. Click on the Save button to save this form.
Sources Records
Column Sorting
All sources will be shown in Tabular Format. You can sort the data by clicking on Column Sorting Arrows in Table’s Header.
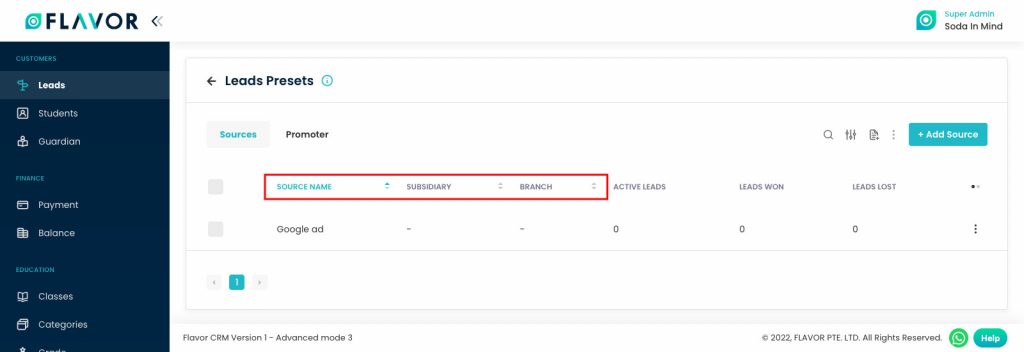
Column Visibility
You can sort columns by clicking on the Ellipsis icon, you will get the pop-up form named Select Data to View. Mark the columns you want to see and unmark the ones you don’t want to see in the table. After this procedure click on the Apply Filter button.
Action Button
- Click on Action Button (Vertical Ellipsis), a popup box will appear on your screen with Edit & Delete Options.
- Click on the Edit button.
- A popup form named Edit Source will open, edit the details and then click on the Update button to save.
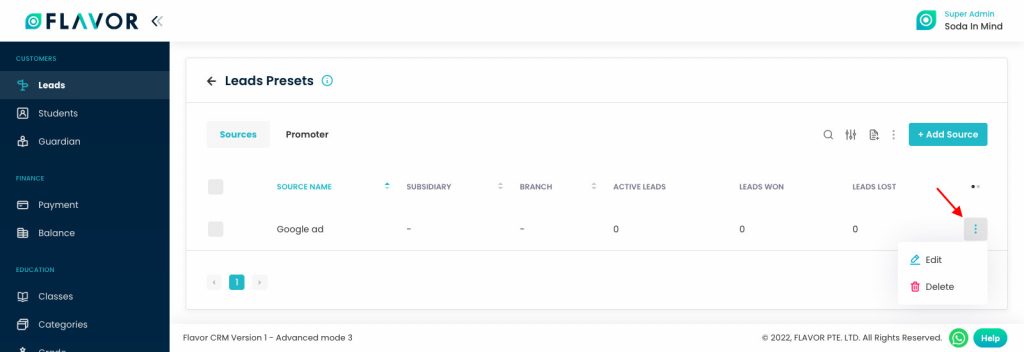
Delete Option
- Click on the Delete button.
- A confirmation box will appear, click on Yes to delete the source.
Promoter Options
Search
By clicking on the Search Icon, you can search the particular Source by entering promoter name, promoter code, email or phone number.

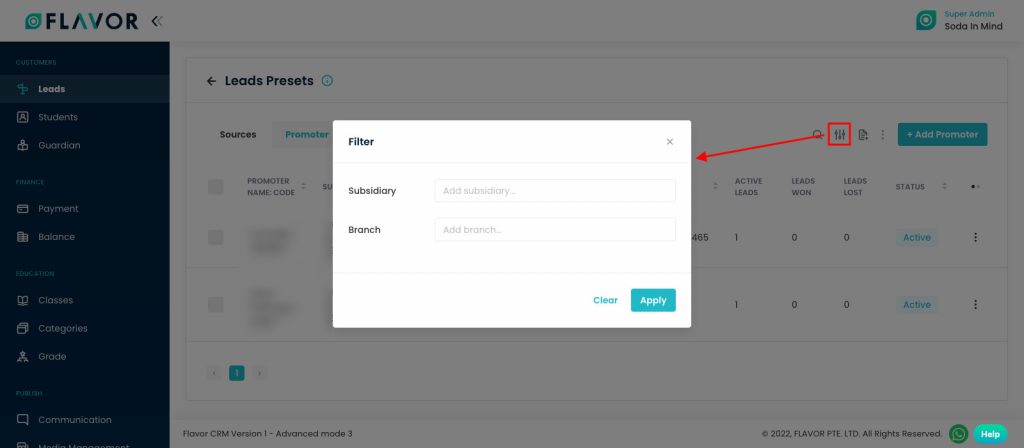
Filter
You can filter the sources based on specific parameters. Click on Filter Icon, after clicking, a popup form will appear on your screen. Select the data according to your need then click on Apply button to save.
Export
- To export all source data, you need to click on the Export icon.
- After clicking on the Export icon, a pop-up form will appear on your screen. From here you can download the records.
- Start Date and End Date: Select the time period in the start date and end date column for which time period’s data you need.
- Select Data to Export: Here, you can export the data of all rows or 15 rows by simply clicking on the dropdown.
- Select Column to Export: Select columns which you need your data to export. Like if you want all the details of promoters, then simply click on “ALL DATA” and you will get all desired row’s information of promoters in your exported file.
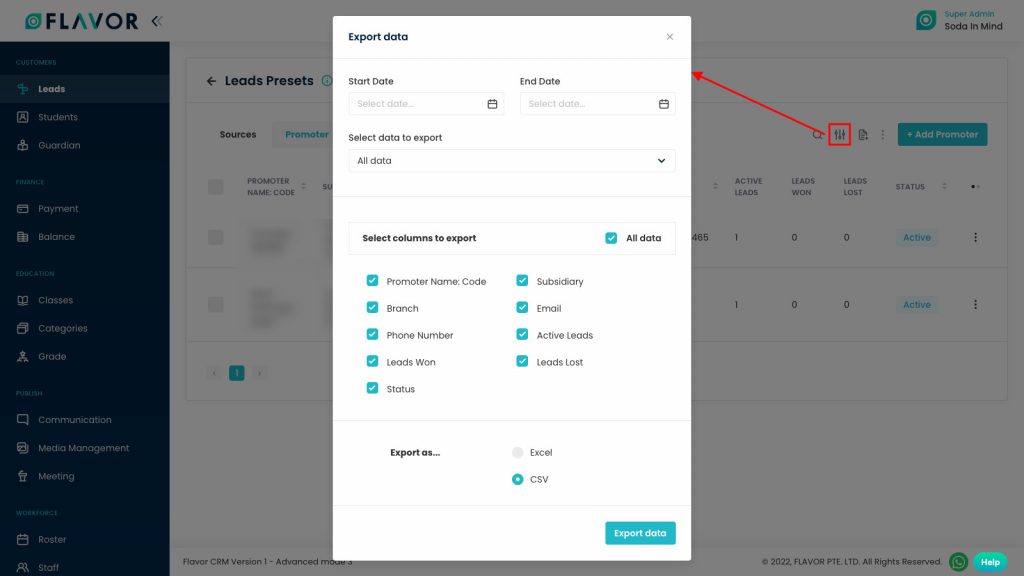
- Export as: Then select a format in which you want to export your data i.e (EXCEL or CSV).
- After selecting the relevant records/data, click on the Export data button to export all sources data in the selected file (Excel/CSV).
Bulk Action Button
- The Bulk Action Button is disabled by default. When you mark on the check box, which appears at the starting of each row, this action button will be enabled. You can select/deselect rows by ticking the checkbox.
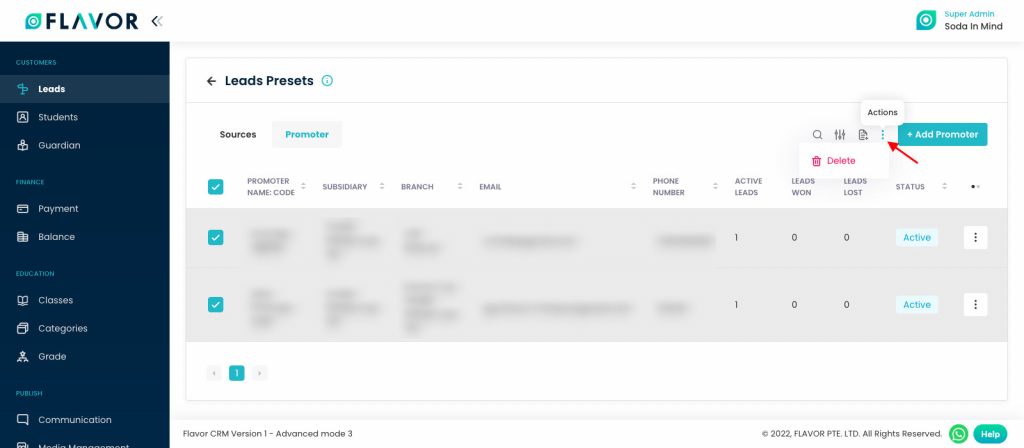
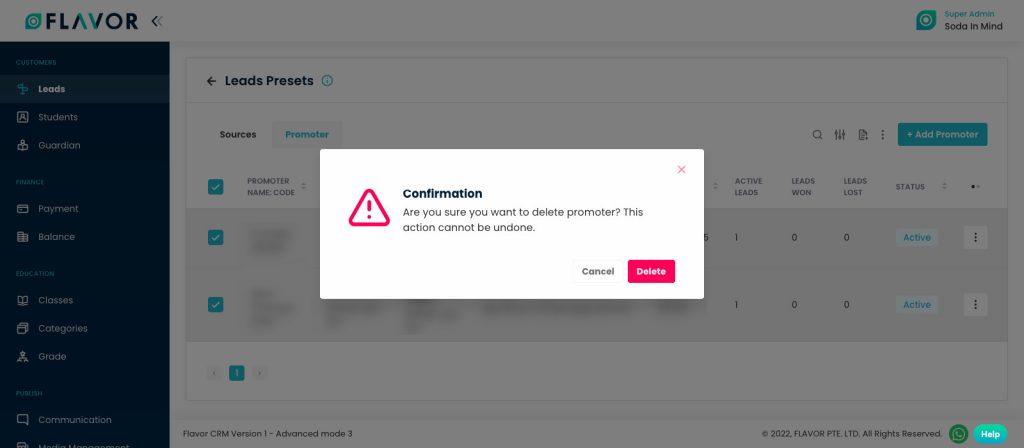
- After the selection of any record go to the Bulk Action Button, click on the button, a small popup named “Delete” will appear. Click on Delete Button to delete the record, you will see the confirmation popup to delete the record.
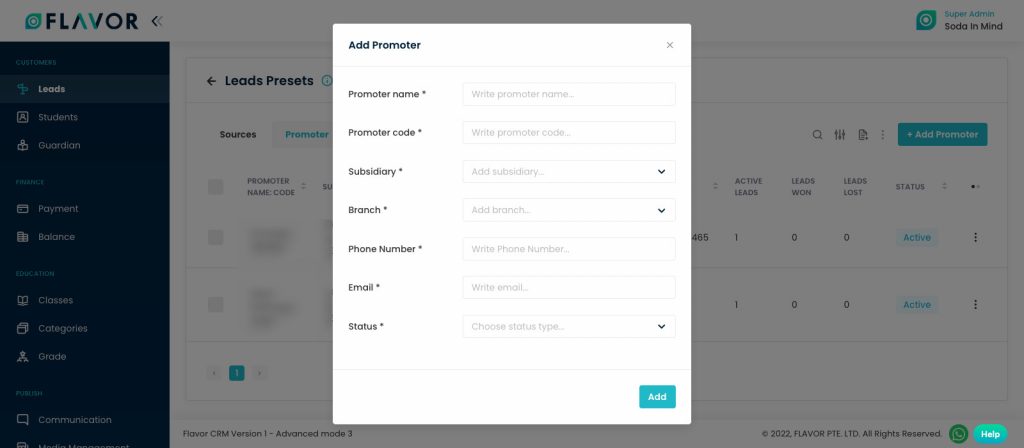
Add Promoter
From here, you create a promoter, click on the Add Promoter button. After clicking a popup form named Add Promoter will be open. Fill the form & then click on the Save button to save this form.
Column Sorting
All promoters will be shown in Tabular Format. You can sort the data by clicking on Column Sorting Arrows in Table’s Header.
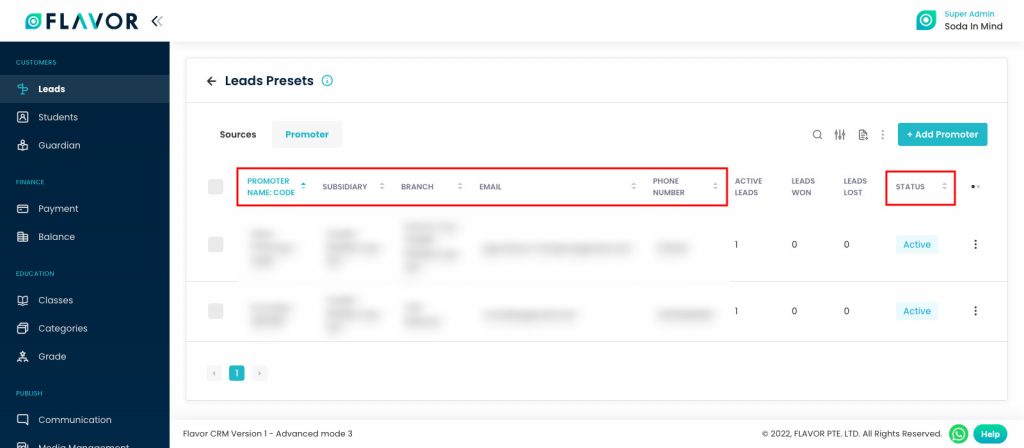
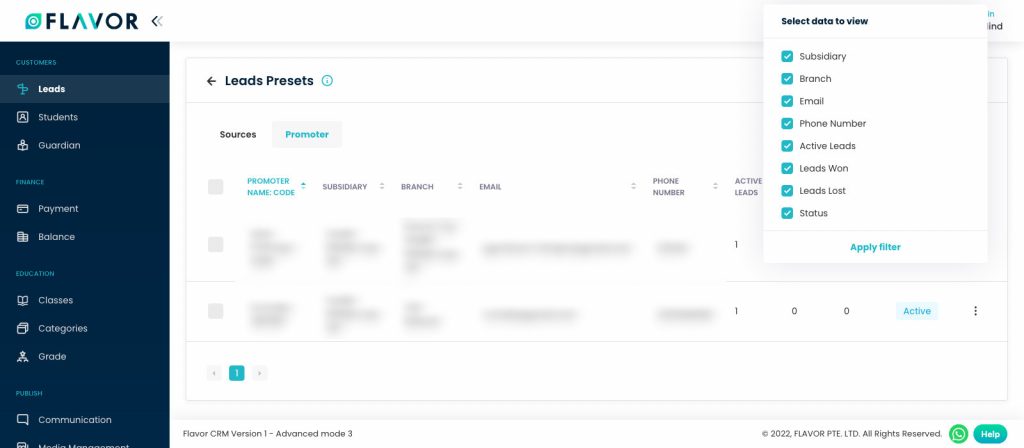
Column Visibility
You can sort columns by clicking on the Ellipsis Icon, you will get the pop-up form named Select Data to View. Mark the columns you want to see and unmark the ones you don’t want to see on screen. After this procedure click on the Apply Filter button.
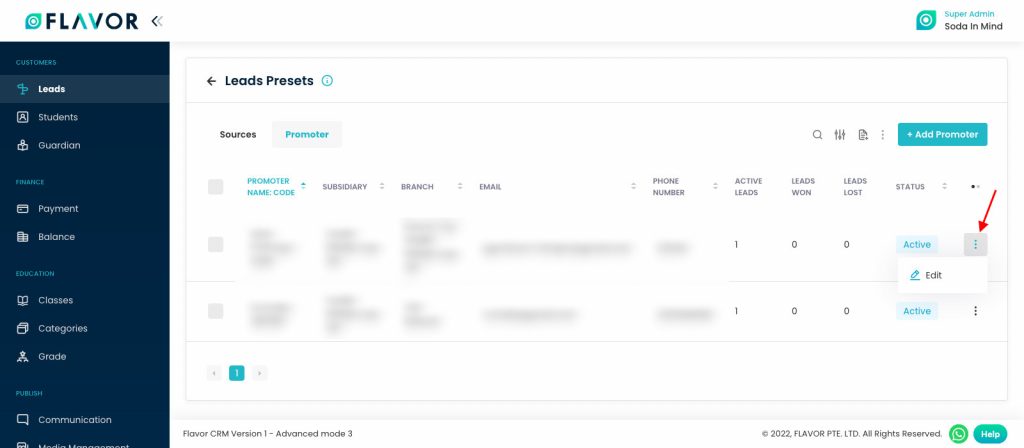
Action Button
Click on Action Button (Vertical Ellipsis), a popup box will appear on your screen with Edit option.
Edit Option
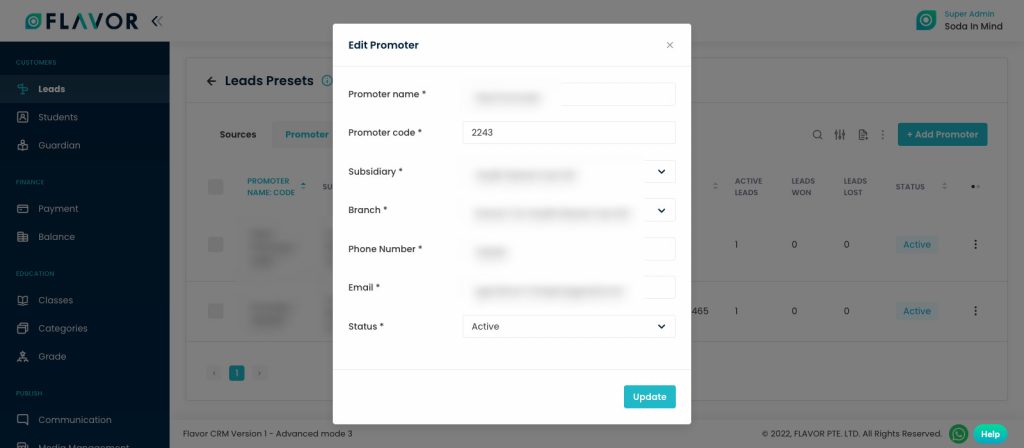
- Click on the Edit button.
- A popup form named “Edit Promoter” will open, edit the details and then click on the Update button to save.
Import/Export
To Import & Export Leads Records, you have to click on the Import/Export Icon. By clicking on the icon, you will see the Export Data & Import Data options.
Import Data
To import the data click on the Import Data option, after clicking a popup named “Import Data” will appear on your screen.
- Download the Sample File: If you want to download the sample file, click on the Download button. After clicking on the Download button a File Download window will be open on your screen, choose the Save File and then click on the OK button.
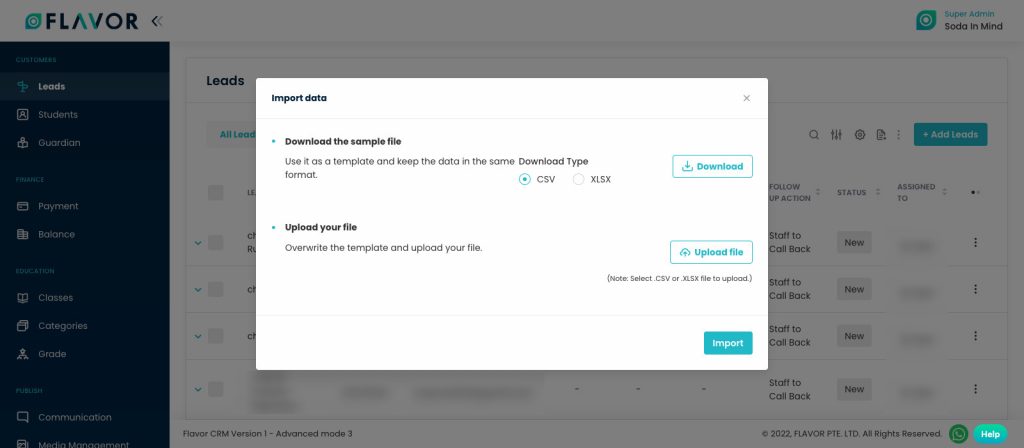
- This file contains the format based on which you can create .CSV file to import student data.
- Upload Your File: Select the Branch from the dropdown, In which branch do you want to upload a file. Then click on Upload File button. A File Selector Window will be open, choose a .CSV file to upload.
Export Data
To export the Students Data you need to click on the Export icon. After clicking on the Export Data button, a pop-up named “Export Data” will appear.
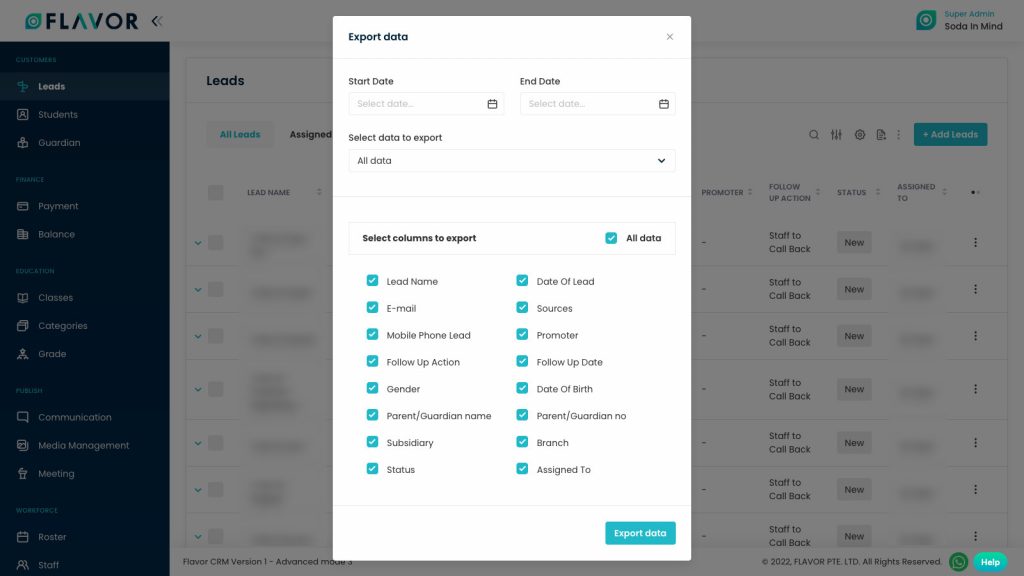
- Start Date and End Date: Select the time period in the start date and end date column for which time period’s data you need.
- Select data to export: Here, you can export the data of all rows or 15 rows by simply clicking on the dropdown.
- Select column to export: Select columns which you need to export. Like if you want all the details of students, then simply click on “ALL DATA” and you will get all the records of students in your exported file.
- After selecting the relevant options, click on the Export data button to export the Registered Students Records in the selected file (Excel/CSV).
Bulk Action Button
- The Bulk Action Button is disabled by default. When you mark on the check box, which appears on the starting on each row, this action button will be enabled. You can select/deselect rows by ticking the checkbox.
- After the selection of any record go to the Action Button, click on the button, a small popup named “Delete” will appear. Click on Delete Button to delete the record, you will see the confirmation popup to delete the record.
Add Leads
To create a new lead click on the Add Leads button. You will be redirected to the Add Leads Form.
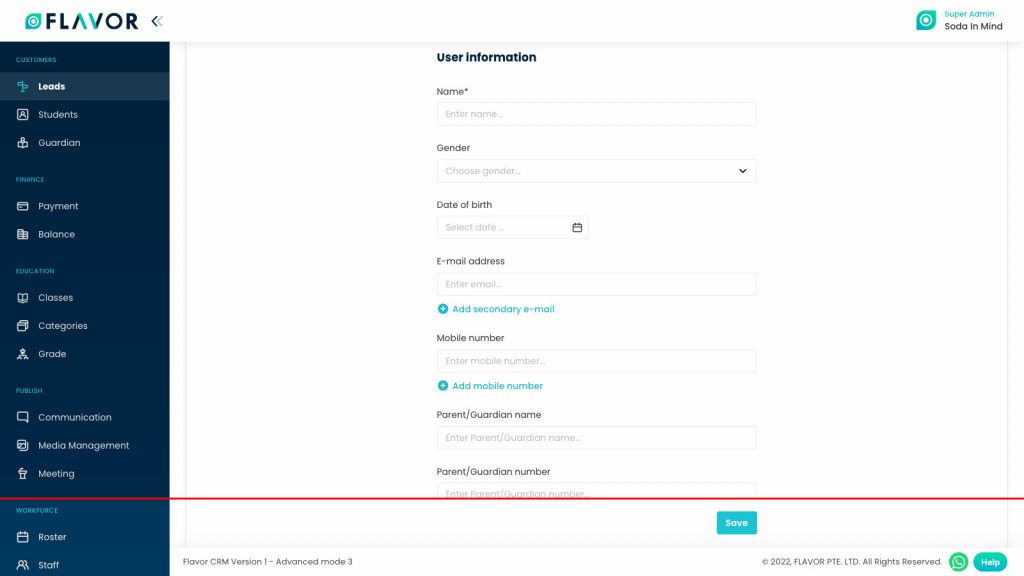
You will see the 3 steps of the Add Leads form.
- User Information: Here, fill the Name of the Lead, Gender, Date of Birth, Email id, Mobile Number, you can also add secondary email & mobile number.
- Lead Details: Add the date of the lead, subsidiary, branch, source type, referred by, etc.
- Followup Details: Fill the status, assign the task to, remarks, etc.
- After filling the all details click on the Save button to save the information.
Leads Records
Column Sorting
All leads will be shown in Tabular Format. You can sort the data by clicking on Column Sorting Arrows in Table’s Header.
Column Visibility
You can sort columns by clicking on the Ellipsis Icon, you will get the pop-up form named Select Data to View. Mark the columns you want to see and unmark the ones you don’t want to see on screen. After this procedure click on the Apply Filter button.
Record’s Actions
Edit
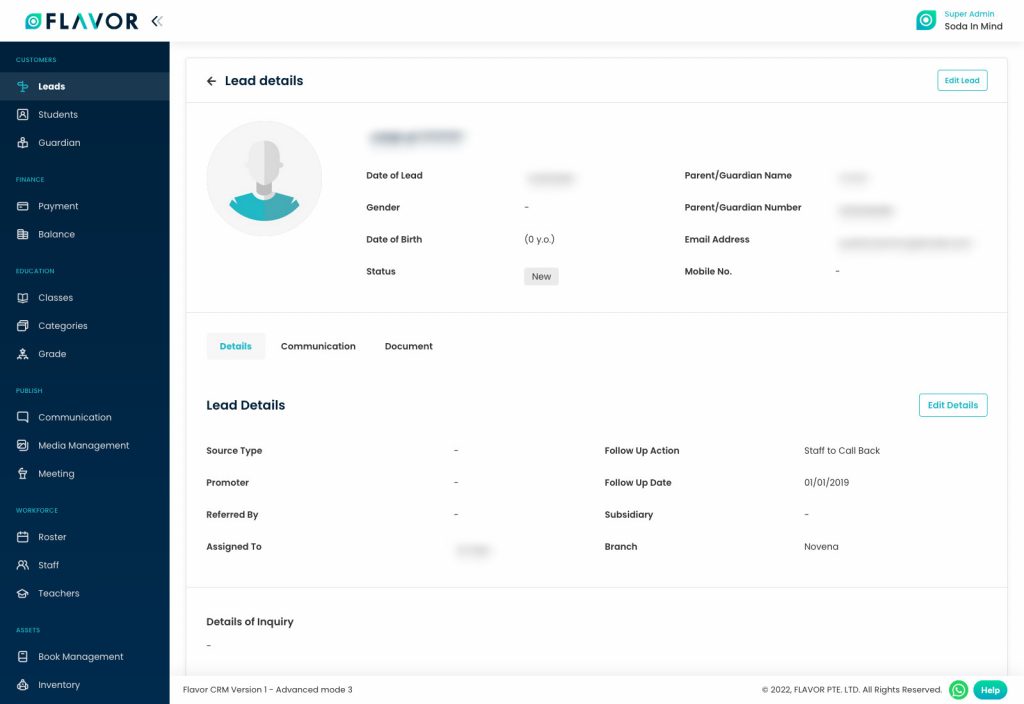
You can check the detail of any lead after clicking on the desired row. A lead’s profile will be open. You can see the details of the particular lead.
You can see the Edit Details button in the Leads Details section, click on that button.
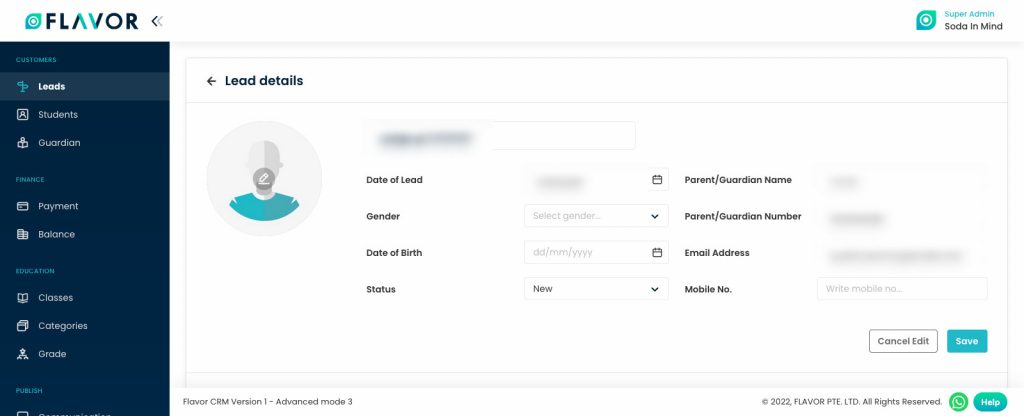
After editing the details click on the Save button to save the changes.
Delete
- Navigate to the Action Button to delete the record. Click on Action Button, a pop up will appear on your screen named Delete.
- After clicking on the Delete button, a confirmation popup will appear, click on the Delete button to delete the lead record.
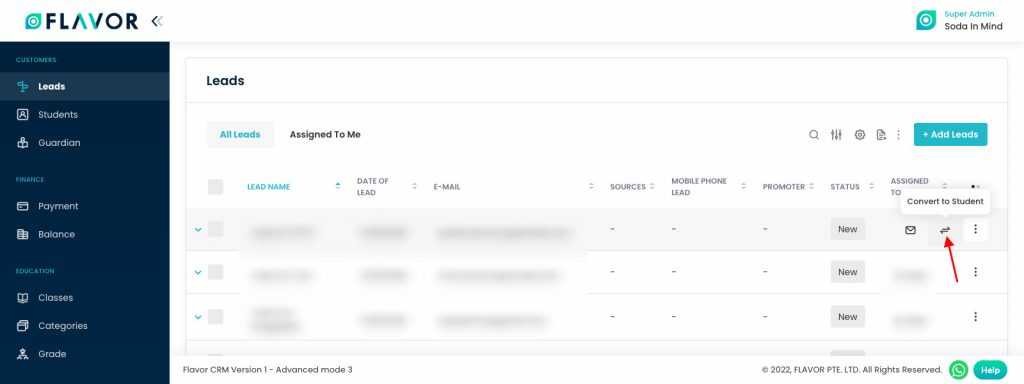
Record’s extra actions
When you hover on the record you can see the Email, SMS, Registration link icons, we have students’ email id and contact no. to inform them about their classes and payment.
SMS
When you hover your cursor on any lead, you will see an SMS Icon, click on that icon to send a message to that lead. After clicking on SMS Icon a popup form will appear on your screen named Send SMS will be open.
- The registered contact number will be automatically shown in the To field.
- Write your desired message to the Message Box.
- Then click on the Send button to send the message.
When you hover the cursor on any lead’s name, you will see an Email Icon, click on that icon to send a message to the registered lead. We have an email id that is associated with that account. After clicking on Email Icon a popup form named Send Email will appear on your screen.
Here, you can see 3 fields.
- Associated email id will automatically be shown in the To field.
- Write subject in the Subject field.
- Write your message to the Message box.
- Then click on the Send button to send the message
Convert Student
From here, you can convert your Lead into Student by clicking on the Convert Icon. After clicking you will be redirected to the Add Students from. Fill in the details of the new student.
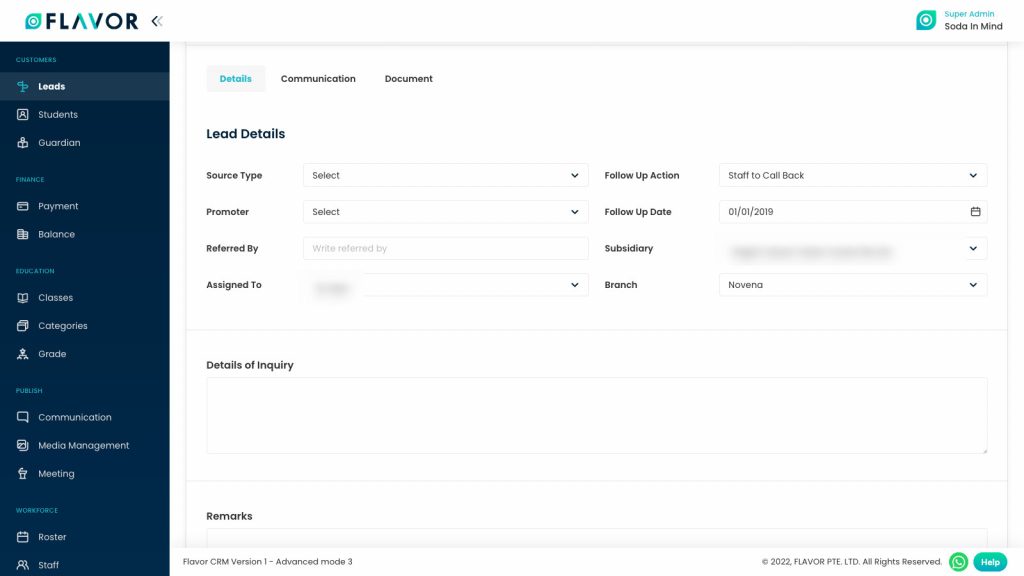
Lead Details
Details
- Navigate to the Leads Section in Lead’s Profile. You will see the Source Type, Follow up Action, Promoter, etc.
- Click on the Edit Details button to update the information.
- Click on the Save button to save the updated information.
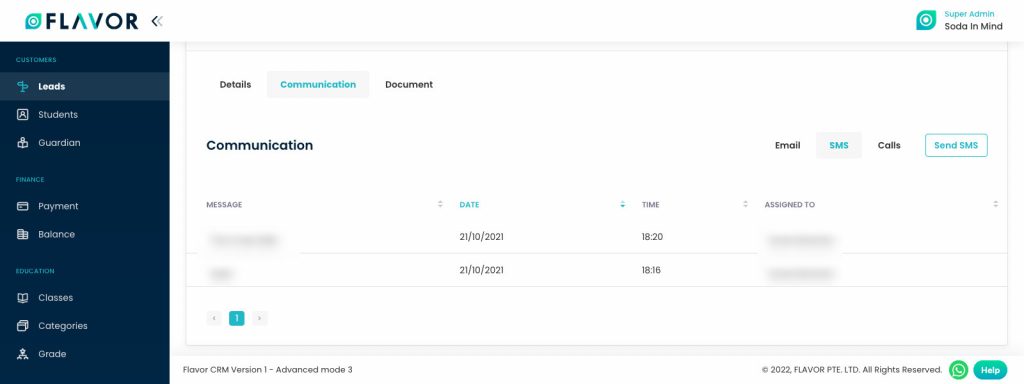
Communication
Here you can see the details of when and at what time calls, emails and messages have been sent to the lead.
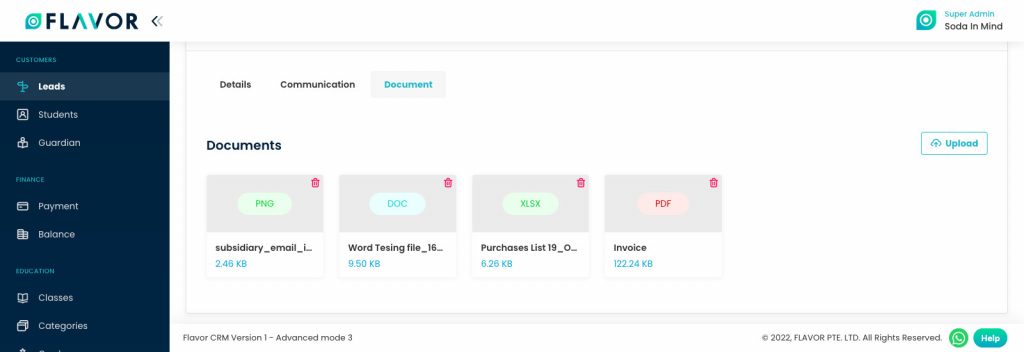
Document
Navigate to the Documents Tab. here, you can upload any files related to a lead. File types ould be PDF, CSV, JPEG & DOC files.
Upload Document
Click on the Upload button to upload a file, a file selector window will be open. Click on the desired file to upload.
Need more help? Ask us a question
Please let us know more of your details and our team will reach out to you very shortly.