
You can check the Communication by clicking on the Communication from the main navigation panel of the Flavor EduPortal. This module is provided under the Publish section in the navigation panel.
By clicking on the Communication, from the left menu you will be redirected to the Communication Page. Here, you can see the list of All, SMS, Email & Notifications tab.
Communication Options
Search
Search By clicking on the Search Icon, you can search the specific types of communication by entering the subject name & type.
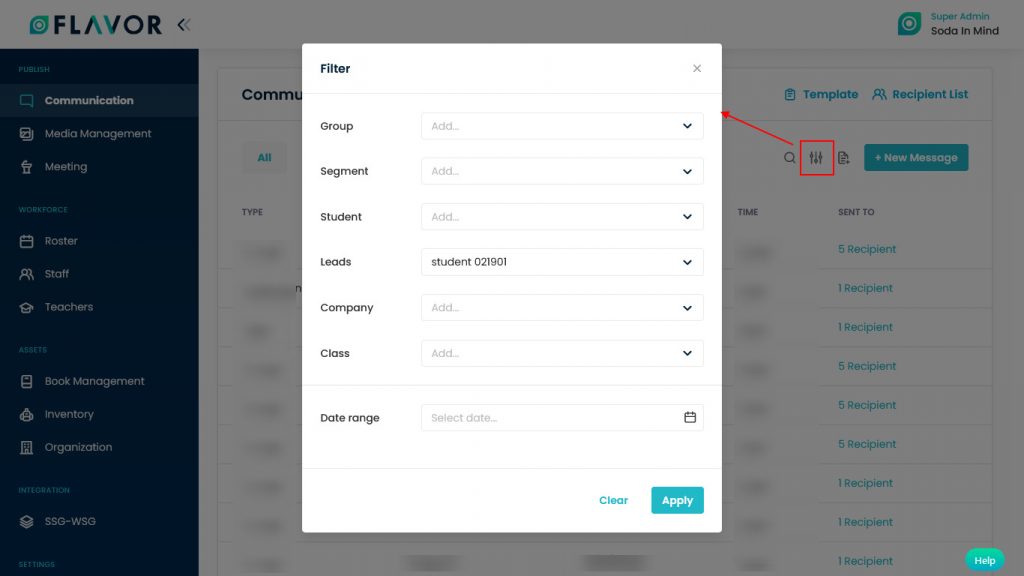
Filter
You can filter the records based on specific parameters. Click on Filter Icon, after clicking, a popup form will appear on your screen. Enter the Subsidiary & Branch then click on Apply button to save parameters.
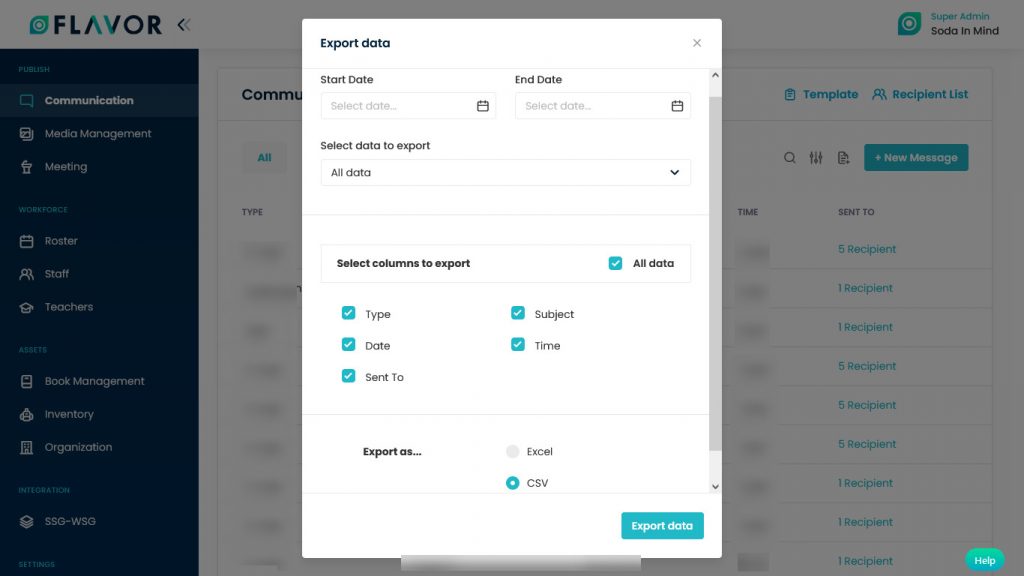
Export Data
- To export all data, you have to click on the Export Icon.
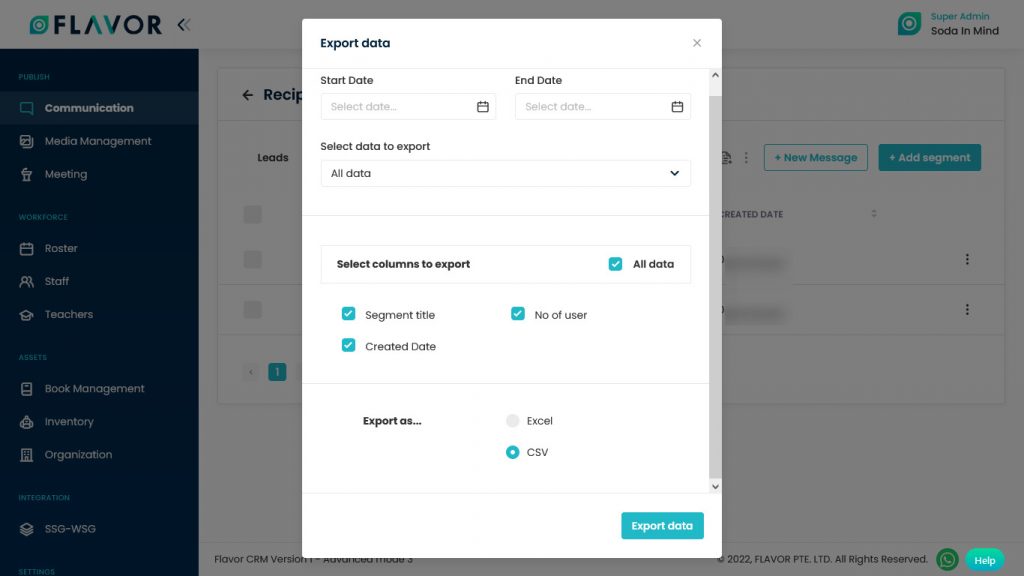
- After clicking on the Export icon, a pop-up form named Export Data will appear on your screen.
- Start Date and End Date: Select the time period in the start date and end date column for which time period’s data you need.
- Select Data to Export: Here, you can export the data of all rows or 15 rows by simply clicking on the dropdown.
- Select Column to Export: Select columns which you need your data to export. Like if you want all the data of the communication module, then simply click on “ALL DATA” and you will get the data of the entire communication module in your exported file.
- Export as: Then select a format in which you want to export your data i.e (EXCEL or CSV).
- After selecting the relevant records/data, click on the Export Data button to export all the data in the selected file (Excel/CSV).
New Message
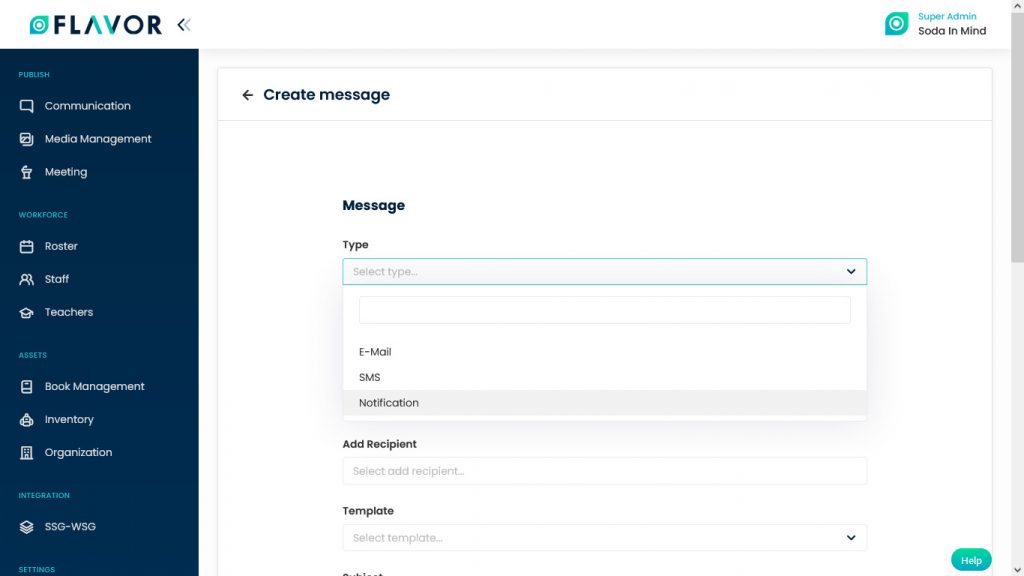
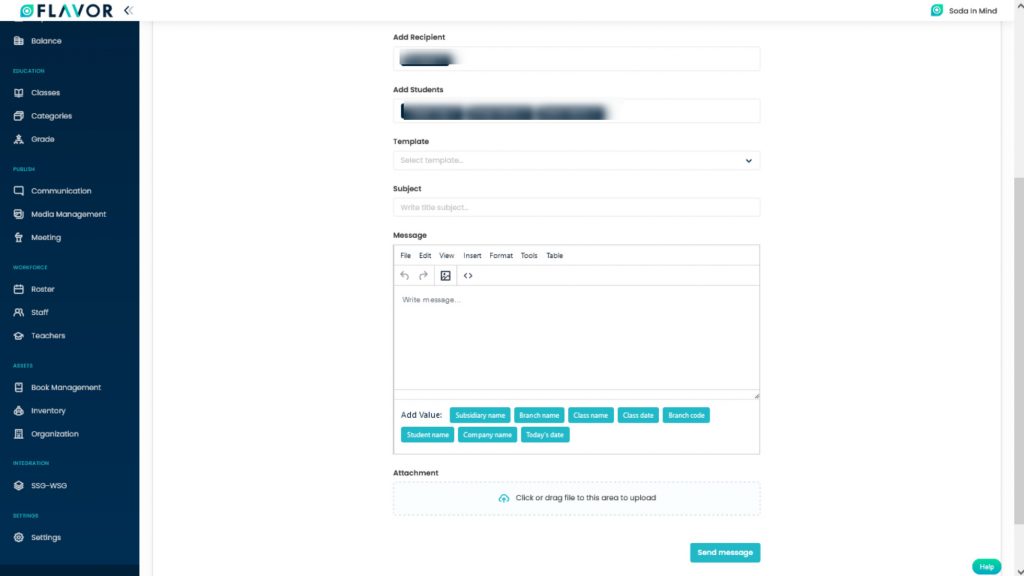
To create a new message, click on the + New Message button. You will be redirected to the Create Message page.
- Type: Select the Type of message from the dropdown, it could be Email, SMS or Notification. Choose an Email.
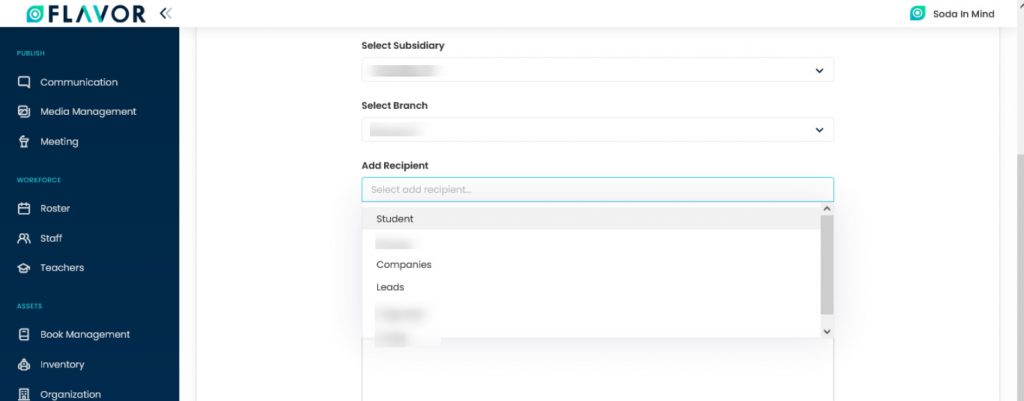
- Subsidiary & Branch: Select the Subsidiary & Branch from the dropdown.
- Add Recipient: Based on the Subsidiary & Branch selected you will get the recipient list. You have to add the type of recipient, whether it’s a student, Parents, leads, etc.
- After adding Student or Parents in the recipient, an Add Students or Add Parents field will be added to the form.
- Add Multiple or a single student in Add Students field.
- Subject: Write the Subject of your email in the Subject field. This field is not available in SMS & Notification.
- Message: Write a message in the message box.
- Attachment: Upload any type of document which you want to send recipients. This field is not available in SMS & Notification.
- Click on the Send Message button.
Communication Records
Column Sorting
All records will be shown in Tabular Format. You can sort the data by clicking on Column Sorting Arrows in Table’s Header.
Template

Search
Search By clicking on the Search Icon, you can search the specific types of templates by entering types & title.
Export Data
- To export all data, you have to click on the Export Icon.
- After clicking on the Export icon, a pop-up form named Export Data will appear on your screen.
- Start Date and End Date: Select the time period in the start date and end date column for which time period’s data you need.
- Select Data to Export: Here, you can export the data of all rows or 15 rows by simply clicking on the dropdown.
- Select Column to Export: Select columns which you need your data to export. Like if you want all the data of Templates, then simply click on “ALL DATA” and you will get the data of all temples in your exported file.
- Export as: Then select a format in which you want to export your data i.e (EXCEL or CSV).
- After selecting the relevant records/data, click on the Export Data button to export all the data in the selected file (Excel/CSV).

Bulk Action Button
Click on Action Button (Vertical Ellipsis), a popup box will appear on your screen with the Delete option.
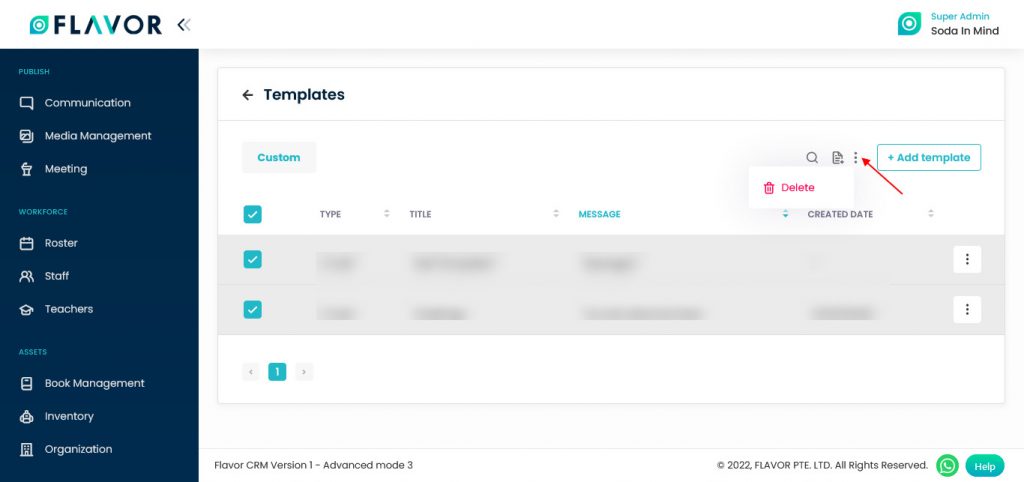
Delete Option
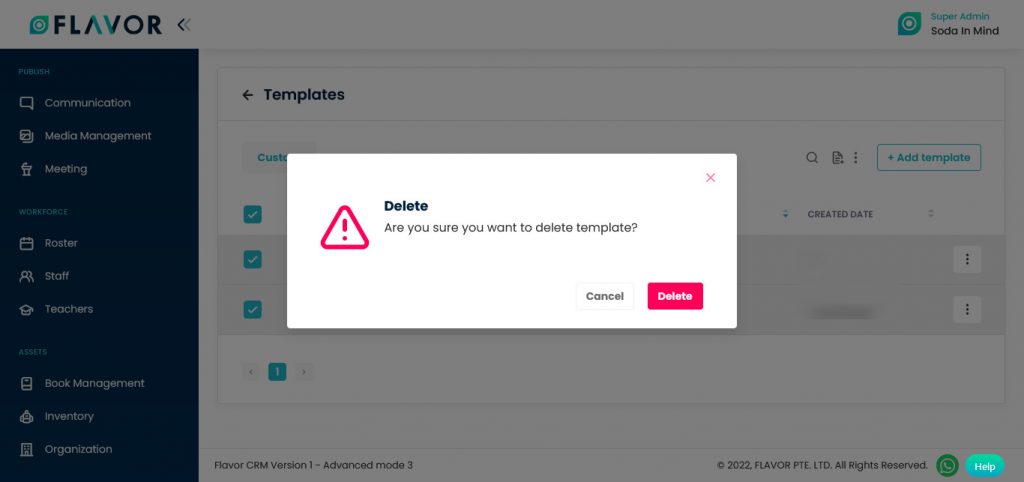
- Click on the Delete button.
- You will see the confirmation popup.
- Click on the Yes button.
Add template
To create a new template, click on the + Add Template button. You will be redirected to the Create Custom Template page.
- Type: Select the Type of Template from the dropdown, it could be Email, SMS or Notification.
- Select Email to create an email template.
- Title: Give a title to your template.
- Subject: Write the desired subject to your Template.
- Message: Write a message in the message box.
- Attachment: Upload any type of document which you want to send recipients.
- Click on the Save Template button to send the email.
- If you want to send this template immediately then click on the Save and Send Message button.
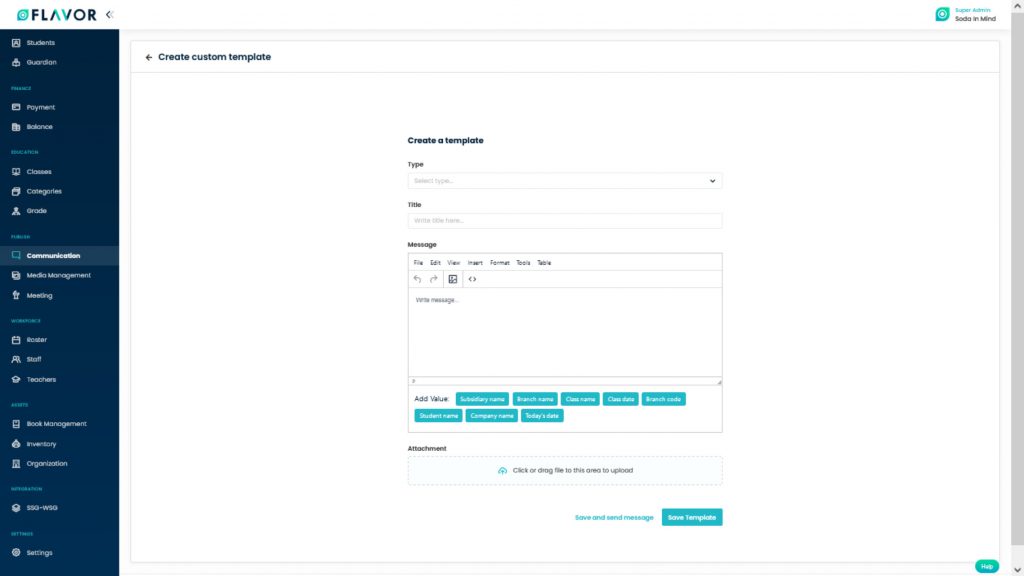
- Note: You can always use this Template. When you create a new message, after choosing the Email type, a new field named Template will appear. Choose a template from the drop-down.
- Whatever subject and message you added to the template will automatically be shown in the Subject and Message fields.
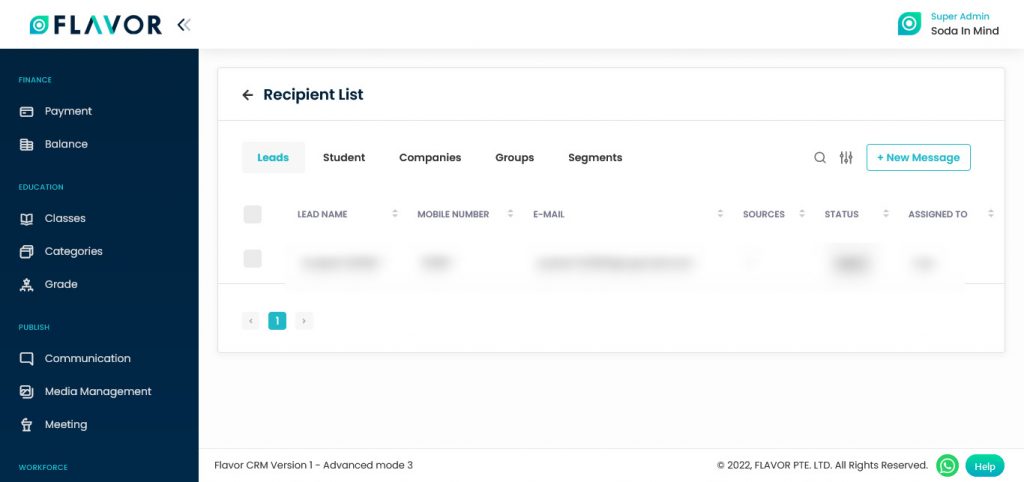
Recipient List
To the upper right corner of the Communication Module, you can see the Recipient List button.

After clicking on the Recipient List button, you will be redirected to the Recipient List page. Here, you can see the Leads, Student, Companies, Groups & Segment tabs. In each tab, you will get the list of all recipients’ emails, SMS & Notifications which have been sent, except the Group tab.
Recipient List Options
Leads Tab
In the Leads tab, you will get the list of all recipients’ emails, SMS & Notifications which have been sent.
Search
By clicking on the Search Icon, you can search recipients by entering the student name, mobile number & follow up staff.
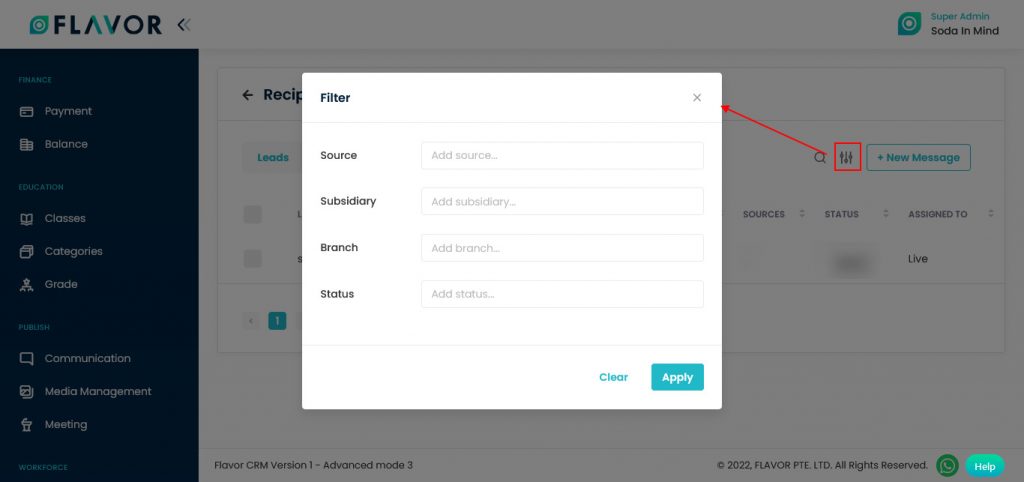
Filter
You can filter the records based on specific parameters. Click on Filter Icon, after clicking, a popup form named Filter will appear on your screen. Enter the Source, Subsidiary, Branch & Status then click on Apply button.
New Message
To create a new message, click on the New Message button. You will be redirected to the Create Message page. Create a new message to send to the Leads. The new message could be an email, SMS & notification. This new message will be sent to all selected recipients of the leads tab.

Student Tab
In the Student tab, you will get the list of all recipients’ emails, SMS & Notifications which have been sent.

Search
By clicking on the Search Icon, you can search recipients by entering the student name, student number & student no.
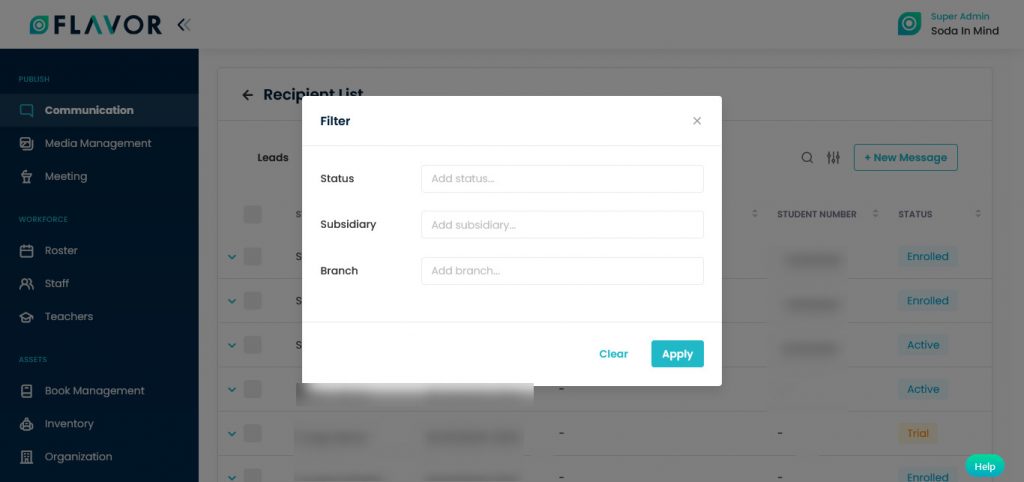
Filter
You can filter the records based on specific parameters. Click on Filter Icon, after clicking, a popup form named Filter will appear on your screen. Enter the Subsidiary, Branch & Status then click on Apply button.
New Message
To create a new message, click on the New Message button. You will be redirected to the Create Message page. Create a new message to send to Students. The new message could be an email, SMS & notification. This new message will be sent to all selected recipients of the student tab.
Companies Tab
In the Companies tab, you will get the list of all recipients’ emails, SMS & Notifications which have been sent.
Search
By clicking on the Search Icon, you can search recipients by entering the company name, student name or company number.
Filter
You can filter the records based on specific parameters. Click on Filter Icon, after clicking, a popup form named Filter will appear on your screen. Enter the Subsidiary & Branch then click on Apply button.
New Message
To create a new message, click on the + New Message button. You will be redirected to the Create Message page. Create a new message to send to companies. The new message could be an email, SMS & notification. This new message will be sent to all selected recipients of the Company tab.
Groups
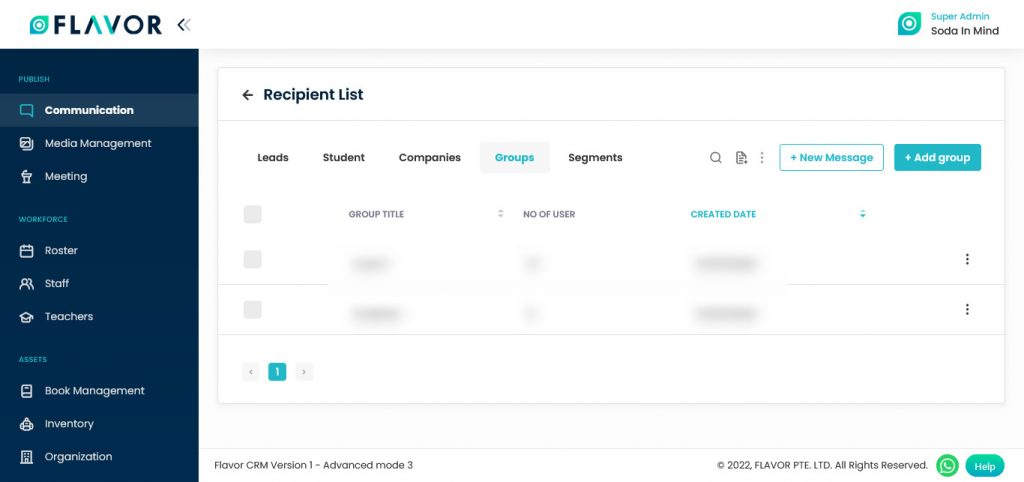
Search
By clicking on the Search Icon, you can search the group by entering the group title.
Export Data
- To export all data, you have to click on the Export Icon.
- After clicking on the Export icon, a pop-up form named Export Data will appear on your screen.
- Start Date and End Date: Select the time period in the start date and end date column for which time period’s data you need.
- Select Data to Export: Here, you can export the data of all rows or 15 rows by simply clicking on the dropdown.
- Select Column to Export: Select columns which you need your data to export. Like if you want all the data of Groups, then simply click on “ALL DATA” and you will get the data of all groups in your exported file.
- Export as: Then select a format in which you want to export your data i.e (EXCEL or CSV).
- After selecting the relevant records/data, click on the Export Data button to export all the data in the selected file (Excel/CSV).

Bulk Action Button
- The Bulk Action Button is disabled by default. When you mark on the check box, which appears on the starting on each row, this action button will be enabled. You can select/deselect rows by marking the checkbox.
- After the selection of any record go to the Action Button, click on the button, a small popup named Delete Group will appear. Click on Delete Group Button to delete all groups, you will see the confirmation popup to delete the groups
- Click on the Yes button to delete all groups.

New Message
To create a new message, click on the + New Message button. You will be redirected to the Create Message page. Create a new message to send to the groups you have selected. The new message could be an email, SMS & notification. This new message will be sent to all selected groups.

Add Group
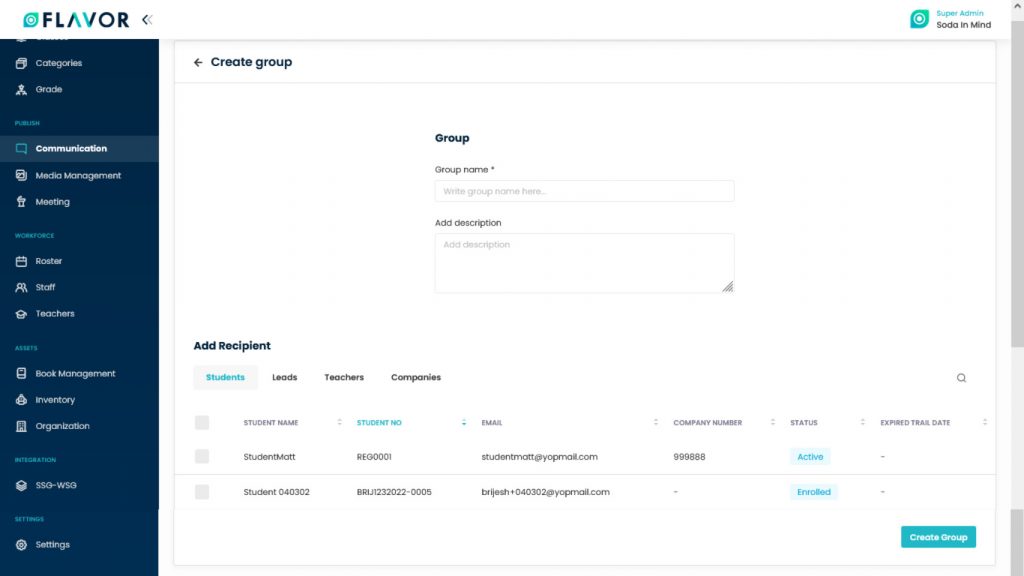
To create a new group, click on the + Add Group button. You will be redirected to the Create Group page.

- Enter the Group name & Description.
- Navigate to the Add Recipient.
- Here, you can see 4 tabs, Students, Leads, Teachers & Companies. Select the recipients from any one of them.
- Click on the Create Group button.
Group Records
Column Sorting
All groups will be shown in Tabular Format. You can sort the data by clicking on Column Sorting Arrows in Table’s Header.
Action Button
Click on Action Button (Vertical Ellipsis), a popup box will appear on your screen with the Edit Group & Delete Group options.

Edit Group Option
- Click on the Edit Group option.
- After clicking on the button, you will be redirected to the Edit Group page.
- Change the group name or Add a Description if you want to change it.
- Navigate to the Add Recipients section, from here, you can add more recipients from all 4 tabs.
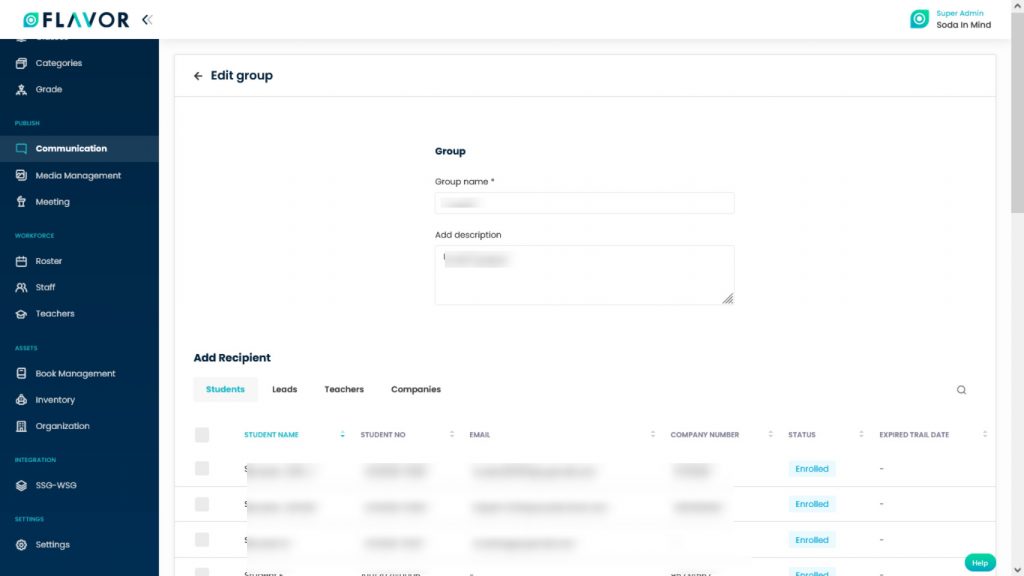
- Navigate to the Recipient List. Here, you can remove any recipient from the group by clicking on the Bin Icon & also get the information of a particular recipient by clicking on the Down Arrow, which is situated at the starting of each row.
- Update the details & click on the Save button.
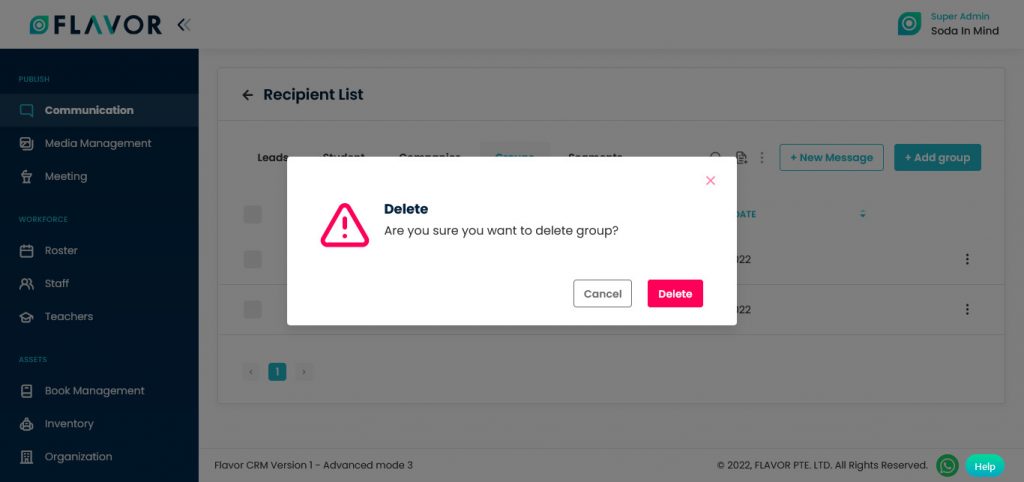
Delete Group Option
- Click on the Delete button.
- You will see the confirmation popup to delete the order.
- Click on the Yes button.
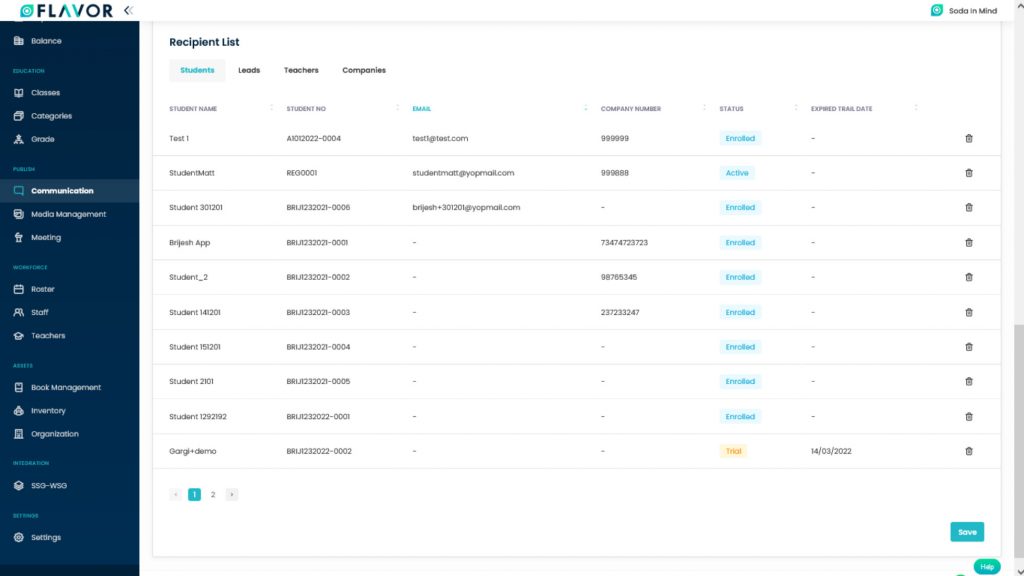
Group Details
Click on any group to check the details, Details of the particular group will be open. Here, you can see the 4 tabs of Students, Leads, Teachers & Companies.
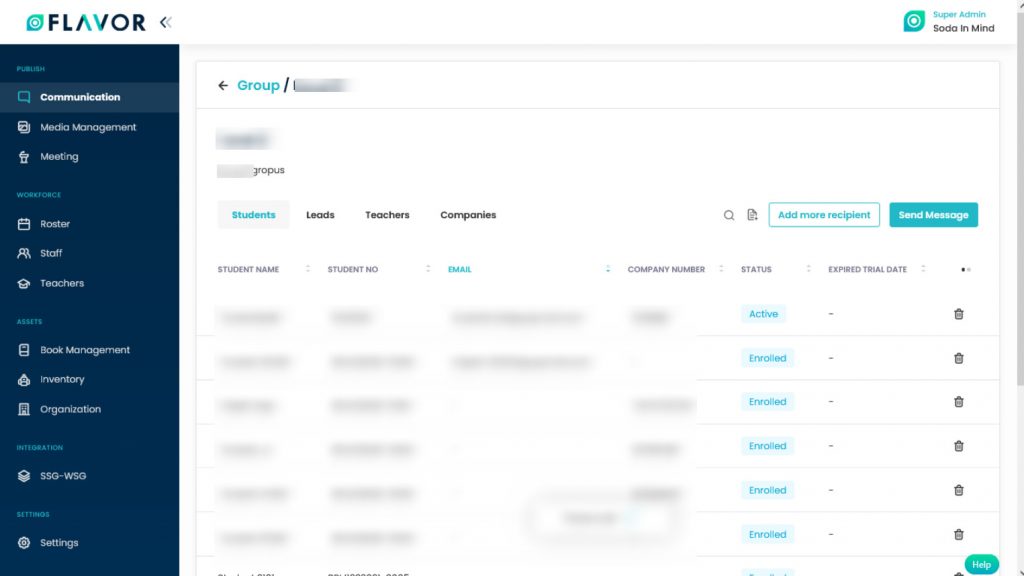
Add More Recipient
- If you want to add more recipients to the group, click on the Add More Recipient button.

- You will be redirected to the Edit Group page. From here, you can change the group name or change the description if you want to change it.
- Navigate to the Add Recipient section. Select recipients from Students, Leads, Teachers & Companies.
- Navigate to the Recipient List. Here, you can remove any recipient from the group by clicking on the Bin Icon & also get the information of a particular recipient by clicking on the Down Arrow, which is situated at the starting of each row.
- Click on the Save button.
Send Message
- To send messages to these recipients click on the Send Message button.
- You will be redirected to the Create Message button.
- Here, you can see Add Recipient & Add Group fields are already selected
- Fill in the other fields.
- Click on the Send Message button.
Segment
The segment is a strategy where you divide your clients or students into small groups that share similar characteristics.

Search
By clicking on the Search Icon, you can search segments by entering the segment title or no. of users.
Export Data
- To export all data, you have to click on the Export Icon.
- After clicking on the Export icon, a pop-up form named Export Data will appear on your screen.
- Start Date and End Date: Select the time period in the start date and end date column for which time period’s data you need.
- Select Data to Export: Here, you can export the data of all rows or 15 rows by simply clicking on the dropdown.
- Select Column to Export: Select columns which you need your data to export. Like if you want all the data of Segments, then simply click on “ALL DATA” and you will get the data of all segments in your exported file.
- Export as: Then select a format in which you want to export your data i.e (EXCEL or CSV).
- After selecting the relevant records/data, click on the Export Data button to export all the data in the selected file (Excel/CSV).
Bulk Action Button
- The Bulk Action Button is disabled by default. When you mark on the check box, which appears on the starting on each row, this action button will be enabled. You can select/deselect rows by marking the checkbox.
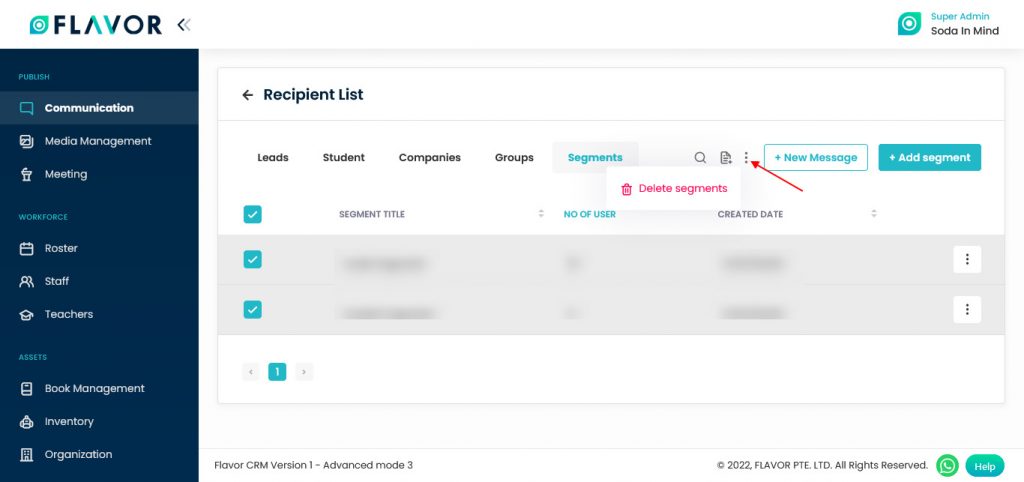
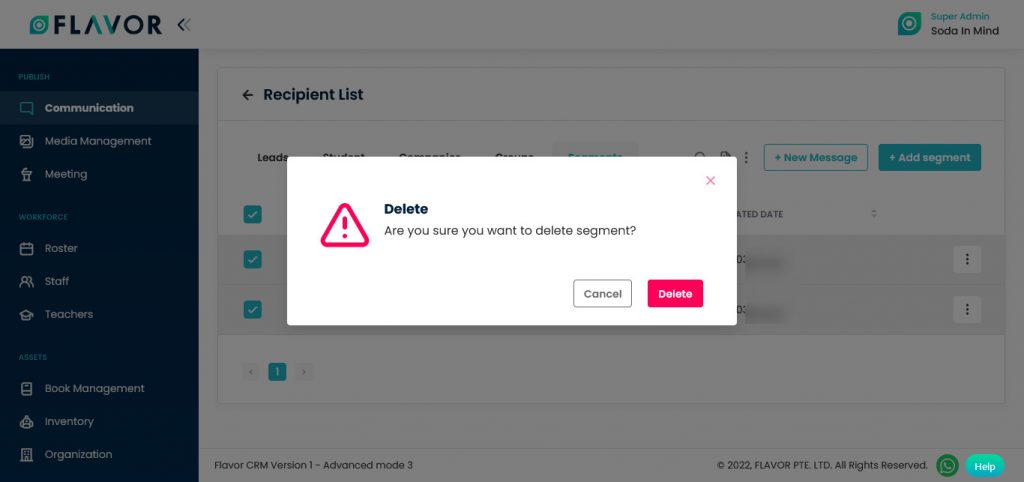
- After the selection of any record go to the Action Button, click on the action button, a small popup named Delete Segment will appear. Click on the Delete Segment option to delete the segment, you will see the confirmation popup to delete the record.
- Click on the Yes button.
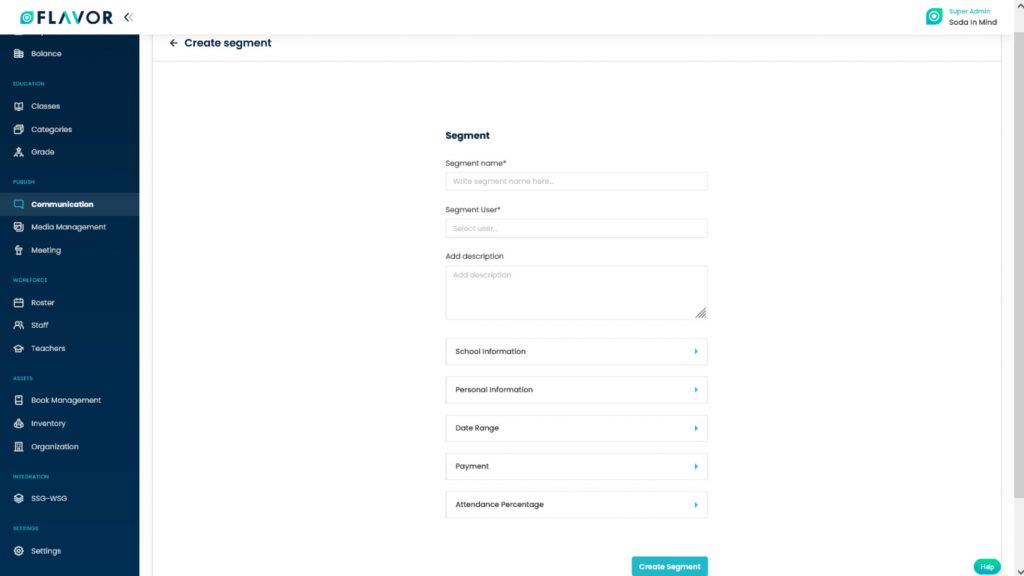
Add New Segment
To add a new segment, click on the + Add Segment button. You will be redirected to the Create Segment page.
- Segment Name: Enter the name of the segment.
- Segment User: Select the types of users segment from the dropdown.
- Add Description: Give the description of the segment.
- School Information: Select the subsidiary & branch from the drop-down. Enter the Course type, course name, class and status, etc.
- Personal Infomation: Choose gender & enter your age.
- Date Range: Select the date range from the signup date to the completion of the course.
- Payment: Chose the payment method and enter the status of payment.
- Attendance Percentage: The percentile of the student’s attendance has to be filled here out of 100.
- Click on the Create Segment button.
New Message
- To send a message to any segment, click on the + New Message button.
- You will be redirected to the Create Message page.
- Here, you will see, a Segment has already been selected in the Add Recipient field.
- Add Segment: Select segment from the dropdown.
- Click on the Send Message button.
Segment Records
Column Sorting
All segments will be shown in Tabular Format. You can sort the data by clicking on Column Sorting Arrows in Table’s Header.
Action Button
Click on Action Button (Vertical Ellipsis), a popup box will appear on your screen with the Edit Segment & Delete Segment options.

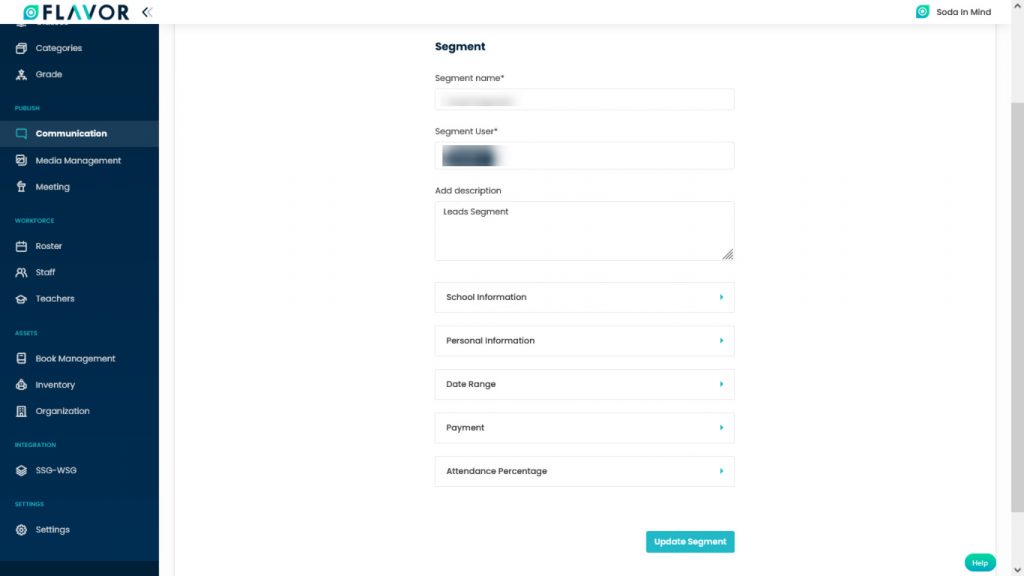
Edit Segment Option
- Click on the Edit Segment option.
- After clicking on the button, you will be redirected to the Edit Segment page.
- Update the details
- Click on the Update Segment button.
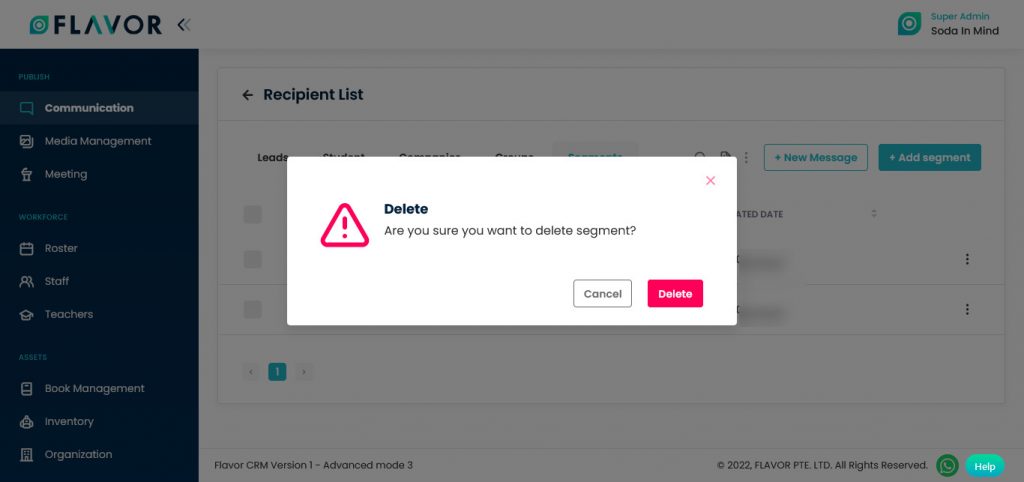
Delete Segment Option
- Click on the Delete Segment button.
- You will see the confirmation popup.
- Click on the Yes button.
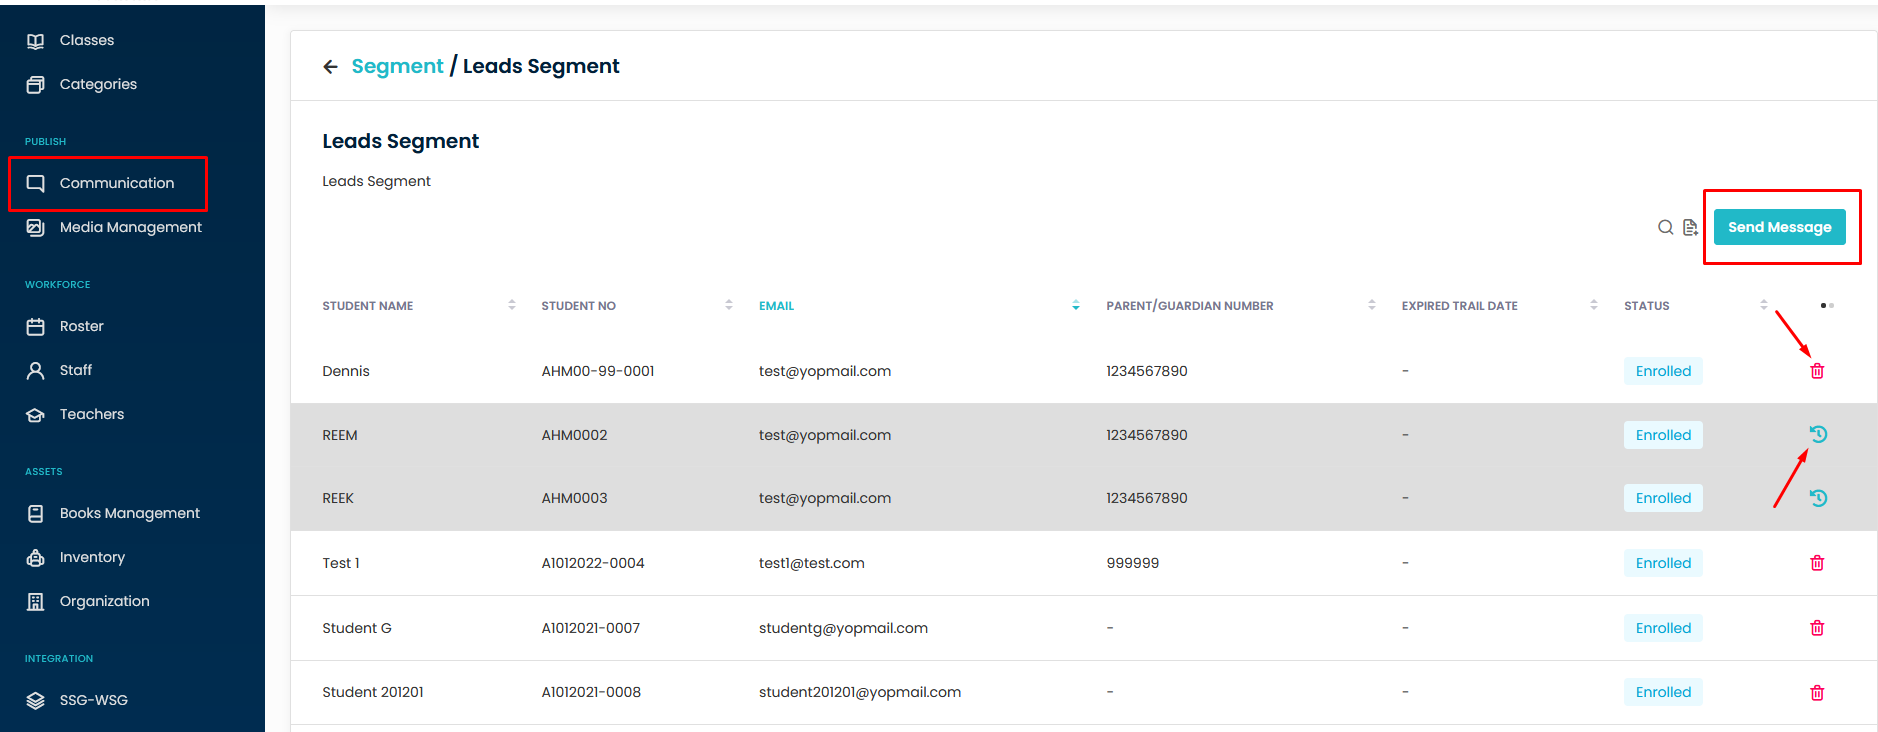
Segment Record’s Option
- Click on any segment to check the details. You will be redirected to a particular segment’s page. here, you can see the list of that Segment.
- To send a message to them again click on the Send Message button.
- You will be redirected to the Create Message page.
- Create a message and click on the Send Message button.
- The Segments can be Deleted and also can be Retrieved.
Need more help? Ask us a question
Please let us know more of your details and our team will reach out to you very shortly.