
You can check the Inventory by clicking on the Inventory from the main navigation panel of the Flavor EduPortal. This module is provided under the Assets section in the navigation panel.
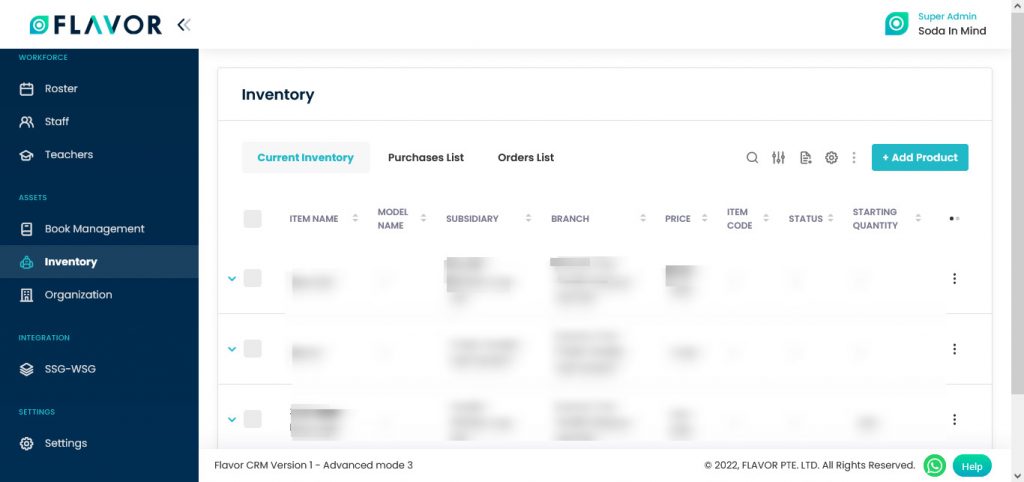
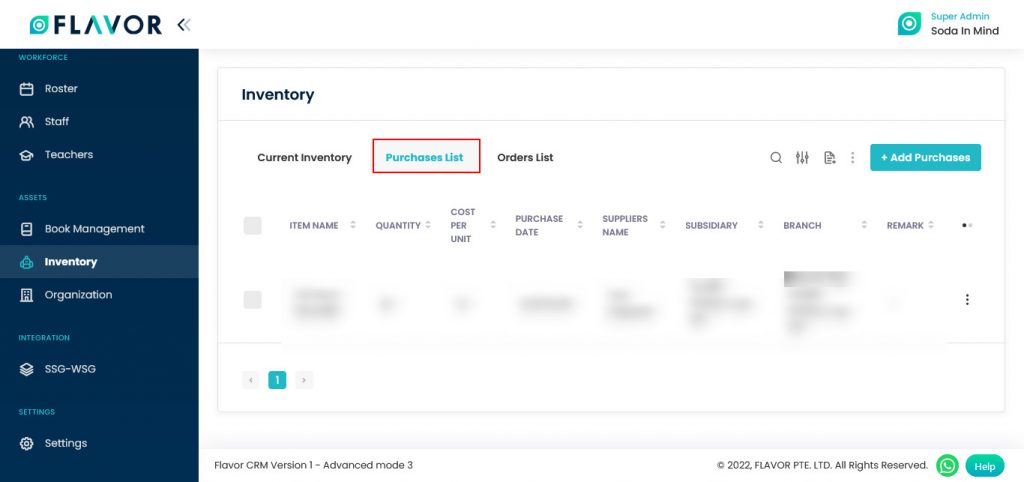
By clicking on the Inventory, from the left menu you will be redirected to the Inventory Page where you will see Current Inventory, Purchases List & Orders List tabs.
Current Inventory
In the Current Inventory tab, you will see the list of all inventory. Here, you put the list of all products in which a company deals.
Inventory Options
Search
Search By clicking on the Search Icon, you can search the specific types of inventory by entering the item name model name & item code.
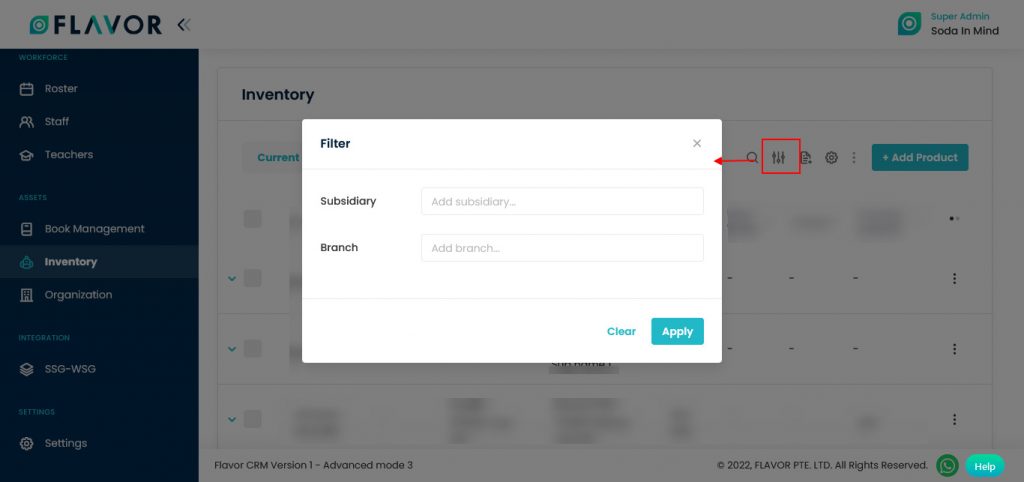
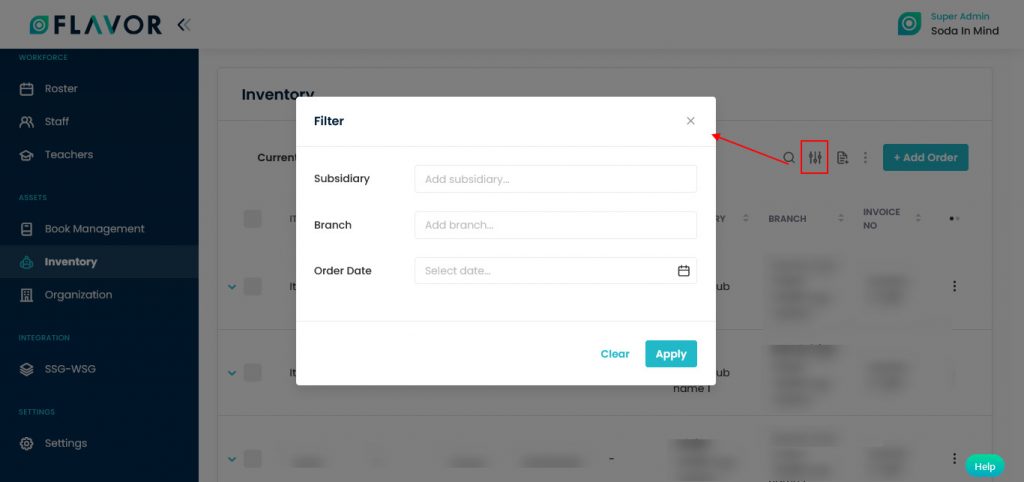
Filter
You can filter the products based on specific parameters. Click on Filter Icon, after clicking, a popup form will appear on your screen. Enter the Subsidiary & Branch then click on Apply button to save parameters.
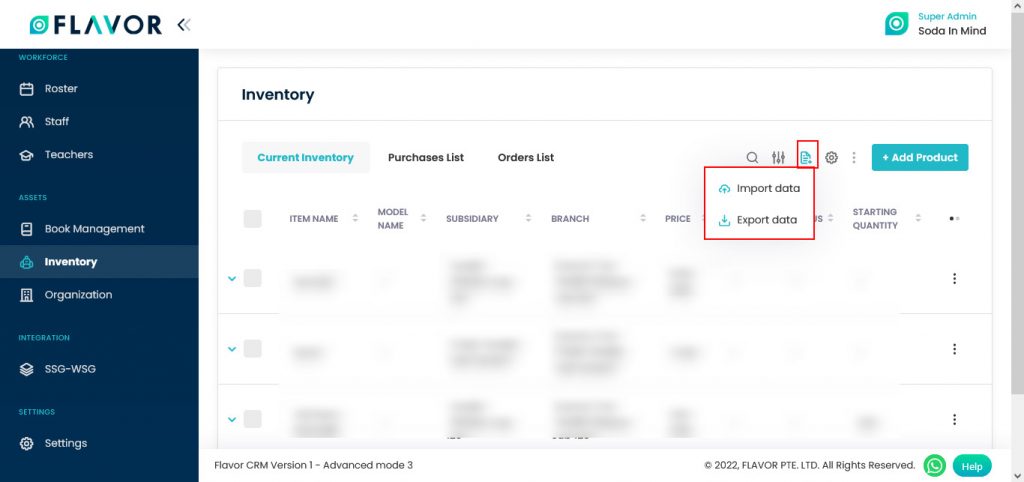
Import/Export
To Import & Export Student data, you have to click on the Import/Export Icon. By clicking on the icon, you will see the Export Data & Import Data options.
Import Data
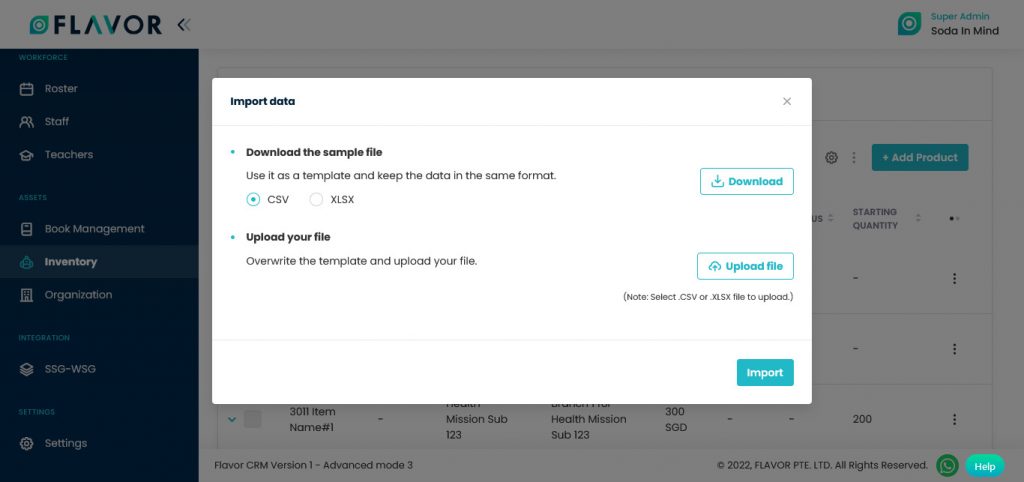
To import the data click on the Import Data option, after clicking a popup named “Import Data” will appear on your screen.
- Download the Sample File: If you want to download the sample file, click on the Download button. After clicking on the Download button a File Download window will be open on your screen, choose the Save File and then click on the OK button.
- This file contains the format based on which you can create .CSV file to import data.
- Upload Your File: Click on the Upload File button. A File Selector Window will be open, choose a .CSV file to upload.
- Click on the Import button.
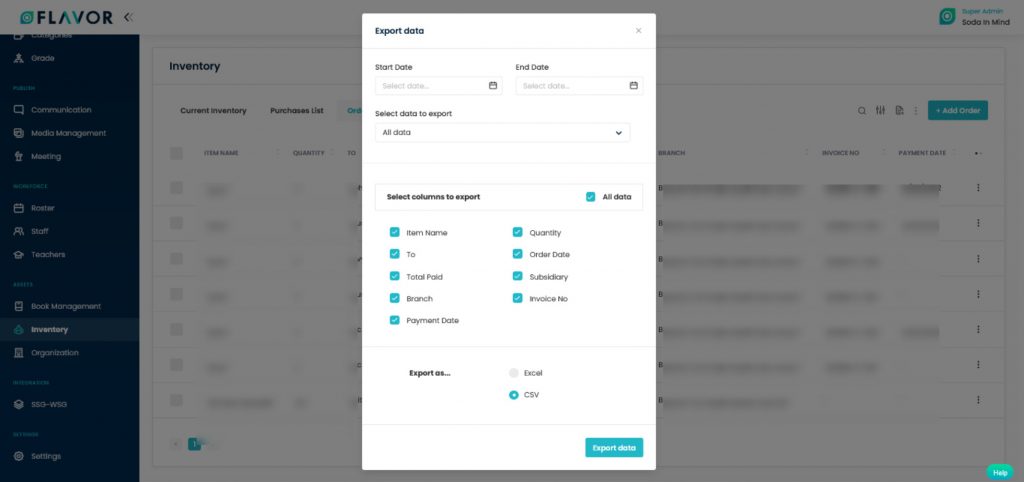
Export Data
- To export all data, you need to click on the Export Icon.
- After clicking on the Export icon, a pop-up form will appear on your screen.
- Start Date and End Date: Select the time period in the start date and end date column for which time period’s data you need.
- Select Data to Export: Here, you can export the data of all rows or 15 rows by simply clicking on the dropdown.
- Select Column to Export: Select columns which you need your data to export. Like if you want all the data of inventory, then simply click on “ALL DATA” and you will get the data of the entire inventory in your exported file.
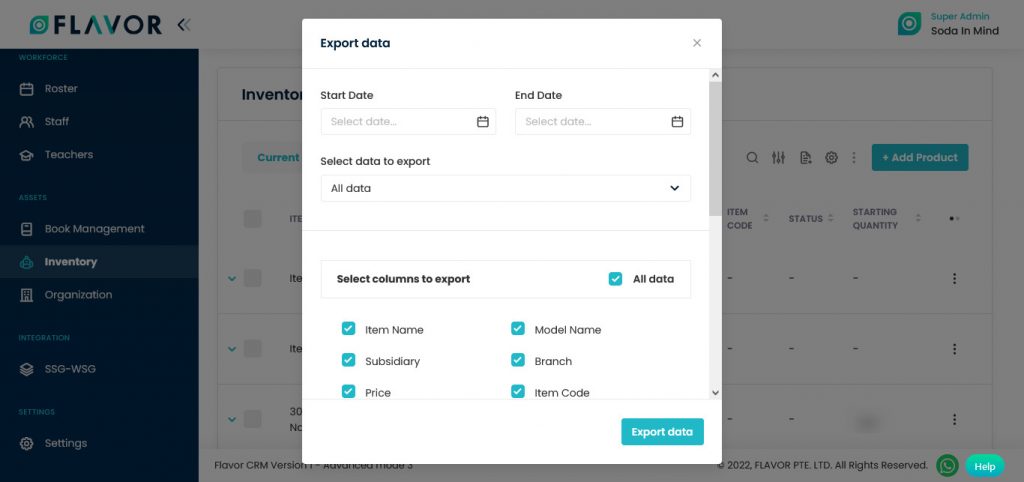
- Export as: Then select a format in which you want to export your data i.e (EXCEL or CSV).
- After selecting the relevant records/data, click on the Export Data button to export all the data in the selected file (Excel/CSV).
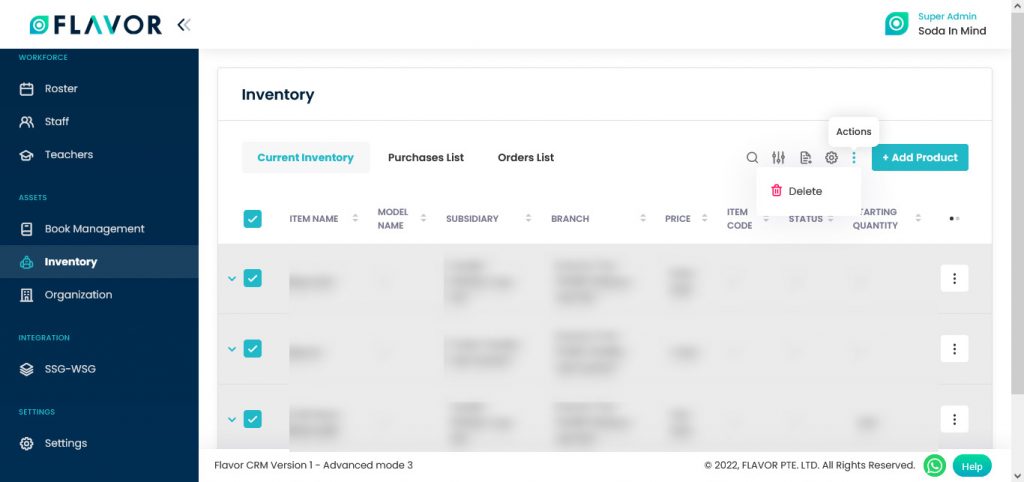
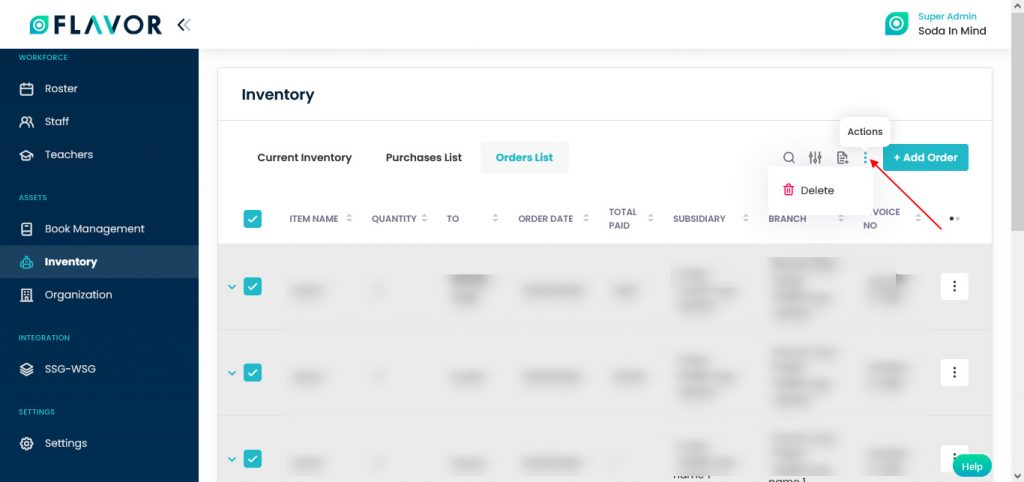
Bulk Action Button
- The Bulk Action Button is disabled by default. When you mark on the check box, which appears on the starting on each row, this action button will be enabled. You can select/deselect rows by marking the checkbox.
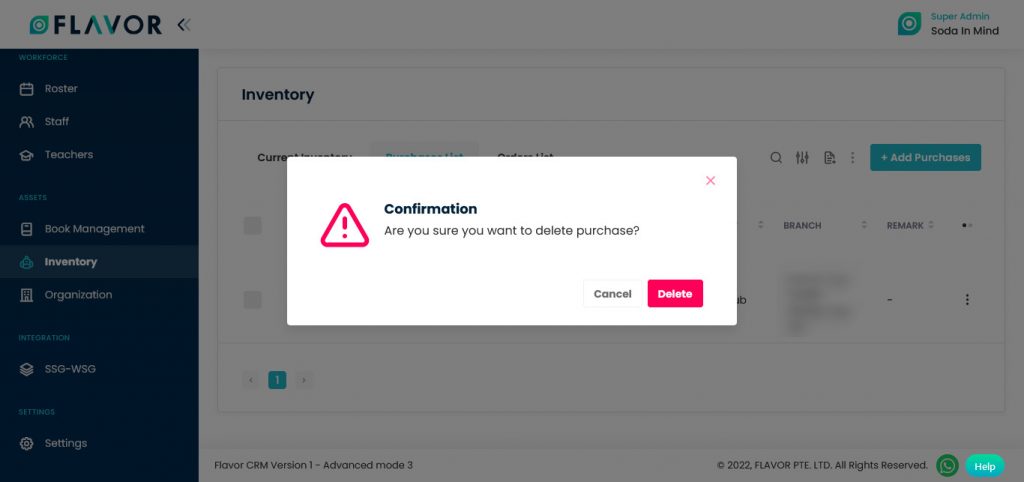
- After the selection of any record go to the Action Button, click on the button, a small popup named Delete will appear. Click on Delete Button to delete the record, you will see the confirmation popup to delete the record.
- Click on the Yes button to delete the record.
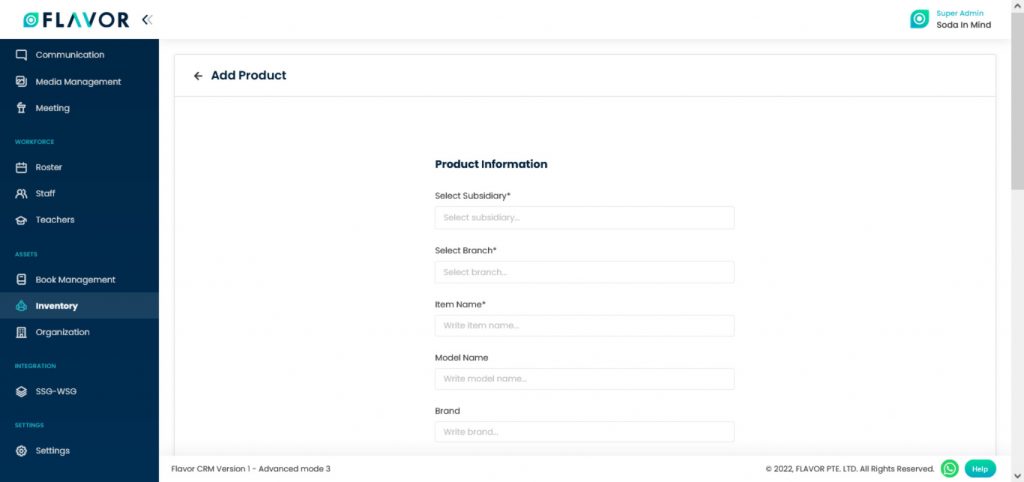
Add Product
To add the pr click on the + Add Product button. You will be redirected to the Add product page. Fill the Product Information form.
- Select the subsidiary, branch & item name, all these 3 fields are mandatory.
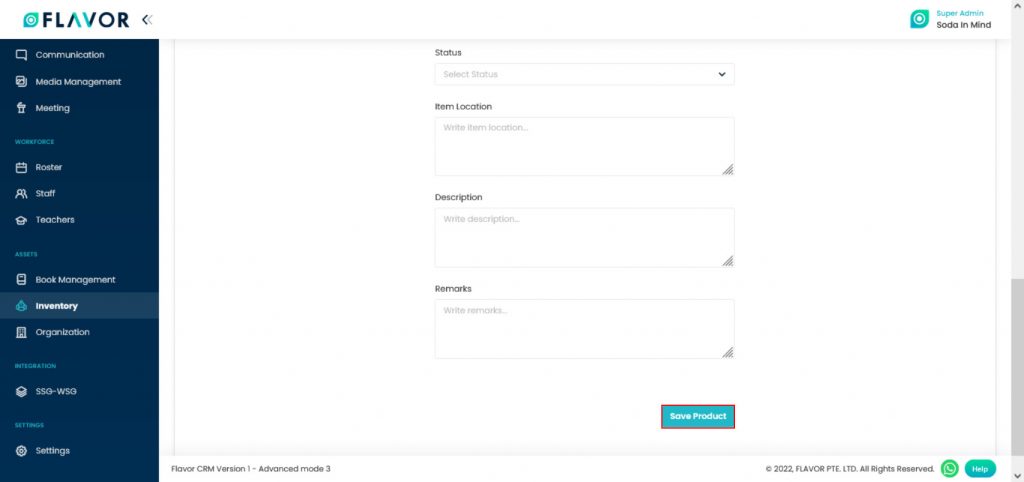
- Enter the Brand, Category, Type, Size, Item Code, Item Location, Description & Remarks.
- Status: Choose the status of the product
- Click on the Save Product button.
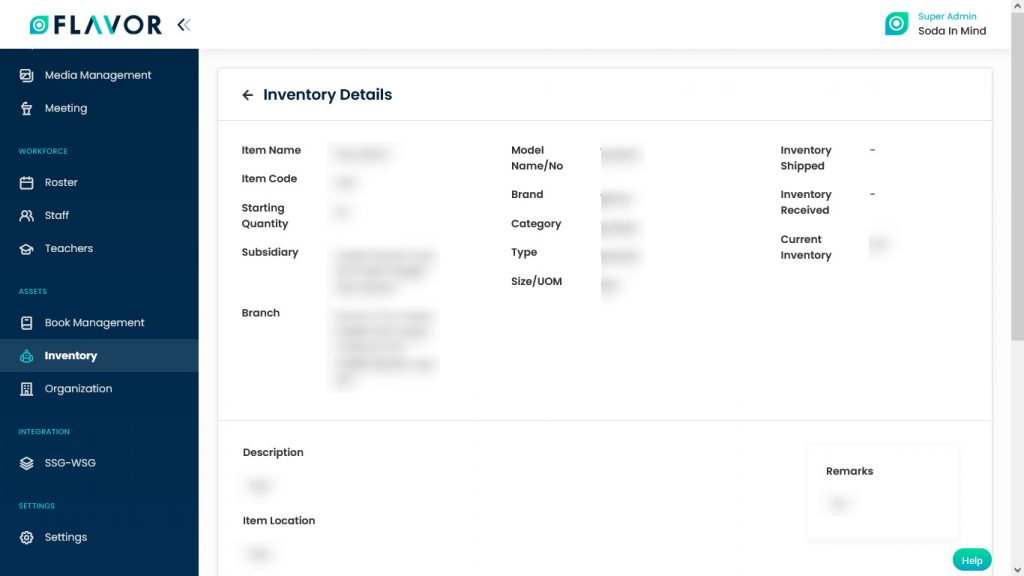
Product Details
Click on any row to check the details, you will be redirected to the Inventory Details page. Here, you will get the details & the location of a product.
Purchase List
Navigate to Purchase List. Here, you can check the quantity of product (how many products are available), date of purchase, name of the supplier of a product.
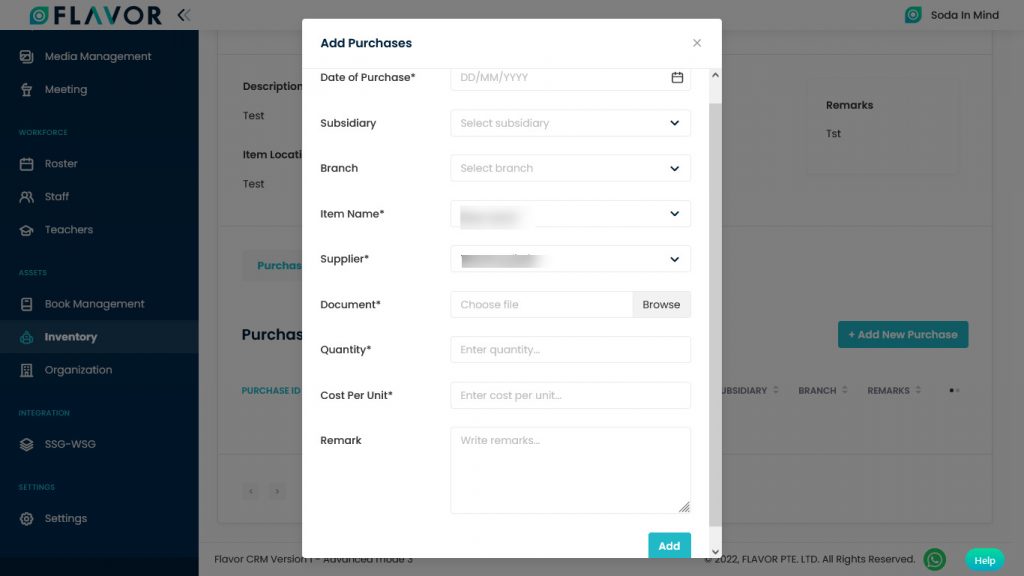
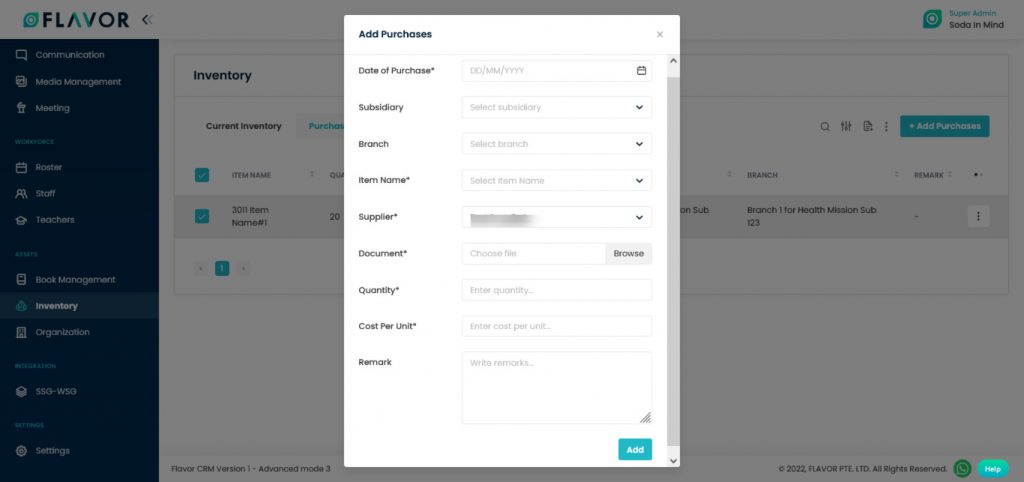
Add New Purchase
To add a new purchase click on the + Add New Purchase button. A popup form named Add Purchase will be open. Fill in the details.
- Date of purchase, subsidiary, branch, quantity, cost per unit & then click on the Save button.
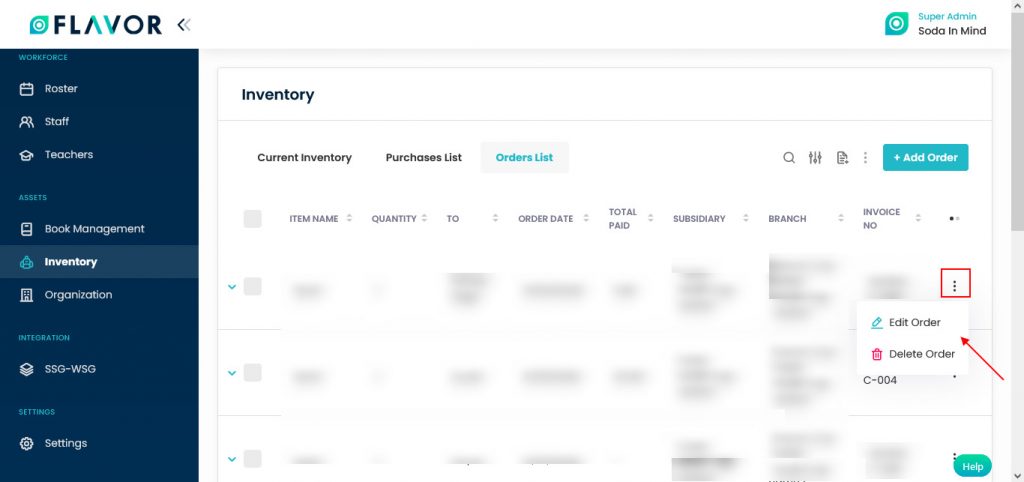
Orders List
In the Orders List, you will see who ordered the product, date of order, payment date, etc.
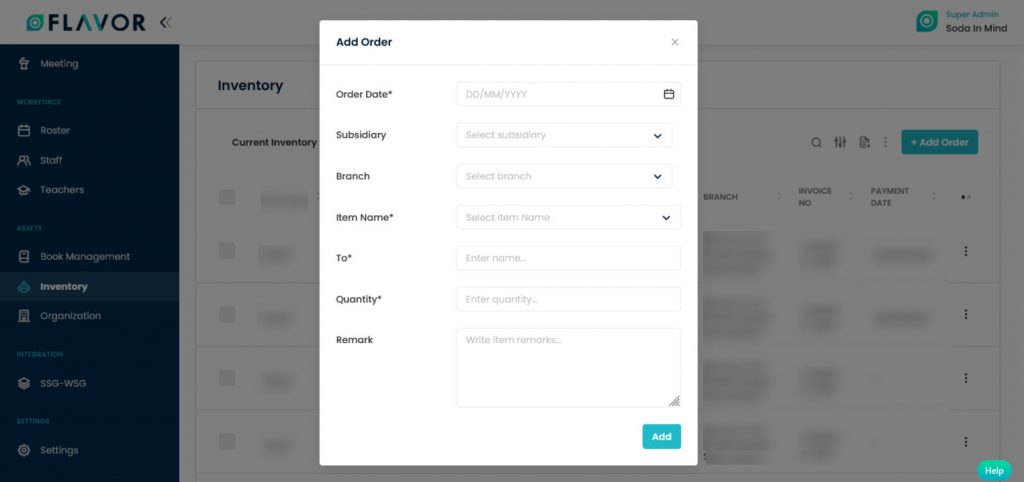
Add New Order
- To add a new order of that product, click on the + Add New Order button. A popup form named Add Order will be open.
- Fill in order date, item name, quantity, to field, subsidiary and then click on the Add button.

Current Inventory Options
Column Sorting
All rooms will be shown in Tabular Format. You can sort the data by clicking on Column Sorting Arrows in Table’s Header.
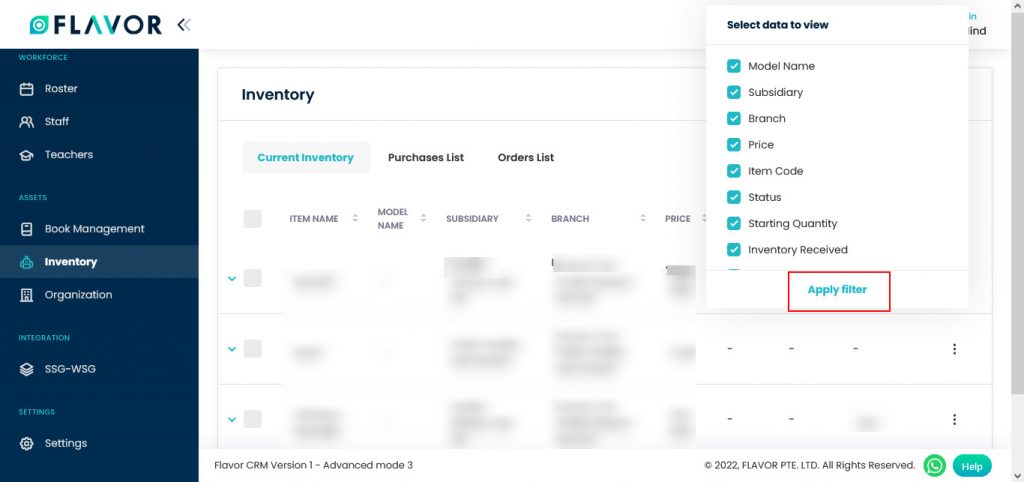
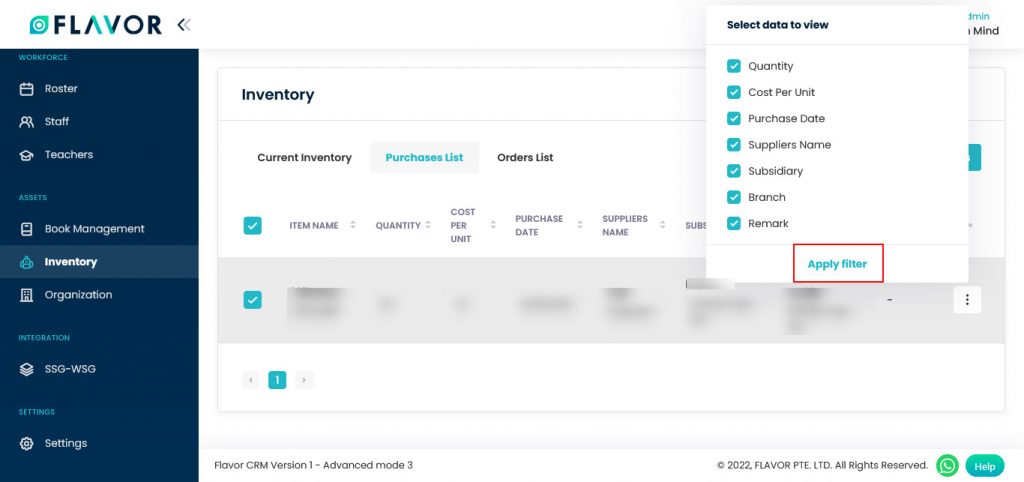
Column Visibility
You can sort columns by clicking on the Ellipsis icon, you will get the pop-up form named Select Data to View. Mark the columns you want to see and unmark the ones you don’t want to see in the table. After this procedure click on the Apply Filter button.
Action Button
Click on Action Button (Vertical Ellipsis), a popup box will appear on your screen with the Edit Purchase option & Delete Purchase option.

Edit Inventory Option
- Click on the Edit Inventory option.
- After clicking on the button, you will be redirected to the Edit Product page.
- Update the details & click on the Save button.
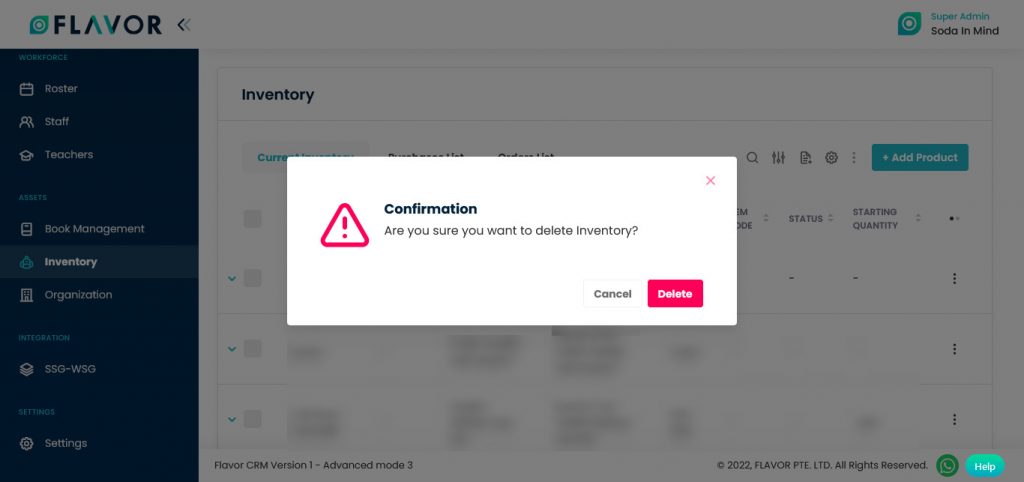
Delete Inventory Option
- Click on the Delete Inventory option. A confirmation popup will appear on the screen.
- Click on the Yes button to delete the room.
Purchases List
Here, you can see the list of all purchases that have happened.
Purchase List Options
Search
Search By clicking on the Search Icon, you can search the specific types of inventory by entering the item name supplier name & quantity.
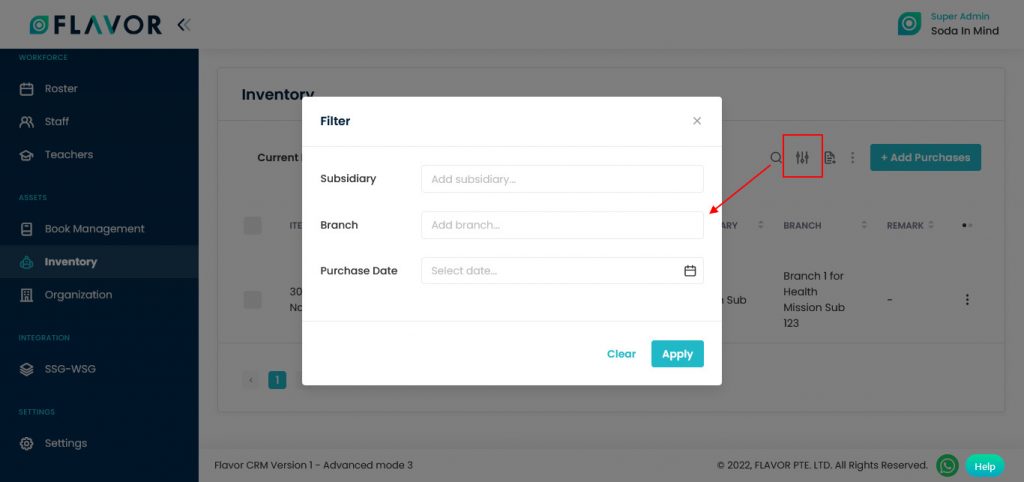
Filter
You can filter the products based on specific parameters. Click on Filter Icon, after clicking, a popup form will appear on your screen. Enter the Subsidiary, Branch & Purchase Date then click on Apply button to save parameters.
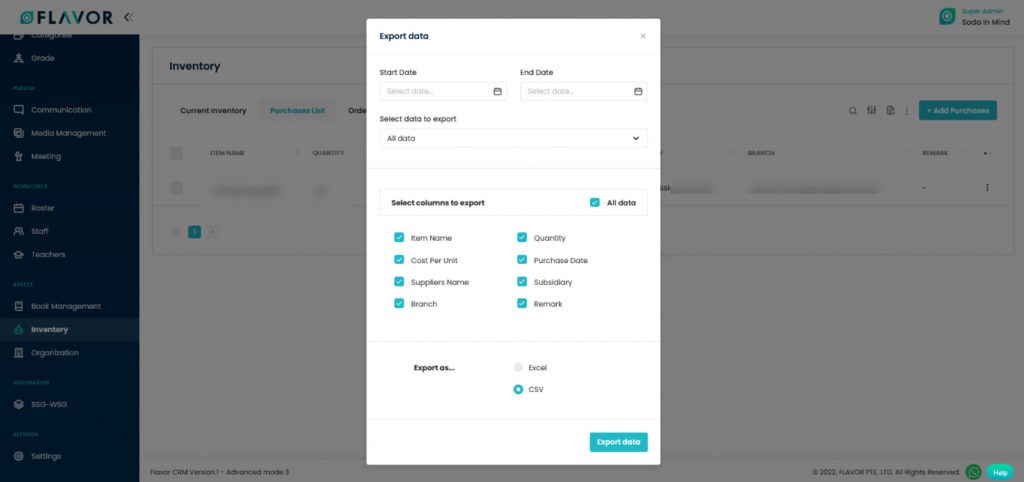
Export Data
- To export all data, you need to click on the Export Icon.
- After clicking on the Export icon, a pop-up form will appear on your screen.
- Start Date and End Date: Select the time period in the start date and end date column for which time period’s data you need.
- Select Data to Export: Here, you can export the data of all rows or 15 rows by simply clicking on the dropdown.
- Select Column to Export: Select columns which you need your data to export. Like if you want all the data of the purchases list, then simply click on “ALL DATA” and you will get the data of the entire purchases list in your exported file.
- Export as: Then select a format in which you want to export your data i.e (EXCEL or CSV).
- After selecting the relevant records/data, click on the Export Data button to export all the data in the selected file (Excel/CSV).
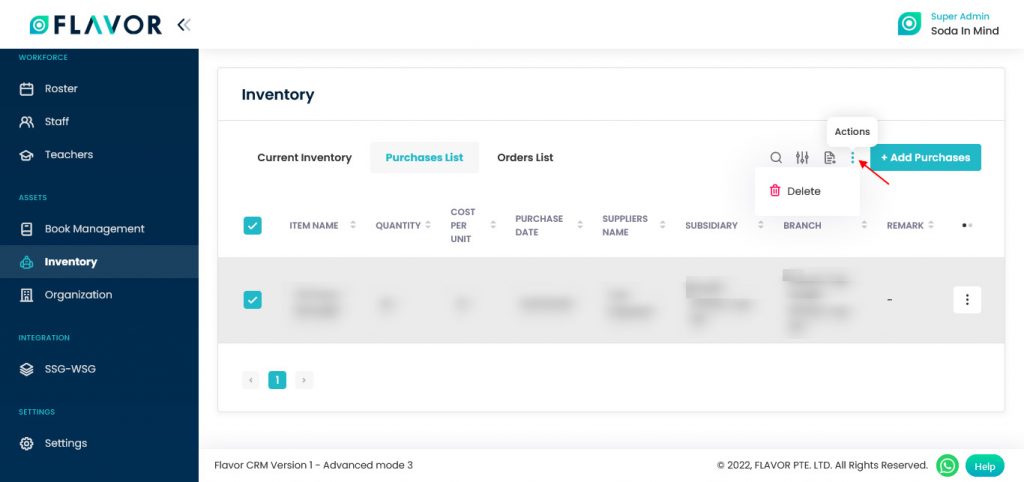
Bulk Actions Button
- The Bulk Action Button is disabled by default. When you mark on the check box, which appears on the starting on each row, this action button will be enabled. You can select/deselect rows by marking the checkbox.
- After the selection of any record go to the Action Button, click on the button, a small popup named Delete will appear. Click on Delete Button to delete the record, you will see the confirmation popup to delete the record.
- Click on the Yes button to delete the record.
Add Purchases
To add purchases, click on the + Add Purchases button. A popup form named Add Purchases will be open. Fill in the form & then click on the Save button.
Purchases List Records
Column Sorting
All rooms will be shown in Tabular Format. You can sort the data by clicking on Column Sorting Arrows in Table’s Header.
Column Visibility
You can sort columns by clicking on the Ellipsis icon, you will get the pop-up form named Select Data to View. Mark the columns you want to see and unmark the ones you don’t want to see in the table. After this procedure click on the Apply Filter button.
Action Button
Click on Action Button (Vertical Ellipsis), a popup box will appear on your screen with the Edit Purchase option & Delete Purchase option.
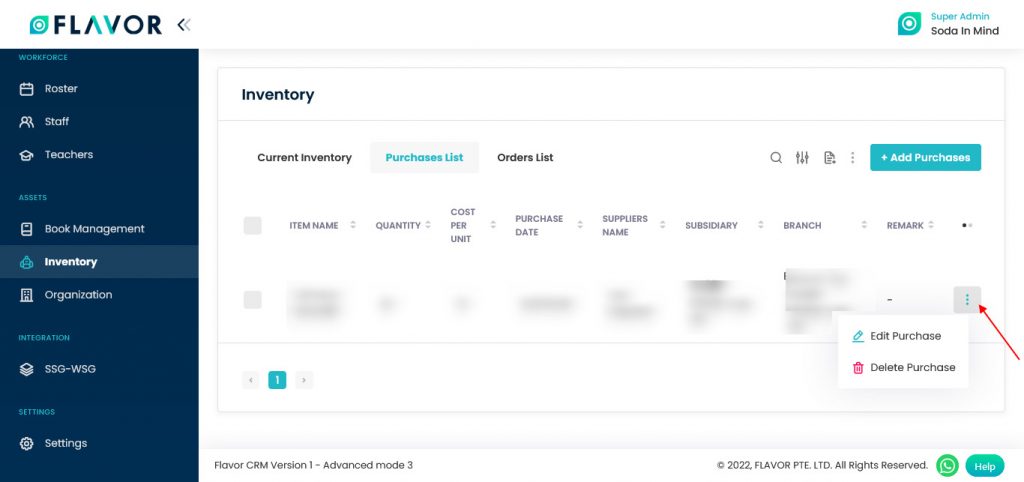
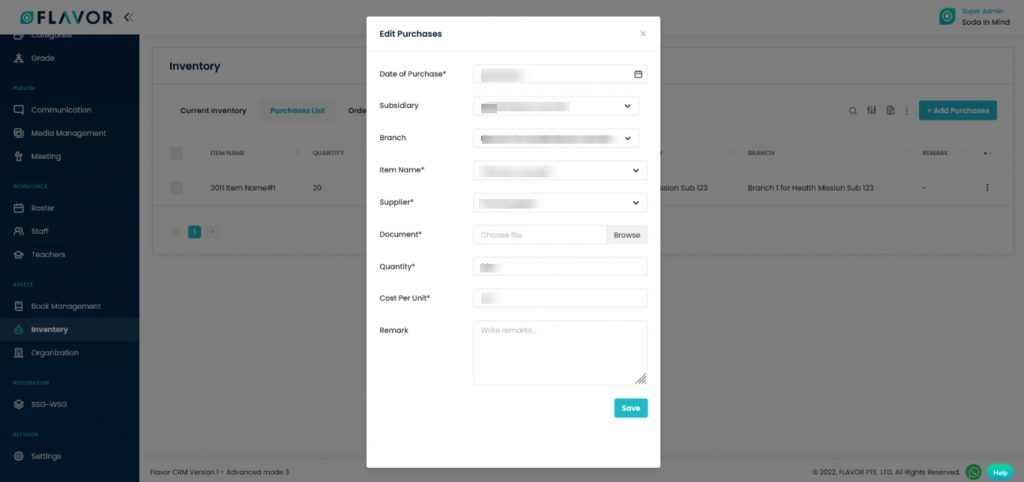
Edit Purchase Option
- Click on the Edit Purchase option.
- After clicking on the button, a popup form name Edit Purchases will be open.
- Update the details & click on the Save button.
Delete Purchases Option
- Click on the Delete Purchases option. A confirmation popup will appear on the screen.
- Click on the Yes button to delete the room.
Orders List
Orders List Options
Search
Search By clicking on the Search Icon, you can search the specific types of inventory by entering the item name & To & Quantity.
Filter
You can filter the products based on specific parameters. Click on Filter Icon, after clicking, a popup form will appear on your screen. Enter the Subsidiary, Branch & Order Date then click on Apply button to save parameters.
Export Data
- To export all the data, you need to click on the Export Icon.
- After clicking on the Export icon, a pop-up form will appear on your screen.
- Start Date and End Date: Select the time period in the start date and end date column for which time period’s data you need.
- Select Data to Export: Here, you can export the data of all rows or 15 rows by simply clicking on the dropdown.
- Select Column to Export: Select columns which you need your data to export. Like if you want all the data of the orders list, then simply click on “ALL DATA” and you will get the data of the entire orders list in your exported file.
- Export as: Then select a format in which you want to export your data i.e (EXCEL or CSV).
- After selecting the relevant records/data, click on the Export Data button to export all the data in the selected file (Excel/CSV).
Bulk Actions Button
- The Bulk Action Button is disabled by default. When you mark on the check box, which appears on the starting on each row, this action button will be enabled. You can select/deselect rows by marking the checkbox.
- After the selection of any record go to the Action Button, click on the button, a small popup named Delete will appear. Click on Delete Button to delete the record, you will see the confirmation popup to delete the record.
- Click on the Yes button to delete the record.
Add Orders
To add orders, click on the + Add Order button. A popup form named Add Order will be open.
Orders Records
Column Sorting
All orders will be shown in Tabular Format. You can sort the data by clicking on Column Sorting Arrows in Table’s Header.
Column Visibility
You can sort columns by clicking on the Ellipsis Icon, you will get the pop-up form named Select Data to View. Mark the columns you want to see and unmark the ones you don’t want to see in the table. After this procedure click on the Apply Filter button.
Action Button
Click on Action Button (Vertical Ellipsis), a popup box will appear on your screen with the Edit Order option & Delete Order option.
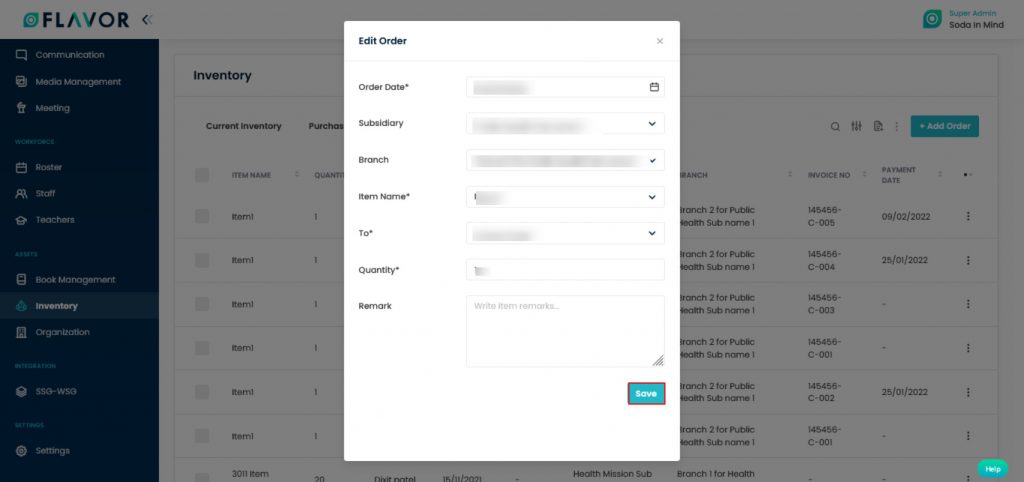
Edit Order
- Click on the Edit Order button.
- After clicking on the edit button, a popup named Edit Order will be open.
- Update the details & click on the Save button.
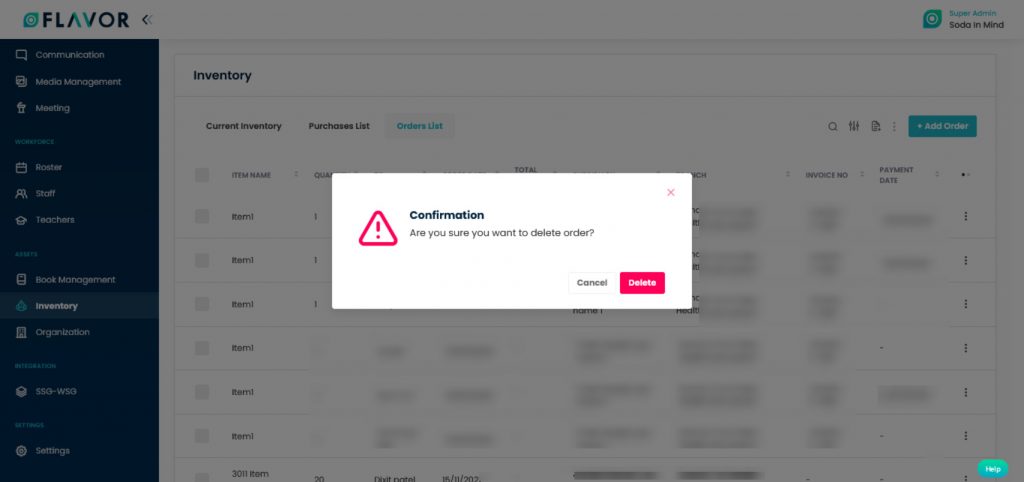
Delete Order
- Click on the Delete Order button.
- You will see the confirmation popup to delete the order.
- Click on the Yes button to delete the order.
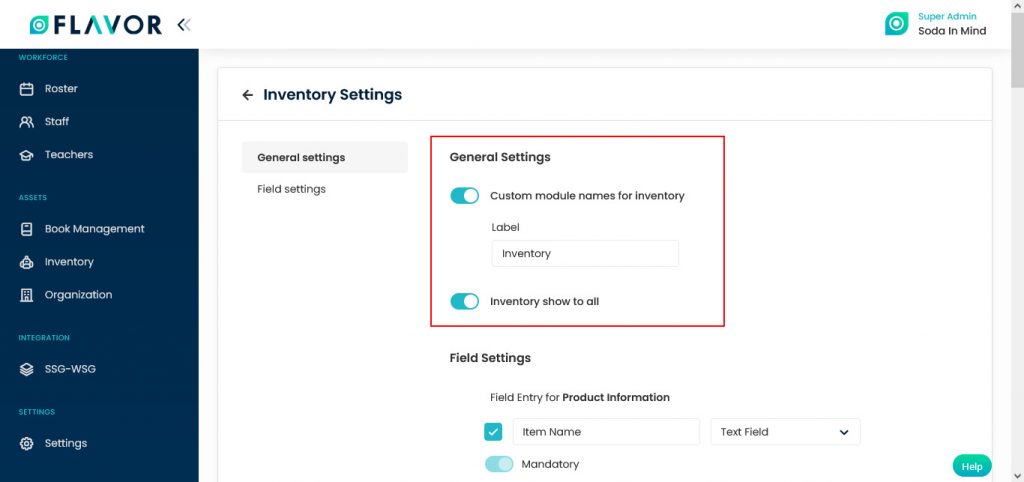
Settings
By clicking on the Settings icon, you will be redirected to Inventory Setting Page.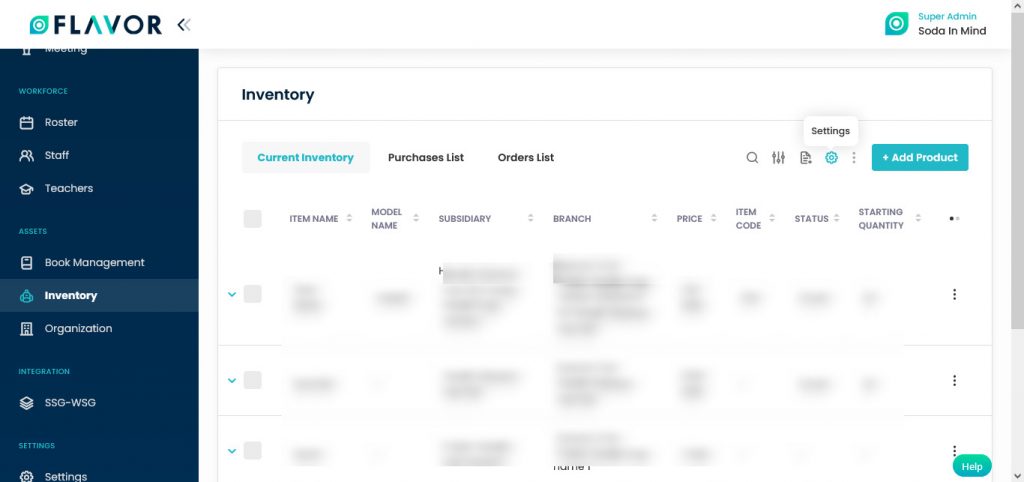
Here, you will see General Settings & Field Settings.
General Settings
Navigate to the General Settings. Here, you can see 2 options.
- Custom module names for inventory: By enabling the switch, you will see a Label Box. You can change the label for inventory from here.
- Inventory show to all: If you want that all users can see the Inventory then enable this option by switching.
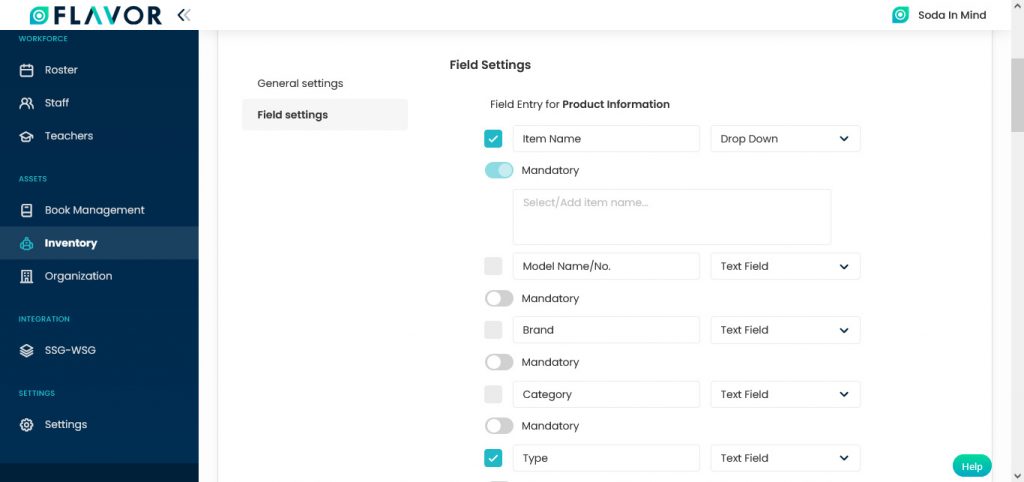
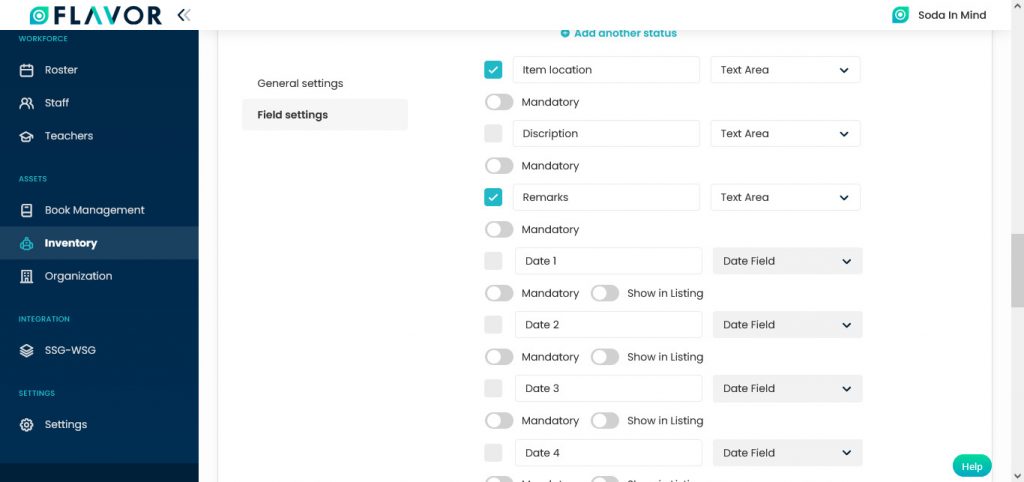
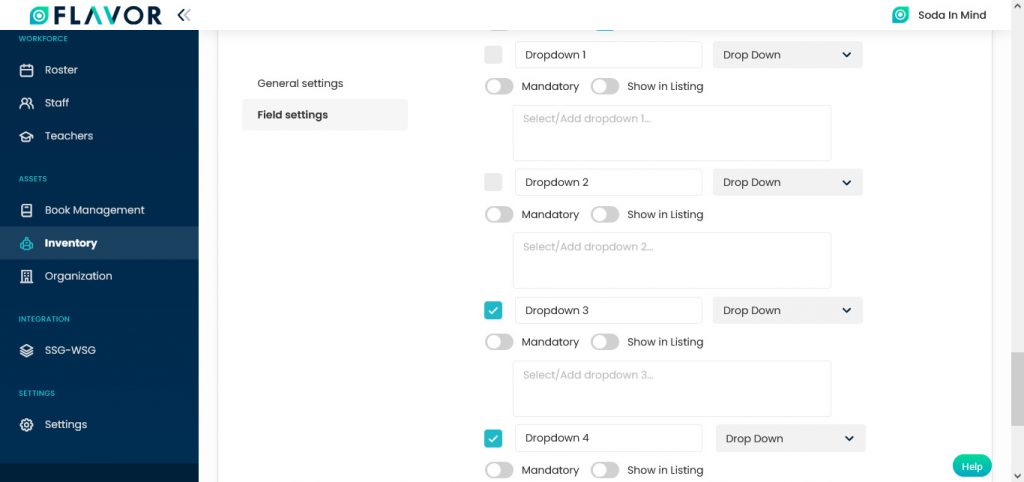
Field Settings
Navigate to the Field Settings. Here, you can see various options.
Field Entry for Product Information:
- This setting is for Product Information. Here, you can see checkboxes before each field. You can enable/disable the fields by marking the checkbox of fields.
- Mandatory Option: First field Item Name is mandatory, you can’t unmark this field. There is also a switch in the bottom of each field to make them mandatory, it is up to you to make them mandatory by enabling the switch.
- After each field you will see a drop-down, from here you can select the type of the field. It could be Text Area, Dropdown or Text Area.
Status Value
- Navigate to Status Value. You can enable or disable this field by switching. Here, you can see the list of values like Good, Pending, Repair, etc.
- You can change the sequence of status by clicking on the drag & drop icon, also you can enable or disable the field by the switch.
- Add another status: By clicking on the “+ Add another status”, you can add more status value.
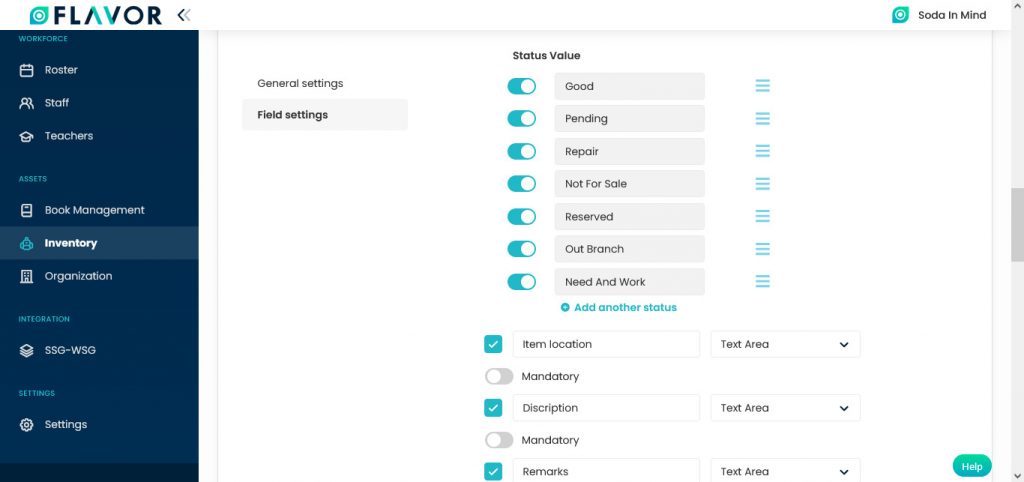
After the Status Value, you can see more settings options. After the Item Location, Description & Remarks fields you will see a drop-down, from here you can select the type of the field. It could be Text Area, Dropdown or Text Area.
Date Fields: You can make them mandatory by enabling the switch. You can enable/disable the fields by marking the checkbox. There is also a Show in Listing option. You can show this in the table by enabling the switch.
Text Fields: You can make them mandatory by enabling the switch. You can enable/disable the fields by marking the checkbox. There is also a Show in Listing option. You can show this in the table by enabling the switch.
Drop Down: You can make them mandatory by enabling the switch. You can enable/disable the fields by marking the checkbox. There is also a Show in Listing option. You can show this in the table by enabling the switch.
Need more help? Ask us a question
Please let us know more of your details and our team will reach out to you very shortly.