
You can check the Media by clicking on the Media Management from the main navigation panel of the Flavor EduPortal. The Media Management is provided under the “Publish” section in the navigation panel.
By clicking on the Media Management, from the left menu you will be redirected to the Media Management page where you will see the listing of all Media in the grid view. Here you can see Media, Collections & Transaction Tabs.
Media Tab
In the Media tab, you can see the list of all of the media irrespective of their Active & Inactive status.

Media Options
Search
Search By clicking on the Search Icon, you can search the specific media by entering the media title & description.
Filter
You can filter the records based on specific parameters. Click on Filter Icon, after clicking, a popup form will appear on your screen. Enter file type, media type, category, etc. then click on Apply button to save parameters.

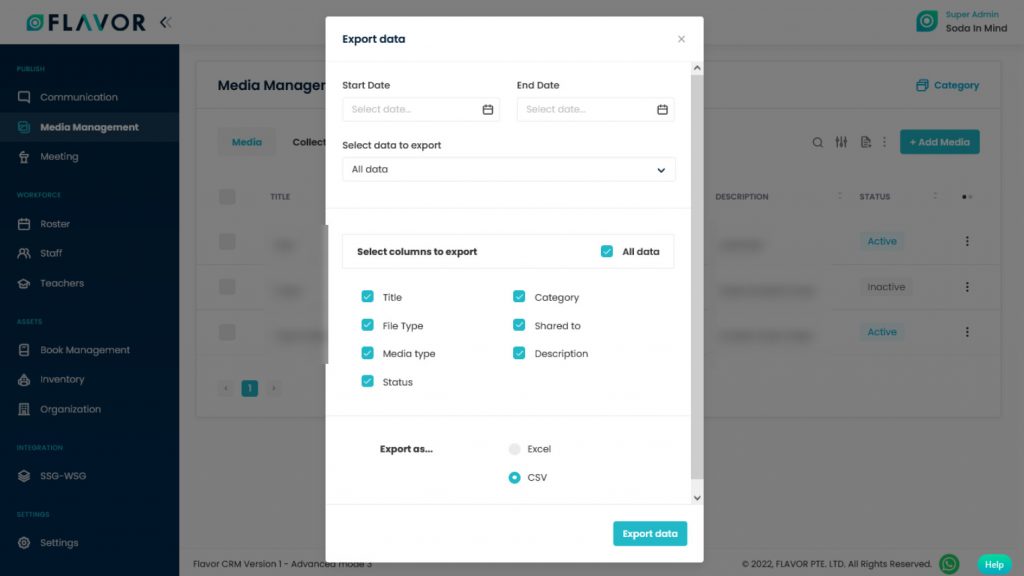
Export
- To export all data, you have to click on the Export Icon.
- After clicking on the Export icon, a pop-up form named Export Data will appear on your screen.
- Start Date and End Date: Select the time period in the start date and end date column for which time period’s data you need.
- Select Data to Export: Here, you can export the data of all rows or 15 rows by simply clicking on the dropdown.
- Select Column to Export: Select columns which you need your data to export. Like if you want all the data of the media module, then simply click on “ALL DATA” and you will get the data of the entire media module in your exported file.
- Export as: Then select a format in which you want to export your data i.e (EXCEL or CSV).
- After selecting the relevant records/data, click on the Export Data button to export all the data in the selected file (Excel/CSV).
Bulk Action
- The Bulk Action Button is disabled by default. When you mark on the check box, which appears on the starting on each row, this action button will be enabled.
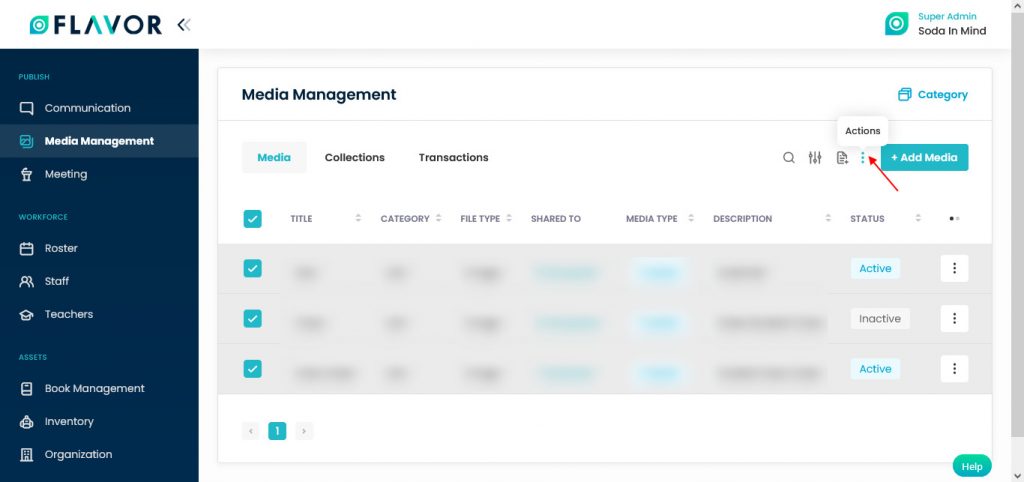
- You can select/deselect rows by marking the checkbox.
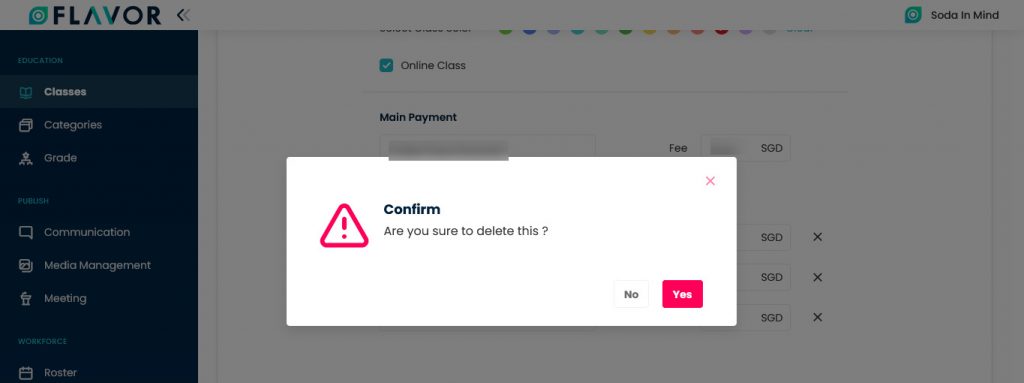
- After selecting any record go to the action button, click on the button a small popup will appear. There, you can see the Delete option.

- Click on that option, a confirmation popup will be open.
- If you want to delete all media click on the Delete button.

Add Media
To create a new media click on the + Add Media button. You will be redirected to the Add Media page. Here, you can see two sections.
Note: Before Add Media Details is finished, the rest of the tab will be disabled.
Add Media Details
- File Uploader: Upload any kind of file here, it could be an image, document, pdf, etc. Click here, to upload any document.
- A Window file will be open.
- Select file from the window. Click on the open button.
- A file will be uploaded.
- You can add multiple files here.
- If you want to delete any media click on the Cross X icon, media will be deleted.
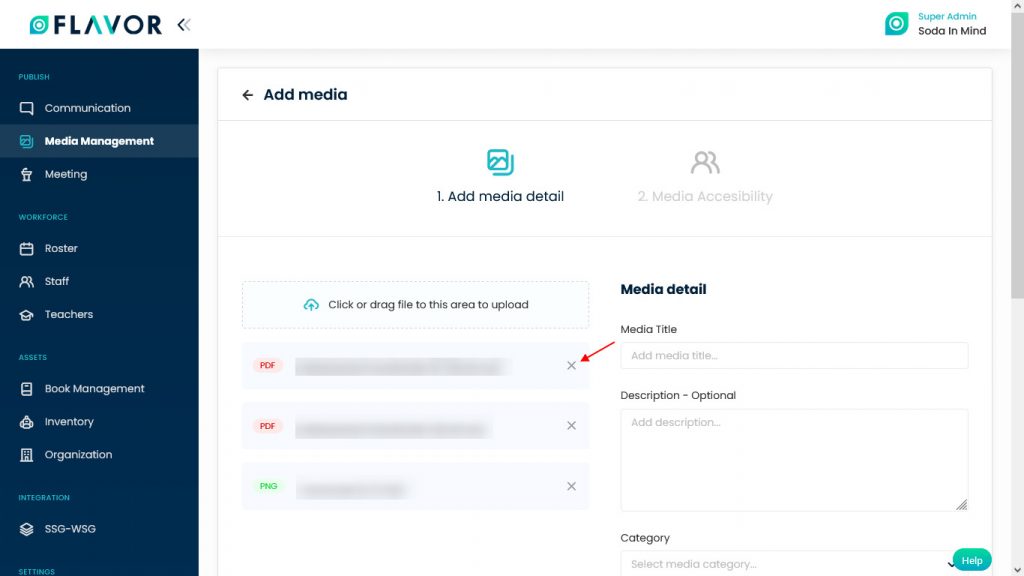
Media Details
- Media Title: Enter the title of media.
- Description: Enter the description of your media file.
- Category: The category listed all category data which has been added. Select desired category from the drop-down.
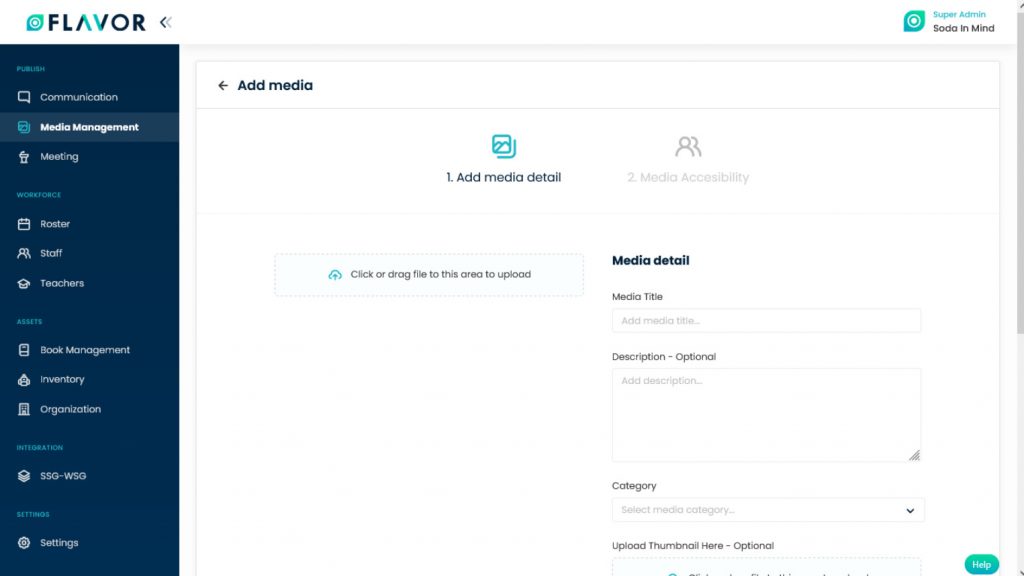
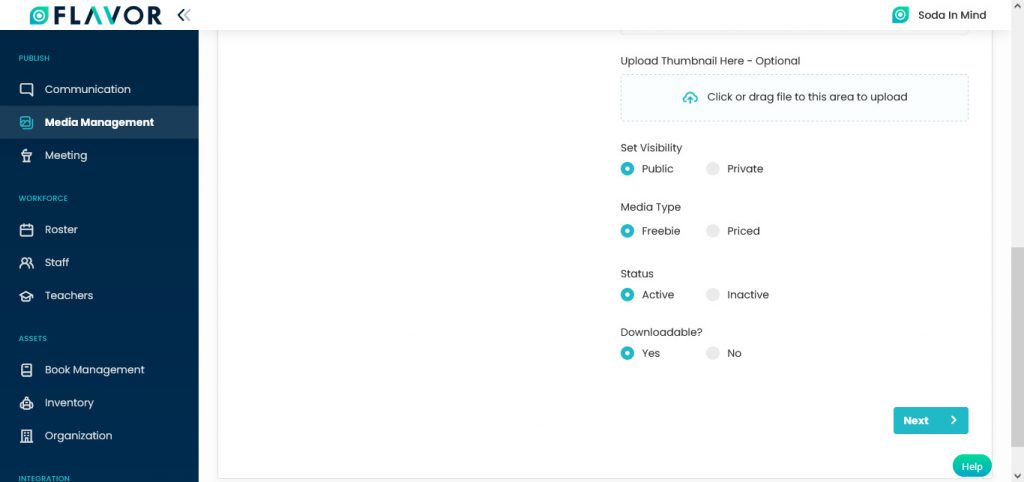
- Upload Thumbnail: It is only allowed for image files. When it is clicked it will show a browser file, but the user also can drag and drop the file to this part. The file which successfully uploaded will be shown under this part.
- Set visibility: By default it is public, this option is only to set media private or public. Private visibility will only be shown or accessed to a particular recipient. Public visibility can be used for everyone.
- Media Type: Media type is a type whether this is paid media or free. By default it is free.
- Status: Status, as default, is active. If the status is inactive then this media will be not showing in any participant mobile apps, and also cannot create any link for this media.
- Downloadable: The file can be downloaded if only the downloadable radio button is checked.
- Click on the Next button to go to the next section.
Media Accessibility
- Now, you have to add users with whom you want to share this media. To add users click on the + Add user button.
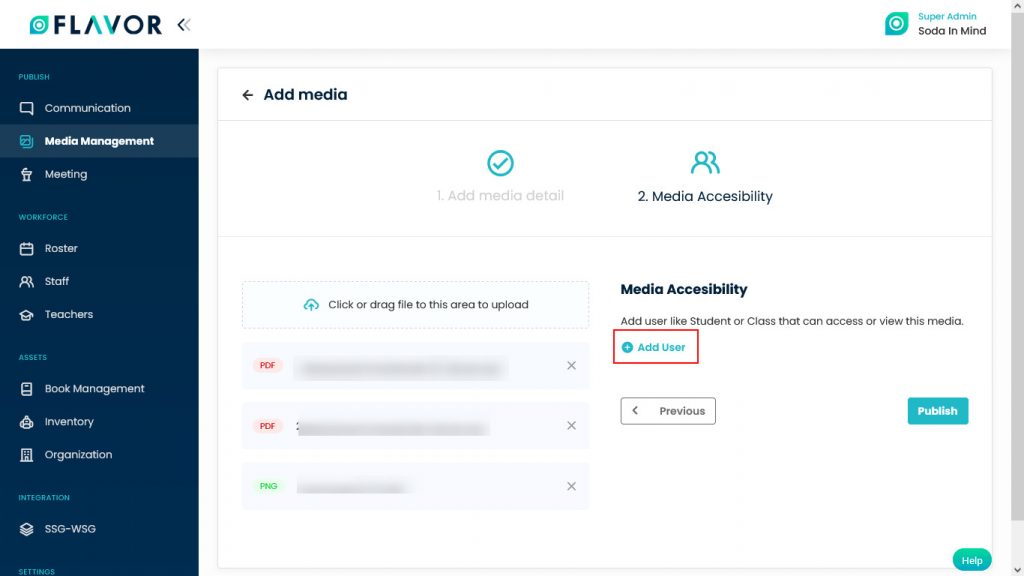
- After clicking, a popup named Add User will be open.
- Here, you can see two tabs, Students & Class.
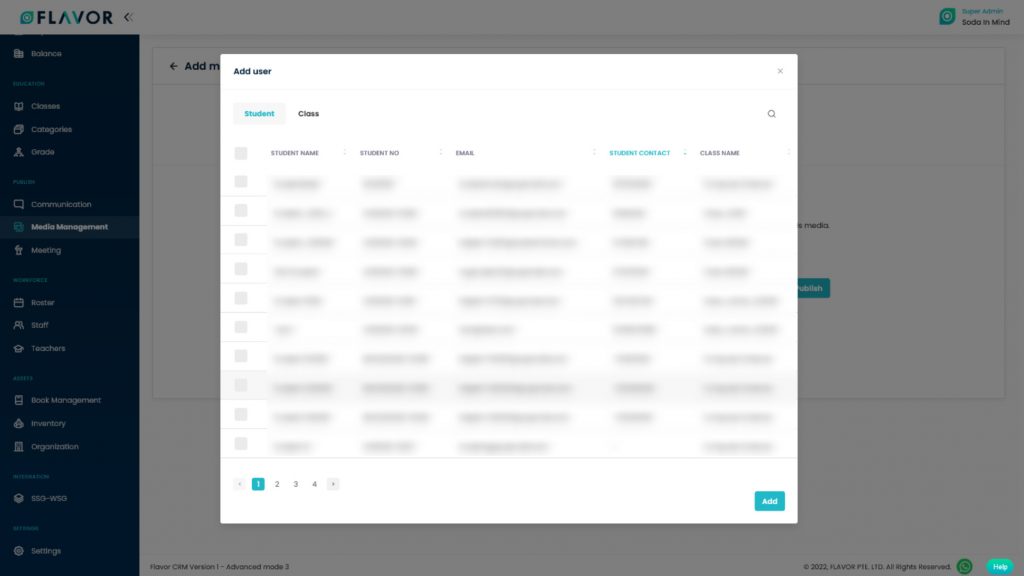
- Students: Select students from the list with whom you want to share this media.
- Search: You can search students by entering their name & class.
- After selecting click on the Add button.
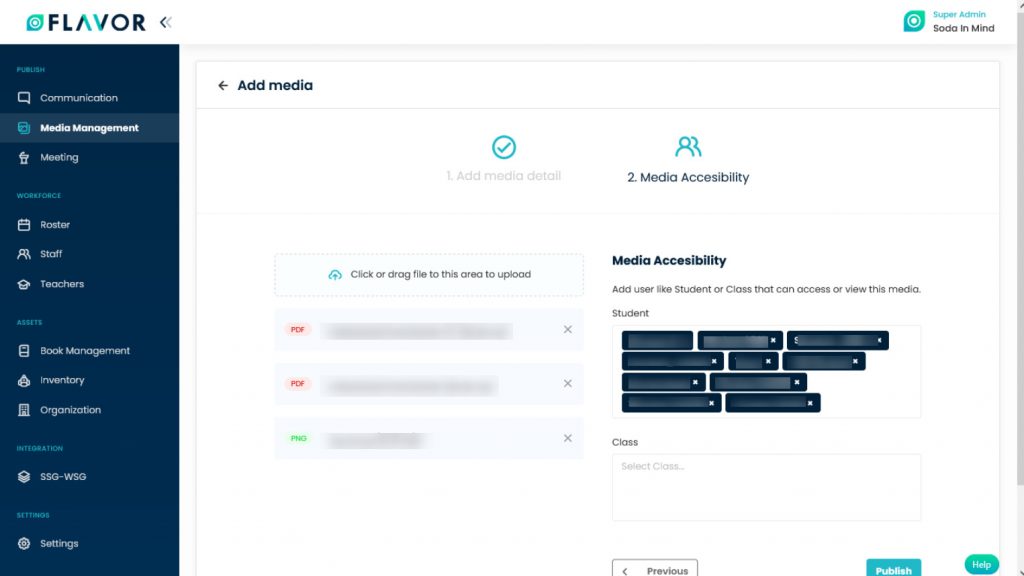
- After adding students you can see students’ names in Student Field. If you want to add Class then click on the Class field, a dropdown of classes will be open select classes from here.
- Click on the Publish button.
For Class
- Class: Select Class from the list with which class you want to share this media.
- Search: You can search students by entering the class name & category.
- After selecting click on the Add button.
- After adding the class you can see class names in Class Field. If you want to add students click on the Student field, a dropdown of students will be open select students from here.
- Click on the Publish button.
Note: If no user is added to this media, then this media can be accessed by everyone.
Media Records
Column Sorting
All media will be shown in Tabular Format. You can sort the data by clicking on Column Sorting Arrows in Table’s Header.
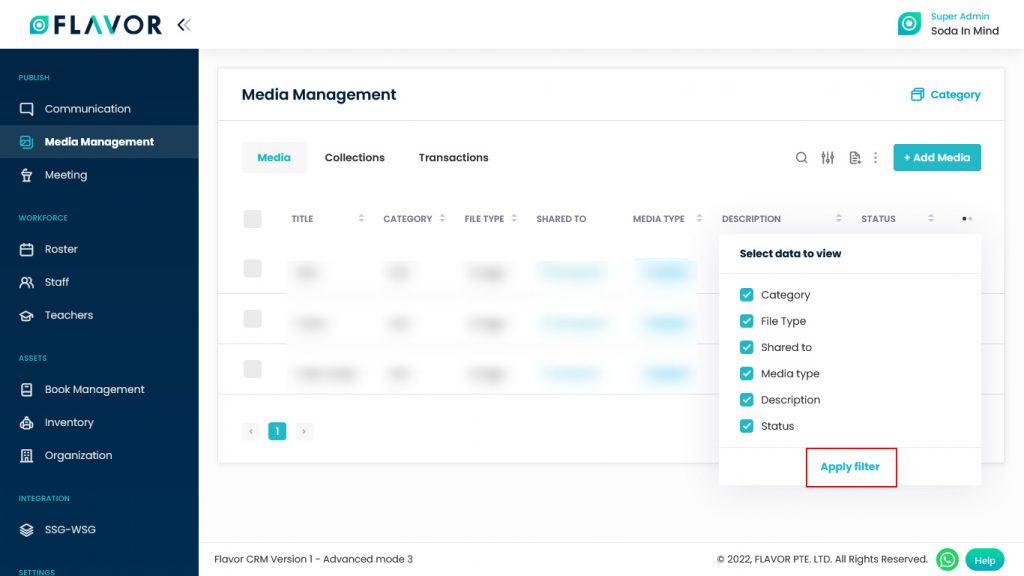
Column Visibility
You can sort columns by clicking on the Ellipsis Icon, you will get the pop-up form named Select Data to View. Mark the columns you want to see and unmark the ones you don’t want to see in the table. After this procedure click on the Apply Filter button.
Action Button
Click on Action Button (Vertical Ellipsis), a popup box will appear on your screen with create link, edit & delete options.

Create Link
- After clicking on Create Link option a popup named Media Link will be open.
- Here, you can see the list of previously created links.
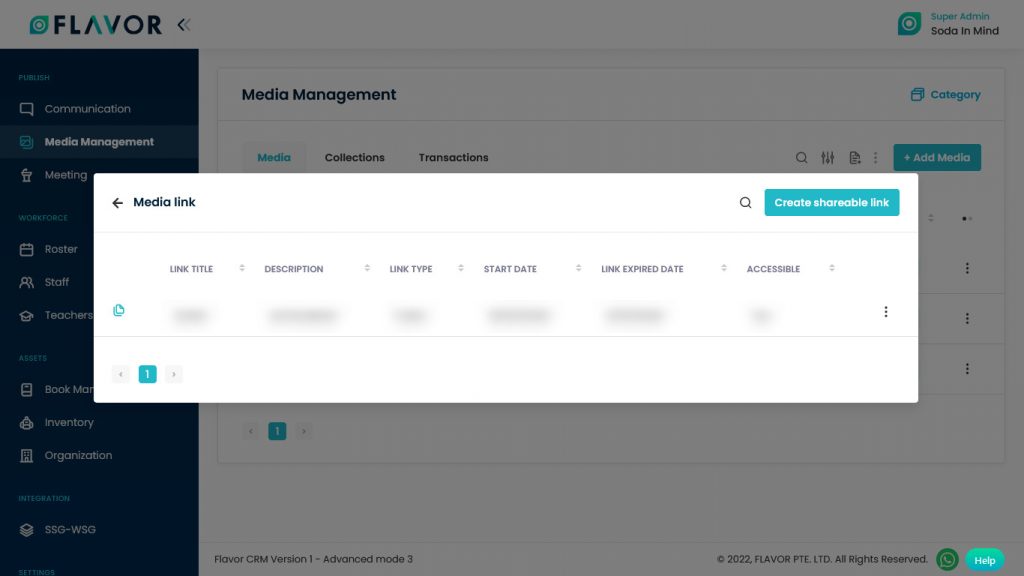
- At the right corner of the row, you can see the Copy Icon, click here, to copy this row.
- Search: You search media by entering the Link title, Description or Link Type.
- Click on the Create Shareable link button.
- After clicking a popup Create Media Link will be open.
- Enter the title & description.
- Link active: Enter the Link activation date.
- Link Expire: Enter the Link Expiry date.
- Set Visibility: Set visibility Public or Protected according to your need.
- Is Accessible: Set visibility Yes or No according to your need.
- Click on the Add button.

Edit Media
- Click on the Edit Media option. You will be redirected to the Edit Media Page.
- Change the details from the 1st section which you want to change and then click on the Next button if you want to change the details in the 2nd section.
- Change the details of the 2nd section.
- Click on the Publish button to save the changes.
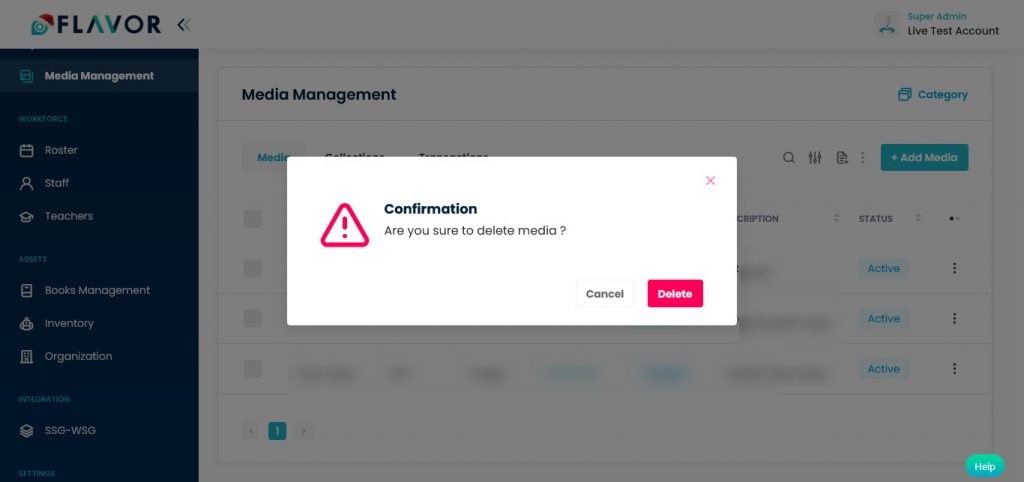
Delete Media
- To delete media click on the Delete option.
- A confirmation popup will be open.
- Click on the Delete button to delete the media.
Media Details
To check the detail of any media click on any row. You will be redirected to the Media Detail Page.
Media Profile
Here, you can see the status of media active & inactive. Status of the visibility of media, Size & Category. At the left side of the button, you can see the Action button. After clicking on the button a small popup will be open with Create Link, Edit & Delete options.
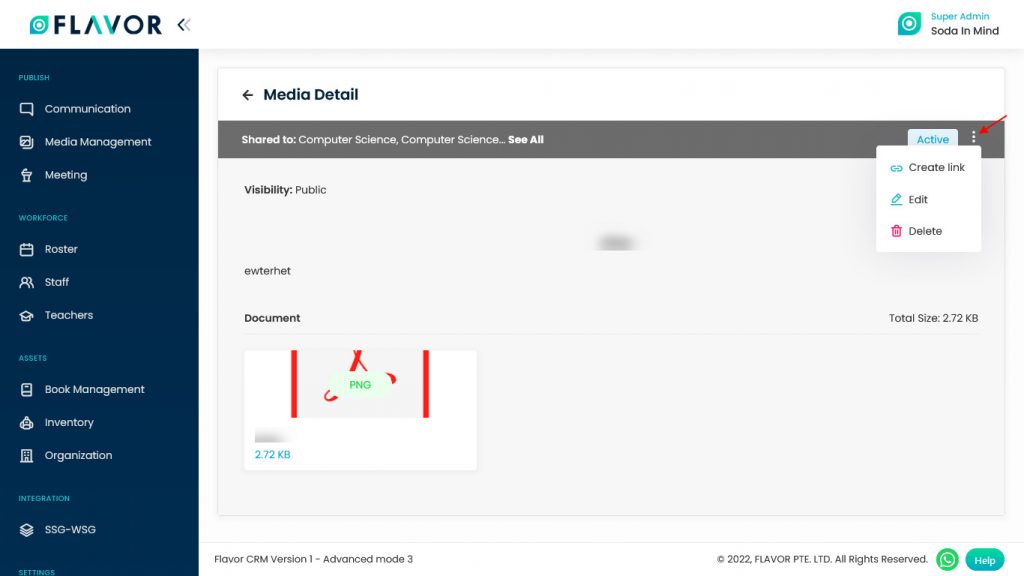
To edit, delete & create link click on the action button.
Collection Tab
Collection Options
Search
Search By clicking on the Search Icon, you can search the specific media by entering the media title & description.
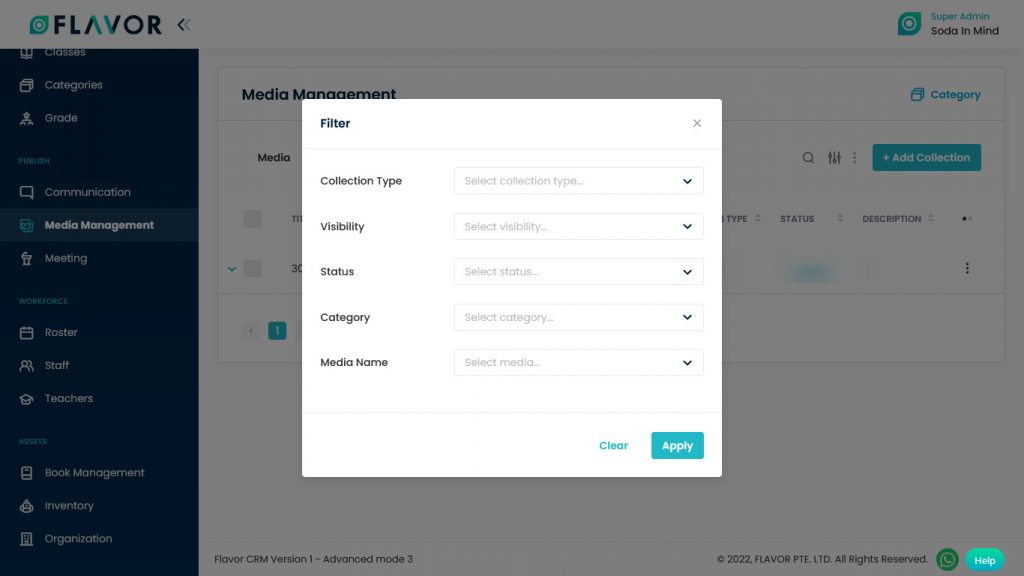
Filter
You can filter the records based on specific parameters. Click on Filter Icon, after clicking, a popup named Filter will appear on your screen. Enter the collection type, visibility, category, etc. then click on Apply button to save parameters.
Bulk Action
- The Bulk Action Button is disabled by default. When you mark on the check box, which appears on the starting on each row, this action button will be enabled.
- You can select/deselect rows by marking the checkbox.
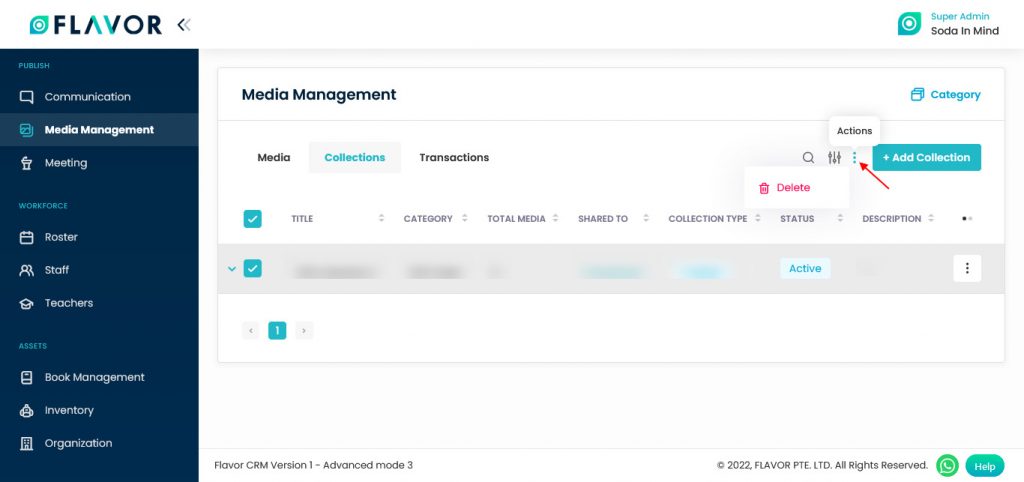
- After selecting any record go to the action button, click on the button a small popup will appear. There, you can see the Delete option.
- Click on that option, a confirmation popup will be open.
- If you want to delete all media click on the Delete button.
Add Collection
- To add collection click on the + Add Collection button, you will be redirected to the Add Collection page.
Note: Before Add collection details are finished, the rest of the tabs will be disabled.
Collection Details
- Collection Title: Enter the collection title.
- Description: Enter the description.
- Category: Select category from the dropdown.
- Upload Thumbnail: it is only allowed for image files. When it is clicked it will show a browser file, but the admin also can drag and drop the file to this part. The file which successfully uploaded will be shown under this part.
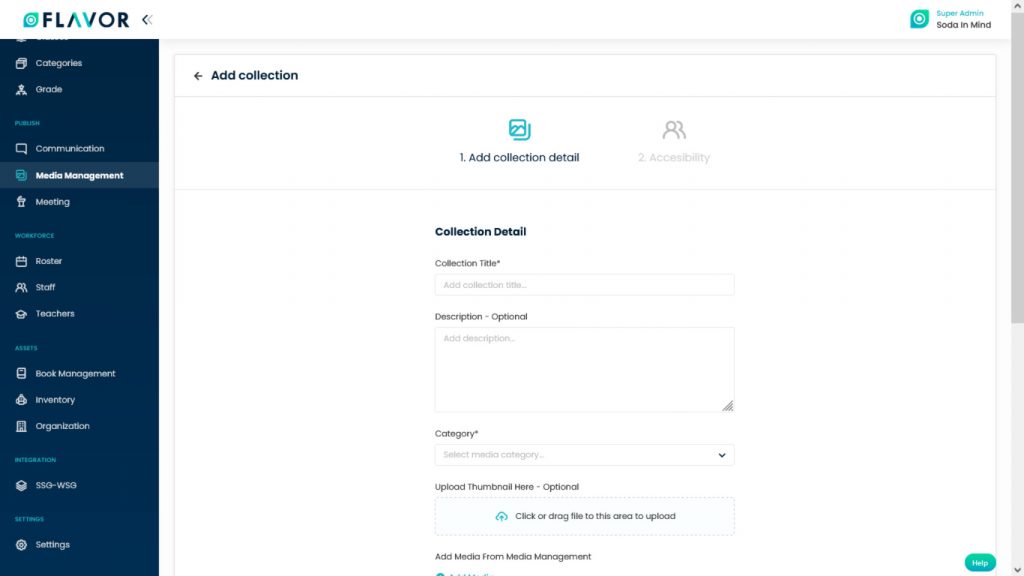
- Add Media: Add media from Media management: To add media click on the + Add Media button.

- A popup named Media List will be open.
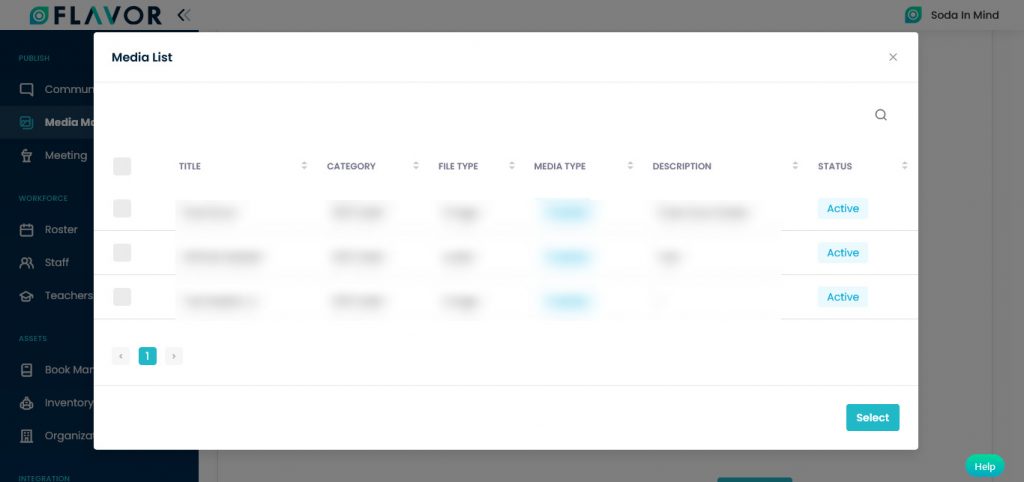
- To add media to this collection select any media from the list.
- Click on the Select button.
- If you want to add more media then again click on the + Add More Media button.
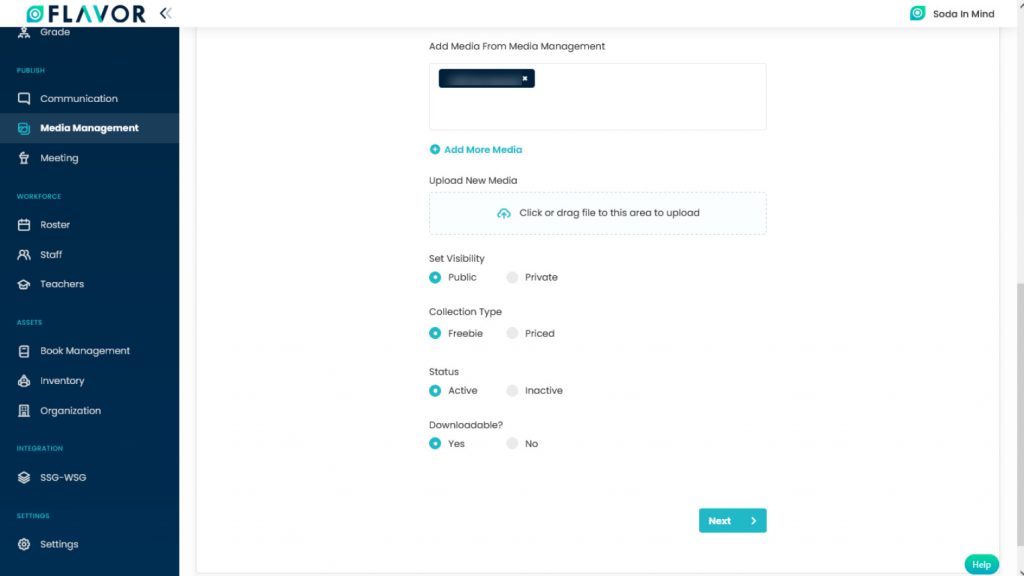
- Upload New Media: Part to upload new media which has not been added before.
- Set visibility: Set this collection private or public by clicking on the radio button. Private visibility will only be shown or accessed to a particular recipient. Public visibility can be used for everyone. By default it is public.
- Collection Type: Set the collection type freebie or price by clicking on the radio button. Collection type is a type whether this is a paid collection or free. By default it is free.
- Status: By default is active. If the status is inactive then this collection will not be showing in any participant mobile apps, and also cannot create any link for this collection.
- Downloadable: The file can be downloaded if only the downloadable radio button is set to Yes.
- Click on the Next button to go to the next section.
Accessibility
- Collection Accessibility: To add users click on the + Add User button.
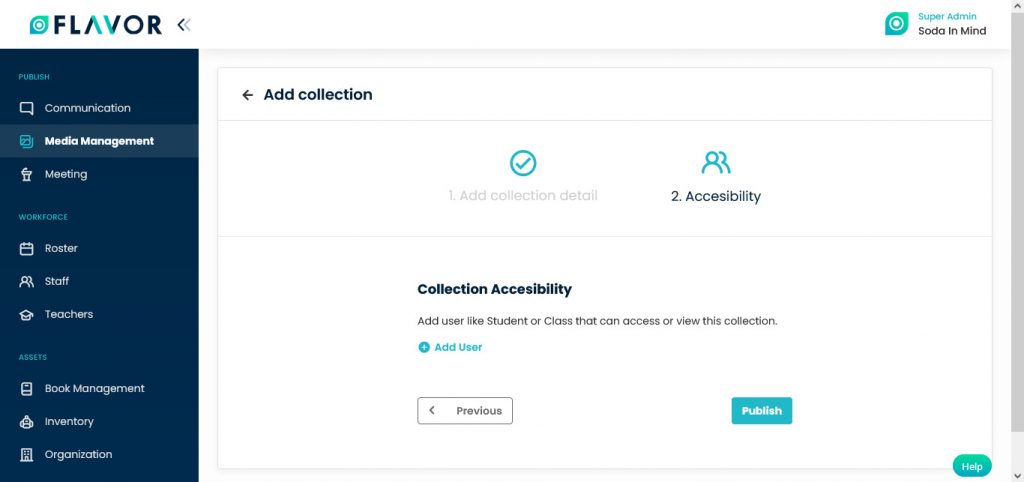
- A popup named Add User will be open.
- Student Field: Select students from the list with whom you want to share this collection.
- Search: You can search students by entering their name & class.
- After selecting click on the Add button.
- After adding students you can see students’ names in Student Field. If you want to add Class then click on the Class field, a dropdown of classes will be open select classes from here.
- Click on the Publish button.
For Class
- Class: Select Class from the list with which class you want to share this collection.
- Search: You can search students by entering the class name & category.
- After selecting click on the Add button.
- After adding the class you can see class names in Class Field. If you want to add students click on the Student field, a dropdown of students will be open select students from here.
- Click on the Publish button.

Collection Records
Column Sorting
All collections will be shown in Tabular Format. You can sort the data by clicking on Column Sorting Arrows in Table’s Header.
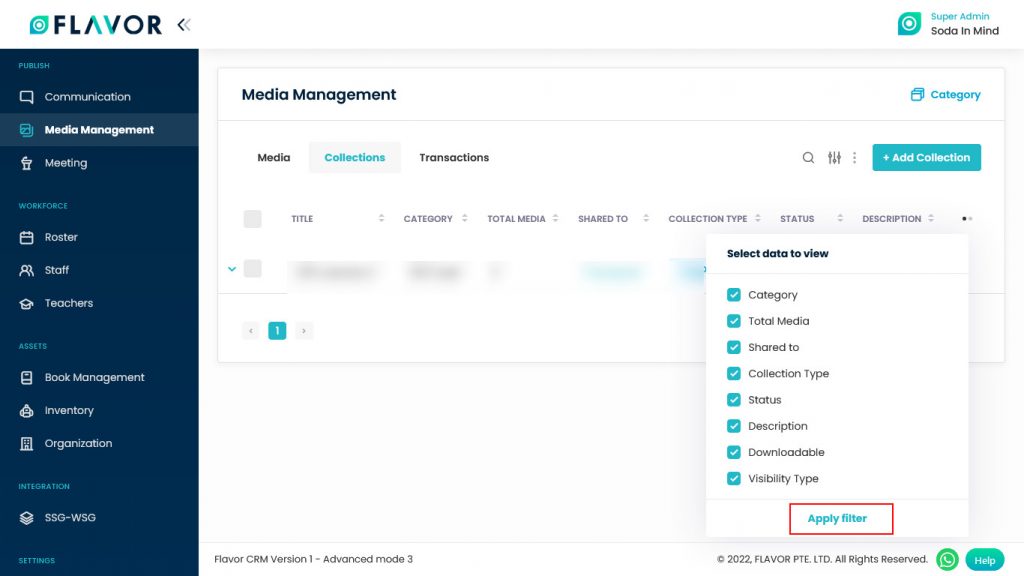
Column Visibility
You can sort columns by clicking on the Ellipsis Icon, you will get the pop-up form named Select Data to View. Mark the columns you want to see and unmark the ones you don’t want to see in the table. After this procedure click on the Apply Filter button.
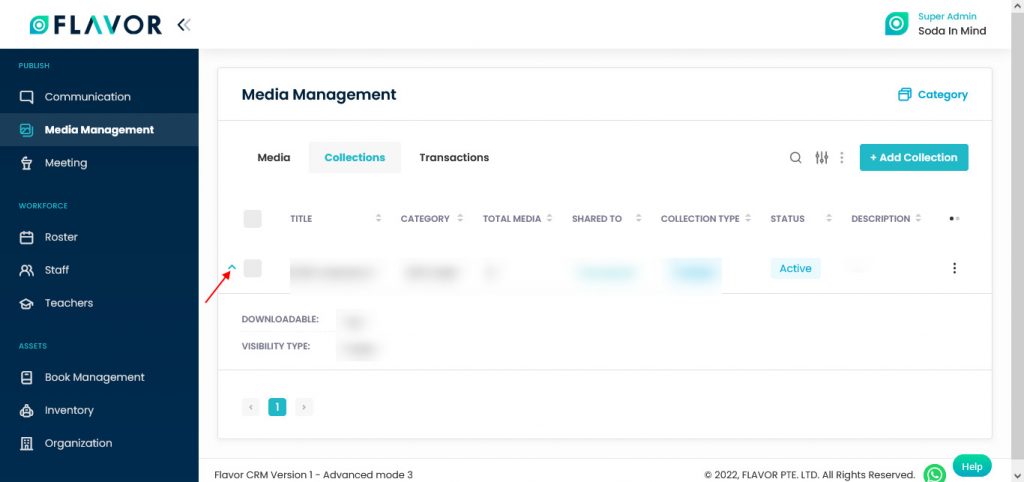
Expand Records
At the starting of all records, there is an Expand Button (Down Arrow), after clicking on this button a record will be expanded. From here will get the description of the selected collection. You can collapse the record by clicking on the same button.
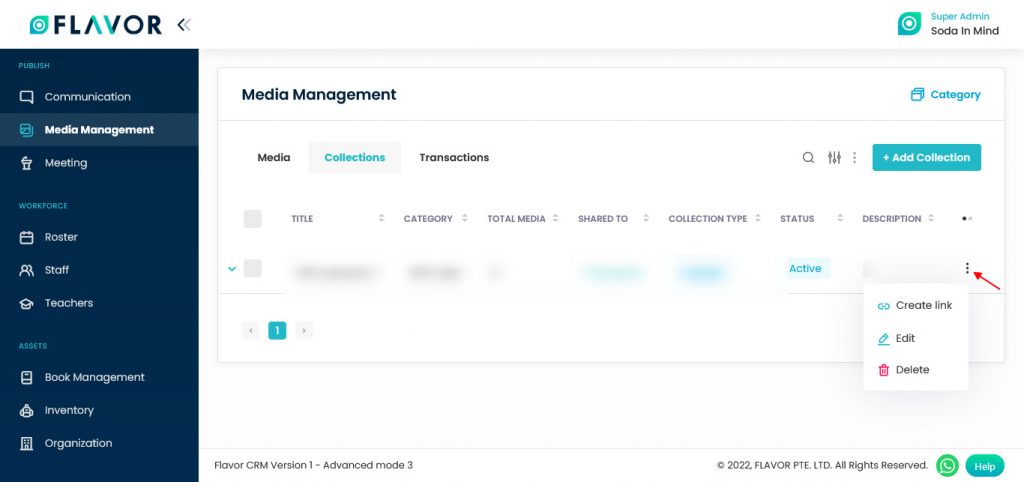
Action Button
Click on Action Button (Vertical Ellipsis), a popup box will appear on your screen with create link, edit & delete options.
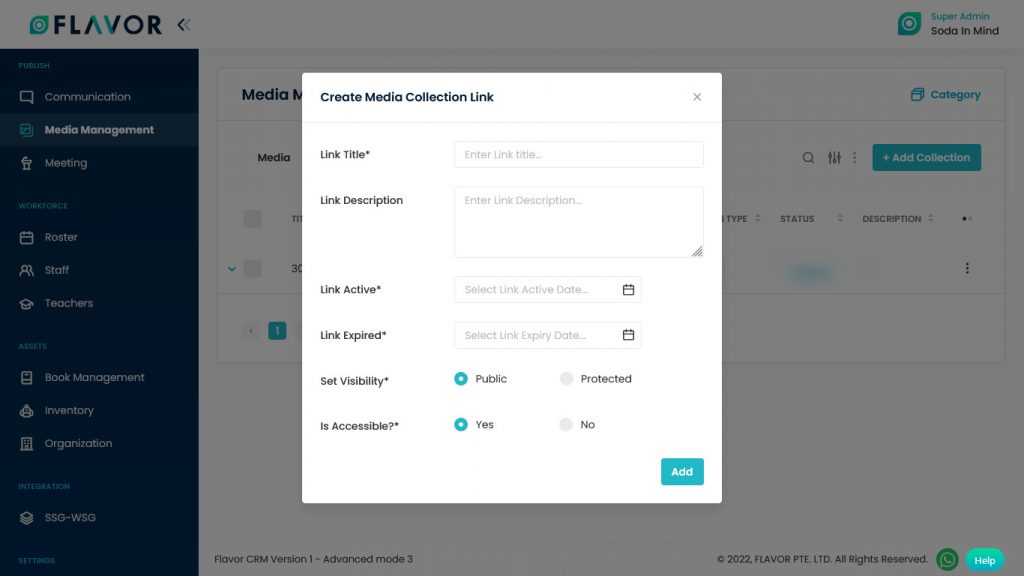
Create link
- After clicking on Create Link option a popup named Media Collection Link will be open.
- Here, you can see the list of previously created links.
- At the right corner of the row, you can see the Copy Icon, click here, to copy this row.
- Search: You search media by entering the Link title, Description or Link Type.
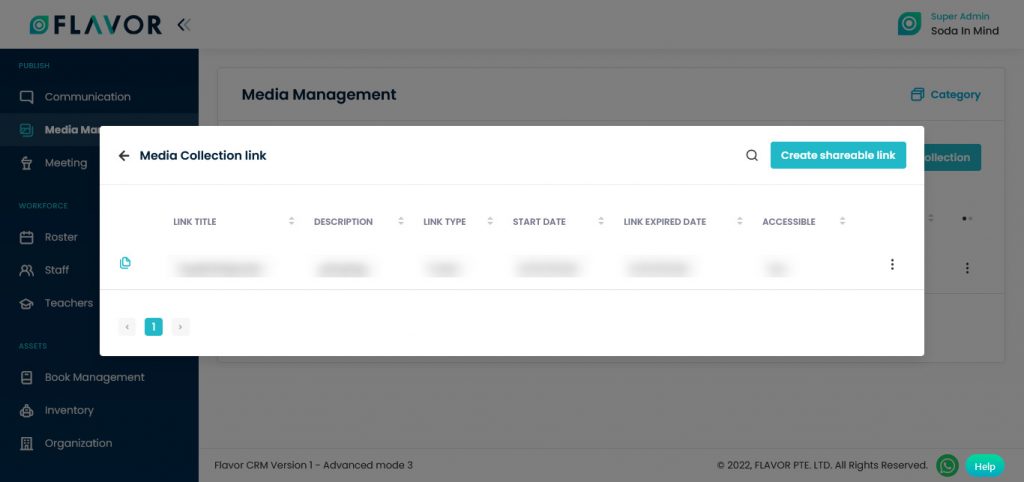
- Click on the Create Shareable link button.
- After clicking a popup Create Media Collection Link will be open.
- Enter the title & description.
- Link active: Enter the Link activation date.
- Link Expire: Enter the Link Expiry date.
- Set Visibility: Set visibility Public or Protected according to your need.
- Is Accessible: Set visibility Yes or No according to your need.
- Click on the Add button.
Edit
- Click on the Edit option. You will be redirected to the Edit Collection page.
- Change the details from the 1st section which you want to change and then click on the Next button if you want to change the details in the 2nd section.
- Change the details of the 2nd section.
- Click on the Publish button to save the changes.
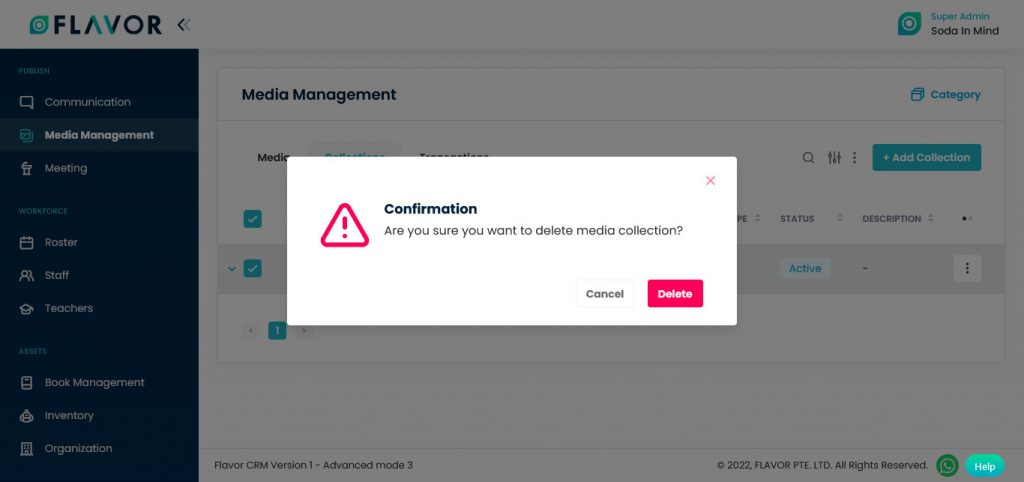
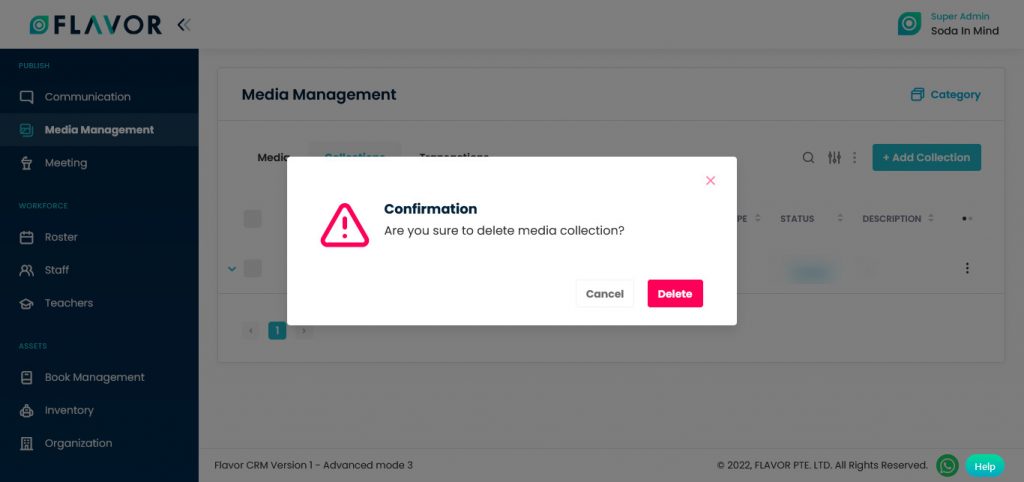
Delete
- To delete Collection click on the Delete option.
- A confirmation popup will be open.
- Click on the Delete button to delete the collection
Collection Details
To check the details of any collection, click on any collection. You will be redirected to the Collection Detail page.
Collection Profile
Here, you can see the details of the collection. Category, visibility, Shared with how many recipients & description.
Edit Collection
To edit the collection, click on the Edit Collection button. You will be redirected to the Edit Collection Page. Update the details that you want to change then click on the Save button.
Transactions
Search
Search By clicking on the Search Icon, you can search the specific transactions by entering the transactions number, name & total amount.
Filter
You can filter the records based on specific parameters. Click on Filter Icon, after clicking, a popup form will appear on your screen. Enter the payment mode, payment status and date range then click on Apply button to save parameters. To clear the entered data click on the Clear button.
![]()
Export
- To export all data, you have to click on the Export Icon.
- After clicking on the Export icon, a pop-up form named Export Data will appear on your screen.
- Start Date and End Date: Select the time period in the start date and end date column for which time period’s data you need.
- Select Data to Export: Here, you can export the data of all rows or 15 rows by simply clicking on the dropdown.
- Select Column to Export: Select columns which you need your data to export. Like if you want all the data of the transactions, then simply click on “ALL DATA” and you will get the data of the transactions in your exported file.
- Export as: Then select a format in which you want to export your data i.e (EXCEL or CSV).
- After selecting the relevant records/data, click on the Export Data button to export all the data in the selected file (Excel/CSV).
Category
Category options
Search
Search By clicking on the Search Icon, you can search the specific media by entering the media title & description.
Bulk Action
- The Bulk Action Button is disabled by default. When you mark on the check box, which appears on the starting on each row, this action button will be enabled.
- You can select/deselect rows by marking the checkbox.
- After selecting any record go to the action button, click on the button a small popup will appear. There, you can see the Delete option.
- Click on that option, a confirmation popup will be open.
- If you want to delete all media click on the Delete button.
Add Category
- To add a category click on the + Add Category button.
- A popup named Add Media Category will be open.
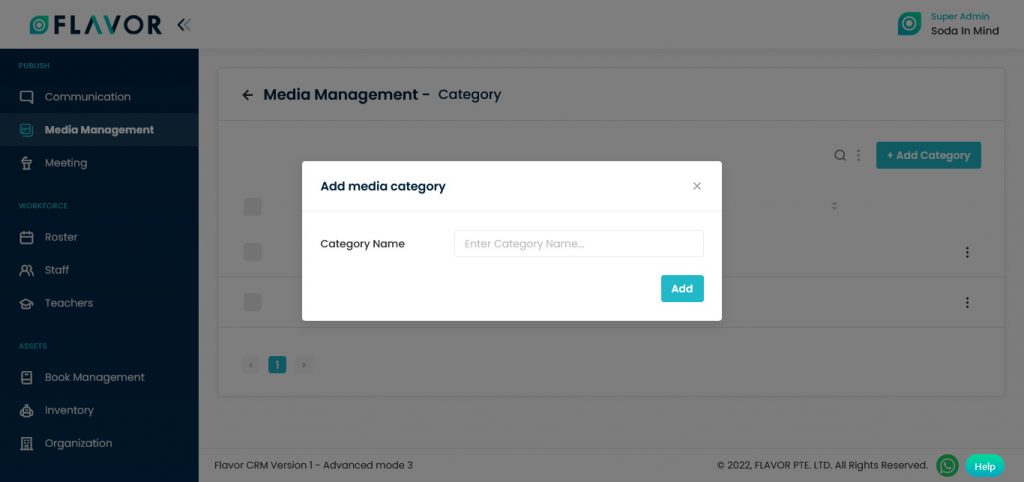
- Category Name: Enter the name of the new category.
- Click on the Add button.
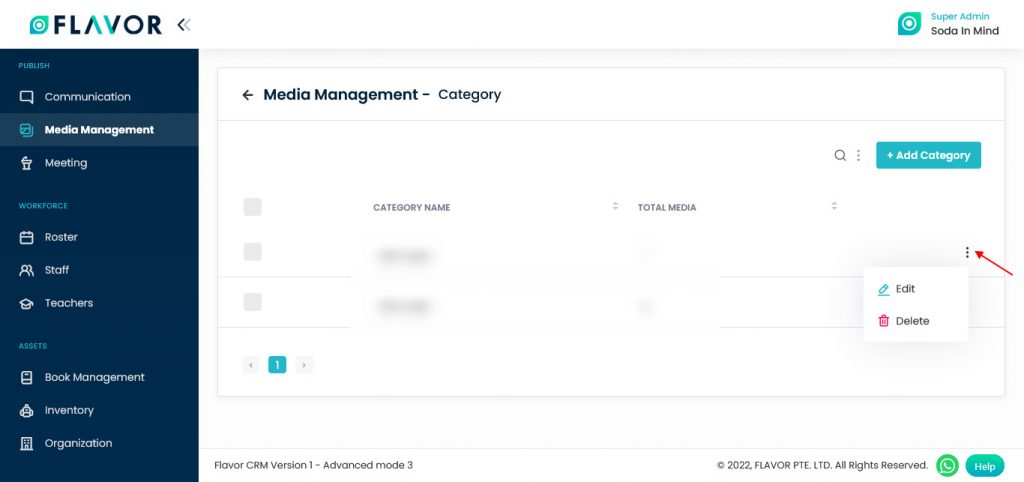
Category Records
Column Sorting
All categories will be shown in Tabular Format. You can sort the data by clicking on Column Sorting Arrows in Table’s Header.
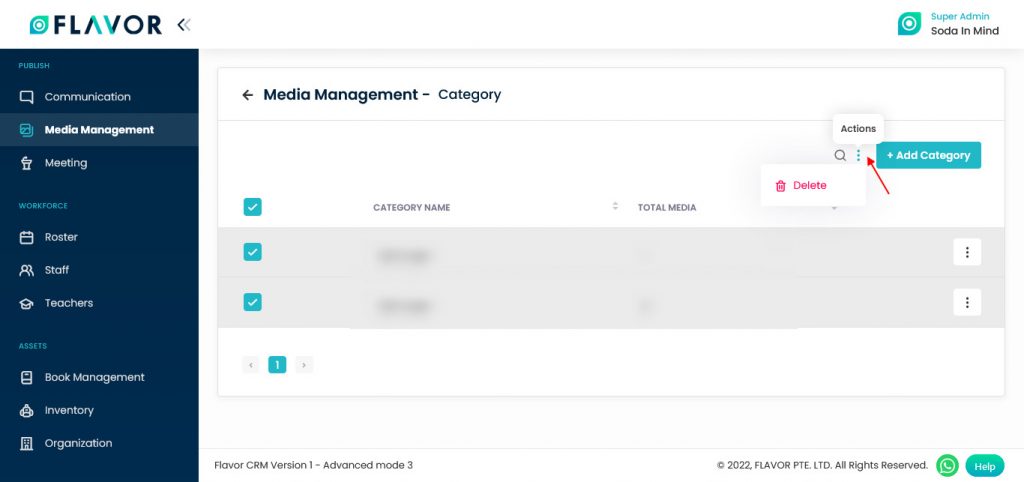
Action Button
Click on Action Button (Vertical Ellipsis), a popup box will appear on your screen with edit & delete options.
Edit Option
- To edit the category click on the Edit option.
- A popup named Edit Media Category will be open.
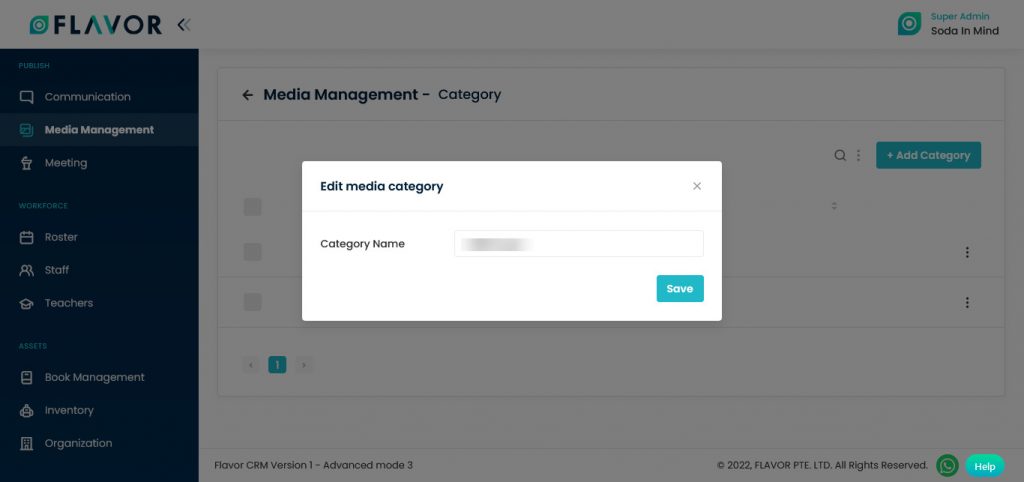
- Category Name: If you want to change the name of this category you can enter the new name.
- Click on the Save button.
Delete Option
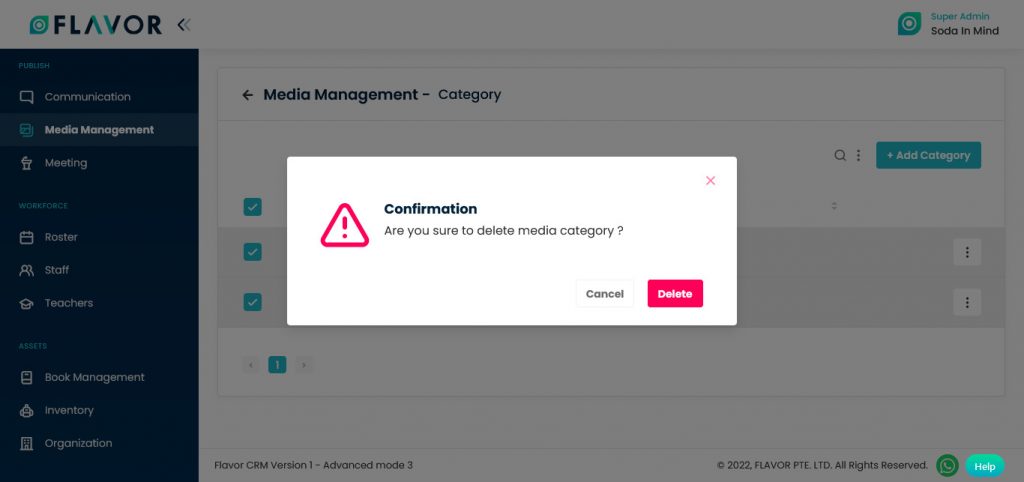
- To delete Category click on the Delete option.
- A confirmation popup will be open.
- Click on the Delete button to delete the category.

Need more help? Ask us a question
Please let us know more of your details and our team will reach out to you very shortly.