
Introduction
This article is all about the Registration Form. You can customize the fields in the Registration form. There is a settings in Flavor System by which you can set up the input field that you want to show on the Registration Form.
To apply these settings, please follow these steps:
Step 1
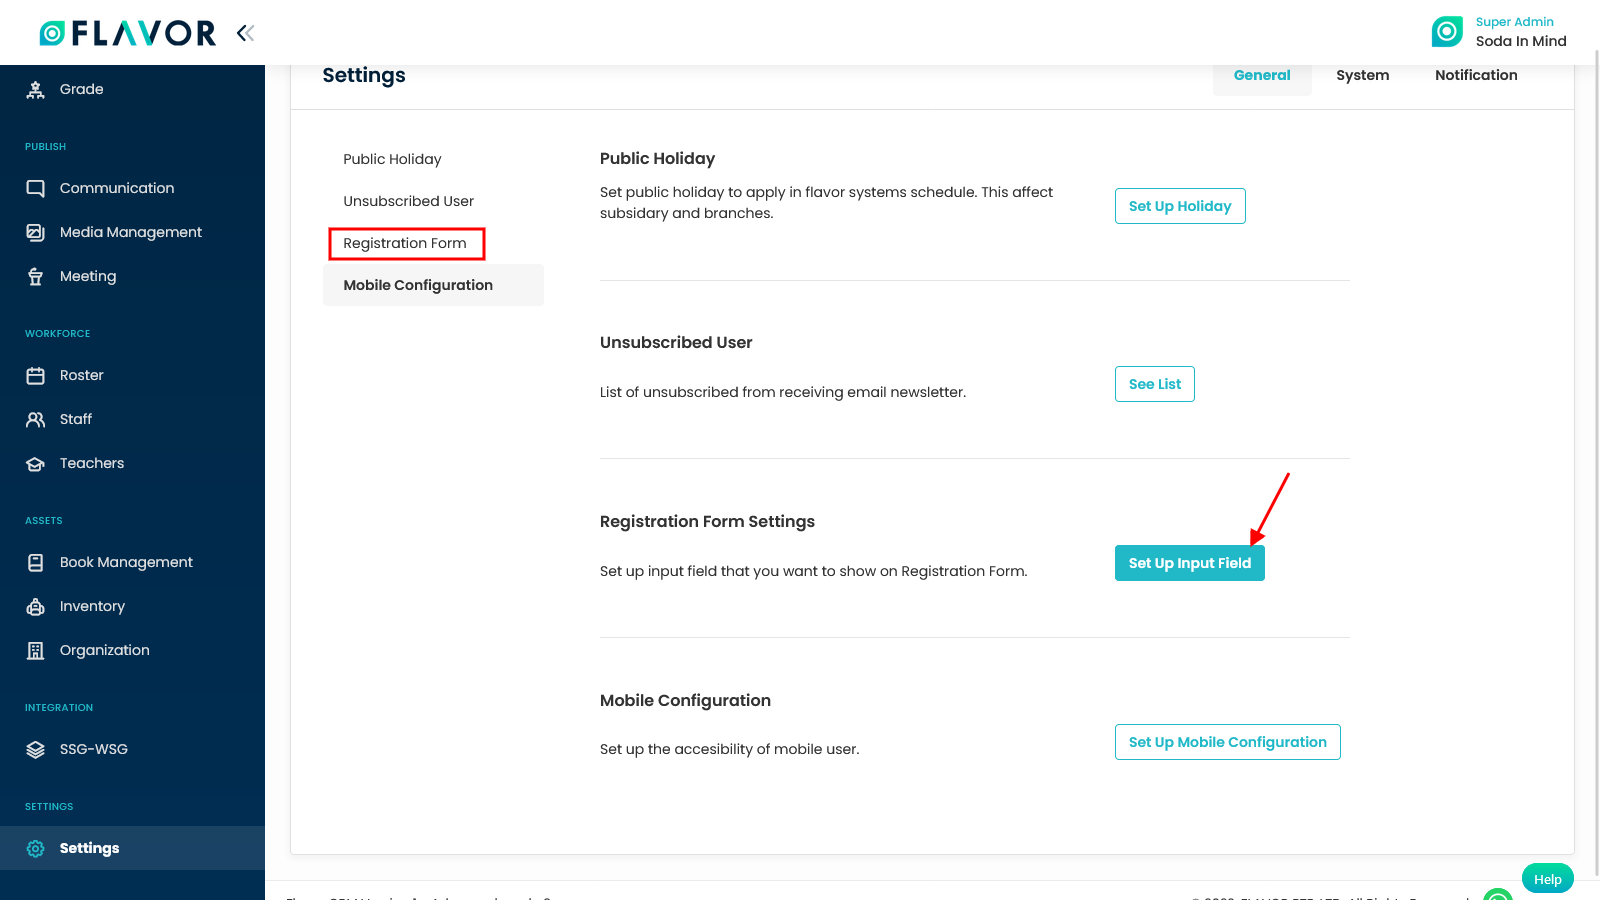
- Go to the Settings from the left-side menu of the Flavor System.
- In the General tab, under Registration form settings, click on Set up Input Field.
Step 2
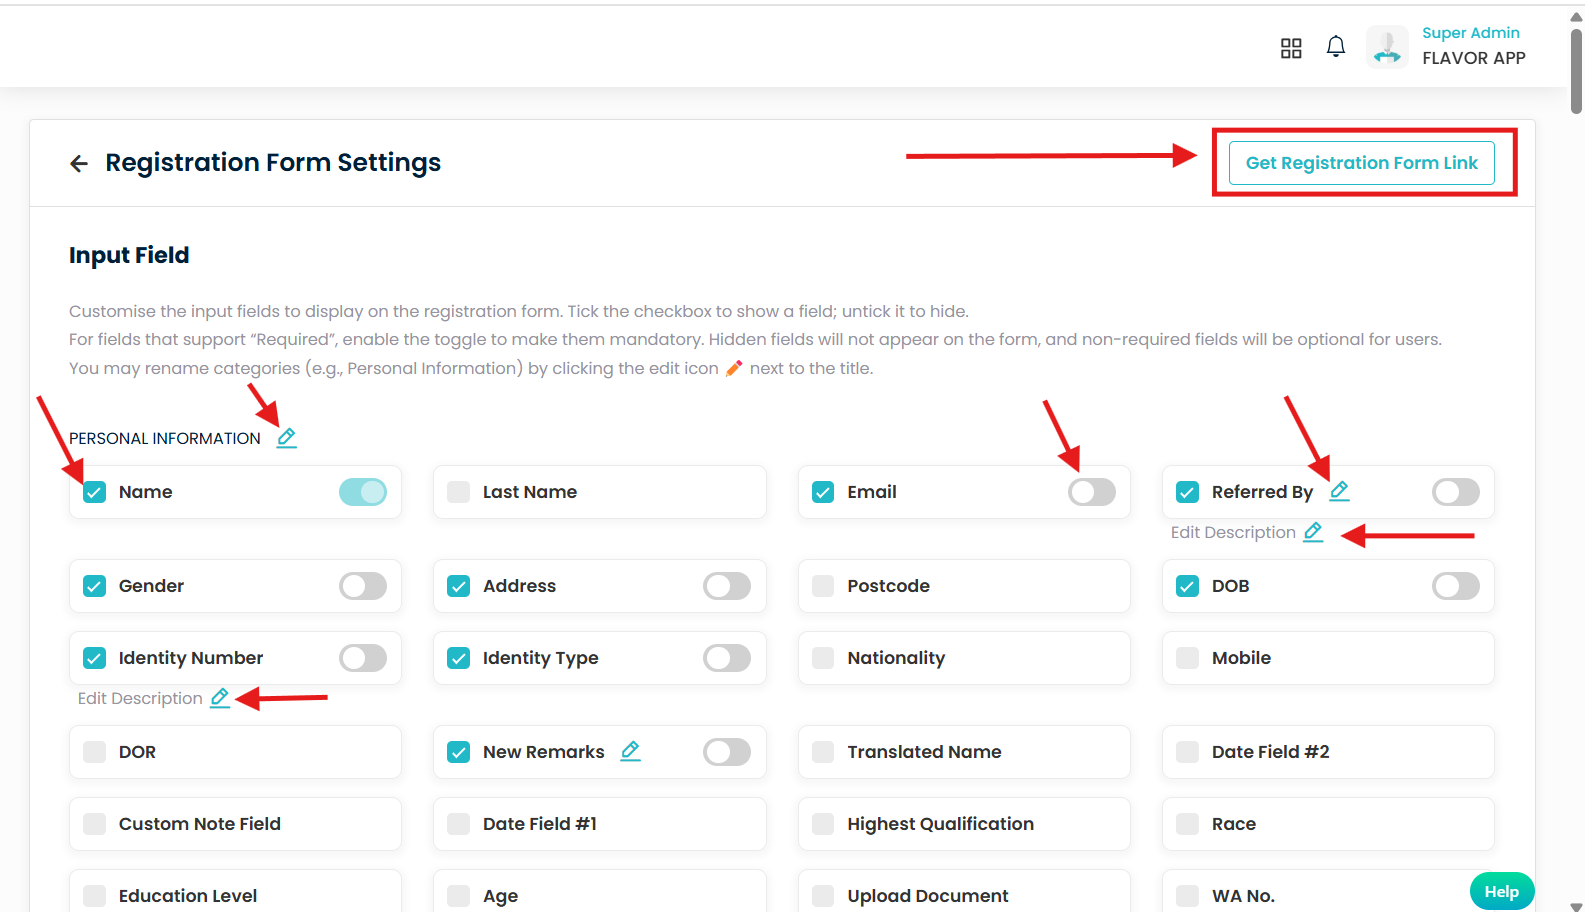
- It will navigate you to the Registration Form Settings page.
- Here, you can edit the section headings like Personal Information and Parent/Guardian information from the Input Field section.
Rename Section Titles
- Click the pencil icon
 beside the section header (e.g., “PERSONAL INFORMATION”) to customize the section name.
Show/Hide Fields
Each field has a checkbox to control its visibility on the registration form:
-
 = Field is visible on the form
  = Field is hidden (will not appear to users)
Mark Fields as Required
- Each field has a toggle switch to mark it as mandatory.
 On =User must fill this field (e.g., Name, Email).
 Off = Field is optional.
Add or Edit Fields Description
- Click “Edit Description” below any field to add helper text that guides users on what to enter.
Registration Form
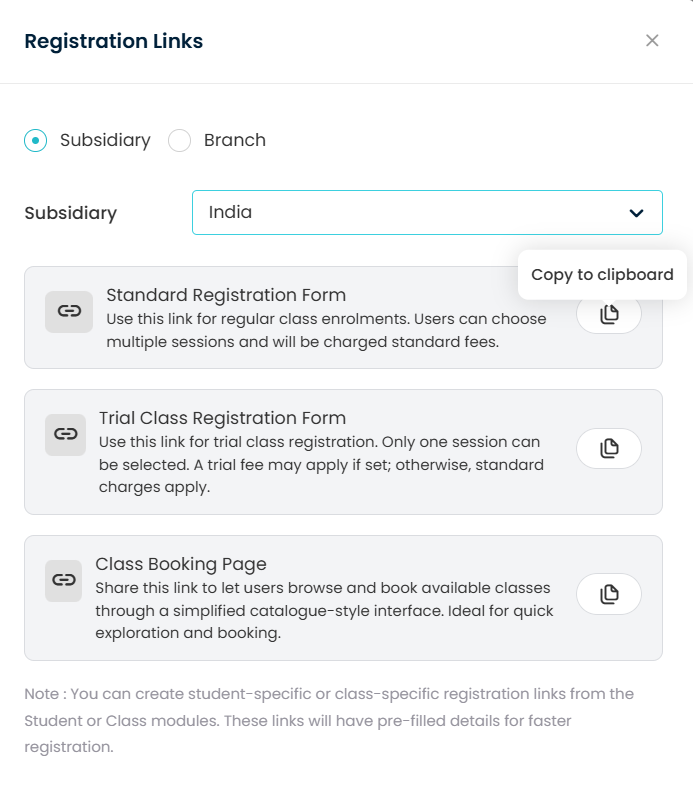
Click on the “Get Registration Form Link” button at the top-right to generate and copy the URL for sharing your registration form.
Accessing Student Settings
-
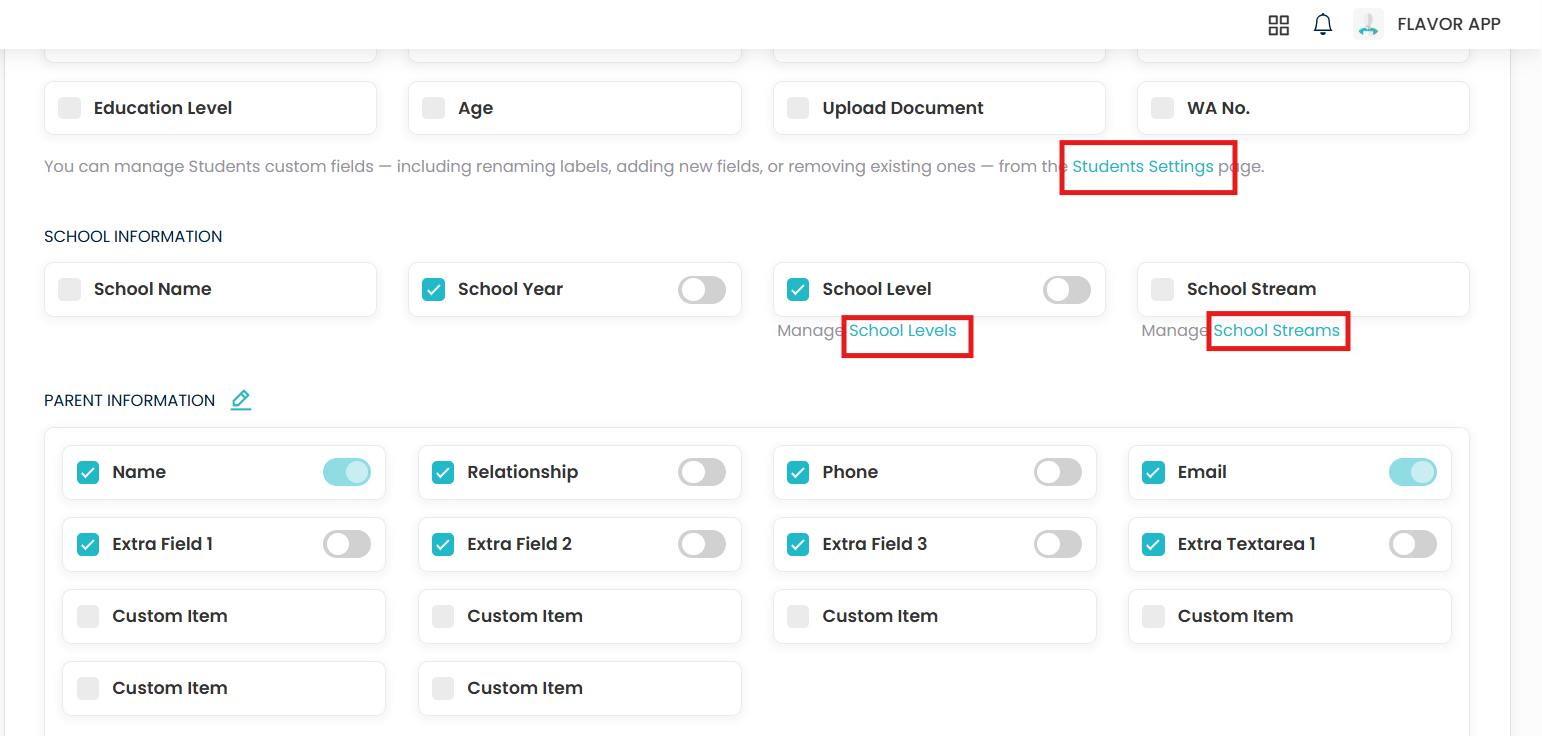
Click on the “Students Settings” This will take you to the main settings page where you can manage custom fields for student information.
-
Same way click for “School Levels” and “School Streams” This will open the School Levels and School Streams page.
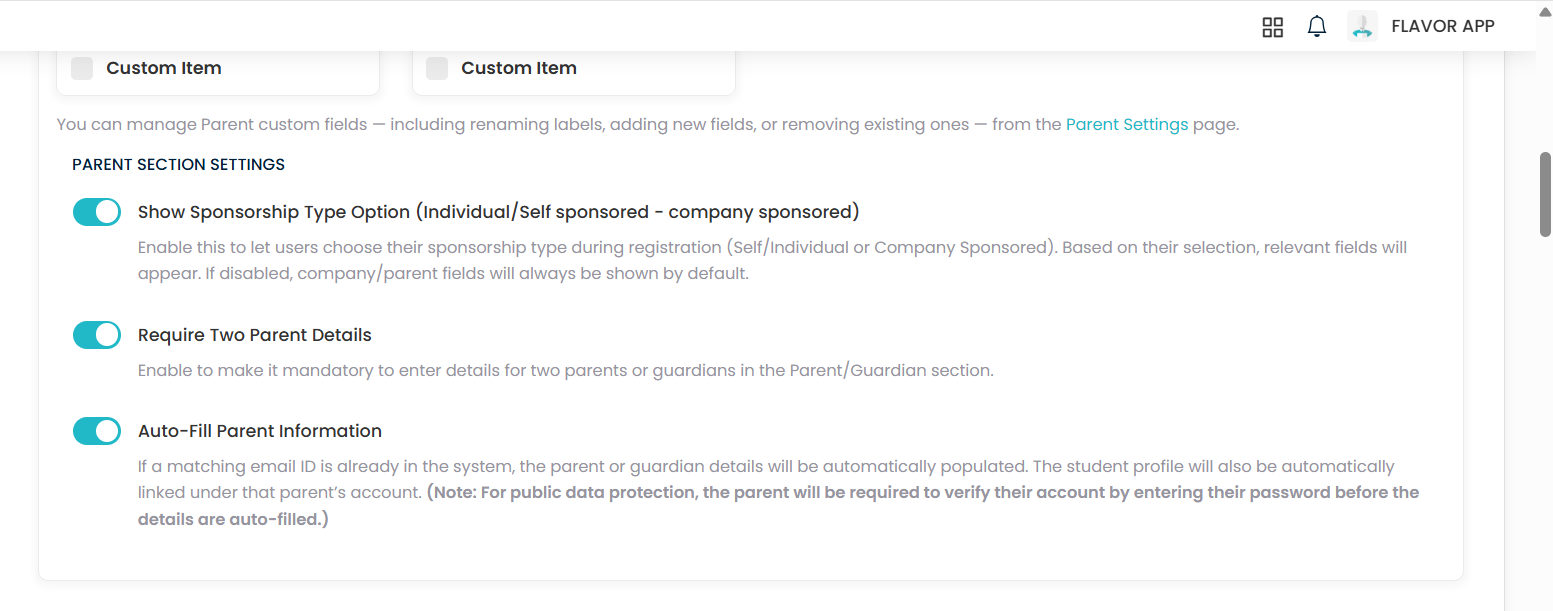
Show Sponsorship Type Option (Individual/Self-Sponsored – Company Sponsored)
- Purpose: Allows users to choose their sponsorship type during registration.
- Enabled: Users can select between:
- Individual/Self-Sponsored: Fields for student or an individual’s details will appear.
- Company Sponsored: Relevant company or parent details will be shown.
- Disabled: Sponsorship selection will be hidden, and default parent/company fields will be displayed.
Require Two Parent Details
- Purpose: Makes it mandatory to enter details for two parents/guardians.
- Enabled: Users must provide details for two parents/guardians.
- Disabled: Only one parent/guardian detail is required.
Auto-Fill Parent Information
- Purpose: Automatically populates parent details if a matching email ID is found in the system.
- Enabled:
- Matching parent details will auto-fill based on the registered email ID.
- The student profile is auto-linked under the parent’s account.
- ⚠️ Security Note: For data protection, parents must verify their account by entering their password before the details are auto-filled.
Accessing Class Information Settings
- Navigate to the “Class Information” section in the settings menu.
- This section allows you to configure how class details are displayed and filtered for users.
- Enabled Filters: Only the selected filters will be visible for users to search classes.
Setting Up Class/Session List Display
- Customize the columns shown in the Class Listing Table (visible when users choose a class).
- Enabled Columns: Selected columns will appear in the listing.
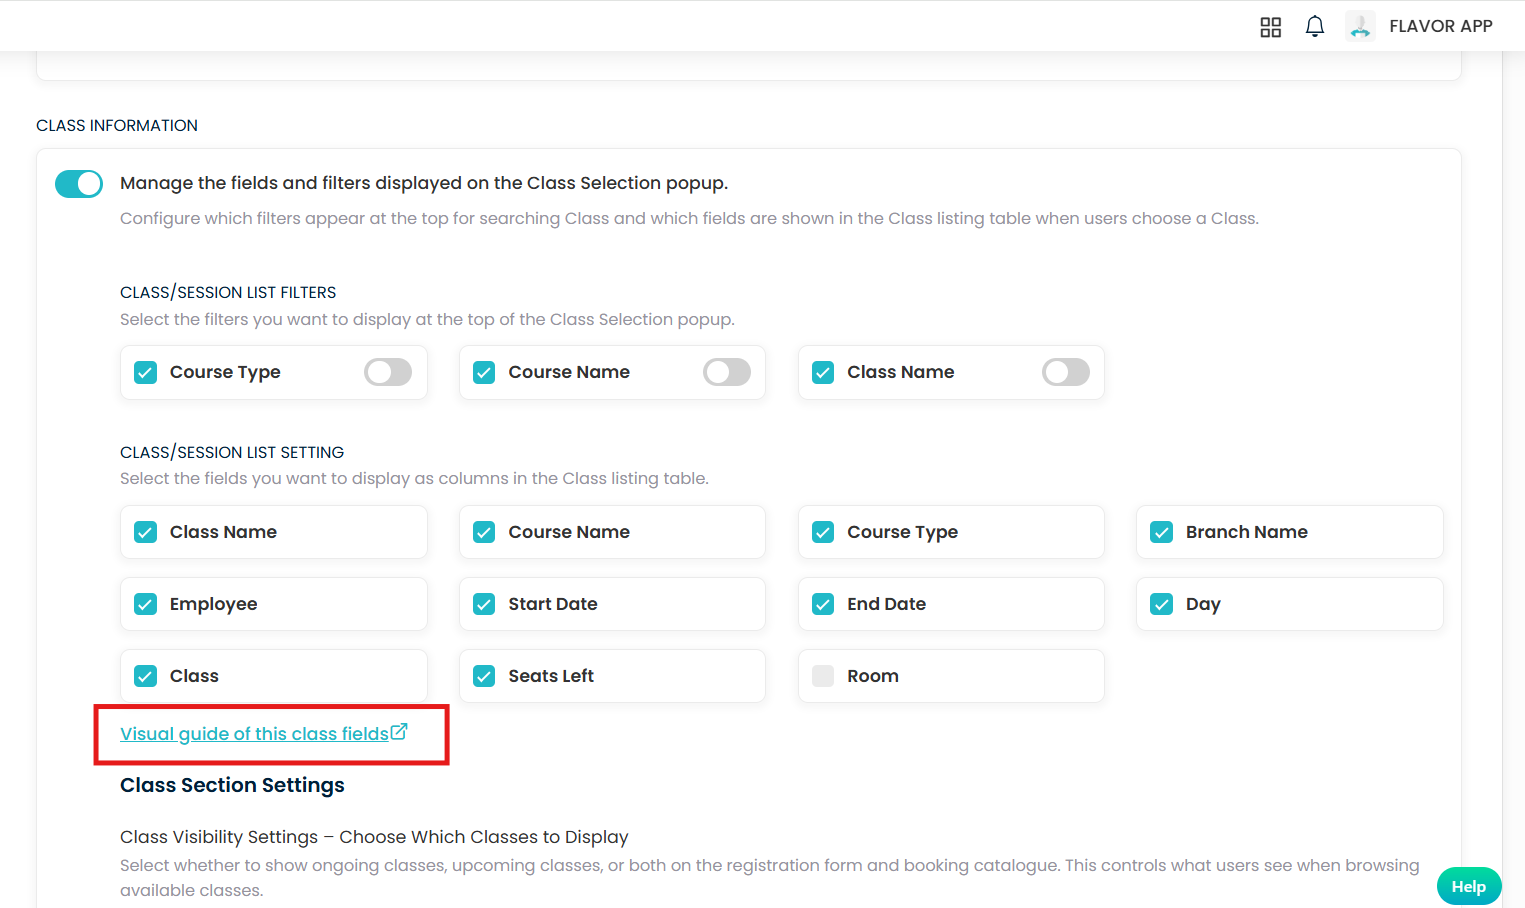
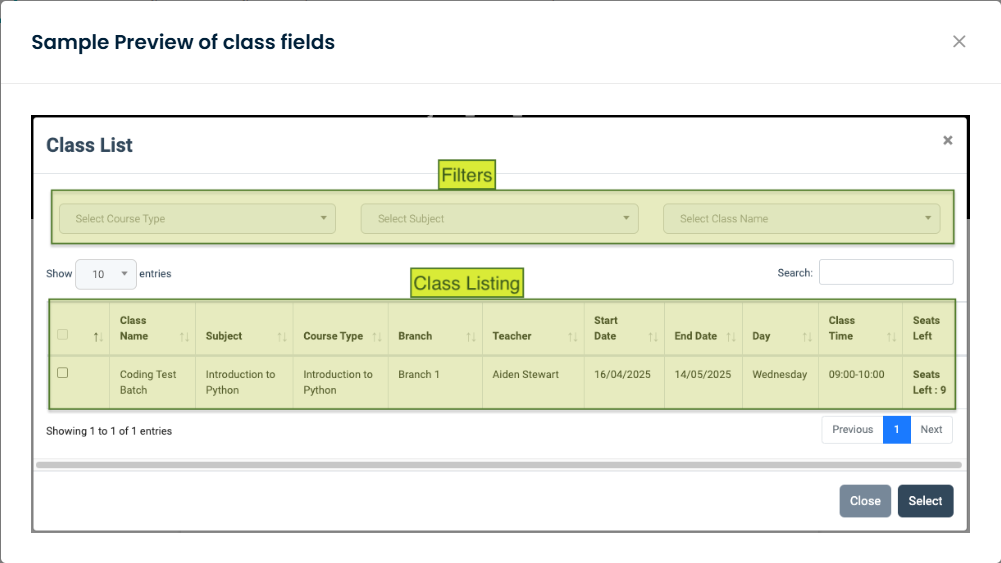
Visual Guide of Class Fields
- Click on the “Visual guide of this class fields” link to see a detailed visual representation of how the class fields appear to users.
- This guide helps ensure that the selected fields are displayed correctly.
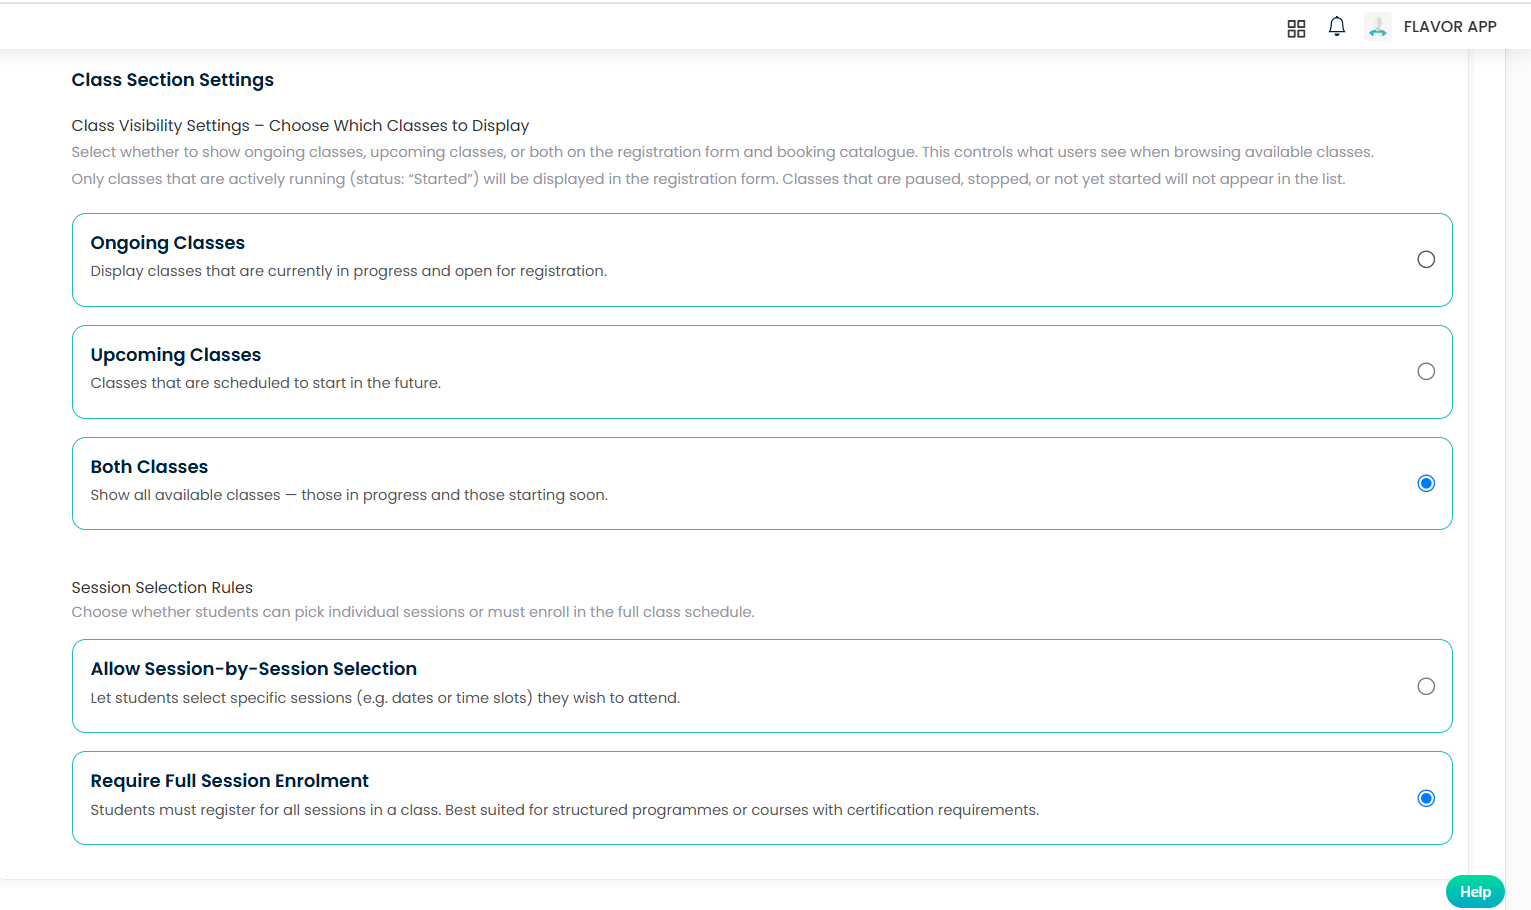
Accessing Class Section Settings
- Navigate to the “Class Section Settings” section in the settings menu.
- This section allows you to control which classes are visible to users and how session selection works.
Class Visibility Settings: Choosing Which Classes to Display
- These settings determine which classes are displayed to users in the registration form and booking catalogue.
- 📌 Options:
- Ongoing Classes: Display classes that are currently in progress and open for registration.
- Upcoming Classes: Show only classes that are scheduled to start in the future.
- Both Classes: Show all available classes — those in progress and those starting soon.
🔖 Note:
- Only classes with the status “Started” will appear in the list.
- Classes that are paused, stopped, or not yet started will not be shown.
Session Selection Rules
- Control how students can register for class sessions.
- 📌 Options:
- Allow Session-by-Session Selection: Students can pick specific sessions (e.g., dates or time slots) they want to attend.
- Require Full Session Enrolment: Students must register for all sessions in a class. This is best for structured programs or courses with certification requirements.
Setting Up Payment Methods
Enable Payment Information
- Toggle the “Enable Payment Information” switch to ON.
⚠️Ensure your payment gateway is properly set up before enabling or choosing any payment methods.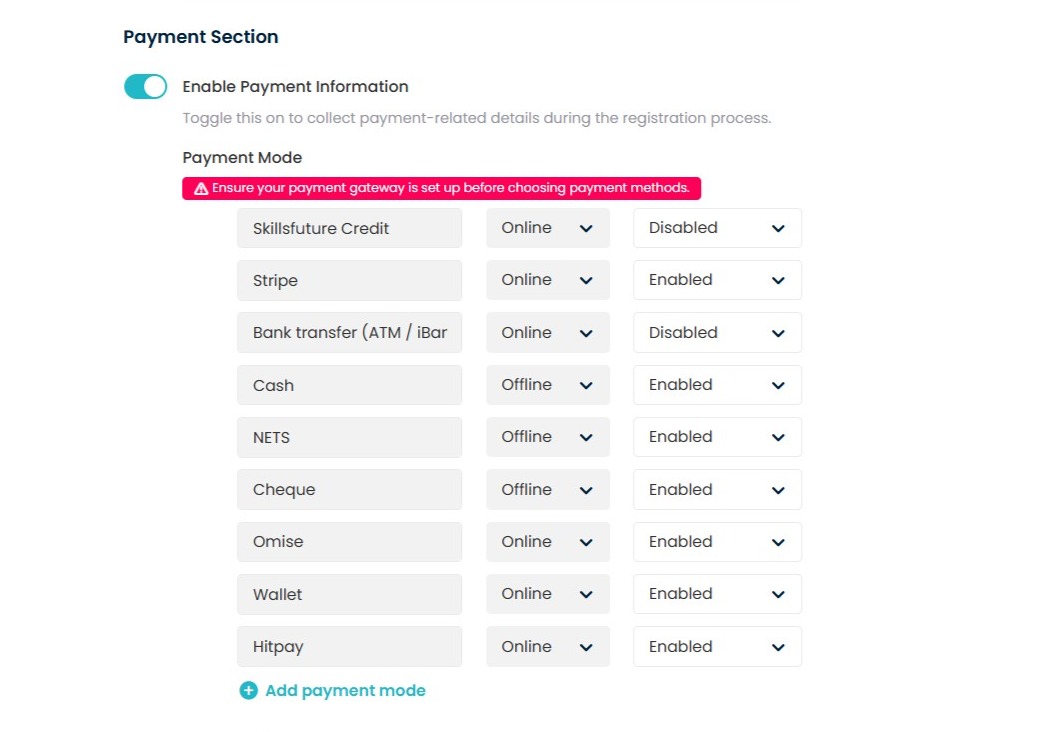
Step 3
📌 1. Accessing Enrolment Settings:
- When the Enable Auto-Enrolment is ON (Settings -> Registration Form Settings -> Form Settings)
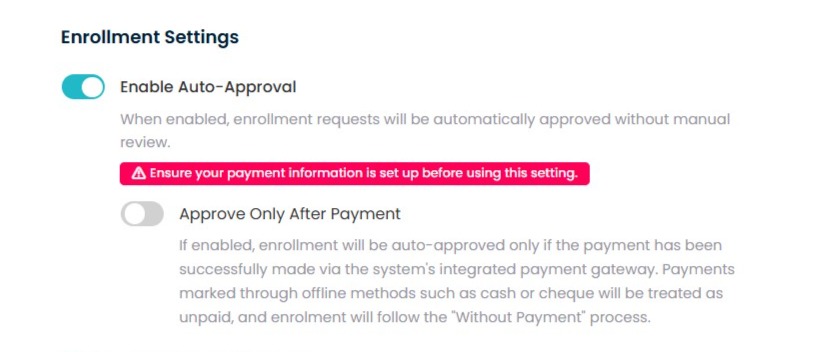
Configuring Auto-Approval Settings
- Enable Auto-Approval
- Toggle: Switch ON to enable automatic approval of enrolment requests.
- Functionality: Automatically approves all enrolment requests without manual intervention.
💳 Approve Only After Payment
- Toggle: Switch ON to enable approval only after successful payment.
- Functionality: Enrolment requests are auto-approved only if payment is completed through the integrated payment gateway.
- Note: Payments made via offline methods (e.g., cash, cheque) are treated as unpaid and follow the manual approval process.
⚠️Ensure your payment gateway is properly set up before enabling or choosing any payment methods.
Configuring Enrolment Approval Process:
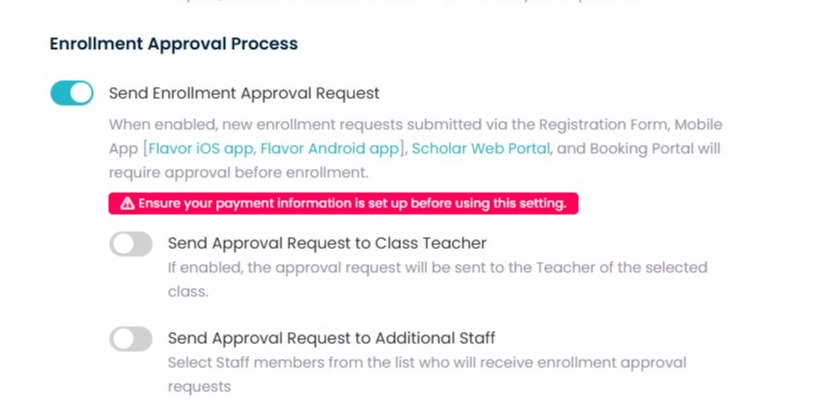
📤 Send Enrolment Approval Request
- Switch ON to send approval requests for new enrolments.
- Applicable Platforms: Registration Form, Mobile Apps (iOS & Android), Scholar Web Portal, Booking Portal.
👩🏫 Send Approval Request to Class Teacher
- Switch ON to notify the teacher of the selected class for approval.
👥 Send Approval Request to Additional Staff
- Switch ON to notify additional staff members.
- Selection: Use the dropdown menu to select staff members who should receive the approval requests.
⚠️Ensure your payment gateway is properly set up before enabling or choosing any payment methods.
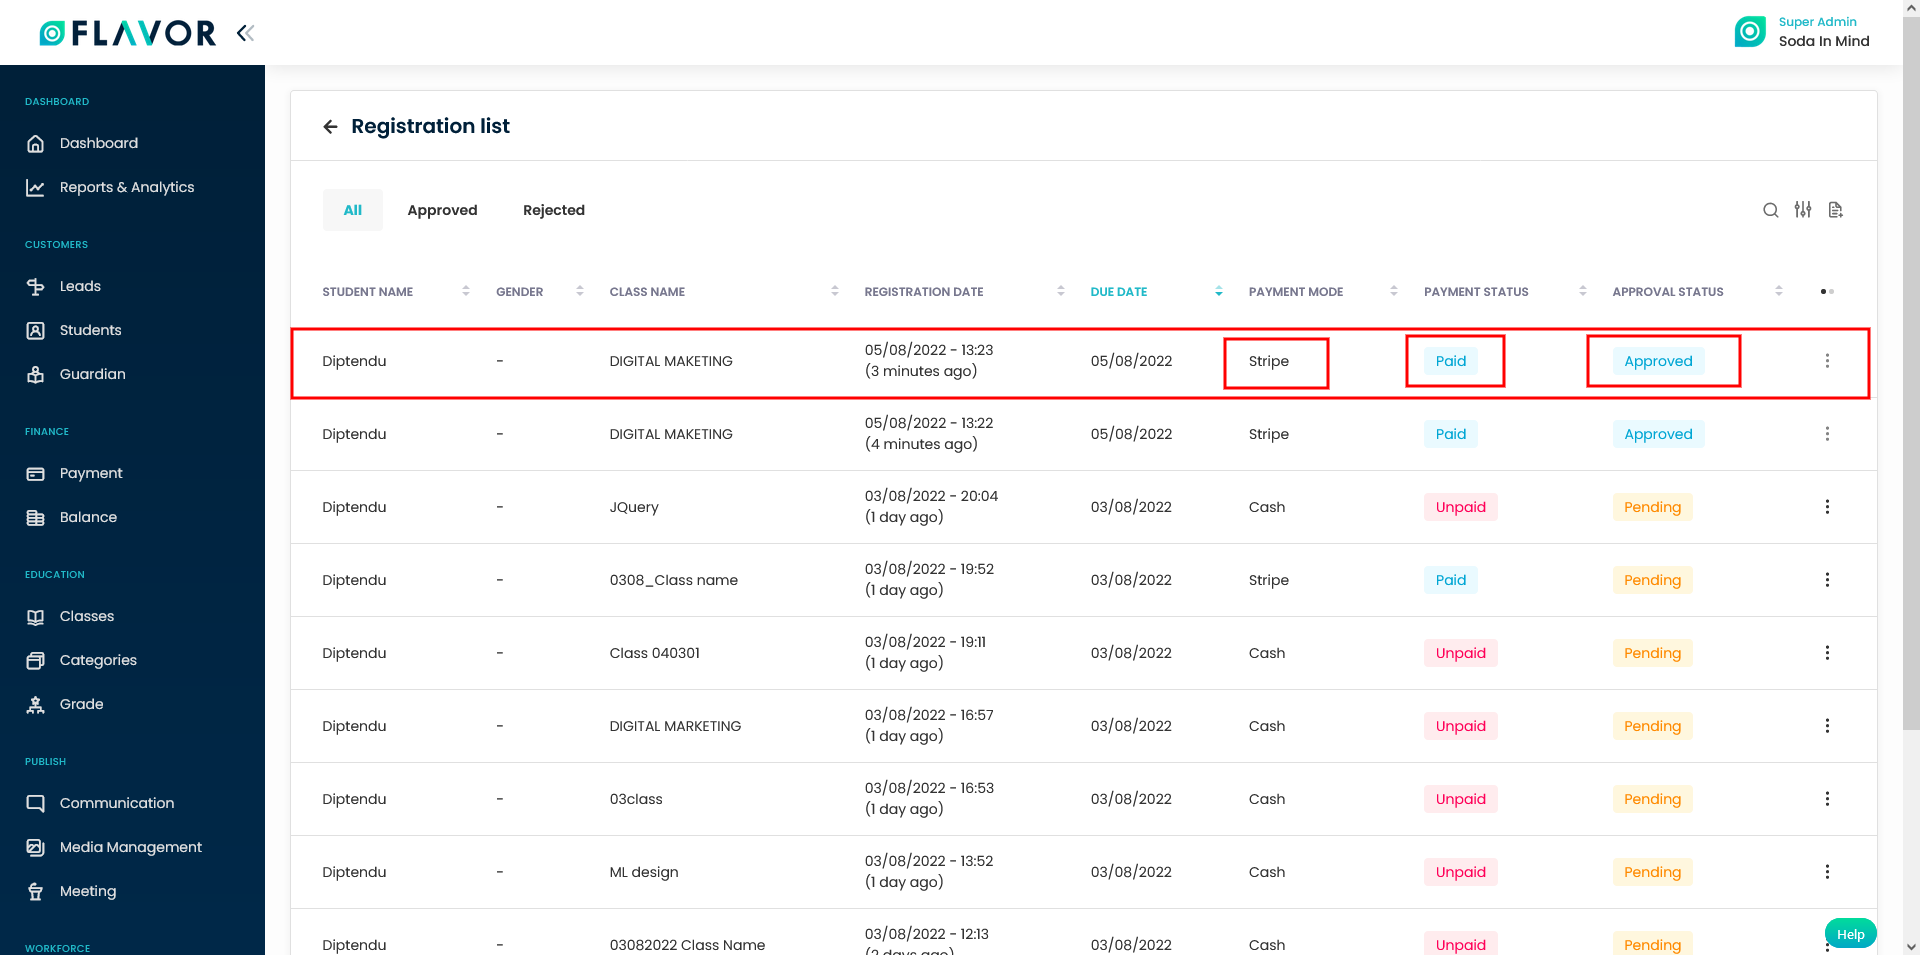
When the Enable Auto-Enrolment is ON and the student register for a class with the “Credit Card (Stripe)/Wallet payment option then Registration Success Payment notification/email will be generated for parents only.
When checked in the class the student shows as registered under the class and also invoice generated with paid status. While the student under the Registration list it showing as payment status as paid and Approval status as Approved.
When the Enable Auto-Enrolment is OFF, and the student register for a class with the “Credit Card (Stripe)/Wallet payment option then Registration Success Payment notification/email will be generated for parents only. When checked in the class the student shows as registered under the class and also invoice generated with unpaid status. While the student under the Registration list it showing as payment status as paid and Approval status as Pending.

If Required 2 Parent/Guardian details when filling Parent/Guardian section is enabled, then 2 Parent/Guardian details can be entered in the registration form.
How to send copy of registration form over email?
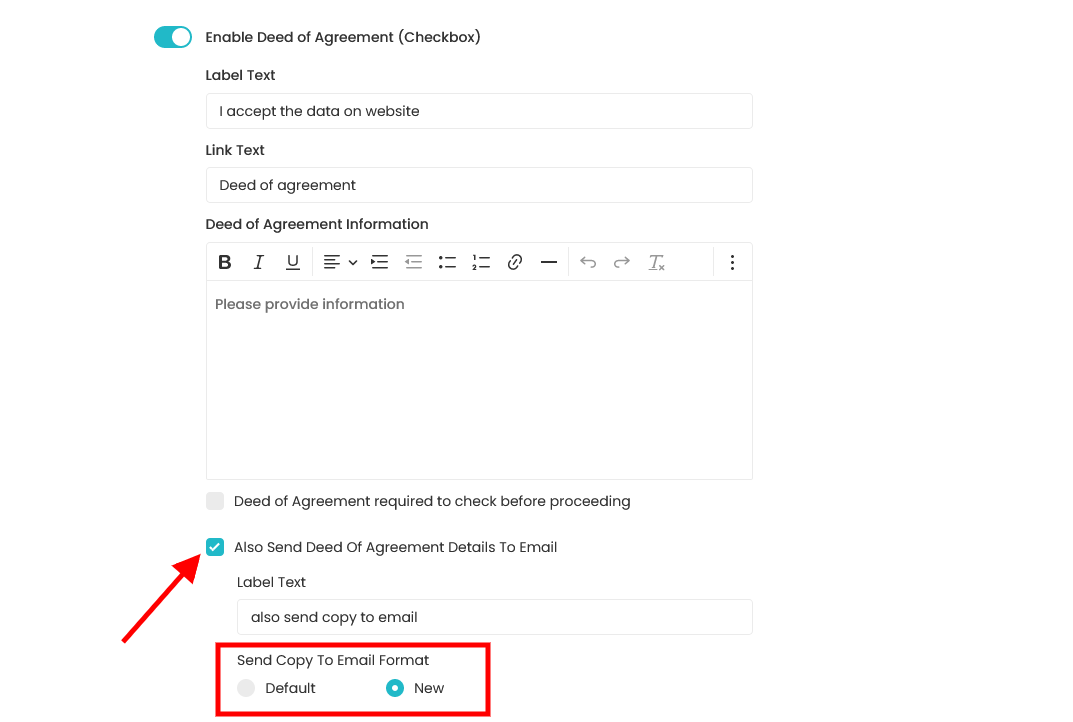
- Over the Registration form setting page, scroll down and enable Deed of Agreement.
- Mark the checkbox for Also Send Deed of Agreement Details To Email.
- Then you need to choose Email format viz. Default or New under the Send Copy To Email Format label.
- On selecting the New, only the enabled fields of Registration form will be there in the PDF file which is sent over the email.
Need more help? Ask us a question
Please let us know more of your details and our team will reach out to you very shortly.